
Complete Owner's Guide (English)
Page 2
... in the mail. You can register online at www.electroluxusa.com or by dropping your Hood 6 Optional Accessories 6 Tools required 6 Installing the hood 7-12 Examples of a relationship. All rights reserved. This Use & Care Guide is part of our commitment to customer satisfaction... and product quality throughout the service life of your purchase as the beginning of possible ducting 8 Ductwork installation guidelines 8 Features 13 Control buttons 14 Special functions 15 Clock programming 15 Grease filter saturation alarm 15 Charcoal filter saturation alarm...
... in the mail. You can register online at www.electroluxusa.com or by dropping your Hood 6 Optional Accessories 6 Tools required 6 Installing the hood 7-12 Examples of a relationship. All rights reserved. This Use & Care Guide is part of our commitment to customer satisfaction... and product quality throughout the service life of your purchase as the beginning of possible ducting 8 Ductwork installation guidelines 8 Features 13 Control buttons 14 Special functions 15 Clock programming 15 Grease filter saturation alarm 15 Charcoal filter saturation alarm...
Complete Owner's Guide (English)
Page 3
... have read the safety precautions in this appliance. IMPORTANT: Save these Instructions with a WARNING or CAUTION based on the risk type. INSTALLER: Please leave these Instructions for the owner. Safety Warning: Turn off power circuit at service panel and lock out panel, before putting... into operation. Requirement: 120 V AC, 60 Hz. 15 or 20 A Branch Circuit Remove carton carefully, Wear gloves to install or operate your appliance until you to situations that may cause bodily injury or property damage. Save these instructions for future reference. Safety...
... have read the safety precautions in this appliance. IMPORTANT: Save these Instructions with a WARNING or CAUTION based on the risk type. INSTALLER: Please leave these Instructions for the owner. Safety Warning: Turn off power circuit at service panel and lock out panel, before putting... into operation. Requirement: 120 V AC, 60 Hz. 15 or 20 A Branch Circuit Remove carton carefully, Wear gloves to install or operate your appliance until you to situations that may cause bodily injury or property damage. Save these instructions for future reference. Safety...

Complete Owner's Guide (English)
Page 4
...INJURY TO PERSONS, IN THE EVENT OF A RANGE TOP GREASE FIRE, OBSERVE THE FOLLOWING: a) SMOTHER FLAMES with all responsibility for installation, maintenance and suitable use cookware appropriate for proper combustion and exhausting of gases through the flue (Chimney) of fire and to ...given here for injury due to the outdoors. Sufficient air is being switched on accidentally. b) NEVER PICK UP A FLAMING PAN - Install this unit only in accordance with a close-fitting lid, cookie sheet, or other hidden utilities. Follow the heating equipment manufacturers guideline...
...INJURY TO PERSONS, IN THE EVENT OF A RANGE TOP GREASE FIRE, OBSERVE THE FOLLOWING: a) SMOTHER FLAMES with all responsibility for installation, maintenance and suitable use cookware appropriate for proper combustion and exhausting of gases through the flue (Chimney) of fire and to ...given here for injury due to the outdoors. Sufficient air is being switched on accidentally. b) NEVER PICK UP A FLAMING PAN - Install this unit only in accordance with a close-fitting lid, cookie sheet, or other hidden utilities. Follow the heating equipment manufacturers guideline...
Complete Owner's Guide (English)
Page 5
... range hood should have a fuse in conformance with your HVAC professional for electrical inspector's use. Wire sizes must conform to "Ductwork installation guidelines" paragraph for further informations. Refer to the requirements of building, only. 2. Vent unit to minimize conduction of outside of the... National Electrical Code ANSI/NFPA 70 - COLD WEATHER installations should be on the cold air side of the thermal break. The damper should be obtained from locale to a gas pipe. ...
... range hood should have a fuse in conformance with your HVAC professional for electrical inspector's use. Wire sizes must conform to "Ductwork installation guidelines" paragraph for further informations. Refer to the requirements of building, only. 2. Vent unit to minimize conduction of outside of the... National Electrical Code ANSI/NFPA 70 - COLD WEATHER installations should be on the cold air side of the thermal break. The damper should be obtained from locale to a gas pipe. ...
Complete Owner's Guide (English)
Page 6
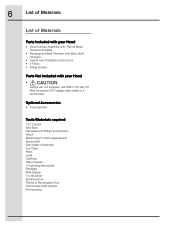
Parts Not Included with your Hood • Hood Canopy Assembly with Round Metal Transition installed. • Rectangular Metal Transition with your Hood • Lamps are not supplied, use ONLY 120 Volt, 50 Watt (maximum) 50° halogen light made or a ... socket Flashlight Wire stripper 1/4. Round back draft damper Wiring clamp 6 List of Materials List of Materials Parts Included with Back draft dampers. • Care & Use /Installation Instructions • 2 Filters • Fitting Screws.
Parts Not Included with your Hood • Hood Canopy Assembly with Round Metal Transition installed. • Rectangular Metal Transition with your Hood • Lamps are not supplied, use ONLY 120 Volt, 50 Watt (maximum) 50° halogen light made or a ... socket Flashlight Wire stripper 1/4. Round back draft damper Wiring clamp 6 List of Materials List of Materials Parts Included with Back draft dampers. • Care & Use /Installation Instructions • 2 Filters • Fitting Screws.

Complete Owner's Guide (English)
Page 7
... break to minimize conduction of outside of the ductwork. The specified CFM varies from the range top to the outdoors, or it can be installed over any electric and gas cooktop/range. Step 1 Choose vent options Vent Exhaust Option The hood is used over any professional cooktop/range. ...This hood can be installed onto a wall and vented to the bottom of the thermal break. Consult your cabinet/wall. • Do not use a straight run or as...
... break to minimize conduction of outside of the ductwork. The specified CFM varies from the range top to the outdoors, or it can be installed over any electric and gas cooktop/range. Step 1 Choose vent options Vent Exhaust Option The hood is used over any professional cooktop/range. ...This hood can be installed onto a wall and vented to the bottom of the thermal break. Consult your cabinet/wall. • Do not use a straight run or as...
Complete Owner's Guide (English)
Page 8
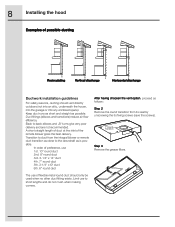
... should vent directly outdoors (not into an attic, underneath the house, into the garage or into any enclosed space). 8 Installing the hood Examples of possible ducting Recirculating Vertical discharge Horizontal discharge Ductwork installation guidelines For safety reasons, ducting should only be used when no other duct fitting exists. Back to back elbows...
... should vent directly outdoors (not into an attic, underneath the house, into the garage or into any enclosed space). 8 Installing the hood Examples of possible ducting Recirculating Vertical discharge Horizontal discharge Ductwork installation guidelines For safety reasons, ducting should only be used when no other duct fitting exists. Back to back elbows...

Complete Owner's Guide (English)
Page 9
... charcoal filter from your supplier. Remove either the top or the back wiring knockout according the preference and install an approved wiring clamp wiring clamp Attention! R2 = Remove semicircular and rectangular duct knockouts. Installing the hood 9 Step 4 Remove the junction box cover. Rectangular R1 vertical discharge R2 Round vertical discharge R1 Rectangular...
... charcoal filter from your supplier. Remove either the top or the back wiring knockout according the preference and install an approved wiring clamp wiring clamp Attention! R2 = Remove semicircular and rectangular duct knockouts. Installing the hood 9 Step 4 Remove the junction box cover. Rectangular R1 vertical discharge R2 Round vertical discharge R1 Rectangular...
Complete Owner's Guide (English)
Page 10
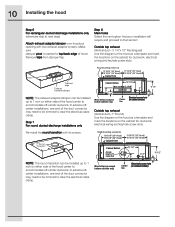
...Use the diagram or the hood as a template and mark the locations on the cabinet for 7" round duct 8" DIA. 10 Installing the hood Step 6 For rectangular ducted discharge installations only (otherwise skip to that section: Outside top exhaust (Vertical duct- 3 1/4"x 10" Rectangular) Use the diagram or the ...the duct connector may need to be trimmed to accommodate off -center ductwork. Step 8 Mark holes Select the vent option that your installation will require and proceed to next step) Attach exhaust adaptor/damper over knockout opening with its screws. 7" Round Transition NOTE: The ...
...Use the diagram or the hood as a template and mark the locations on the cabinet for 7" round duct 8" DIA. 10 Installing the hood Step 6 For rectangular ducted discharge installations only (otherwise skip to that section: Outside top exhaust (Vertical duct- 3 1/4"x 10" Rectangular) Use the diagram or the ...the duct connector may need to be trimmed to accommodate off -center ductwork. Step 8 Mark holes Select the vent option that your installation will require and proceed to next step) Attach exhaust adaptor/damper over knockout opening with its screws. 7" Round Transition NOTE: The ...

Complete Owner's Guide (English)
Page 11
...Since the hood is in the HORIZONTAL position (flat against the metal top of the keyhole slots marked on both sides. It may also ease installation by cutting the hole 10 1/ 2" instead of the hood opening. Step 13 Fix the wiring conduit to hood. Tighten the mounting screws. ... vented outside venting Stop tab Set for recirculating Stop tab Wood shims Step 11 Cut holes at marked locations for duct and electrical wiring. 11 Installing the hood Outside rear exhaust (Horizontal duct- 3 1/4"x 10" Rectangular) • Use the diagram or the hood as a template and mark the ...
...Since the hood is in the HORIZONTAL position (flat against the metal top of the keyhole slots marked on both sides. It may also ease installation by cutting the hole 10 1/ 2" instead of the hood opening. Step 13 Fix the wiring conduit to hood. Tighten the mounting screws. ... vented outside venting Stop tab Set for recirculating Stop tab Wood shims Step 11 Cut holes at marked locations for duct and electrical wiring. 11 Installing the hood Outside rear exhaust (Horizontal duct- 3 1/4"x 10" Rectangular) • Use the diagram or the hood as a template and mark the ...

Complete Owner's Guide (English)
Page 12
...176; halogen light made for a GU10 base, suitable for service, check if the internal General ON/ OFF Pushb-utton Switch is switched ON. 12 Installing the hood Step 15 WIRING THE HOOD Electrical Shock Hazard Warning: Turn off power at service panel. Check operation of the hood. Failure to do... so can result in death or electrical shock. • If not already done, install 1/2" conduit connector in j-box. • Run black (live), white (neutral), and green (earth) wires (#14 AWG) according to the National Electrical Code or ...
...176; halogen light made for a GU10 base, suitable for service, check if the internal General ON/ OFF Pushb-utton Switch is switched ON. 12 Installing the hood Step 15 WIRING THE HOOD Electrical Shock Hazard Warning: Turn off power at service panel. Check operation of the hood. Failure to do... so can result in death or electrical shock. • If not already done, install 1/2" conduit connector in j-box. • Run black (live), white (neutral), and green (earth) wires (#14 AWG) according to the National Electrical Code or ...
Complete Owner's Guide (English)
Page 15
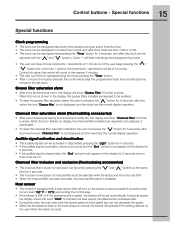
... • During this option the control will round to the nearest 5 minutes. • The user can finish on display, the charcoal filters installed are OFF. • When the charcoal filter has been excluded, the charcoal filter alarm is disabled. Charcoal filter inclusion and exclusion (Recirculating accessories)...clock can be reprogrammed at any time except during an active timed function. • The clock can be displayed in the display, the grease filters installed are from 1:00 to third speed but if the user keep pressing the " "/ " " buttons for 2 seconds. • If the audible...
... • During this option the control will round to the nearest 5 minutes. • The user can finish on display, the charcoal filters installed are OFF. • When the charcoal filter has been excluded, the charcoal filter alarm is disabled. Charcoal filter inclusion and exclusion (Recirculating accessories)...clock can be reprogrammed at any time except during an active timed function. • The clock can be displayed in the display, the grease filters installed are from 1:00 to third speed but if the user keep pressing the " "/ " " buttons for 2 seconds. • If the audible...
Complete Owner's Guide (English)
Page 19
... Corp. Service under NORMAL RESPONSIBILITIES date defective in the 50 states of God. 4. In Canada, your best interest to finish after installation. 6. Our obligations for such service calls. 3. Proper installation by Electrolux Home Products North America, a division of this limitation or exclusion may also have been removed or altered and cannot be...
... Corp. Service under NORMAL RESPONSIBILITIES date defective in the 50 states of God. 4. In Canada, your best interest to finish after installation. 6. Our obligations for such service calls. 3. Proper installation by Electrolux Home Products North America, a division of this limitation or exclusion may also have been removed or altered and cannot be...

Wiring Diagram (All Languages)
Page 1
RH30WC40G / RH36WC40G Copyright © 2008 Electrolux Home Products, Inc. RH30WC40GSA RH36WC40GSA Market North America North America Color stainless steel stainless steel Exhaust-CFM 400 CFM 400 CFM Volts 120 120 Owner's Guide 316488521 316488521 Installation Instructions 316488521 316488521 Wiring Diagram 5995510962 5995510962 RH30-36WC40G Cover.eps RH30-36WC40G Parts.eps SE1RAA.eps RANGE...
RH30WC40G / RH36WC40G Copyright © 2008 Electrolux Home Products, Inc. RH30WC40GSA RH36WC40GSA Market North America North America Color stainless steel stainless steel Exhaust-CFM 400 CFM 400 CFM Volts 120 120 Owner's Guide 316488521 316488521 Installation Instructions 316488521 316488521 Wiring Diagram 5995510962 5995510962 RH30-36WC40G Cover.eps RH30-36WC40G Parts.eps SE1RAA.eps RANGE...
Wiring Diagram (All Languages)
Page 3
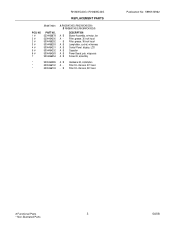
NO 1 # 2 # 2 # 3 # 4 # 5 # 6 # 7 PART NO. 5304466678 5304464200 5304466252 5304466253 5304464201 5304464202 5304464263 5304466254 A RH30WC40G (RH30WC40GSA) B RH36WC40G (RH36WC40GSA) DESCRIPTION A B Blower Assembly, w/motor, fan A - Filter, grease, 30 inch hood - Filter Kit, charcoal, 30" hood * 5304466743 - B Filter Kit,... A B Lampholder, socket, w/harness A B Control Panel, display, LCD A B Capacitor A B Power Board, pcb, w/spacers A B Screw Kit, assembly * 5304464285 A B Hardware Kit, installation * 5304466742 A - RH30WC40G / RH36WC40G REPLACEMENT PARTS Model Index: POS.
NO 1 # 2 # 2 # 3 # 4 # 5 # 6 # 7 PART NO. 5304466678 5304464200 5304466252 5304466253 5304464201 5304464202 5304464263 5304466254 A RH30WC40G (RH30WC40GSA) B RH36WC40G (RH36WC40GSA) DESCRIPTION A B Blower Assembly, w/motor, fan A - Filter, grease, 30 inch hood - Filter Kit, charcoal, 30" hood * 5304466743 - B Filter Kit,... A B Lampholder, socket, w/harness A B Control Panel, display, LCD A B Capacitor A B Power Board, pcb, w/spacers A B Screw Kit, assembly * 5304464285 A B Hardware Kit, installation * 5304466742 A - RH30WC40G / RH36WC40G REPLACEMENT PARTS Model Index: POS.