
Datasheet
Page 1
imaging Scanning for maximum efficiency fi-4860C2 Production Color Scanner Improve scanning processes by letting image processing functions do the work. Hardware-assisted Kofax® VRS Professional image processing functions for enhanced productivity Scan in ... with document types of various weights, sizes, colors and shades Enhance productivity with advanced image processing, high-speed, supreme quality color for production environments with Fujitsu service and support
imaging Scanning for maximum efficiency fi-4860C2 Production Color Scanner Improve scanning processes by letting image processing functions do the work. Hardware-assisted Kofax® VRS Professional image processing functions for enhanced productivity Scan in ... with document types of various weights, sizes, colors and shades Enhance productivity with advanced image processing, high-speed, supreme quality color for production environments with Fujitsu service and support

Datasheet
Page 2
..., post-warranty and service programs. Printed in the U.S.A. residents, are based on all service programs noted in . The Fujitsu fi-4860C2 production color scanner doesn't force you to 10,000 pages Limited Warranty 3 months on -site, fi-4860C2 Scanner Specifications Functional Specifications Technology Dual Color Charge coupled device (CCD image sensor) Output Monochrome/Grayscale 100, 150, 200...
..., post-warranty and service programs. Printed in the U.S.A. residents, are based on all service programs noted in . The Fujitsu fi-4860C2 production color scanner doesn't force you to 10,000 pages Limited Warranty 3 months on -site, fi-4860C2 Scanner Specifications Functional Specifications Technology Dual Color Charge coupled device (CCD image sensor) Output Monochrome/Grayscale 100, 150, 200...

Operator's Guide
Page 3
The fi-4860C2 has the following information. 1. Highly reliable document handling Accepts various thicknesses, sizes and types of 60ppm/120ipm @200dpi. SCANNING DOCUMENTS This chapter describes how to replace scanner consumables. ●i FUJITSU fi series image scanners are known for high reliability and this manual... and imprinter options. Duplex capability is an image scanner designed to scan small to clean the scanner. 4. DAILY CARE This chapter describes how to double letter documents in large quantities. The fi-4860C2 is available as standard feature. Production ready High ...
The fi-4860C2 has the following information. 1. Highly reliable document handling Accepts various thicknesses, sizes and types of 60ppm/120ipm @200dpi. SCANNING DOCUMENTS This chapter describes how to replace scanner consumables. ●i FUJITSU fi series image scanners are known for high reliability and this manual... and imprinter options. Duplex capability is an image scanner designed to scan small to clean the scanner. 4. DAILY CARE This chapter describes how to double letter documents in large quantities. The fi-4860C2 is available as standard feature. Production ready High ...

Operator's Guide
Page 4
... This chapter describes documents that this Scanner. SCANNER SPECIFICATIONS This chapter lists the scanner specifications. This guide contains necessary information for this scanner. 7. SOLVING COMMON PROBLEMS This chapter describes how to remedy document jams, scanner troubleshooting, and items to check before... the scanner for use. 2. OPTIONS This chapter describes the options available for the scanner and the driver installation, please also read the Installation Guide. 1. The "Installation Guide" is useful in taking full advantage of the fi-4860C2 Duplex Color Scanner's features...
... This chapter describes documents that this Scanner. SCANNER SPECIFICATIONS This chapter lists the scanner specifications. This guide contains necessary information for this scanner. 7. SOLVING COMMON PROBLEMS This chapter describes how to remedy document jams, scanner troubleshooting, and items to check before... the scanner for use. 2. OPTIONS This chapter describes the options available for the scanner and the driver installation, please also read the Installation Guide. 1. The "Installation Guide" is useful in taking full advantage of the fi-4860C2 Duplex Color Scanner's features...

Operator's Guide
Page 24
...15 Replacing the Back-side Lamp 4-20 5 SOLVING COMMON PROBLEMS 5-1 Clearing Document Jams 5-2 Troubleshooting 5-8 Before Contacting a Service Provider 5-29 Labels on the Scanner 5-31 6 ADF DOCUMENT SPECIFICATIONS ...... 6-1 Document Size 6-2 Document Quality 6-3 Hole-punching Prohibited Areas 6-6 Print Prohibited Area 6-7 Background Color Areas 6-8 Job ... Setup mode functions 7-9 Setup Mode Details 7-16 Test Mode Overview 7-67 Test Mode Details 7-72 8 OPTIONS 8-1 Options 8-2 fi-486PRFR (Pre-imprinter 8-3 fi-486PRRE (Post-imprinter 8-4 fi-486TRK (Thinner paper Roller Kit 8-5
...15 Replacing the Back-side Lamp 4-20 5 SOLVING COMMON PROBLEMS 5-1 Clearing Document Jams 5-2 Troubleshooting 5-8 Before Contacting a Service Provider 5-29 Labels on the Scanner 5-31 6 ADF DOCUMENT SPECIFICATIONS ...... 6-1 Document Size 6-2 Document Quality 6-3 Hole-punching Prohibited Areas 6-6 Print Prohibited Area 6-7 Background Color Areas 6-8 Job ... Setup mode functions 7-9 Setup Mode Details 7-16 Test Mode Overview 7-67 Test Mode Details 7-72 8 OPTIONS 8-1 Options 8-2 fi-486PRFR (Pre-imprinter 8-3 fi-486PRRE (Post-imprinter 8-4 fi-486TRK (Thinner paper Roller Kit 8-5
Operator's Guide
Page 50
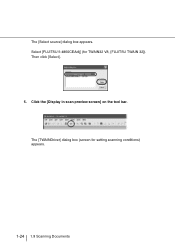
Select [FUJITSU fi-4860CEAdij] (for setting scanning conditions) appears. 1-24 1.9 Scanning Documents The [TWAINDriver] dialog box (screen for TWAIN32 V8, [FUJITSU TWAIN 32]). The [Select source] dialog box appears. Click the [Display in scan preview screen] on the tool bar. Then click [Select]. 5.
Select [FUJITSU fi-4860CEAdij] (for setting scanning conditions) appears. 1-24 1.9 Scanning Documents The [TWAINDriver] dialog box (screen for TWAIN32 V8, [FUJITSU TWAIN 32]). The [Select source] dialog box appears. Click the [Display in scan preview screen] on the tool bar. Then click [Select]. 5.
Operator's Guide
Page 53
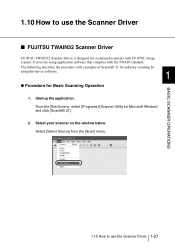
... application software that complies with FUJITSU image scanner fi series by using this driver software. 1 ● Procedure for Microsoft Window] and click [ScandAll 21]. 2. BASIC SCANNER OPERATIONS 1.10 How to use the Scanner Driver 1-27 Select your scanner on the window below. 1.10 How to use the Scanner Driver ■ FUJITSU TWAIN32 Scanner Driver FUJITSU TWAIN32 Scanner Driver is designed for...
... application software that complies with FUJITSU image scanner fi series by using this driver software. 1 ● Procedure for Microsoft Window] and click [ScandAll 21]. 2. BASIC SCANNER OPERATIONS 1.10 How to use the Scanner Driver 1-27 Select your scanner on the window below. 1.10 How to use the Scanner Driver ■ FUJITSU TWAIN32 Scanner Driver FUJITSU TWAIN32 Scanner Driver is designed for...

Operator's Guide
Page 54
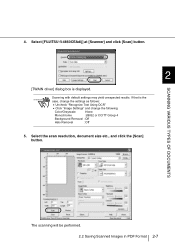
Load the documents on page 1-18. 5. Select the scanner to use , then click the [Select] button. Open the TWAIN Driver window. Select [Scan To View] from the [Scan] menu. •ScandAll 21 provides scanning ... scanned images to e-mail. •For details, refer to "ScandAll 21 Help". 1-28 1.10 How to use the Scanner Driver 3. For details on loading documents, refer to "1.7 Loading Documents on the Hopper" on the scanner. Select • [FUJITSU fi-4860CEAdij] for FUJITSU TWAIN32 V9 or • [FUJITSU TWAIN32] for FUJITSU TWAIN32 V8 then click the [Select] button. 4.
Load the documents on page 1-18. 5. Select the scanner to use , then click the [Select] button. Open the TWAIN Driver window. Select [Scan To View] from the [Scan] menu. •ScandAll 21 provides scanning ... scanned images to e-mail. •For details, refer to "ScandAll 21 Help". 1-28 1.10 How to use the Scanner Driver 3. For details on loading documents, refer to "1.7 Loading Documents on the Hopper" on the scanner. Select • [FUJITSU fi-4860CEAdij] for FUJITSU TWAIN32 V9 or • [FUJITSU TWAIN32] for FUJITSU TWAIN32 V8 then click the [Select] button. 4.

Operator's Guide
Page 60
... the window below. Select your application. If you use the Scanner Driver ■ FUJITSU ISIS Scanner Driver FUJITSU ISIS Scanner Driver is designed for scanning documents with FUJITSU image scanner fi series by using application software that complies with examples of QuickScanTM for Basic Scanning Operation 1. From the [Start] menu, select [Programs]-[QuickScan] and click [QuickScan]. 2. ...
... the window below. Select your application. If you use the Scanner Driver ■ FUJITSU ISIS Scanner Driver FUJITSU ISIS Scanner Driver is designed for scanning documents with FUJITSU image scanner fi series by using application software that complies with examples of QuickScanTM for Basic Scanning Operation 1. From the [Start] menu, select [Programs]-[QuickScan] and click [QuickScan]. 2. ...
Operator's Guide
Page 77
Select [FUJITSU fi-4860CEAdij] at [Scanner] and click [Scan] button. 2 [TWAIN driver] dialog box is the case, change the settings as follows: • Uncheck "Recognize Text Using OCR" • Click "Image ...
Select [FUJITSU fi-4860CEAdij] at [Scanner] and click [Scan] button. 2 [TWAIN driver] dialog box is the case, change the settings as follows: • Uncheck "Recognize Text Using OCR" • Click "Image ...

Operator's Guide
Page 90
...of calcium carbonate • Documents filled in with pencil Do not use fi486PRFR or fi-486PRRE imprinters. The imprinter ink tend to stick to enter the scanner mechanism and resulting scanner failure or malfunction. Vacuum the scanner instead. The air from the spray may cause dirt and dust to the document ...; Removable sheet guide • Glass sheet guide • Feed rollers • Pinch rollers 3-4 3.1 Cleaning Materials and Areas Requiring Cleaning ATTENTION ATTENTION ATTENTION The scanner must clean the following area more frequently if you use aerosol sprays to clean the...
...of calcium carbonate • Documents filled in with pencil Do not use fi486PRFR or fi-486PRRE imprinters. The imprinter ink tend to stick to enter the scanner mechanism and resulting scanner failure or malfunction. Vacuum the scanner instead. The air from the spray may cause dirt and dust to the document ...; Removable sheet guide • Glass sheet guide • Feed rollers • Pinch rollers 3-4 3.1 Cleaning Materials and Areas Requiring Cleaning ATTENTION ATTENTION ATTENTION The scanner must clean the following area more frequently if you use aerosol sprays to clean the...

Operator's Guide
Page 185
.... (* 3) For the details of the error. (* 3) Contact an authorized FUJITSU Scanner service provider. 5 SOLVING COMMON PROBLEMS (* 1) For the details on how to install the SCSI card driver and updates, refer to section 2.2 in the "fi-4860C2 Installation Guide". (* 2) For the details on how to install FUJITSU TWAIN, refer to "APPENDIX 3 MESSAGES ON THE OPERATOR PANEL...
.... (* 3) For the details of the error. (* 3) Contact an authorized FUJITSU Scanner service provider. 5 SOLVING COMMON PROBLEMS (* 1) For the details on how to install the SCSI card driver and updates, refer to section 2.2 in the "fi-4860C2 Installation Guide". (* 2) For the details on how to install FUJITSU TWAIN, refer to "APPENDIX 3 MESSAGES ON THE OPERATOR PANEL...

Operator's Guide
Page 187
5.3 Before Contacting a Service Provider Please check the following items before contacting an authorized FUJITSU Scanner service provider. SOLVING COMMON PROBLEMS ■ General descriptions 5 Items to check Model Serial Number Manufacturing date Date of purchase Symptom Frequency of trouble (example) fi-4860C2 (example) 000001 (example) 2006-05 (May 2006) (example) October, 2006 Information For the confirmation of manufacturing information, refer to ""5.4 Labels on the Scanner" on page 5-31. 5.3 Before Contacting a Service Provider 5-29
5.3 Before Contacting a Service Provider Please check the following items before contacting an authorized FUJITSU Scanner service provider. SOLVING COMMON PROBLEMS ■ General descriptions 5 Items to check Model Serial Number Manufacturing date Date of purchase Symptom Frequency of trouble (example) fi-4860C2 (example) 000001 (example) 2006-05 (May 2006) (example) October, 2006 Information For the confirmation of manufacturing information, refer to ""5.4 Labels on the Scanner" on page 5-31. 5.3 Before Contacting a Service Provider 5-29

Operator's Guide
Page 193
... are as follows. 6 - Wood containing paper When using documents of a paper type other than the above, perform a test-scanning with a few sheets of documents this scanner: 52 g/m2 to 127 g/m2 or 14 lb to check whether or not the documents can be scanned. ■ Document thickness Paper thickness is not... paper - 6.2 Document Quality This section describes the types and thickness of the same type before executing the actural task in order to 34 lb (when fi-486TRK option is expressed by "paper weight."
... are as follows. 6 - Wood containing paper When using documents of a paper type other than the above, perform a test-scanning with a few sheets of documents this scanner: 52 g/m2 to 127 g/m2 or 14 lb to check whether or not the documents can be scanned. ■ Document thickness Paper thickness is not... paper - 6.2 Document Quality This section describes the types and thickness of the same type before executing the actural task in order to 34 lb (when fi-486TRK option is expressed by "paper weight."
Operator's Guide
Page 208
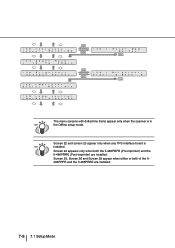
Screen 25, Screen 26 and Screen 29 appear when either or both the fi-486PRFR (Pre-imprinter) and the fi-486PRRE (Post-imprinter) are installed. 7-8 7.1 Setup Mode No / Ye s ! 29 I nk( xxxx ) =g g g g c c Re s e t / No ! 27 Po we r = 10 15 Sa v e 2 0 mi n ! 28 Br i gh t n ... appear only when any TPS interface board is in HINT the Offline setup mode. Screen 24 appears only when both of the fi486PRFR and the fi-486PRRE are installed. ! 26 I mp r i n t e r St at u s Pos t / Pr e ! 30 L a mp cont r ol = No r ma l / A l wa y s On ! 26- 1 Re s e t No w No / ...
Screen 25, Screen 26 and Screen 29 appear when either or both the fi-486PRFR (Pre-imprinter) and the fi-486PRRE (Post-imprinter) are installed. 7-8 7.1 Setup Mode No / Ye s ! 29 I nk( xxxx ) =g g g g c c Re s e t / No ! 27 Po we r = 10 15 Sa v e 2 0 mi n ! 28 Br i gh t n ... appear only when any TPS interface board is in HINT the Offline setup mode. Screen 24 appears only when both of the fi486PRFR and the fi-486PRRE are installed. ! 26 I mp r i n t e r St at u s Pos t / Pr e ! 30 L a mp cont r ol = No r ma l / A l wa y s On ! 26- 1 Re s e t No w No / ...
Operator's Guide
Page 214
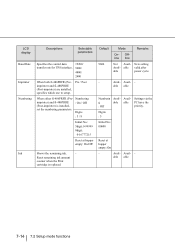
...at hopper empty: On/Off Shows the remaining ink. - Default 9600 Mode Remarks On- able able Numberin Avail- Numbering imprinter) and fi-486PRRE : On / Off (Post-imprinter) is replaced. New setting Avail- Avail- Reset remaining ink amount counter when the Print ...Imprinter Numbering Ink Descriptions Selectable parameters Specifies the control data transfer rate for TPS interface. 19200/ 9600/ 4800/ 2400 When both fi-486PRFR (Preimprinter) and fi-486PRRE (Post-imprinter) are installed, specifies which one to setup. Digits : 5 / 8 Initial No.: 5digit:0-99999 8digit:...
...at hopper empty: On/Off Shows the remaining ink. - Default 9600 Mode Remarks On- able able Numberin Avail- Numbering imprinter) and fi-486PRRE : On / Off (Post-imprinter) is replaced. New setting Avail- Avail- Reset remaining ink amount counter when the Print ...Imprinter Numbering Ink Descriptions Selectable parameters Specifies the control data transfer rate for TPS interface. 19200/ 9600/ 4800/ 2400 When both fi-486PRFR (Preimprinter) and fi-486PRRE (Post-imprinter) are installed, specifies which one to setup. Digits : 5 / 8 Initial No.: 5digit:0-99999 8digit:...
Operator's Guide
Page 253
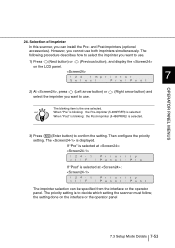
24. HINT When "Pre" is blinking: the Pre-imprinter (fi-486PRFR) is selected When "Post" is blinking: the Post-imprinter (fi-486PRRE) is the one selected. the setting done on the LCD panel. ! 24 I / F / Pan e l : ty Po s t The imprinter selection can install the Pre- The following ... s t 2) At , press (Left arrow button) or select the imprinter you can be specified from the interface or the operator panel. Selection of Imprinter In this scanner, you want to decide which setting the...
24. HINT When "Pre" is blinking: the Pre-imprinter (fi-486PRFR) is selected When "Post" is blinking: the Post-imprinter (fi-486PRRE) is the one selected. the setting done on the LCD panel. ! 24 I / F / Pan e l : ty Po s t The imprinter selection can install the Pre- The following ... s t 2) At , press (Left arrow button) or select the imprinter you can be specified from the interface or the operator panel. Selection of Imprinter In this scanner, you want to decide which setting the...
Operator's Guide
Page 254
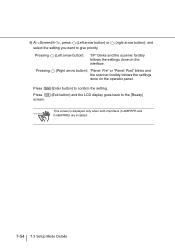
...) and the LCD display goes back to give priority. Pressing (Right arrow button): "Panel: Pre" or "Panel: Post" blinks and the scanner forcibly follows the settings done on the interface. 4) At , press (Left arrow button) or (right arrow button), and select the setting you... want to the [Ready] ATTENTION This screen is displayed only when both imprinters (fi-486PRFR and fi-486PRRE) are installed. 7-54 7.3 Setup Mode Details Pressing (Left arrow button): "I/F" blinks and the scanner forcibly follows the settings done on the operator panel.
...) and the LCD display goes back to give priority. Pressing (Right arrow button): "Panel: Pre" or "Panel: Post" blinks and the scanner forcibly follows the settings done on the interface. 4) At , press (Left arrow button) or (right arrow button), and select the setting you... want to the [Ready] ATTENTION This screen is displayed only when both imprinters (fi-486PRFR and fi-486PRRE) are installed. 7-54 7.3 Setup Mode Details Pressing (Left arrow button): "I/F" blinks and the scanner forcibly follows the settings done on the operator panel.
Operator's Guide
Page 262
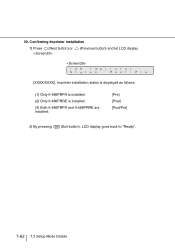
Confirming Imprinter installation 1) Press (Next button) or . (Previous button) and let LCD display ! 29 I mp r i n t e r St at u s Pos t / Pr e [XXXX/XXXX], imprinter installation status is displayed as follows. (1) Only fi-486PRFR is installed: (2) Only fi-486PRRE is installed: (3) Both fi-486PRFR and fi-486PRRE are installed: [Pre] [Post] [Post/Pre] 2) By pressing (Exit button), LCD display goes back to "Ready". 7-62 7.3 Setup Mode Details 29.
Confirming Imprinter installation 1) Press (Next button) or . (Previous button) and let LCD display ! 29 I mp r i n t e r St at u s Pos t / Pr e [XXXX/XXXX], imprinter installation status is displayed as follows. (1) Only fi-486PRFR is installed: (2) Only fi-486PRRE is installed: (3) Both fi-486PRFR and fi-486PRRE are installed: [Pre] [Post] [Post/Pre] 2) By pressing (Exit button), LCD display goes back to "Ready". 7-62 7.3 Setup Mode Details 29.
Operator's Guide
Page 270
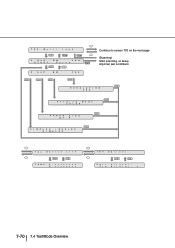
T02 Mu l t i f eed S A4 P ST ART BW 2 00 Se t u p S A 4 Pe t BW 2 00 Continue to screen T03 on the next page (Scanning) Start scanning, or setup imprinter test conditions R E S O L U T I Oe Nt 200 Re a d i n g M oe dt e COL OR P AP ER A4 S Ie Zt E P S I MP L E X /e Dt U P L E X S I MP L E X T03 De v i c e Li f e L A MP FO :f xf sx ex xt x x x x B: x x x x x x x x T04 Op t i o n s Pos t pO rf fi ns et et r : - Pr e pr i nt er : g 7-70 7.4 Test Mode Overview
T02 Mu l t i f eed S A4 P ST ART BW 2 00 Se t u p S A 4 Pe t BW 2 00 Continue to screen T03 on the next page (Scanning) Start scanning, or setup imprinter test conditions R E S O L U T I Oe Nt 200 Re a d i n g M oe dt e COL OR P AP ER A4 S Ie Zt E P S I MP L E X /e Dt U P L E X S I MP L E X T03 De v i c e Li f e L A MP FO :f xf sx ex xt x x x x B: x x x x x x x x T04 Op t i o n s Pos t pO rf fi ns et et r : - Pr e pr i nt er : g 7-70 7.4 Test Mode Overview


