
User Manual
Page 1
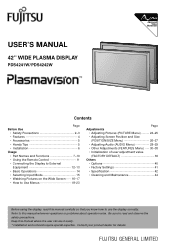
...; Using the Remote Control 11 • Connecting the Display to External Equipment 12-13 • Basic Operations 14 • Selecting Input Mode 15 • Watching Pictures on the Wide Screen 16-17 • How to Use Menus 18-23 Page Adjustments • Adjusting Pictures (PICTURE Menu 24-25 • Adjusting Screen Position and Size (POSITION/SIZE Menu 26-27 • Adjusting Audio (AUDIO Menu 28-29 • Other Adjustments (FEATURES Menu 30-38 • Initialization of user adjustment value (FACTORY DEFAULT...
...; Using the Remote Control 11 • Connecting the Display to External Equipment 12-13 • Basic Operations 14 • Selecting Input Mode 15 • Watching Pictures on the Wide Screen 16-17 • How to Use Menus 18-23 Page Adjustments • Adjusting Pictures (PICTURE Menu 24-25 • Adjusting Screen Position and Size (POSITION/SIZE Menu 26-27 • Adjusting Audio (AUDIO Menu 28-29 • Other Adjustments (FEATURES Menu 30-38 • Initialization of user adjustment value (FACTORY DEFAULT...
User Manual
Page 5
.... Adjust only those controls that the product is used replacement parts specified by the manufacturer. - e) If the product has been dropped or damaged in the cabinet are not likely to the operator. - f) When the product exhibits a distinct change in damage and will often require extensive work by the Operation Manual, as this product from the wall outlet and refer service...
.... Adjust only those controls that the product is used replacement parts specified by the manufacturer. - e) If the product has been dropped or damaged in the cabinet are not likely to the operator. - f) When the product exhibits a distinct change in damage and will often require extensive work by the Operation Manual, as this product from the wall outlet and refer service...
User Manual
Page 6
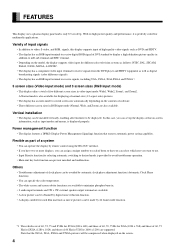
... five different screen sizes in video input mode: Wide1, Wide2, Zoom1, and Zoom2. FEATURES This display uses a plasma display panel and is provided to avoid troublesome operation. • Main unit key lock function can be installed vertically, enabling advertisement to be compressed when displayed on the model, the display supports video input for multimedia applications. In this display supports input of high-quality video signals such as part of DVI standard to display a high definition picture quality in...
... five different screen sizes in video input mode: Wide1, Wide2, Zoom1, and Zoom2. FEATURES This display uses a plasma display panel and is provided to avoid troublesome operation. • Main unit key lock function can be installed vertically, enabling advertisement to be compressed when displayed on the model, the display supports video input for multimedia applications. In this display supports input of high-quality video signals such as part of DVI standard to display a high definition picture quality in...
User Manual
Page 7
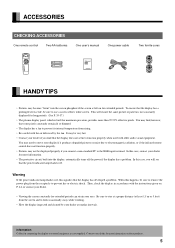
.... ACCESSORIES CHECKING ACCESSORIES One remote control Two AA batteries One user's manual One power cable Two ferrite cores Manual HANDY TIPS • Pictures may be very hot. • Contact your eyes. Warning If the power indicator lamp flashes red, this case, you will ensure the same picture or pattern is not constantly displayed for long periods. (See P. 35-37.) • The plasma display panel, which is left...
.... ACCESSORIES CHECKING ACCESSORIES One remote control Two AA batteries One user's manual One power cable Two ferrite cores Manual HANDY TIPS • Pictures may be very hot. • Contact your eyes. Warning If the power indicator lamp flashes red, this case, you will ensure the same picture or pattern is not constantly displayed for long periods. (See P. 35-37.) • The plasma display panel, which is left...
User Manual
Page 8
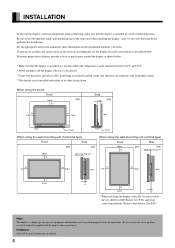
... Wall mounting unit When using the wall-mounting unit (vertical type) Front Side Upper 10 (cm) (cm) Wall mounting unit 10 Left 10 Right Wall 10 Left 10 Right Wall 6 Lower 1.5 10 Lower 1.5 * When installing the display vertically, be installed with the display when repacking it. Reference See P. 40 for more information on the installation hardware you select. See P.32) and setup vertical installation. (Refer to Installation. See the appropriate instruction manual...
... Wall mounting unit When using the wall-mounting unit (vertical type) Front Side Upper 10 (cm) (cm) Wall mounting unit 10 Left 10 Right Wall 10 Left 10 Right Wall 6 Lower 1.5 10 Lower 1.5 * When installing the display vertically, be installed with the display when repacking it. Reference See P. 40 for more information on the installation hardware you select. See P.32) and setup vertical installation. (Refer to Installation. See the appropriate instruction manual...
User Manual
Page 9
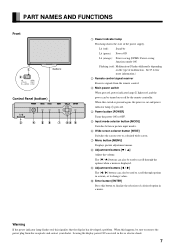
... is displayed. 9 Adjustment buttons [ / ] The [ / ] buttons can also be used to scroll through the options when a menu is cut and power indicator lamp 1 goes off by Lit (green): Power ON Lit (orange): Power saving (DPMS: Power saving function) mode ON Flashing (red): Malfunction (Flashes differently depending on or off . 4 Power button [POWER] Turns the power ON or OFF. 5 Input mode selector button [MODE] Switches between picture input modes. 6 Wide screen selector button [WIDE] Switches the screen over to remove the power plug from the remote control. 3 Main power switch...
... is displayed. 9 Adjustment buttons [ / ] The [ / ] buttons can also be used to scroll through the options when a menu is cut and power indicator lamp 1 goes off by Lit (green): Power ON Lit (orange): Power saving (DPMS: Power saving function) mode ON Flashing (red): Malfunction (Flashes differently depending on or off . 4 Power button [POWER] Turns the power ON or OFF. 5 Input mode selector button [MODE] Switches between picture input modes. 6 Wide screen selector button [WIDE] Switches the screen over to remove the power plug from the remote control. 3 Main power switch...
User Manual
Page 10
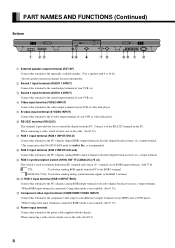
....) B Power input terminal Connect this terminal to the power cable supplied with the display. Connect it to the PC's display (digital RGB) output terminal or decoder (digital broadcast tuner, etc.) output terminal. *The connection cable No.88741-8000 made by molex Inc. PART NAMES AND FUNCTIONS (Continued) Bottom 1 External speaker output terminal (EXT SP) Connect this terminal to the optionally available speaker. (Use a speaker with 4 to 16 Ω.) *See the speaker instruction manual for more information. 2 Sound 1 input terminal (AUDIO 1 INPUT) Connect...
....) B Power input terminal Connect this terminal to the power cable supplied with the display. Connect it to the PC's display (digital RGB) output terminal or decoder (digital broadcast tuner, etc.) output terminal. *The connection cable No.88741-8000 made by molex Inc. PART NAMES AND FUNCTIONS (Continued) Bottom 1 External speaker output terminal (EXT SP) Connect this terminal to the optionally available speaker. (Use a speaker with 4 to 16 Ω.) *See the speaker instruction manual for more information. 2 Sound 1 input terminal (AUDIO 1 INPUT) Connect...
User Manual
Page 12
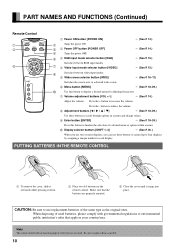
... the volume. 8 Adjustment buttons [ / / / ] ➝ (See P. 18-39.) Use these buttons to control up to four displays by assigning a unique number to each display. CAUTION: Be sure to use these buttons to scroll through options in a menu and change values. 9 Enter button [ENTER] ➝ (See P. 18-39.) Press this button to display a desired menu for adjusting the picture. 7 Volume adjustment buttons [VOL +/-] ➝ (See P. 14.) Adjust the volume. PUTTING BATTERIES IN THE REMOTE CONTROL 1 To remove the...
... the volume. 8 Adjustment buttons [ / / / ] ➝ (See P. 18-39.) Use these buttons to control up to four displays by assigning a unique number to each display. CAUTION: Be sure to use these buttons to scroll through options in a menu and change values. 9 Enter button [ENTER] ➝ (See P. 18-39.) Press this button to display a desired menu for adjusting the picture. 7 Volume adjustment buttons [VOL +/-] ➝ (See P. 14.) Adjust the volume. PUTTING BATTERIES IN THE REMOTE CONTROL 1 To remove the...
User Manual
Page 14
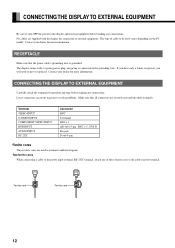
... power plug; If you have it replaced. The display comes with the display for more information. Ferrite core Ferrite core 12 The type of these ferrite cores to attenuate undesired signals. RECEPTACLE Make sure that all connectors are used varies depending on the PC model. Contact your dealer for connection to the display and external equipment before making any connections. Terminal VIDEO INPUT S-VIDEO INPUT COMPONENT VIDEO INPUT RGB INPUT AUDIO INPUT...
... power plug; If you have it replaced. The display comes with the display for more information. Ferrite core Ferrite core 12 The type of these ferrite cores to attenuate undesired signals. RECEPTACLE Make sure that all connectors are used varies depending on the PC model. Contact your dealer for connection to the display and external equipment before making any connections. Terminal VIDEO INPUT S-VIDEO INPUT COMPONENT VIDEO INPUT RGB INPUT AUDIO INPUT...
User Manual
Page 17
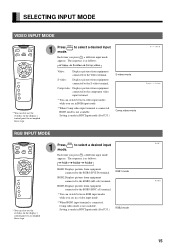
... in BNC Input mode.(See P.33.) S-video mode Comp.video mode RGB INPUT MODE 1 Press mode. to accomplish these steps. Setting is as follows: * You can also use the switches on the display's control panel to select a desired input Each time you press , a different input mode appears. The sequence is made in BNC Input mode.(See P.33.) RGB1 mode RGB2 mode 15 SELECTING INPUT MODE VIDEO INPUT MODE 1 Press mode. Video: Displays pictures from equipment connected to the Video terminal. RGB3:Displays pictures from equipment connected to...
... in BNC Input mode.(See P.33.) S-video mode Comp.video mode RGB INPUT MODE 1 Press mode. to accomplish these steps. Setting is as follows: * You can also use the switches on the display's control panel to select a desired input Each time you press , a different input mode appears. The sequence is made in BNC Input mode.(See P.33.) RGB1 mode RGB2 mode 15 SELECTING INPUT MODE VIDEO INPUT MODE 1 Press mode. Video: Displays pictures from equipment connected to the Video terminal. RGB3:Displays pictures from equipment connected to...
User Manual
Page 20
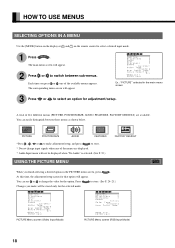
... the PICTURE menu screen, press . At this time, the adjustment/setup screen for adjustment/setup. PICTURE POSITION/SIZE AUDIO FEATURES *Press , , or to select an option for that option will appear. HOW TO USE MENUS SELECTING OPTIONS IN A MENU Use the [MODE] button on the display or and on the remote control to switch between these menus as shown below. A total of the available menus appears. Press to store. (See P. 24-25.) Changes...
... the PICTURE menu screen, press . At this time, the adjustment/setup screen for adjustment/setup. PICTURE POSITION/SIZE AUDIO FEATURES *Press , , or to select an option for that option will appear. HOW TO USE MENUS SELECTING OPTIONS IN A MENU Use the [MODE] button on the display or and on the remote control to switch between these menus as shown below. A total of the available menus appears. Press to store. (See P. 24-25.) Changes...

User Manual
Page 24
... Mask. Operation Use or for S-video) (3) BNC Input (4) D-SUB Input Function Selects video mode. Display D-SUB Input screen and press or to select an option. Others(1/2) Menu screen Option (1) DPMS (2) Audio Input (3) Screen Orbiter (for switching. Display the "Screen Orbiter" adjustment screen and use or to select Decoder and set up screen orbiter. Selects audio input terminal. Display the "Audio Input" adjustment screen and use or to select an option. Selects BNC Input signal. Use Function to select an option. Range Auto/NTSC/PAL...
... Mask. Operation Use or for S-video) (3) BNC Input (4) D-SUB Input Function Selects video mode. Display D-SUB Input screen and press or to select an option. Others(1/2) Menu screen Option (1) DPMS (2) Audio Input (3) Screen Orbiter (for switching. Display the "Screen Orbiter" adjustment screen and use or to select Decoder and set up screen orbiter. Selects audio input terminal. Display the "Audio Input" adjustment screen and use or to select an option. Selects BNC Input signal. Use Function to select an option. Range Auto/NTSC/PAL...

User Manual
Page 25
... for switching. Sets up to display white over the entire screen. Sets up Parameter. Selects input signal. Range Off/RGB2/RGB3/Video/ S-video/Comp.video 0 (no setup) 1/2/3/4 RGB1: Auto/VGA/WVGA/XGA/ WXGA RGB2, RGB3: Auto/VGA/WVGA/480P/ XGA/WXGA/SXGA/ SXGA+ Auto/Manual On /Off(disabled) On (Exhibition mode)/ Off(disabled) Horizontal/Vertical On (Key Lock)/ Off(disabled) Display only USING THE FACTORY DEFAULT MENU • Select FACTORY DEFAULT and execute to restore the adjustment/setting...
... for switching. Sets up to display white over the entire screen. Sets up Parameter. Selects input signal. Range Off/RGB2/RGB3/Video/ S-video/Comp.video 0 (no setup) 1/2/3/4 RGB1: Auto/VGA/WVGA/XGA/ WXGA RGB2, RGB3: Auto/VGA/WVGA/480P/ XGA/WXGA/SXGA/ SXGA+ Auto/Manual On /Off(disabled) On (Exhibition mode)/ Off(disabled) Horizontal/Vertical On (Key Lock)/ Off(disabled) Display only USING THE FACTORY DEFAULT MENU • Select FACTORY DEFAULT and execute to restore the adjustment/setting...
User Manual
Page 27
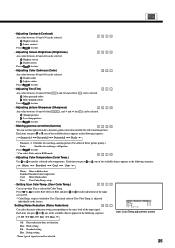
... [ : Sharper pictures : Less sharp pictures ], and -4 and +4 for [ ], can be selected. setup • Setting User Color Temp. (User Color Temp.) Can set up when User is selected in the following sequence: User Color Temp.adjustment screen Off: Noise reduction does not function. setup is adjusted individually at the factory. Each time you press or , one of the available choices appears in RGB mode. • Adjusting Color Temperature (Color Temp.) Use or to User. Press...
... [ : Sharper pictures : Less sharp pictures ], and -4 and +4 for [ ], can be selected. setup • Setting User Color Temp. (User Color Temp.) Can set up when User is selected in the following sequence: User Color Temp.adjustment screen Off: Noise reduction does not function. setup is adjusted individually at the factory. Each time you press or , one of the available choices appears in RGB mode. • Adjusting Color Temperature (Color Temp.) Use or to User. Press...
User Manual
Page 33
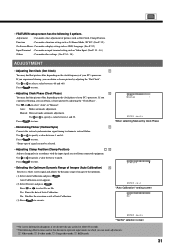
... Images (Auto Calibration) Receives a white screen signal and adjusts the dynamic range of Auto Calibration. If you experience blurring, you do not take any action for about 60 seconds. * The following 5 options. • FEATURES setup screen has the following abbreviations used in this document represent input modes in accordance with the input signal received from connected equipment. Use or to the optimum. (1) Select Auto Calibration and press . When selecting Manual by Clock Phase "Auto Calibration" setting screen...
... Images (Auto Calibration) Receives a white screen signal and adjusts the dynamic range of Auto Calibration. If you experience blurring, you do not take any action for about 60 seconds. * The following 5 options. • FEATURES setup screen has the following abbreviations used in this document represent input modes in accordance with the input signal received from connected equipment. Use or to the optimum. (1) Select Auto Calibration and press . When selecting Manual by Clock Phase "Auto Calibration" setting screen...
User Manual
Page 38
... will turn OFF. When using the display continuously When switching between RGB and video input modes frequently (1) Select "Mode" for "Mode/Time" with "Screen Orbiter". (2) Select a desired range for "DPMS". When the predetermined time elapses, the power will automatically display white or black over the entire screen. on the Information screen. (See P.38.) 36 Each time you to control a desired display by assigning a unique number to store. * You can control all displays. Other modes: Displays pictures when a signal is received...
... will turn OFF. When using the display continuously When switching between RGB and video input modes frequently (1) Select "Mode" for "Mode/Time" with "Screen Orbiter". (2) Select a desired range for "DPMS". When the predetermined time elapses, the power will automatically display white or black over the entire screen. on the Information screen. (See P.38.) 36 Each time you to control a desired display by assigning a unique number to store. * You can control all displays. Other modes: Displays pictures when a signal is received...
User Manual
Page 40
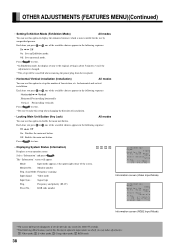
...: Sets up normal mode. Scan Mode: Frequency scanning Input Signal: Video mode Input Sync.: Signal type Freq.: Frequency and polarity (fH, fV) Preset No.: RGB code number Information screen (Video Input Mode) Information screen (RGB2 Input Mode) * On-screen information disappears if you do not take any action for horizontal and vertical installation. Press to store. * In Exhibition mode, the display returns to the original setting in which is changed. * The setup will appear. Off: Enables the main unit button. for...
...: Sets up normal mode. Scan Mode: Frequency scanning Input Signal: Video mode Input Sync.: Signal type Freq.: Frequency and polarity (fH, fV) Preset No.: RGB code number Information screen (Video Input Mode) Information screen (RGB2 Input Mode) * On-screen information disappears if you do not take any action for horizontal and vertical installation. Press to store. * In Exhibition mode, the display returns to the original setting in which is changed. * The setup will appear. Off: Enables the main unit button. for...
User Manual
Page 43
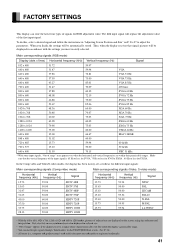
Thus, when the display receives that signal, pictures will be automatically stored. Note also that the vertical frequency of the input signal is also displayed in accordance with the settings you most recently selected. FACTORY SETTINGS This display can check input signals through "Information" on P. 26-27 to adjust the parameters. To do this, select a desired signal and follow the instructions in "Adjusting Screen Position and Size" on the FEATURES Menu screen. (See P. 38...
Thus, when the display receives that signal, pictures will be automatically stored. Note also that the vertical frequency of the input signal is also displayed in accordance with the settings you most recently selected. FACTORY SETTINGS This display can check input signals through "Information" on P. 26-27 to adjust the parameters. To do this, select a desired signal and follow the instructions in "Adjusting Screen Position and Size" on the FEATURES Menu screen. (See P. 38...
User Manual
Page 44
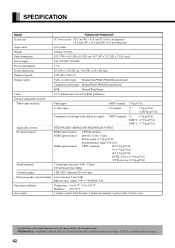
... SPECIFICATION Model PDS4241W/PDS4242W Screen size 42" wide screen: 92.0 cm (W) x 51.8 cm (H) (105.6 cm diagonal) 36.2 inch (W) x 20.4 inch (H) (41.6 inch diagonal) Aspect ratio 16:9 (wide) Weight 28.8 kg / 63.5 lbs Outer dimensions 103.5 (W) x 64.0 (H) x 8.5 (D) cm / 40.7 (W) x 25.2 (H) x 3.3 (D) inch Power supply 100-240 VAC 50/60 Hz Power consumption 3.7 A Screen dimensions 92.0 (W) x 51.8 (H) cm / 36.2 (W) x 20.4 (H) inch Number of pixels 1024 (H) x 1024 (V) Display modes Video, S-video input: Normal/Auto/Wide1/Wide2/Zoom1/Zoom2 Component video input...
... SPECIFICATION Model PDS4241W/PDS4242W Screen size 42" wide screen: 92.0 cm (W) x 51.8 cm (H) (105.6 cm diagonal) 36.2 inch (W) x 20.4 inch (H) (41.6 inch diagonal) Aspect ratio 16:9 (wide) Weight 28.8 kg / 63.5 lbs Outer dimensions 103.5 (W) x 64.0 (H) x 8.5 (D) cm / 40.7 (W) x 25.2 (H) x 3.3 (D) inch Power supply 100-240 VAC 50/60 Hz Power consumption 3.7 A Screen dimensions 92.0 (W) x 51.8 (H) cm / 36.2 (W) x 20.4 (H) inch Number of pixels 1024 (H) x 1024 (V) Display modes Video, S-video input: Normal/Auto/Wide1/Wide2/Zoom1/Zoom2 Component video input...
User Manual
Page 46
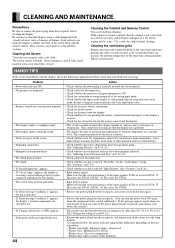
... Remote Control Use a soft cloth for final cleaning. This sound does not indicate that the vertical frequency of the input signal is heavily stained, soak a soft cloth in the rear of water and detergent and squeeze it with the display, check the following explanations before contacting your dealer about how the lamp flashed. Change the setting of your PC,etc. • Remove the power plug...
... Remote Control Use a soft cloth for final cleaning. This sound does not indicate that the vertical frequency of the input signal is heavily stained, soak a soft cloth in the rear of water and detergent and squeeze it with the display, check the following explanations before contacting your dealer about how the lamp flashed. Change the setting of your PC,etc. • Remove the power plug...


