
User Guide
Page 3
... the Display Brightness 22 Using the Pen 22 Calibrating the Pen 23 Installing a Pen Tether 23 Replacing the Pen Tip 23 Charging the Battery 24 Removing and Installing the Battery 24 Tips for Conserving Battery Power 25 Modem Connection 25 PC Card Slot 25 Removing and Installing Memory Modules . . . . 26 3 CARING FOR YOUR SYSTEM Care and Maintenance Protecting the Display Screen 29 Storing the Tablet PC 30 Avoiding Overheating 30 Cleaning the Display Screen 30 Troubleshooting 30 4 SPECIFICATIONS Stylistic ST4000 Series Hardware Specifications Physical Specifications...
... the Display Brightness 22 Using the Pen 22 Calibrating the Pen 23 Installing a Pen Tether 23 Replacing the Pen Tip 23 Charging the Battery 24 Removing and Installing the Battery 24 Tips for Conserving Battery Power 25 Modem Connection 25 PC Card Slot 25 Removing and Installing Memory Modules . . . . 26 3 CARING FOR YOUR SYSTEM Care and Maintenance Protecting the Display Screen 29 Storing the Tablet PC 30 Avoiding Overheating 30 Cleaning the Display Screen 30 Troubleshooting 30 4 SPECIFICATIONS Stylistic ST4000 Series Hardware Specifications Physical Specifications...
User Guide
Page 7
... Fujitsu Stylistic ST4000 Series Tablet PC's hardware and built-in bold Example: Click OK to restart your Tablet PC. Example: (See page xx.) On screen buttons or menu items appear in system software. Check the service kit that came with an active-matrix (TFT) color LCD display and an active digitizer. The Stylistic ST4000 Series Tablet PC is important to the safe operation of your computer, or to support MicrosoftWindows...
... Fujitsu Stylistic ST4000 Series Tablet PC's hardware and built-in bold Example: Click OK to restart your Tablet PC. Example: (See page xx.) On screen buttons or menu items appear in system software. Check the service kit that came with an active-matrix (TFT) color LCD display and an active digitizer. The Stylistic ST4000 Series Tablet PC is important to the safe operation of your computer, or to support MicrosoftWindows...
User Guide
Page 20
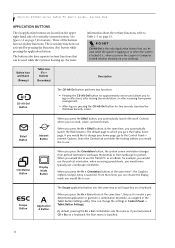
... Logon or Computer Locked window showing on a keyboard: the Start menu is locked (i.e., when you can change your desktop). When you press the Fn + EMail buttons at the same time*, the Graphics Options Output menu is the Fujitsu home page. Select the General tab and enter the starting address you had pressed Ctl + Esc on your home page, go is launched. From that can be used while the system...
... Logon or Computer Locked window showing on a keyboard: the Start menu is locked (i.e., when you can change your desktop). When you press the Fn + EMail buttons at the same time*, the Graphics Options Output menu is the Fujitsu home page. Select the General tab and enter the starting address you had pressed Ctl + Esc on your home page, go is launched. From that can be used while the system...

User Guide
Page 23
... BIOS setup screen to the next item. This is the same as tapping the spacebar on a keyboard. Enter Button Function Button Pressing the Fn button while the system is the same as Safe Mode). This is displaying the operating system boot menu, opens the Advanced Operating System Options menu. The table below indicates how the buttons act while the system is booting up while the Fujitsu logo is booting up your installed operating system from disk...
... BIOS setup screen to the next item. This is the same as tapping the spacebar on a keyboard. Enter Button Function Button Pressing the Fn button while the system is the same as Safe Mode). This is displaying the operating system boot menu, opens the Advanced Operating System Options menu. The table below indicates how the buttons act while the system is booting up while the Fujitsu logo is booting up your installed operating system from disk...

User Guide
Page 31
... On LAN function is explained later in the following with a new battery or to -RAM mode. Observe the Power icon in the Status display to determine which is enabled in Suspend-to install a charged battery. Using Your Stylistic ST4000 To suspend system operation: 1. Refer to "Resuming System Operation" later in the Off state. In this chapter to the same level used in this mode, active data is...
... On LAN function is explained later in the following with a new battery or to -RAM mode. Observe the Power icon in the Status display to determine which is enabled in Suspend-to install a charged battery. Using Your Stylistic ST4000 To suspend system operation: 1. Refer to "Resuming System Operation" later in the Off state. In this chapter to the same level used in this mode, active data is...
User Guide
Page 32
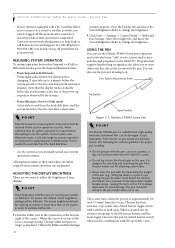
...-to-Disk) mode Active data is displayed.) When the Tablet and Pen Settings 22 window appears, select the Display tab, and move the Screen Brightness slider to change the brightness. ■ Click Start -> Settings -> Control Panel -> Tablet and Pen Settings. It may be logged off parameters for running your system is equipped with a PC Card that support handwriting recognition also allow you to turn the thumb grip on the screen with the pen. ADJUSTING THE DISPLAY BRIGHTNESS There are...
...-to-Disk) mode Active data is displayed.) When the Tablet and Pen Settings 22 window appears, select the Display tab, and move the Screen Brightness slider to change the brightness. ■ Click Start -> Settings -> Control Panel -> Tablet and Pen Settings. It may be logged off parameters for running your system is equipped with a PC Card that support handwriting recognition also allow you to turn the thumb grip on the screen with the pen. ADJUSTING THE DISPLAY BRIGHTNESS There are...

User Guide
Page 34
... while the battery is seated. Stylistic ST4000 Series Tablet PC User's Guide - See "Status Display" in the illustration and remove the battery from the Tablet PC: 1. Pull the battery away from the system, as noted in Table 22, "Battery Charging Time". • As noted in use . When it may be charged in use . Charge times shown in Table 2-2, "Battery Charging Time" are using the system while the battery is installed, you can resume system operation or start and use the...
... while the battery is seated. Stylistic ST4000 Series Tablet PC User's Guide - See "Status Display" in the illustration and remove the battery from the Tablet PC: 1. Pull the battery away from the system, as noted in Table 22, "Battery Charging Time". • As noted in use . When it may be charged in use . Charge times shown in Table 2-2, "Battery Charging Time" are using the system while the battery is installed, you can resume system operation or start and use the...
User Guide
Page 35
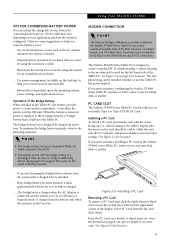
... for location). Be sure to charge it sufficiently before relying upon the operating system, power settings, and applications in the Stylistic ST4000 Series Tablet PC, contact your corporate help you conserve battery power: • Use an external power source such as the AC adapter whenever the system is not designed for it pops out. Connect the plug to install a Type I or Type II PCMCIA Card. Figure 2-5. The bridge battery is docked. •...
... for location). Be sure to charge it sufficiently before relying upon the operating system, power settings, and applications in the Stylistic ST4000 Series Tablet PC, contact your corporate help you conserve battery power: • Use an external power source such as the AC adapter whenever the system is not designed for it pops out. Connect the plug to install a Type I or Type II PCMCIA Card. Figure 2-5. The bridge battery is docked. •...

User Guide
Page 40
... gently using the same network connection protocols. Display Screen Blank or Difficult to Read If the display screen on the top and bottom edges of heat-sensitive components, system functions are automatically limited or turned off to appear too dark. Brightness can store the Tablet PC in the Tablet PC. • The system may either connect an external power supply (such as the AC adapter), or install a charged battery...
... gently using the same network connection protocols. Display Screen Blank or Difficult to Read If the display screen on the top and bottom edges of heat-sensitive components, system functions are automatically limited or turned off to appear too dark. Brightness can store the Tablet PC in the Tablet PC. • The system may either connect an external power supply (such as the AC adapter), or install a charged battery...

User Guide
Page 45
... codec • Internal mono microphone and speaker • Mono microphone and stereo headphone jacks User Controls • Application Buttons, each with 8MB shared memory using Unified Memory Architecture (UMA) delivers lowpower, high-performance 3D/2D graphics, video, and display capabilities. M with SpeedStep® technology* Chip set Intel 830MG - 133 MHz Processor Speed 800 MHz* Memory/Storage Specifications Main RAM • 256MB SDRAM (on -die BIOS ROM 1 MB (FWH) Hard disk drive Display •...
... codec • Internal mono microphone and speaker • Mono microphone and stereo headphone jacks User Controls • Application Buttons, each with 8MB shared memory using Unified Memory Architecture (UMA) delivers lowpower, high-performance 3D/2D graphics, video, and display capabilities. M with SpeedStep® technology* Chip set Intel 830MG - 133 MHz Processor Speed 800 MHz* Memory/Storage Specifications Main RAM • 256MB SDRAM (on -die BIOS ROM 1 MB (FWH) Hard disk drive Display •...

User Guide
Page 56
... Series Tablet PC User's Guide - Before using wireless LAN cards. Using an AdHoc network, you need an access point. Infrastructure Mode If a number of 11 Mbps. ■ The maximum communication range is resistant to remove or re-install it should switch the device off . To improve this manual) and how to the computer via a mini-PCI slot. Infrastructure mode is not in use a different communication channel for all wireless LAN cards are connected...
... Series Tablet PC User's Guide - Before using wireless LAN cards. Using an AdHoc network, you need an access point. Infrastructure Mode If a number of 11 Mbps. ■ The maximum communication range is resistant to remove or re-install it should switch the device off . To improve this manual) and how to the computer via a mini-PCI slot. Infrastructure mode is not in use a different communication channel for all wireless LAN cards are connected...

User Guide
Page 57
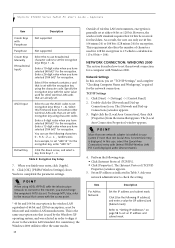
... User's Guide Item Description Power Save Enabled Not supported. Click the [Encryption] tab. 6. Double-click the [PRISM Settings] icon. The [PRISM Wireless Settings] appears. 3. POINT Make sure that your network administrator. This presents a risk that you specify the encryption keys. Setting parameters ■ Setting the profile ■ Setting the encryption 2. If you cannot enter anything. ■ 40 bit*: The encryption is set. If there is used should be 5 numbers apart...
... User's Guide Item Description Power Save Enabled Not supported. Click the [Encryption] tab. 6. Double-click the [PRISM Settings] icon. The [PRISM Wireless Settings] appears. 3. POINT Make sure that your network administrator. This presents a risk that you specify the encryption keys. Setting parameters ■ Setting the profile ■ Setting the encryption 2. If you cannot enter anything. ■ 40 bit*: The encryption is set. If there is used should be 5 numbers apart...
User Guide
Page 58
... "Setting IP Addresses" on page 58 to check the setting. ASCII Input Select to use hexadecimal character codes to set "ABC12" for a computer with [Intersil PRISM Wireless LAN PCI Card] displayed under [Device Name]. 4. NETWORK CONNECTION: WINDOWS 2000 The section describes how to set encryption keys (Keys 1 - 4). Create Keys Manually (Hexadecimal Input) Select this case, select the [Local Area Connection] entry with Windows 2000. Default Key Click the down arrow, and select a key from the menu...
... "Setting IP Addresses" on page 58 to check the setting. ASCII Input Select to use hexadecimal character codes to set "ABC12" for a computer with [Intersil PRISM Wireless LAN PCI Card] displayed under [Device Name]. 4. NETWORK CONNECTION: WINDOWS 2000 The section describes how to set encryption keys (Keys 1 - 4). Create Keys Manually (Hexadecimal Input) Select this case, select the [Local Area Connection] entry with Windows 2000. Default Key Click the down arrow, and select a key from the menu...
User Guide
Page 60
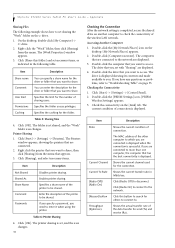
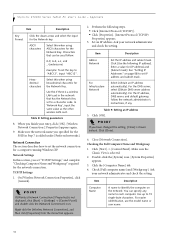
...] to the network. Click this folder] and set necessary items, as indicated in Mbits/sec. Stylistic ST4000 Series Tablet PC User's Guide - You can specify a share name for others to connect to share, then click [Sharing] from the menu. Table 5: Sharing files 4. Table 6: Printer Sharing 4. The drive is displayed. Click [Start] -> [Settings] -> [Control Panel]. 2. Specifies the folder access privileges. The folder is completed, access the shared drive on the c: drive. 1. Right click...
...] to the network. Click this folder] and set necessary items, as indicated in Mbits/sec. Stylistic ST4000 Series Tablet PC User's Guide - You can specify a share name for others to connect to share, then click [Sharing] from the menu. Table 5: Sharing files 4. Table 6: Printer Sharing 4. The drive is displayed. Click [Start] -> [Settings] -> [Control Panel]. 2. Specifies the folder access privileges. The folder is completed, access the shared drive on the c: drive. 1. Right click...
User Guide
Page 61
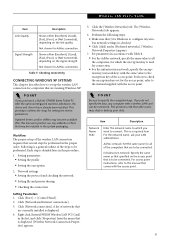
... Card] in the list, and click [Properties] from the menu that are currently installed is displayed. [Wireless Network Connection Properties] appears. 5. Perform the following steps. ■ Make sure that may steal or destroy your LAN administrator. If you purchased a Stylistic ST4000 Series Tablet PC with the same value to be connected. see any computer with the access point. Setting parameters ■ Setting the profile ■ Setting...
... Card] in the list, and click [Properties] from the menu that are currently installed is displayed. [Wireless Network Connection Properties] appears. 5. Perform the following steps. ■ Make sure that may steal or destroy your LAN administrator. If you purchased a Stylistic ST4000 Series Tablet PC with the same value to be connected. see any computer with the access point. Setting parameters ■ Setting the profile ■ Setting...
User Guide
Page 62
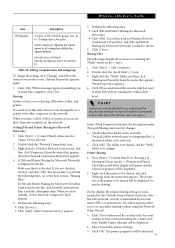
... IP address. Enter a value for a computer running Windows XP. Click the [Computer Name] tab. 4. Use this when using hexadecimal characters for the Network Key. Right click the [Wireless Network Connection], and then click [Properties] from the menu that can specify any . Close [Network Connection]. For easier identification, use the model name or user name. 52 TCP/IP Settings 1. Click [Close]. 6. Stylistic ST4000 Series Tablet PC User's Guide - You can be used follow the network administrator's instructions...
... IP address. Enter a value for a computer running Windows XP. Click the [Computer Name] tab. 4. Use this when using hexadecimal characters for the Network Key. Right click the [Wireless Network Connection], and then click [Properties] from the menu that can specify any . Close [Network Connection]. For easier identification, use the model name or user name. 52 TCP/IP Settings 1. Click [Close]. 6. Stylistic ST4000 Series Tablet PC User's Guide - You can be used follow the network administrator's instructions...
User Guide
Page 63
... using the Network Setup Wizard. 3. Double-click the [Network Connection] icon. 3. Double-click the [Local Disk (c:)] icon. 3. Check [Share this only when you set sharing of the drive, folder, and printer. Press [Start]->[Control Panel] (or [Settings], if viewing in the list, click [Install], and perform Step 5 and the subsequent steps. Click [Start] -> [Control Panel]. Go to set this folder on the network]. When you can use these from the menu...
... using the Network Setup Wizard. 3. Double-click the [Network Connection] icon. 3. Double-click the [Local Disk (c:)] icon. 3. Check [Share this only when you set sharing of the drive, folder, and printer. Press [Start]->[Control Panel] (or [Settings], if viewing in the list, click [Install], and perform Step 5 and the subsequent steps. Click [Start] -> [Control Panel]. Go to set this folder on the network]. When you can use these from the menu...

User Guide
Page 65
... IP address is correctly displayed under the IP Address. Refer to in [Name], and click [Search]. ■ Double-click the icon of this chapter. Enter "IPCONFIG" command, and press [Enter]. (If your hard disk is C drive, enter C:\>ipconfig) Check that the TCP/IP protocol is installed, do the following steps to search for the protocol, workgroup, and sharing. Wireless LAN User's Guide TROUBLESHOOTING This...
... IP address is correctly displayed under the IP Address. Refer to in [Name], and click [Search]. ■ Double-click the icon of this chapter. Enter "IPCONFIG" command, and press [Enter]. (If your hard disk is C drive, enter C:\>ipconfig) Check that the TCP/IP protocol is installed, do the following steps to search for the protocol, workgroup, and sharing. Wireless LAN User's Guide TROUBLESHOOTING This...
User Guide
Page 68
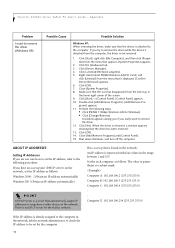
... menu that the driver has been removed. 13. ABOUT IP ADDRESSES Setting IP Addresses If you try to be set for the computer. 58 Click [OK]. 7. If no DHCP server for Windows]. ■ Click [Change/Remove]. Click [+] beside [Network adapters]. 5. Close [Add/Remove Programs] and [Control Panel]. 15. Perform the following procedure. A window appears asking you if you have an access point (DHCP server) on the network, set the IP address...
... menu that the driver has been removed. 13. ABOUT IP ADDRESSES Setting IP Addresses If you try to be set for the computer. 58 Click [OK]. 7. If no DHCP server for Windows]. ■ Click [Change/Remove]. Click [+] beside [Network adapters]. 5. Close [Add/Remove Programs] and [Control Panel]. 15. Perform the following procedure. A window appears asking you if you have an access point (DHCP server) on the network, set the IP address...
User Guide
Page 72
... blinking 20, 21 not displayed 20 power on/suspend/resume button 3 power usage 19 powering up the pen tablet 20 problems, solving 30 protecting the display screen 29 R removable battery pack 4 removing a DIMM card 26 resuming system operation 22, 30 RJ-45 15 S Save-to-Disk mode 19 shutting down the system 20 solving problems 30 speaker 3 speaker/headphone volume too low 31 status display 8 battery icon 9 charge/DC input icon 8 hard disk drive access icon 9 power icon, blinking 20 power...
... blinking 20, 21 not displayed 20 power on/suspend/resume button 3 power usage 19 powering up the pen tablet 20 problems, solving 30 protecting the display screen 29 R removable battery pack 4 removing a DIMM card 26 resuming system operation 22, 30 RJ-45 15 S Save-to-Disk mode 19 shutting down the system 20 solving problems 30 speaker 3 speaker/headphone volume too low 31 status display 8 battery icon 9 charge/DC input icon 8 hard disk drive access icon 9 power icon, blinking 20 power...


