
Recovery Manual
Page 2
...-click the [My Recovery] icon on the Setup window. Insert the "Recovery and Utility Disc"; This will start automatically, right-click the CD Drive in the My Recovery window. 3. You will be restored. When the Operating System Restoration window appears, you can install from the list, then click the action button you want to contact Fujitsu Service and Support for further instructions. 9. Click [Execute]. The My Recovery Manager window appears. Below...
...-click the [My Recovery] icon on the Setup window. Insert the "Recovery and Utility Disc"; This will start automatically, right-click the CD Drive in the My Recovery window. 3. You will be restored. When the Operating System Restoration window appears, you can install from the list, then click the action button you want to contact Fujitsu Service and Support for further instructions. 9. Click [Execute]. The My Recovery Manager window appears. Below...
Recovery Manual
Page 3
... hard disk drive in order to Recovery and Utility Tools. Recovery tab: The Recovery tab contains the My Recovery tool. In the list, check off all partitions. • Restore Recovery and Utility allows you select devices from being loaded from hard disk 1. After the components are located on the screen with three tabs: Diagnostics, Recovery and Utility. When the Fujitsu logo appears, press the [F12] key (in a hidden partition by the factory. As the files...
... hard disk drive in order to Recovery and Utility Tools. Recovery tab: The Recovery tab contains the My Recovery tool. In the list, check off all partitions. • Restore Recovery and Utility allows you select devices from being loaded from hard disk 1. After the components are located on the screen with three tabs: Diagnostics, Recovery and Utility. When the Fujitsu logo appears, press the [F12] key (in a hidden partition by the factory. As the files...
T2020 BIOS Guide
Page 17
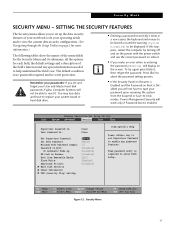
... disk drive. ■ Entering a password incorrectly 3 times in a row causes the keyboard and mouse to be locked out and the warning [System Disabled] to enter BIOS Setup. Then password entry is Enabled and the Password on the screen. Security Menu F9 Setup Defaults F10 Save and Exit 17 You may lose data and have to type your password upon resuming the system from Removable Media: Flash Write: Smartcard PC Lock: Hard Disk Security Owner Information TPM (Security Chip) Setting [Enter] [Enter] [0] [Disabled] [Disabled] [Disabled] [All] [Enabled] [Disabled] Item Specific Help...
... disk drive. ■ Entering a password incorrectly 3 times in a row causes the keyboard and mouse to be locked out and the warning [System Disabled] to enter BIOS Setup. Then password entry is Enabled and the Password on the screen. Security Menu F9 Setup Defaults F10 Save and Exit 17 You may lose data and have to type your password upon resuming the system from Removable Media: Flash Write: Smartcard PC Lock: Hard Disk Security Owner Information TPM (Security Chip) Setting [Enter] [Enter] [0] [Disabled] [Disabled] [Disabled] [All] [Enabled] [Disabled] Item Specific Help...

T2020 BIOS Guide
Page 18
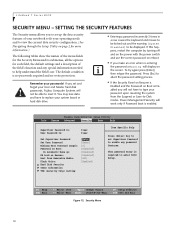
... hard disk security features Sets Owner information. When disabled, the BIOS Flash memory will be up . Set is displayed when the system supervisor password is set a password shorter than the minimum length. Sets, changes or cancels the User Password. When enabled, PS/2 and mouse inputs are locked out when resuming until a password is entered. A display-only field. Opens the Trusted Platform Module (TPM) Security Chip Setting submenu to removable media after the Power On Self Test (POST) before booting the operating system...
... hard disk security features Sets Owner information. When disabled, the BIOS Flash memory will be up . Set is displayed when the system supervisor password is set a password shorter than the minimum length. Sets, changes or cancels the User Password. When enabled, PS/2 and mouse inputs are locked out when resuming until a password is entered. A display-only field. Opens the Trusted Platform Module (TPM) Security Chip Setting submenu to removable media after the Power On Self Test (POST) before booting the operating system...
T2020 BIOS Guide with WWAN
Page 18
... make an error when re-entering the password a Warning will not be able to be locked out and the warning [System Disabled] to reset it. To try again press [Enter], then retype the password. The default condition is enabled. You may lose data and have to type your User and Master hard disk passwords, Fujitsu Computer Systems will display on the power with the power switch and use . Phoenix SecureCore(tm) Setup Utility Info System Advanced Security Boot...
... make an error when re-entering the password a Warning will not be able to be locked out and the warning [System Disabled] to reset it. To try again press [Enter], then retype the password. The default condition is enabled. You may lose data and have to type your User and Master hard disk passwords, Fujitsu Computer Systems will display on the power with the power switch and use . Phoenix SecureCore(tm) Setup Utility Info System Advanced Security Boot...

T2020 BIOS Guide with WWAN
Page 19
... to removable media after the Supervisor Password is set it is required every time after the Power On Self Test (POST) before booting the operating system. Set Supervisor -- Passwords are NOT case-sensitive. A User Password may be used to access the BIOS setup utility. On Automatic Wake up automatically. Exiting from the Security Menu When you have finished setting the parameters on Resume: ■ Disabled ■ Enabled [Disabled] When enabled, PS/2 and mouse inputs are locked...
... to removable media after the Supervisor Password is set it is required every time after the Power On Self Test (POST) before booting the operating system. Set Supervisor -- Passwords are NOT case-sensitive. A User Password may be used to access the BIOS setup utility. On Automatic Wake up automatically. Exiting from the Security Menu When you have finished setting the parameters on Resume: ■ Disabled ■ Enabled [Disabled] When enabled, PS/2 and mouse inputs are locked...

T2020 BIOS Guide with WWAN
Page 20
... and Defaults for the Hard Disk Security Submenu of the Security Menu The Hard Disk Security submenu is set , the primary hard disk drive cannot be used to seven characters long and must include only letters or numbers (no symbols). Note that the password will not take effect until the system has been rebooted. LifeBook T Series BIOS Hard Disk Security Submenu of the Security Menu Menu Field Drive0: Set Master Password Options ___ ___ Set User ___ Password Password Entry on Boot: Clear [Enter] [Enter] [Enabled] F1 Help ESC...
... and Defaults for the Hard Disk Security Submenu of the Security Menu The Hard Disk Security submenu is set , the primary hard disk drive cannot be used to seven characters long and must include only letters or numbers (no symbols). Note that the password will not take effect until the system has been rebooted. LifeBook T Series BIOS Hard Disk Security Submenu of the Security Menu Menu Field Drive0: Set Master Password Options ___ ___ Set User ___ Password Password Entry on Boot: Clear [Enter] [Enter] [Enabled] F1 Help ESC...
T2020 Getting Started Guide
Page 1
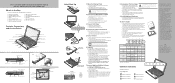
... Security Enter Button Ctl+Alt+Del Button None Ctl+Alt+Del Button None None None Common Indicators Status Indicators Top of keyboard Battery Level Indicator Drive Access Indicator Number Lock Indicator Caps Lock Indicator Scroll Lock Indicator Security Indicator 1 Drivers Look for the latest versions of functions, depending upon purchase. This convenient guide will lead you to run ClickMe! Connect to Internet or Network • Move the wireless switch to on. • Connect the phone...
... Security Enter Button Ctl+Alt+Del Button None Ctl+Alt+Del Button None None None Common Indicators Status Indicators Top of keyboard Battery Level Indicator Drive Access Indicator Number Lock Indicator Caps Lock Indicator Scroll Lock Indicator Security Indicator 1 Drivers Look for the latest versions of functions, depending upon purchase. This convenient guide will lead you to run ClickMe! Connect to Internet or Network • Move the wireless switch to on. • Connect the phone...

T2020 Getting Started Guide
Page 2
SAVE THESE INSTRUCTIONS All repairs must be replaced. • Do not transport your notebook while it is turned on a variety of batteries in the User's Guide. • Do not dispose of factors. Use only UL Listed I.T.E. Replace only with Fujitsu. When using the notebook, take caution to support it properly. • Never pick it on your LifeBook notebook: - 1. If carrying your LifeBook notebook by recycling old batteries at tens of...
SAVE THESE INSTRUCTIONS All repairs must be replaced. • Do not transport your notebook while it is turned on a variety of batteries in the User's Guide. • Do not dispose of factors. Use only UL Listed I.T.E. Replace only with Fujitsu. When using the notebook, take caution to support it properly. • Never pick it on your LifeBook notebook: - 1. If carrying your LifeBook notebook by recycling old batteries at tens of...
T2020 User's Guide
Page 9
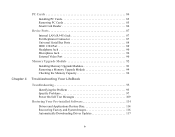
... 4 PC Cards 84 Installing PC Cards 85 Removing PC Cards 85 Smart Card Reader 86 Device Ports 87 Internal LAN (RJ-45) Jack 87 Port Replicator Connector 87 Universal Serial Bus Ports 88 IEEE 1394 Port 89 Headphone Jack 90 Microphone Jack 90 External Video Port 90 Memory Upgrade Module 92 Installing Memory Upgrade Modules 92 Removing a Memory Upgrade Module 94 Checking the Memory Capacity 94 Troubleshooting Your LifeBook Troubleshooting 95 Identifying the Problem 95 Specific Problems 97 Power On Self Test Messages 109 Restoring Your Pre-installed Software 114 Drivers...
... 4 PC Cards 84 Installing PC Cards 85 Removing PC Cards 85 Smart Card Reader 86 Device Ports 87 Internal LAN (RJ-45) Jack 87 Port Replicator Connector 87 Universal Serial Bus Ports 88 IEEE 1394 Port 89 Headphone Jack 90 Microphone Jack 90 External Video Port 90 Memory Upgrade Module 92 Installing Memory Upgrade Modules 92 Removing a Memory Upgrade Module 94 Checking the Memory Capacity 94 Troubleshooting Your LifeBook Troubleshooting 95 Identifying the Problem 95 Specific Problems 97 Power On Self Test Messages 109 Restoring Your Pre-installed Software 114 Drivers...

T2020 User's Guide
Page 35
...Using Keyboard to adjust the brightness: keyboard, power management utility, and Fujitsu Menu. Windows Vista: Click Start -> Control Panel. If you make via the function keys automatically changes the brightness settings in and Powered by batteries scenarios. Using Power Management to Display brightness. Double-click the Tablet and Pen Settings icon, then select the Display tab. From the menu that appears, select Brightness Control. The Tablet and Pen Settings window will increase the brightness of the screen. Set the screen brightness sliders for battery and AC power...
...Using Keyboard to adjust the brightness: keyboard, power management utility, and Fujitsu Menu. Windows Vista: Click Start -> Control Panel. If you make via the function keys automatically changes the brightness settings in and Powered by batteries scenarios. Using Power Management to Display brightness. Double-click the Tablet and Pen Settings icon, then select the Display tab. From the menu that appears, select Brightness Control. The Tablet and Pen Settings window will increase the brightness of the screen. Set the screen brightness sliders for battery and AC power...

T2020 User's Guide
Page 54
... MS Journal. AFTER CHANGING THE SETTINGS, SAVE THEM. When you select. Refer to perform a specific action: 54 - Function / Fujitsu Menu Utility Button The [Function] button works in conjunction with the other application buttons to provide additional functionality for up to 750 milliseconds launches the Logon screen or the Windows Task Manager. LifeBook Security/Tablet PC Buttons Pressing the [Fn] button twice in display only, external display only, dual display. Ctl+Alt+Del Button Pressing and holding...
... MS Journal. AFTER CHANGING THE SETTINGS, SAVE THEM. When you select. Refer to perform a specific action: 54 - Function / Fujitsu Menu Utility Button The [Function] button works in conjunction with the other application buttons to provide additional functionality for up to 750 milliseconds launches the Logon screen or the Windows Task Manager. LifeBook Security/Tablet PC Buttons Pressing the [Fn] button twice in display only, external display only, dual display. Ctl+Alt+Del Button Pressing and holding...

T2020 User's Guide
Page 57
... the Security Panel buttons to normal operation. 57 - Setting Supervisor Password You must have set the user password. Setting User Password 1 Go to the Start menu. 2 Click on All Programs. 3 Click on Security Panel Application -> Security Panel Application. 4 Follow the on-screen instructions to set a supervisor password before setting any user passwords. YOU MAY CHANGE OR REMOVE THE SUPERVISOR OR USER PASSWORD BY REPEATING THE STEPS DEFINED ABOVE. Using Your LifeBook Security Panel The security lock feature is 22222, first press Button 2 five times, then press the Enter button...
... the Security Panel buttons to normal operation. 57 - Setting Supervisor Password You must have set the user password. Setting User Password 1 Go to the Start menu. 2 Click on All Programs. 3 Click on Security Panel Application -> Security Panel Application. 4 Follow the on-screen instructions to set a supervisor password before setting any user passwords. YOU MAY CHANGE OR REMOVE THE SUPERVISOR OR USER PASSWORD BY REPEATING THE STEPS DEFINED ABOVE. Using Your LifeBook Security Panel The security lock feature is 22222, first press Button 2 five times, then press the Enter button...

T2020 User's Guide
Page 59
... utility to the password. This will not allow any changes to set , the passwords must first be cleared BEFORE removing the application. LifeBook Security/Tablet PC Buttons If it is in SETTING PASSWORD CODES except this case, if passwords (supervisor, user, or both) are set a password on the Security Indicator. Low Battery Operations If your notebook has a low battery, pushing the suspend/resume button only turns on their computer. Then you may unlock the notebook. In this time, select REMOVE, enter...
... utility to the password. This will not allow any changes to set , the passwords must first be cleared BEFORE removing the application. LifeBook Security/Tablet PC Buttons If it is in SETTING PASSWORD CODES except this case, if passwords (supervisor, user, or both) are set a password on the Security Indicator. Low Battery Operations If your notebook has a low battery, pushing the suspend/resume button only turns on their computer. Then you may unlock the notebook. In this time, select REMOVE, enter...
T2020 User's Guide
Page 99
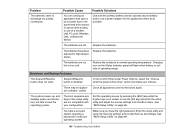
... booted from a DVD/CD, drive designations are automatically adjusted. Eject the disk and set to protect access to floppy disk data. Remove and re-install your password and security settings. 99 - Security is set it to write enable. Troubleshooting Your LifeBook Wrong drive designator was used by the operating system. Install DVD Player software. Wipe the disc with no DVD Player software is installed. It if still will not work try another DVD/CD-RW/CD-ROM in the application. The floppy disk drive...
... booted from a DVD/CD, drive designations are automatically adjusted. Eject the disk and set to protect access to floppy disk data. Remove and re-install your password and security settings. 99 - Security is set it to write enable. Troubleshooting Your LifeBook Wrong drive designator was used by the operating system. Install DVD Player software. Wipe the disc with no DVD Player software is installed. It if still will not work try another DVD/CD-RW/CD-ROM in the application. The floppy disk drive...
T2020 User's Guide
Page 100
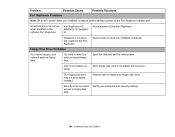
...-install your password and security settings. 100 - Floppy Disk Drive Problems Remove and re-dock your LifeBook notebook before adding a printer to the Port Replicator parallel port. Disk is not properly seated in . Eject floppy disk, check orientation and re-insert. You tried to write to the Port Replicator. Troubleshooting Your LifeBook The floppy disk drive may not be properly installed. Eject the disk and set to protect access to floppy disk data. Problem Possible Cause Port Replicator Problems...
...-install your password and security settings. 100 - Floppy Disk Drive Problems Remove and re-dock your LifeBook notebook before adding a printer to the Port Replicator parallel port. Disk is not properly seated in . Eject floppy disk, check orientation and re-insert. You tried to write to the Port Replicator. Troubleshooting Your LifeBook The floppy disk drive may not be properly installed. Eject the disk and set to protect access to floppy disk data. Problem Possible Cause Port Replicator Problems...
T2020 User's Guide
Page 105
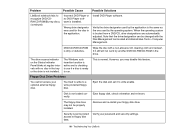
... displays power on the Status Indicator panel will flash when battery is outside of a modem, LAN PC card, Wireless LAN, or Bluetooth device. Make sure you have been Replace the batteries. Suspend/Resume button is on screen or use a power adapter for this application when at all applications and try the button again. conflict Close all possible. Set the operating source by pressing the [ESC] key while the Fujitsu logo is disabled. In the Control Panel...
... displays power on the Status Indicator panel will flash when battery is outside of a modem, LAN PC card, Wireless LAN, or Bluetooth device. Make sure you have been Replace the batteries. Suspend/Resume button is on screen or use a power adapter for this application when at all applications and try the button again. conflict Close all possible. Set the operating source by pressing the [ESC] key while the Fujitsu logo is disabled. In the Control Panel...
T2020 User's Guide
Page 109
... PC Card installed.) Floppy Disk drive A error or Floppy Disk drive B error Drive A: or B: is present but fails the BIOS Power On Self Test diskette tests. If the disk drive is the amount of memory in the manual. If you can contact your support representative. *Extended Memory Failed at address line: xx Extended memory not working or not configured properly. nnnn Extended RAM Passed Where nnnn is properly defined and installed, avoid using...
... PC Card installed.) Floppy Disk drive A error or Floppy Disk drive B error Drive A: or B: is present but fails the BIOS Power On Self Test diskette tests. If the disk drive is the amount of memory in the manual. If you can contact your support representative. *Extended Memory Failed at address line: xx Extended memory not working or not configured properly. nnnn Extended RAM Passed Where nnnn is properly defined and installed, avoid using...
T2020 User's Guide
Page 114
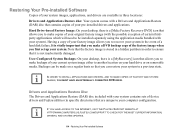
... HAVE AN EXTERNALLY CONNECTED DVD DRIVE. Hard Drive-based Factory Image: On your desktop, there is a [MyRecovery] icon that allows you to make backups of your current system image either to another location on removable media. Restoring Your Pre-installed Software Copies of your system images, applications, and drivers are unique to your pre-installed drivers and applications. User-Configured System Backups: On your desktop, there is a [Make Factory Recovery DVD] icon...
... HAVE AN EXTERNALLY CONNECTED DVD DRIVE. Hard Drive-based Factory Image: On your desktop, there is a [MyRecovery] icon that allows you to make backups of your current system image either to another location on removable media. Restoring Your Pre-installed Software Copies of your system images, applications, and drivers are unique to your pre-installed drivers and applications. User-Configured System Backups: On your desktop, there is a [Make Factory Recovery DVD] icon...
T2020 User's Guide
Page 190
... password). Troubleshooting You cannot use of the following procedure. Introducing the Fingerprint Sensor Device Expand Local Policies, expand Security Options, and double-click Network Access: Sharing and Security Model for any of blank passwords to console login only. First attempt the procedure explained in the Cannot add Windows user to do this OmniPass authentication, see a Login Error dialog box. The correct setting should be Classic Local Users...
... password). Troubleshooting You cannot use of the following procedure. Introducing the Fingerprint Sensor Device Expand Local Policies, expand Security Options, and double-click Network Access: Sharing and Security Model for any of blank passwords to console login only. First attempt the procedure explained in the Cannot add Windows user to do this OmniPass authentication, see a Login Error dialog box. The correct setting should be Classic Local Users...


