Specifications
Page 1
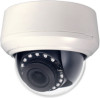
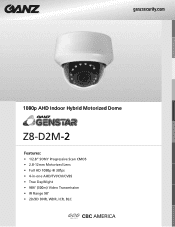
ganzsecurity.com 1080p AHD Indoor Hybrid Motorized Dome Z8-D2M-2 Features: • 1/2.8" SONY Progressive Scan CMOS • 2.8-12mm Motorized Lens • Full HD 1080p @ 30fps • 4-in-one AHD/TVI/CVI/CVBS • True Day/Night • 984' (300m) Video Transmission • IR Range 98' • 2D/3D DNR, WDR, ICR, BLC
ganzsecurity.com 1080p AHD Indoor Hybrid Motorized Dome Z8-D2M-2 Features: • 1/2.8" SONY Progressive Scan CMOS • 2.8-12mm Motorized Lens • Full HD 1080p @ 30fps • 4-in-one AHD/TVI/CVI/CVBS • True Day/Night • 984' (300m) Video Transmission • IR Range 98' • 2D/3D DNR, WDR, ICR, BLC
Specifications
Page 2
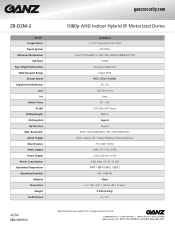
...;2021 CBC AMERICA, All Rights Reserved. 04/21 Resolution Alarm Trigger Max Distance Video Output Power Supply Power Consumption Operating Temperature Operating Humidity Material Dimensions Weight Certifications ganzsecurity.com 1080p AHD Indoor Hybrid IR Motorized Dome Z8-D2M-2 1 / 2.8" Progressive Scan CMOS NTSC/PAL Color:0.001Lux@(F1.2, AGC ON) / B/W:0LUX@(IR LED ON) ≥50dB True Day / Night (ICR) Digital WDR NTSC:1/30s-1/10000s 2D / 3D 2.8-12mm...
...;2021 CBC AMERICA, All Rights Reserved. 04/21 Resolution Alarm Trigger Max Distance Video Output Power Supply Power Consumption Operating Temperature Operating Humidity Material Dimensions Weight Certifications ganzsecurity.com 1080p AHD Indoor Hybrid IR Motorized Dome Z8-D2M-2 1 / 2.8" Progressive Scan CMOS NTSC/PAL Color:0.001Lux@(F1.2, AGC ON) / B/W:0LUX@(IR LED ON) ≥50dB True Day / Night (ICR) Digital WDR NTSC:1/30s-1/10000s 2D / 3D 2.8-12mm...
Z8-D2_VD2 Series Operation Guide
Page 2
Intended Audience This document is used to address practices not related to set and use OSD menu for : z Technical support engineers z Maintenance engineers Symbol ...potentially hazardous situation which , if not avoided, could result in minor or moderate injury. Operation Guide Contents About This Document Purpose This document describes how to personal injury. Indicates a potentially hazardous...death or serious injury. NOTICE is intended for coaxial HD cameras managed by DVR. Symbol Description Indicates an imminently hazardous situation which , if not avoided, may ...
Intended Audience This document is used to address practices not related to set and use OSD menu for : z Technical support engineers z Maintenance engineers Symbol ...potentially hazardous situation which , if not avoided, could result in minor or moderate injury. Operation Guide Contents About This Document Purpose This document describes how to personal injury. Indicates a potentially hazardous...death or serious injury. NOTICE is intended for coaxial HD cameras managed by DVR. Symbol Description Indicates an imminently hazardous situation which , if not avoided, may ...
Z8-D2_VD2 Series Operation Guide
Page 4
Operation Guide Contents Contents About This Document...ii 1 OSD Main Menu ...1 1.1 Procedure ...1 1.1.1 Camera Control over DVR UTC ...1 1.1.2 Camera Control Using Five Buttons...2 1.2 OSD Main Menu Interface ...2 2 OSD Setting ...4 2.1 LENS ...4 2.2 EXPOSURE ...4 2.3 BACKLIGHT ...6 2.3.1 HSBLC ...6 2.3.2 BLC ...9 2.4 WHITE BAL ...11 2.5 Day&Night ...12 2.5.1 D&N EXT ...12 2.5.2 B/W...13 2.5.3 D&N AUTO ...15 2.6 NR ...16 2.7 SPECIAL ...16 2.7.1 CAM TITLE ...17 2.7.2 D-EFFECT ...18 2.7.3 MOTION ...19 2.7.4 PRIVACY ...22 2.7.5 LANGUAGE ...23 2.7.6 DEFECT ...23 2.7.7 RS485 ...29 2.7.8 ADJUST ...
Operation Guide Contents Contents About This Document...ii 1 OSD Main Menu ...1 1.1 Procedure ...1 1.1.1 Camera Control over DVR UTC ...1 1.1.2 Camera Control Using Five Buttons...2 1.2 OSD Main Menu Interface ...2 2 OSD Setting ...4 2.1 LENS ...4 2.2 EXPOSURE ...4 2.3 BACKLIGHT ...6 2.3.1 HSBLC ...6 2.3.2 BLC ...9 2.4 WHITE BAL ...11 2.5 Day&Night ...12 2.5.1 D&N EXT ...12 2.5.2 B/W...13 2.5.3 D&N AUTO ...15 2.6 NR ...16 2.7 SPECIAL ...16 2.7.1 CAM TITLE ...17 2.7.2 D-EFFECT ...18 2.7.3 MOTION ...19 2.7.4 PRIVACY ...22 2.7.5 LANGUAGE ...23 2.7.6 DEFECT ...23 2.7.7 RS485 ...29 2.7.8 ADJUST ...
Z8-D2_VD2 Series Operation Guide
Page 5
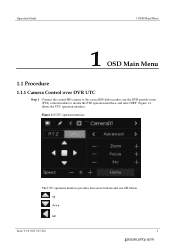
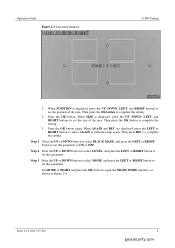
Operation Guide 1 OSD Main Menu 1 OSD Main Menu 1.1 Procedure 1.1.1 Camera Control over DVR UTC Step 1 Connect the coaxial HD camera to the coaxial HD disk recorder, use the DVR pan-tilt-zoom (PTZ) control module to invoke the PTZ operation interface, and select UTC. Figure 1-1 UTC operation interface The UTC operation interface provides four arrow buttons and one OK button. : up : down : left Issue V1.0 (2017-07-28) 1 ganzsecurity.com Figure 1-1 shows the UTC operation interface.
Operation Guide 1 OSD Main Menu 1 OSD Main Menu 1.1 Procedure 1.1.1 Camera Control over DVR UTC Step 1 Connect the coaxial HD camera to the coaxial HD disk recorder, use the DVR pan-tilt-zoom (PTZ) control module to invoke the PTZ operation interface, and select UTC. Figure 1-1 UTC operation interface The UTC operation interface provides four arrow buttons and one OK button. : up : down : left Issue V1.0 (2017-07-28) 1 ganzsecurity.com Figure 1-1 shows the UTC operation interface.
Z8-D2_VD2 Series Operation Guide
Page 6
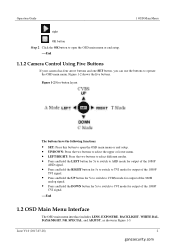
... menu or end setup. ----End 1.1.2 Camera Control Using Five Buttons If your camera has four arrow buttons and one SET button, you can use the buttons to select different modes. z Press and hold the UP button for 5s to switch to AHD mode for output of the 1080P AHD signal. Issue V1.0 (2017-07-28) 2 ganzsecurity.com z Press and hold the RIGHT button for 5s to switch to CVI mode for output...
... menu or end setup. ----End 1.1.2 Camera Control Using Five Buttons If your camera has four arrow buttons and one SET button, you can use the buttons to select different modes. z Press and hold the UP button for 5s to switch to AHD mode for output of the 1080P AHD signal. Issue V1.0 (2017-07-28) 2 ganzsecurity.com z Press and hold the RIGHT button for 5s to switch to CVI mode for output...
Z8-D2_VD2 Series Operation Guide
Page 8
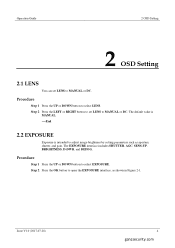
... button to select LENS. The EXPOSURE interface includes SHUTTER, AGC, SENS-UP, BRIGHTNESS, D-DWR, and DEFOG. Step 2 Press the OK button to open the EXPOSURE interface, as aperture, shutter, and gain. The default value is MANUAL. ----End 2.2 EXPOSURE Exposure is intended to adjust image brightness by setting parameters such as shown in Figure 2-1. Operation Guide 2 OSD Setting 2 OSD Setting 2.1 LENS You can set LENS to MANUAL...
... button to select LENS. The EXPOSURE interface includes SHUTTER, AGC, SENS-UP, BRIGHTNESS, D-DWR, and DEFOG. Step 2 Press the OK button to open the EXPOSURE interface, as aperture, shutter, and gain. The default value is MANUAL. ----End 2.2 EXPOSURE Exposure is intended to adjust image brightness by setting parameters such as shown in Figure 2-1. Operation Guide 2 OSD Setting 2 OSD Setting 2.1 LENS You can set LENS to MANUAL...

Z8-D2_VD2 Series Operation Guide
Page 9
Operation Guide Figure 2-1 EXPOSURE interface 2 OSD Setting Step 3 Set exposure parameters. Table 2-1 Exposure parameters Parameter Meaning Setup SHUTTER This parameter is used to adjust image brightness and noise (two factors that aperture and gain remain unchanged. [Setting method] Press the LEFT or RIGHT button. [Default value] AUTO AGC This parameter is used to adjust shutter manually for the desired image brightness. The greater the shutter, the brighter...
Operation Guide Figure 2-1 EXPOSURE interface 2 OSD Setting Step 3 Set exposure parameters. Table 2-1 Exposure parameters Parameter Meaning Setup SHUTTER This parameter is used to adjust image brightness and noise (two factors that aperture and gain remain unchanged. [Setting method] Press the LEFT or RIGHT button. [Default value] AUTO AGC This parameter is used to adjust shutter manually for the desired image brightness. The greater the shutter, the brighter...

Z8-D2_VD2 Series Operation Guide
Page 10
... save the settings and exit the OSD main menu interface. ----End 2.3 BACKLIGHT You can set BACKLIGHT to HSBLC, BLC, or OFF. Operation Guide 2 OSD Setting Parameter D-WDR DEFOG Meaning Setup Overexposure or missing dark details may occur when areas of low brightness and high brightness coexist in foggy environments. [Setting method] Press the LEFT or RIGHT button. [Default value] OFF...
... save the settings and exit the OSD main menu interface. ----End 2.3 BACKLIGHT You can set BACKLIGHT to HSBLC, BLC, or OFF. Operation Guide 2 OSD Setting Parameter D-WDR DEFOG Meaning Setup Overexposure or missing dark details may occur when areas of low brightness and high brightness coexist in foggy environments. [Setting method] Press the LEFT or RIGHT button. [Default value] OFF...

Z8-D2_VD2 Series Operation Guide
Page 11
Set DISPLAY to ON and press the OK button to ON or OFF. Step 2 Press the UP or DOWN button to select DISPLAY, and press the LEFT or RIGHT button to set this parameter to open the area setup interface, as shown in Figure 2-3. Issue V1.0 (2017-07-28) 7 ganzsecurity.com Operation Guide Figure 2-2 HSBLC interface 2 OSD Setting ----End Procedure Step 1 Press the UP or DOWN button to select SELECT, and press the LEFT or RIGHT button to select the desired area.
Set DISPLAY to ON and press the OK button to ON or OFF. Step 2 Press the UP or DOWN button to select DISPLAY, and press the LEFT or RIGHT button to set this parameter to open the area setup interface, as shown in Figure 2-3. Issue V1.0 (2017-07-28) 7 ganzsecurity.com Operation Guide Figure 2-2 HSBLC interface 2 OSD Setting ----End Procedure Step 1 Press the UP or DOWN button to select SELECT, and press the LEFT or RIGHT button to select the desired area.
Z8-D2_VD2 Series Operation Guide
Page 12
... RIGHT button to set this parameter to set the position of the area. Press the OK button. Issue V1.0 (2017-07-28) 8 ganzsecurity.com When POSITION is displayed, press the UP, DOWN, LEFT, and RIGHT buttons to set this parameter. Step 5 Press the UP or DOWN button to select MODE, and press the LEFT or RIGHT button to ON or OFF. Set MODE to NIGHT and...
... RIGHT button to set this parameter to set the position of the area. Press the OK button. Issue V1.0 (2017-07-28) 8 ganzsecurity.com When POSITION is displayed, press the UP, DOWN, LEFT, and RIGHT buttons to set this parameter. Step 5 Press the UP or DOWN button to select MODE, and press the LEFT or RIGHT button to ON or OFF. Set MODE to NIGHT and...

Z8-D2_VD2 Series Operation Guide
Page 13
... main menu interface. ----End 2.3.2 BLC You can select BLC to enable backlight compensation to make the target look clearer when the background is too dark. Press the UP or DOWN button to select RETURN after setup, and press the OK button to return to open the BLC interface, as shown in Figure 2-5. Operation Guide Figure 2-4 NIGHT MODE interface 2 OSD Setting 1.
... main menu interface. ----End 2.3.2 BLC You can select BLC to enable backlight compensation to make the target look clearer when the background is too dark. Press the UP or DOWN button to select RETURN after setup, and press the OK button to return to open the BLC interface, as shown in Figure 2-5. Operation Guide Figure 2-4 NIGHT MODE interface 2 OSD Setting 1.
Z8-D2_VD2 Series Operation Guide
Page 14
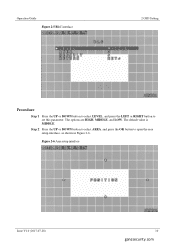
The options are HIGH, MIDDLE, and LOW. Figure 2-6 Area setup interface Issue V1.0 (2017-07-28) 10 ganzsecurity.com Step 2 Press the UP or DOWN button to select AREA, and press the OK button to set this parameter. Operation Guide Figure 2-5 BLC interface 2 OSD Setting Procedure Step 1 Press the UP or DOWN button to select LEVEL, and press the LEFT or RIGHT button to open the area setup interface, as shown in Figure 2-6. The default value is MIDDLE.
The options are HIGH, MIDDLE, and LOW. Figure 2-6 Area setup interface Issue V1.0 (2017-07-28) 10 ganzsecurity.com Step 2 Press the UP or DOWN button to select AREA, and press the OK button to set this parameter. Operation Guide Figure 2-5 BLC interface 2 OSD Setting Procedure Step 1 Press the UP or DOWN button to select LEVEL, and press the LEFT or RIGHT button to open the area setup interface, as shown in Figure 2-6. The default value is MIDDLE.

Z8-D2_VD2 Series Operation Guide
Page 15
... to ATW, AWG, MANUAL WB, OUTDOOR, INDOOR, or AWC-SET. Press the UP or DOWN button to select BLUE, and press the LEFT or RIGHT button to set this parameter. Issue V1.0 (2017-07-28) 11 ganzsecurity.com Step 2 Press the LEFT or RIGHT button to set this parameter. 3. The options are changed. Operation Guide 2 OSD Setting BLC area setup is intended to reproduce...
... to ATW, AWG, MANUAL WB, OUTDOOR, INDOOR, or AWC-SET. Press the UP or DOWN button to select BLUE, and press the LEFT or RIGHT button to set this parameter. Issue V1.0 (2017-07-28) 11 ganzsecurity.com Step 2 Press the LEFT or RIGHT button to set this parameter. 3. The options are changed. Operation Guide 2 OSD Setting BLC area setup is intended to reproduce...
Z8-D2_VD2 Series Operation Guide
Page 20
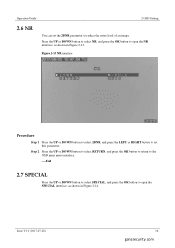
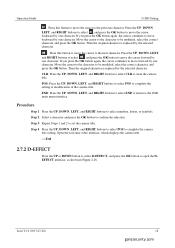
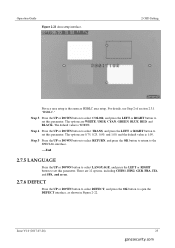
Operation Guide 2 OSD Setting 2.6 NR You can set the 2DNR parameter to set this parameter. Issue V1.0 (2017-07-28) 16 ganzsecurity.com Figure 2-13 NR interface Procedure Step 1 Press the UP or DOWN button to select 2DNR, and press the LEFT or RIGHT button to reduce the noise level of an image. Press the UP or DOWN button...13. Step 2 Press the UP or DOWN button to select RETURN, and press the OK button to return to the OSD main menu interface. ----End 2.7 SPECIAL Press the UP or DOWN button to select SPECIAL, and press the OK button to open the SPECIAL interface, as shown in ...
Operation Guide 2 OSD Setting 2.6 NR You can set the 2DNR parameter to set this parameter. Issue V1.0 (2017-07-28) 16 ganzsecurity.com Figure 2-13 NR interface Procedure Step 1 Press the UP or DOWN button to select 2DNR, and press the LEFT or RIGHT button to reduce the noise level of an image. Press the UP or DOWN button...13. Step 2 Press the UP or DOWN button to select RETURN, and press the OK button to return to the OSD main menu interface. ----End 2.7 SPECIAL Press the UP or DOWN button to select SPECIAL, and press the OK button to open the SPECIAL interface, as shown in ...
Z8-D2_VD2 Series Operation Guide
Page 22
..., LEFT, and RIGHT buttons to select , and press the OK button to move the cursor to the previous character. Open the real-time video interface, which displays the camera title. ----End 2.7.2 D-EFFECT Press the UP or DOWN button to select D-EFFECT, and press the OK button to complete the camera title setting. Operation Guide 2 OSD Setting : Press this button to move forward by one character.
..., LEFT, and RIGHT buttons to select , and press the OK button to move the cursor to the previous character. Open the real-time video interface, which displays the camera title. ----End 2.7.2 D-EFFECT Press the UP or DOWN button to select D-EFFECT, and press the OK button to complete the camera title setting. Operation Guide 2 OSD Setting : Press this button to move forward by one character.
Z8-D2_VD2 Series Operation Guide
Page 23
... 3 Press the UP or DOWN button to select NEG.IMAGE, and press the LEFT or RIGHT button to set this parameter to set this parameter. Set MOTION to ON and press the OK button to ON or OFF. The default value is OFF. Issue V1.0 (2017-07-28) 19 ganzsecurity.com Operation Guide Figure 2-16 D-EFFECT interface 2 OSD Setting Procedure Step 1 Press the...
... 3 Press the UP or DOWN button to select NEG.IMAGE, and press the LEFT or RIGHT button to set this parameter to set this parameter. Set MOTION to ON and press the OK button to ON or OFF. The default value is OFF. Issue V1.0 (2017-07-28) 19 ganzsecurity.com Operation Guide Figure 2-16 D-EFFECT interface 2 OSD Setting Procedure Step 1 Press the...
Z8-D2_VD2 Series Operation Guide
Page 25
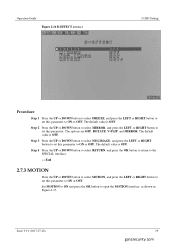
... to open the ALARM interface, as HSBLC area setup. Operation Guide 2 OSD Setting Motion area setup is 3. 5. Press the UP or DOWN button to select RETURN, and press the OK button to return to set this parameter. Figure 2-19 ALARM interface 1. Press the UP or DOWN button to select TIME, and press the LEFT or RIGHT button to set this parameter to set this parameter. The...
... to open the ALARM interface, as HSBLC area setup. Operation Guide 2 OSD Setting Motion area setup is 3. 5. Press the UP or DOWN button to select RETURN, and press the OK button to return to set this parameter. Figure 2-19 ALARM interface 1. Press the UP or DOWN button to select TIME, and press the LEFT or RIGHT button to set this parameter to set this parameter. The...
Z8-D2_VD2 Series Operation Guide
Page 27
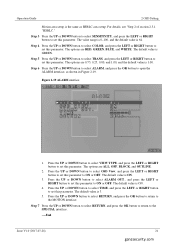
... press the OK button to set this parameter. The options are 0.75, 0.25, 0.00, and 1.00, and the default value is WHITE. The default value is 1.00. Operation Guide Figure 2-21 Area setup interface. 2 OSD Setting Privacy area setup is the same as shown in Figure 2-22. Issue V1.0 (2017-07-28) 23 ganzsecurity.com The options are WHITE, USER, CYAN, GREEN, BLUE...
... press the OK button to set this parameter. The options are 0.75, 0.25, 0.00, and 1.00, and the default value is WHITE. The default value is 1.00. Operation Guide Figure 2-21 Area setup interface. 2 OSD Setting Privacy area setup is the same as shown in Figure 2-22. Issue V1.0 (2017-07-28) 23 ganzsecurity.com The options are WHITE, USER, CYAN, GREEN, BLUE...
Z8-D2_VD2 Series Operation Guide
Page 37
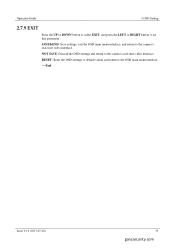
SAVE&END: Save settings, exit the OSD main menu interface, and return to the camera's real-time video interface. NOT SAVE: Discard the OSD settings and return to the camera's real-time video interface. RESET: Reset the OSD settings to default values and return to set this parameter. Operation Guide 2 OSD Setting 2.7.9 EXIT Press the UP or DOWN button to select EXIT, and press the LEFT or RIGHT button to the OSD main menu interface. ----End Issue V1.0 (2017-07-28) 33 ganzsecurity.com
SAVE&END: Save settings, exit the OSD main menu interface, and return to the camera's real-time video interface. NOT SAVE: Discard the OSD settings and return to the camera's real-time video interface. RESET: Reset the OSD settings to default values and return to set this parameter. Operation Guide 2 OSD Setting 2.7.9 EXIT Press the UP or DOWN button to select EXIT, and press the LEFT or RIGHT button to the OSD main menu interface. ----End Issue V1.0 (2017-07-28) 33 ganzsecurity.com
