
GXI Imbedded Intelligence Brochure
Page 2
... maximizes your surveillance capability with a powerful set of the acceptance angle) through the setup "lines" with tone mapping and edge recording to SD card. GXi's Imbedded Intelligence provides analysis of inventory losses. Ideal for retail: counting customers, identifying trends and alerting staff when a group gathers in real-time video analysis tools, WDR with precision. Ganz GXi Technology adds a suite...
... maximizes your surveillance capability with a powerful set of the acceptance angle) through the setup "lines" with tone mapping and edge recording to SD card. GXi's Imbedded Intelligence provides analysis of inventory losses. Ideal for retail: counting customers, identifying trends and alerting staff when a group gathers in real-time video analysis tools, WDR with precision. Ganz GXi Technology adds a suite...
PixelPro GXI Camera Model Comparison
Page 1
..., Embedded Intelligence Technology, Text Overlay, Video ZN-PTZ202XE-XT motion detection support, Built-in auto-tracking license, Up to 432X PTZ, 36X Optical 12X Digital Zoom (Selectable), Pan/Tilt speed control while zooming, Full video recording to SD card, ONVIF (S) Compliant. 1/2.7" CMOS, Full HD 1080p 30fps, H.264 & MJPEG, Embedded Intelligence Technology, Text Overlay, Video ZN-BT662XE-MIR motion detection support, ProSet Remote Zoom & Focus, 34 Built-in IR LEDs for more details. 1080p 1080p...
..., Embedded Intelligence Technology, Text Overlay, Video ZN-PTZ202XE-XT motion detection support, Built-in auto-tracking license, Up to 432X PTZ, 36X Optical 12X Digital Zoom (Selectable), Pan/Tilt speed control while zooming, Full video recording to SD card, ONVIF (S) Compliant. 1/2.7" CMOS, Full HD 1080p 30fps, H.264 & MJPEG, Embedded Intelligence Technology, Text Overlay, Video ZN-BT662XE-MIR motion detection support, ProSet Remote Zoom & Focus, 34 Built-in IR LEDs for more details. 1080p 1080p...
Manual
Page 2
... Series ZN1-D4NMZ43L Installation Guide Precaution Please read this manual. Before applying power to the camera, check the power source to "Environment Condition" on "APPENDIX (A) : SPECIFICATIONS" 03-2014-B 2 Refer to "Electrical Characteristics" on "APPENDIX (A) : SPECIFICATIONS" in environments beyond the specified temperature. Refer to ensure that it is within the specifications. Unauthorized disassembly may cause equipment failure or damage to the unit...
... Series ZN1-D4NMZ43L Installation Guide Precaution Please read this manual. Before applying power to the camera, check the power source to "Environment Condition" on "APPENDIX (A) : SPECIFICATIONS" 03-2014-B 2 Refer to "Electrical Characteristics" on "APPENDIX (A) : SPECIFICATIONS" in environments beyond the specified temperature. Refer to ensure that it is within the specifications. Unauthorized disassembly may cause equipment failure or damage to the unit...

Manual
Page 3
... (B): POWER OVER ETHERNET 24 PoE compatibility ...24 Power Comparison ...24 APPENDIX (C): DIMENSIONS 25 APPENDIX (D): HEXADECIMAL-DECIMAL CONVERSION TABLE 26 REVISION HISTORY 27 03-2014-B 3 CONNECTIONS ...13 6. Custom IP Environment 16 6.2. ActiveX Installation...17 6.2.2. Generic IP Environment 15 6.1.2. Set up network environment 15 6.1.1. Setting the Image Attribute 12 5. Reboot ...19 6.4. FEATURES ...4 2. PACKAGE CONTENTS 5 3. Adjusting Zoom and Focus 11 4.4. PixelPro GXi Series ZN1-D4NMZ43L Installation Guide Table of the camera 10 4.3. Adjusting angle...
... (B): POWER OVER ETHERNET 24 PoE compatibility ...24 Power Comparison ...24 APPENDIX (C): DIMENSIONS 25 APPENDIX (D): HEXADECIMAL-DECIMAL CONVERSION TABLE 26 REVISION HISTORY 27 03-2014-B 3 CONNECTIONS ...13 6. Custom IP Environment 16 6.2. ActiveX Installation...17 6.2.2. Generic IP Environment 15 6.1.2. Set up network environment 15 6.1.1. Setting the Image Attribute 12 5. Reboot ...19 6.4. FEATURES ...4 2. PACKAGE CONTENTS 5 3. Adjusting Zoom and Focus 11 4.4. PixelPro GXi Series ZN1-D4NMZ43L Installation Guide Table of the camera 10 4.3. Adjusting angle...

Manual
Page 4
PixelPro GXi Series ZN1-D4NMZ43L Installation Guide 1. FEATURES Camera SONY EXMOR 1/2.9" 1080p CMOS Image Sensor True Day / Night DC Auto Iris Lens WDR Embedded IR Illuminator Remote Zoom/Focus Control (One Click Focus) Video H.264 Baseline, Main, High Profile(MPEG-4 Part 10/AVC), MJPEG(Motion JPEG) Max 30fps in 1080p Text Overlay Analog Video Output for 3 minutes (only for installation purpose) Network ...
PixelPro GXi Series ZN1-D4NMZ43L Installation Guide 1. FEATURES Camera SONY EXMOR 1/2.9" 1080p CMOS Image Sensor True Day / Night DC Auto Iris Lens WDR Embedded IR Illuminator Remote Zoom/Focus Control (One Click Focus) Video H.264 Baseline, Main, High Profile(MPEG-4 Part 10/AVC), MJPEG(Motion JPEG) Max 30fps in 1080p Text Overlay Analog Video Output for 3 minutes (only for installation purpose) Network ...

Manual
Page 6
PART NAMES ZN1-D4NMZ43L Installation Guide ⑤ ③ ③ ⑥ ② ④ * Models herein and their appearance are subject to change without any prior notice. ① Reset button Use the button to restart the device or to reset it to 'no video output mode: NO video > PAL > NTSC ③ microSD slot Supports up to 6.3. Recommend Class 4 and higher for HD recordings. ④ Power Cable socket Socket for the DC...
PART NAMES ZN1-D4NMZ43L Installation Guide ⑤ ③ ③ ⑥ ② ④ * Models herein and their appearance are subject to change without any prior notice. ① Reset button Use the button to restart the device or to reset it to 'no video output mode: NO video > PAL > NTSC ③ microSD slot Supports up to 6.3. Recommend Class 4 and higher for HD recordings. ④ Power Cable socket Socket for the DC...
Manual
Page 7
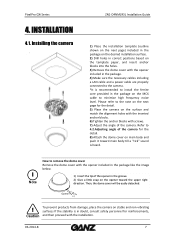
... ! INSTALLATION 4.1. Installing the camera ZN1-D4NMZ43L Installation Guide 1) Place the installation template (outline shown on the next page) included in the package on the desired installation surface. 2) Drill holes in correct positions based on the template paper, and insert anchor blocks into the holes. 3) Remove the dome cover with the opener included in the package. 4) Make sure the necessary cables including a LAN cable and a power cable...
... ! INSTALLATION 4.1. Installing the camera ZN1-D4NMZ43L Installation Guide 1) Place the installation template (outline shown on the next page) included in the package on the desired installation surface. 2) Drill holes in correct positions based on the template paper, and insert anchor blocks into the holes. 3) Remove the dome cover with the opener included in the package. 4) Make sure the necessary cables including a LAN cable and a power cable...
Manual
Page 10
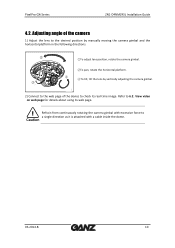
... lens by vertically adjusting the camera gimbal. 회전 2) Connect to the web page of the device to check its web page. ! Caution 03-2014-B 10 Refer to a single direction as it is attached with excessive force to 6.2. View video on web page for details about using its real-time image. PixelPro GXi Series ZN1-D4NMZ43L Installation Guide 4.2. Refrain from continuously rotating the camera gimbal with a cable inside the dome...
... lens by vertically adjusting the camera gimbal. 회전 2) Connect to the web page of the device to check its web page. ! Caution 03-2014-B 10 Refer to a single direction as it is attached with excessive force to 6.2. View video on web page for details about using its real-time image. PixelPro GXi Series ZN1-D4NMZ43L Installation Guide 4.2. Refrain from continuously rotating the camera gimbal with a cable inside the dome...
Manual
Page 11
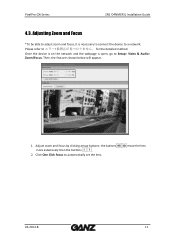
Please refer to Setup> Video & Audio> Zoom/Focus. Once the device is on the network and the webpage is necessary to connect the device to automatically set the lens. PixelPro GXi Series ZN1-D4NMZ43L Installation Guide 4.3. Adjust zoom and focus by clicking arrow buttons: the buttons more extensively than the buttons . 2. Adjusting Zoom and Focus *To be able to adjust zoom and focus, it is open, go to for the detailed method. Then, the features shown below will appear. 1. move the lens 03-2014-B 11 Click One Click Focus to a network.
Please refer to Setup> Video & Audio> Zoom/Focus. Once the device is on the network and the webpage is necessary to connect the device to automatically set the lens. PixelPro GXi Series ZN1-D4NMZ43L Installation Guide 4.3. Adjust zoom and focus by clicking arrow buttons: the buttons more extensively than the buttons . 2. Adjusting Zoom and Focus *To be able to adjust zoom and focus, it is open, go to for the detailed method. Then, the features shown below will appear. 1. move the lens 03-2014-B 11 Click One Click Focus to a network.
Manual
Page 12
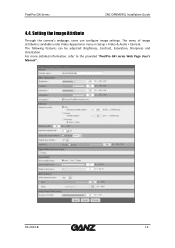
The following features can configure image settings. Setting the Image Attribute Through the camera's webpage, users can be adjusted: Brightness, Contrast, Saturation, Sharpness and Orientation For more detailed information, refer to the provided "PixelPro GXi series Web Page User's Manual". 03-2014-B 12 The menu of image attribute is available under Video Appearance menu in Setup > Video & Audio > Camera. PixelPro GXi Series ZN1-D4NMZ43L Installation Guide 4.4.
The following features can configure image settings. Setting the Image Attribute Through the camera's webpage, users can be adjusted: Brightness, Contrast, Saturation, Sharpness and Orientation For more detailed information, refer to the provided "PixelPro GXi series Web Page User's Manual". 03-2014-B 12 The menu of image attribute is available under Video Appearance menu in Setup > Video & Audio > Camera. PixelPro GXi Series ZN1-D4NMZ43L Installation Guide 4.4.
Manual
Page 13
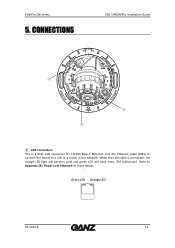
PixelPro GXi Series FUNCTION 5. CONNECTIONS ZN1-D4NMZ43L Installation Guide ① ③ ② ① LAN Connection This is connected, the orange LED light will become solid and green LED will blink every 250 millisecond. Refer to a hub or a router in the network. When the LAN cable is a RJ45 LAN connector for more details. Green LED Orange LED 03-2014-B 13 Use the Ethernet cable (RJ45) to connect the device to Appendix (B). Power over Ethernet for 10/100 Base-T Ethernet.
PixelPro GXi Series FUNCTION 5. CONNECTIONS ZN1-D4NMZ43L Installation Guide ① ③ ② ① LAN Connection This is connected, the orange LED light will become solid and green LED will blink every 250 millisecond. Refer to a hub or a router in the network. When the LAN cable is a RJ45 LAN connector for more details. Green LED Orange LED 03-2014-B 13 Use the Ethernet cable (RJ45) to connect the device to Appendix (B). Power over Ethernet for 10/100 Base-T Ethernet.
Manual
Page 14
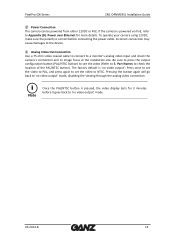
... to set the video to check the location of the PAL/NTSC button). Part Names to NTSC. The factory default is powered via PoE, refer to a monitor's analog video input and check the camera's connection and its image focus at the installation site. Power over Ethernet for 3 minutes before connecting the power cable. Be sure to press the output configuration button (PAL/NTSC button) to see the video (Refer to 'no video output' mode, disabling the viewing through...
... to set the video to check the location of the PAL/NTSC button). Part Names to NTSC. The factory default is powered via PoE, refer to a monitor's analog video input and check the camera's connection and its image focus at the installation site. Power over Ethernet for 3 minutes before connecting the power cable. Be sure to press the output configuration button (PAL/NTSC button) to see the video (Refer to 'no video output' mode, disabling the viewing through...
Manual
Page 15
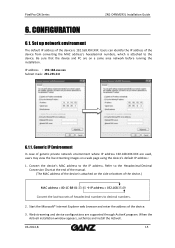
... are used, users may view the live streaming images on a same area network before running the installation. IP address : 192.168.xxx.xxx Subnet mask: 255.255.0.0 6.1.1. Be sure that the device and PC are supported through ActiveX program. Generic IP Environment In case of the device from converting the MAC address's hexadecimal numbers, which is 192.168.XXX.XXX. CONFIGURATION 6.1. Start the Microsoft® Internet Explorer web browser and...
... are used, users may view the live streaming images on a same area network before running the installation. IP address : 192.168.xxx.xxx Subnet mask: 255.255.0.0 6.1.1. Be sure that the device and PC are supported through ActiveX program. Generic IP Environment In case of the device from converting the MAC address's hexadecimal numbers, which is 192.168.XXX.XXX. CONFIGURATION 6.1. Start the Microsoft® Internet Explorer web browser and...

Manual
Page 16
... unique numbers for the setting 4. Refer to complete the modification. 03-2014-B 16 Click "Setup" to the image above for the device. Find the device from the IPAdminTool's list and highlight the device's name. 2. IP Setup window appears. 3. PixelPro GXi Series ZN1-D4NMZ43L Installation Guide 6.1.2. Custom IP Environment IPAdminTool is a management tool, which automatically scans all of IP Address, which includes network configurations, firmware update, device...
... unique numbers for the setting 4. Refer to complete the modification. 03-2014-B 16 Click "Setup" to the image above for the device. Find the device from the IPAdminTool's list and highlight the device's name. 2. IP Setup window appears. 3. PixelPro GXi Series ZN1-D4NMZ43L Installation Guide 6.1.2. Custom IP Environment IPAdminTool is a management tool, which automatically scans all of IP Address, which includes network configurations, firmware update, device...
Manual
Page 17
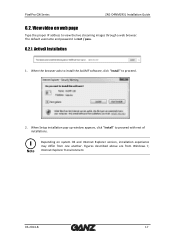
... GXi Series ZN1-D4NMZ43L Installation Guide 6.2. When the browser asks to install the AxUMF software, click "Install" to proceed with rest of installations. i Note Depending on web page Type the proper IP address to view the live streaming images through a web browser. View video on system OS and Internet Explorer version, installation experience may differ from Windows 7, Internet Explorer 9 environment. 03-2014-B 17 When Setup installation pop-up window appears, click "Install" to proceed. 2. The default username and password is root / pass. 6.2.1. ActiveX Installation...
... GXi Series ZN1-D4NMZ43L Installation Guide 6.2. When the browser asks to install the AxUMF software, click "Install" to proceed with rest of installations. i Note Depending on web page Type the proper IP address to view the live streaming images through a web browser. View video on system OS and Internet Explorer version, installation experience may differ from Windows 7, Internet Explorer 9 environment. 03-2014-B 17 When Setup installation pop-up window appears, click "Install" to proceed. 2. The default username and password is root / pass. 6.2.1. ActiveX Installation...
Manual
Page 18
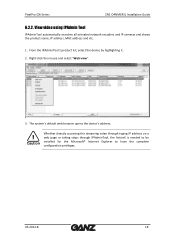
... etc. 1. Caution Whether directly accessing the streaming video through typing IP address on a web page or taking steps through IPAdminTool, the ActiveX is needed to be installed for the Microsoft® Internet Explorer to have the complete configuration privileges. 03-2014-B 18 Right-click the mouse and select "Web view". 3. From the IPAdminTool's product list, select the device by highlighting it. 2. PixelPro GXi Series ZN1-D4NMZ43L Installation Guide 6.2.2.
... etc. 1. Caution Whether directly accessing the streaming video through typing IP address on a web page or taking steps through IPAdminTool, the ActiveX is needed to be installed for the Microsoft® Internet Explorer to have the complete configuration privileges. 03-2014-B 18 Right-click the mouse and select "Web view". 3. From the IPAdminTool's product list, select the device by highlighting it. 2. PixelPro GXi Series ZN1-D4NMZ43L Installation Guide 6.2.2.
Manual
Page 19
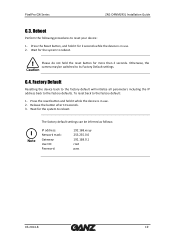
... while the device is in use . 2. Caution 6.4. Factory Default Resetting the device back to the factory default will initialize all parameters including the IP address back to reboot. ! Release the button after 10 seconds. 3. Wait for 2 seconds while the device is in use . 2. The factory default settings can be switched to reboot. PixelPro GXi Series ZN1-D4NMZ43L Installation Guide 6.3. Press the Reset button, and hold the reset button for the system to...
... while the device is in use . 2. Caution 6.4. Factory Default Resetting the device back to the factory default will initialize all parameters including the IP address back to reboot. ! Release the button after 10 seconds. 3. Wait for 2 seconds while the device is in use . 2. The factory default settings can be switched to reboot. PixelPro GXi Series ZN1-D4NMZ43L Installation Guide 6.3. Press the Reset button, and hold the reset button for the system to...

Manual
Page 20
... required for the device with safe mode when there is Safe Mode? PixelPro GXi Series ZN1-D4NMZ43L Installation Guide 6.5. To restore the device from Safe Mode Browse The messages above , ensure that the firmware means the firmware file for system booting are two types of firmware files when you receive a firmware folder from i your booting system files. Then, you need to recover your system from...
... required for the device with safe mode when there is Safe Mode? PixelPro GXi Series ZN1-D4NMZ43L Installation Guide 6.5. To restore the device from Safe Mode Browse The messages above , ensure that the firmware means the firmware file for system booting are two types of firmware files when you receive a firmware folder from i your booting system files. Then, you need to recover your system from...
Manual
Page 21
PixelPro GXi Series ZN1-D4NMZ43L Installation Guide i Note There is another method to 'IPAdminTool User's Manual.pdf' for safe mode, you want to update the firmware for the detailed procedure. Please refer to update firmware, which is still at safe mode after trying to update firmware, please contact your local agency to get further assistance. * Firmware update for safe mode itself: If you should upload a firmware file with the following file name: GXi-SAFEMODE.~~~.enc. 03-2014-B 21 i Note If your device is using IPAdminTool.
PixelPro GXi Series ZN1-D4NMZ43L Installation Guide i Note There is another method to 'IPAdminTool User's Manual.pdf' for safe mode, you want to update the firmware for the detailed procedure. Please refer to update firmware, which is still at safe mode after trying to update firmware, please contact your local agency to get further assistance. * Firmware update for safe mode itself: If you should upload a firmware file with the following file name: GXi-SAFEMODE.~~~.enc. 03-2014-B 21 i Note If your device is using IPAdminTool.
Manual
Page 22
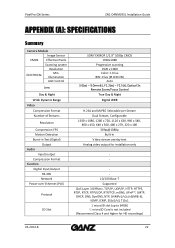
PixelPro GXi Series ZN1-D4NMZ43L Installation Guide APPENDIX (A): SPECIFICATIONS Summary Camera Module Image Sensor CMOS Effective Pixels ELECTRICAL Scanning system Resolution Min. Illumination AGC Control Lens Day & Night Wide Dynamic Range Video Compression Format Number of Streams Resolution Compression FPS Motion Detection Burnt-in Video stream overlay text Analog video output for installation only - 10/100 Base-T Supported QoS Layer 3 DiffServ, TCP/IP, UDP/IP, HTTP, HTTPS, RTSP, RTCP, RTP/UDP, RTP/TCP, mDNS, UPnP™, SMTP, DHCP...
PixelPro GXi Series ZN1-D4NMZ43L Installation Guide APPENDIX (A): SPECIFICATIONS Summary Camera Module Image Sensor CMOS Effective Pixels ELECTRICAL Scanning system Resolution Min. Illumination AGC Control Lens Day & Night Wide Dynamic Range Video Compression Format Number of Streams Resolution Compression FPS Motion Detection Burnt-in Video stream overlay text Analog video output for installation only - 10/100 Base-T Supported QoS Layer 3 DiffServ, TCP/IP, UDP/IP, HTTP, HTTPS, RTSP, RTCP, RTP/UDP, RTP/TCP, mDNS, UPnP™, SMTP, DHCP...
