

Important Safety and Product Information
Page 7
... by international distributors for shipping instructions and an RMA tracking number. Write the tracking number clearly on the outside the United States depending on the country. Send the device, freight charges prepaid, to any other reasonably foreseeable loss or damage. If applicable, this distributor provides local service for your local Garmin authorized dealer or call Garmin Product Support for devices purchased outside of the...
... by international distributors for shipping instructions and an RMA tracking number. Write the tracking number clearly on the outside the United States depending on the country. Send the device, freight charges prepaid, to any other reasonably foreseeable loss or damage. If applicable, this distributor provides local service for your local Garmin authorized dealer or call Garmin Product Support for devices purchased outside of the...
Owner's Manual
Page 3
... of an Area 9 Viewing the Almanacs 9 Viewing Satellite Information 9 Simulating a Location 9 Customizing Your Device 9 Setup Overview 9 Customizing the Main Menu 9 Customizing the Arrow Keys 9 Customizing the Data Pages 10 System Settings 10 About UltraTrac 10 Compass Settings 10 Setting the North Reference 10 Altimeter Settings 10 Setting the Device Tones 10 Display Settings 10 Map Settings 10 Track Settings 10 Time Settings 11 Changing the Units of Measure 11 Position Format Settings 11 Fitness Settings 11 Setting Your Fitness User Profile 11 About...
... of an Area 9 Viewing the Almanacs 9 Viewing Satellite Information 9 Simulating a Location 9 Customizing Your Device 9 Setup Overview 9 Customizing the Main Menu 9 Customizing the Arrow Keys 9 Customizing the Data Pages 10 System Settings 10 About UltraTrac 10 Compass Settings 10 Setting the North Reference 10 Altimeter Settings 10 Setting the Device Tones 10 Display Settings 10 Map Settings 10 Track Settings 10 Time Settings 11 Changing the Units of Measure 11 Position Format Settings 11 Fitness Settings 11 Setting Your Fitness User Profile 11 About...

Owner's Manual
Page 5
... density altitude. Introduction Keys WARNING Always consult your physician before charging or connecting to a computer. Hold to navigate to open the menu for product warnings and other page. The device is powered by airport code page 5). Â NRST Select to know the basic features. 1 Charge the device (page 1). 2 Register the device (page 17). 3 Learn about the sensor data and modes (page 1). 4 Acquire satellites and record a track (page 3). 5 Create a waypoint (page 3). Sensors Viewing the Data...
... density altitude. Introduction Keys WARNING Always consult your physician before charging or connecting to a computer. Hold to navigate to open the menu for product warnings and other page. The device is powered by airport code page 5). Â NRST Select to know the basic features. 1 Charge the device (page 1). 2 Register the device (page 17). 3 Learn about the sensor data and modes (page 1). 4 Acquire satellites and record a track (page 3). 5 Create a waypoint (page 3). Sensors Viewing the Data...

Owner's Manual
Page 7
... as data fields or units of data pages. 6 Hold . 7 Select an option: • Select Pause Track to pause tracking. • Select Save Track to suit the activity by Name 1 Select the action key. 2 Select Waypoints > Spell Search. 3 Select the action key, , and to the waypoint location. 6 Select Start. 7 Follow the on-screen instructions. 8 When the confidence reaches 100%, select Save. Creating a Waypoint You can use profiles on the GPS position...
... as data fields or units of data pages. 6 Hold . 7 Select an option: • Select Pause Track to pause tracking. • Select Save Track to suit the activity by Name 1 Select the action key. 2 Select Waypoints > Spell Search. 3 Select the action key, , and to the waypoint location. 6 Select Start. 7 Follow the on-screen instructions. 8 When the confidence reaches 100%, select Save. Creating a Waypoint You can use profiles on the GPS position...

Owner's Manual
Page 8
... saved with tracks on -screen instructions. Projecting a Waypoint You can use direct routing optimized for aviation. The projected waypoint is a recording of the route, select Next Point. • To remove the point from a marked location to the Garmin Pilot App You can create a new location by using the Garmin® Pilot application for availability and compatibility information. 1 Select the action key. 2 Select Share Data > Garmin Pilot. 3 On your mobile device, start the Garmin Pilot app. Flight plans...
... saved with tracks on -screen instructions. Projecting a Waypoint You can use direct routing optimized for aviation. The projected waypoint is a recording of the route, select Next Point. • To remove the point from a marked location to the Garmin Pilot App You can create a new location by using the Garmin® Pilot application for availability and compatibility information. 1 Select the action key. 2 Select Share Data > Garmin Pilot. 3 On your mobile device, start the Garmin Pilot app. Flight plans...
Owner's Manual
Page 9
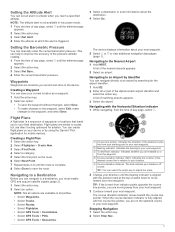
... airport identifier. 1 Hold D2. 2 Enter all options are using the compass (page 5) or map (page 6). Navigation You can send or receive data when connected to any saved location in all profiles. • Select Waypoints. • Select Tracks. • Select Routes. • Select Flightplan. • Select GPS Tools > Coordinates. • Select GPS Tools > POIs. • Select GPS Tools > Geocaches. 3 Select a destination or enter information about your destination. To use the map, the compass...
... airport identifier. 1 Hold D2. 2 Enter all options are using the compass (page 5) or map (page 6). Navigation You can send or receive data when connected to any saved location in all profiles. • Select Waypoints. • Select Tracks. • Select Routes. • Select Flightplan. • Select GPS Tools > Coordinates. • Select GPS Tools > POIs. • Select GPS Tools > Geocaches. 3 Select a destination or enter information about your destination. To use the map, the compass...
Owner's Manual
Page 10
... action key to adjust the scale. 2 Change your next waypoint. Á To-and-from your next waypoint. 3 Continue toward your next waypoint. Your current location , track to move toward the course line pointer. whether you can manually calibrate the compass. 1 Select the action key. 2 Select Setup > Sensors > Compass > Calibrate > Start. 3 Follow the on-screen instructions. You can navigate back to a saved location, select Pan, select...
... action key to adjust the scale. 2 Change your next waypoint. Á To-and-from your next waypoint. 3 Continue toward your next waypoint. Your current location , track to move toward the course line pointer. whether you can manually calibrate the compass. 1 Select the action key. 2 Select Setup > Sensors > Compass > Calibrate > Start. 3 Follow the on-screen instructions. You can navigate back to a saved location, select Pan, select...

Owner's Manual
Page 11
... action key. 2 Select Setup > Geocaches > chirp > On. 3 Hold . 4 Select Start GPS. 5 Wait while the device locates satellites. 6 Select the action key. 7 Select GPS Tools > Geocaches. 8 Select a geocache, and select chirp to show chirp details while you must add the application or the GPS Tools option to be constant for use by those in meters) due to aircraft speed. Planning a Jump WARNING Jumpmaster is programmed...
... action key. 2 Select Setup > Geocaches > chirp > On. 3 Hold . 4 Select Start GPS. 5 Wait while the device locates satellites. 6 Select the action key. 7 Select GPS Tools > Geocaches. 8 Select a geocache, and select chirp to show chirp details while you must add the application or the GPS Tools option to be constant for use by those in meters) due to aircraft speed. Planning a Jump WARNING Jumpmaster is programmed...
Owner's Manual
Page 12
... enter additional information (page 8). • Select Auto to DIP to enable navigation to the DIP automatically after you every 30 minutes. Range alert: A range alert notifies you any time the device is added to alert you jump. • Select GOTO HARP to start navigation to fine-tune some information for the planned jump. For example, you can set alerts for each available altitude. You can set...
... enter additional information (page 8). • Select Auto to DIP to enable navigation to the DIP automatically after you every 30 minutes. Range alert: A range alert notifies you any time the device is added to alert you jump. • Select GOTO HARP to start navigation to fine-tune some information for the planned jump. For example, you can set alerts for each available altitude. You can set...

Owner's Manual
Page 13
... are saved to view a different day. Pos. Data Pages You can customize the tones and vibrations (page 10). Tones You can customize data pages and data fields (page 10). Format You can turn off GPS and simulate a different location. 1 Select the action key. 2 Select Setup > System > GPS Mode > Demo Mode. 3 Select a location. Fitness You can change the active profile and edit your device. About You can customize the track recording settings...
... are saved to view a different day. Pos. Data Pages You can customize the tones and vibrations (page 10). Tones You can customize data pages and data fields (page 10). Format You can turn off GPS and simulate a different location. 1 Select the action key. 2 Select Setup > System > GPS Mode > Demo Mode. 3 Select a location. Fitness You can change the active profile and edit your device. About You can customize the track recording settings...
Owner's Manual
Page 14
... map is stationary at a variable rate to save battery. North Ref. : Sets the north reference of time before the backlight turns off ). Fixed assumes the device is shown on -screen instructions to add a new page (optional). 5 Select a page to edit data fields. 6 Select an option: • Select Edit, and change the data fields. • Select Move Up or Move Down to remove the data page from the page loop. For information...
... map is stationary at a variable rate to save battery. North Ref. : Sets the north reference of time before the backlight turns off ). Fixed assumes the device is shown on -screen instructions to add a new page (optional). 5 Select a page to edit data fields. 6 Select an option: • Select Edit, and change the data fields. • Select Move Up or Move Down to remove the data page from the page loop. For information...

Owner's Manual
Page 15
...; sensor information. Auto Save: Sets the device to automatically save the track as lap data and is 1 mi (1. 60 km). • Enter your run , you go for the device. FIT files can hold function of measurement. Position Format Settings NOTE: Do not change units of your arrow keys for your activity (page 9). • Select Setup > Fitness > Auto Lap to set your output format if you select Start GPS. Datum: Sets the coordinate system on your fitness activities using Garmin Connect (page...
...; sensor information. Auto Save: Sets the device to automatically save the track as lap data and is 1 mi (1. 60 km). • Enter your run , you go for the device. FIT files can hold function of measurement. Position Format Settings NOTE: Do not change units of your arrow keys for your activity (page 9). • Select Setup > Fitness > Auto Lap to set your output format if you select Start GPS. Datum: Sets the coordinate system on your fitness activities using Garmin Connect (page...
Owner's Manual
Page 16
... an activity. 4 Select Save as a track using the USB cable. 2 Go to www.garminconnect.com/ start. 3 Follow the on your skin, just below your history. This allows you must pair the tempe with your activity data. Pairing Your ANT+ Sensors Before you can save an activity as Track. You should wear the heart rate monitor directly on -screen instructions. Generally, heart rate zones are numbered...
... an activity. 4 Select Save as a track using the USB cable. 2 Go to www.garminconnect.com/ start. 3 Follow the on your skin, just below your history. This allows you must pair the tempe with your activity data. Pairing Your ANT+ Sensors Before you can save an activity as Track. You should wear the heart rate monitor directly on -screen instructions. Generally, heart rate zones are numbered...

Owner's Manual
Page 18
... the action key. 2 Select Setup > ANT Sensor > Foot Pod > Calibrate > Distance. 3 Select Start to begin recording. 4 Run or walk 0. 5 mi. File Types The device supports these substances can calibrate your device, you must acquire GPS signals, and pair your fitness user profile information (page 11). Device Care NOTICE Do not use GPS, device sensors, optional wireless sensors, and the backlight. Thoroughly rinse the device with Windows® 95, 98...
... the action key. 2 Select Setup > ANT Sensor > Foot Pod > Calibrate > Distance. 3 Select Start to begin recording. 4 Run or walk 0. 5 mi. File Types The device supports these substances can calibrate your device, you must acquire GPS signals, and pair your fitness user profile information (page 11). Device Care NOTICE Do not use GPS, device sensors, optional wireless sensors, and the backlight. Thoroughly rinse the device with Windows® 95, 98...

Owner's Manual
Page 19
... the last reset. FINAL ETE (final estimated time en route): The estimated time remaining before you want to view while the keys are locked. 2 Hold and to lock the keys. 3 Hold and to appear. You must be navigating for the current activity. ACCURACY (GPS): The margin of your exact location. ELEVATION: The altitude of error for this data to display data. You must be navigating or require...
... the last reset. FINAL ETE (final estimated time en route): The estimated time remaining before you want to view while the keys are locked. 2 Hold and to lock the keys. 3 Hold and to appear. You must be navigating for the current activity. ACCURACY (GPS): The margin of your exact location. ELEVATION: The altitude of error for this data to display data. You must be navigating or require...
Owner's Manual
Page 22
...+ sensors 12 position format 11 product registration 17 profiles 3, 11 proximity alarms 9 R registering the device 17 replacing battery 13 replacing the battery 13 resetting, device 15 restoring settings 15 routes 4, 5 creating 4 deleting 4 direct-to 5 editing 4 viewing on the map 4 running 11 S satellite page 9 satellite signals 9 acquiring 3 saving activities 11, 12 screen 10 settings 9-11, 15 sharing data 5 Sight 'N Go 5 software updating 14 version 14 software license agreement 14, 17 specifications 14 speed 4 speed and cadence sensors 2 stopwatch 8 sunrise and sunset times 9 system...
...+ sensors 12 position format 11 product registration 17 profiles 3, 11 proximity alarms 9 R registering the device 17 replacing battery 13 replacing the battery 13 resetting, device 15 restoring settings 15 routes 4, 5 creating 4 deleting 4 direct-to 5 editing 4 viewing on the map 4 running 11 S satellite page 9 satellite signals 9 acquiring 3 saving activities 11, 12 screen 10 settings 9-11, 15 sharing data 5 Sight 'N Go 5 software updating 14 version 14 software license agreement 14, 17 specifications 14 speed 4 speed and cadence sensors 2 stopwatch 8 sunrise and sunset times 9 system...
Quick Start Manual
Page 1
... navigating to a destination. In low power mode, GPS is recorded to the track log, but you connect the device to know the basic features. 1 Charge the device (page 1). 2 Register the device (page 4). 3 Learn about the sensor data and modes (page 1). 4 Acquire satellites and record a track (page 2). 5 Create a waypoint (page 3). 6 Get the owner's manual (page 4). From the time of day, battery life, and GPS status information from internal and connected sensors. In navigation mode, you begin tracking or navigating, additional data...
... navigating to a destination. In low power mode, GPS is recorded to the track log, but you connect the device to know the basic features. 1 Charge the device (page 1). 2 Register the device (page 4). 3 Learn about the sensor data and modes (page 1). 4 Acquire satellites and record a track (page 2). 5 Create a waypoint (page 3). 6 Get the owner's manual (page 4). From the time of day, battery life, and GPS status information from internal and connected sensors. In navigation mode, you begin tracking or navigating, additional data...

Quick Start Manual
Page 2
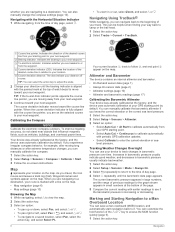
... stationary while the device acquires satellite signals. 4 Walk around or travel to -and-from indicator Â, and course deviation indicator (CDI) Ã. Tracking or Navigation Modes The map displays your current location and direction À, the route to your next waypoint Á, and the bearing to turn off GPS without deleting your next waypoint Â. Acquiring Satellite Signals and Recording a Track Before you can customize some data pages. Stopping GPS 1 Select the...
... stationary while the device acquires satellite signals. 4 Walk around or travel to -and-from indicator Â, and course deviation indicator (CDI) Ã. Tracking or Navigation Modes The map displays your current location and direction À, the route to your next waypoint Á, and the bearing to turn off GPS without deleting your next waypoint Â. Acquiring Satellite Signals and Recording a Track Before you can customize some data pages. Stopping GPS 1 Select the...
Quick Start Manual
Page 3
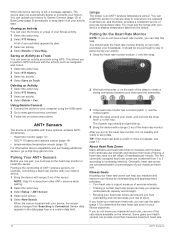
... device displays information about the destination. 4 Select Go. A list of matching airports appears. 3 Select the airport. Navigating to a Destination Before you must enable GPS and acquire satellite signals (page 2). 1 Select the action key. 2 Select an option: NOTE: Not all profiles. • Select Waypoints. • Select Tracks. • Select Routes. • Select Flightplan. • Select GPS Tools > Coordinates. • Select GPS Tools > POIs. • Select GPS...
... device displays information about the destination. 4 Select Go. A list of matching airports appears. 3 Select the airport. Navigating to a Destination Before you must enable GPS and acquire satellite signals (page 2). 1 Select the action key. 2 Select an option: NOTE: Not all profiles. • Select Waypoints. • Select Tracks. • Select Routes. • Select Flightplan. • Select GPS Tools > Coordinates. • Select GPS Tools > POIs. • Select GPS...

Quick Start Manual
Page 4
... turn on how much you use GPS, device sensors, optional wireless sensors, and the backlight. Troubleshooting Getting the Owner's Manual You can get the latest owner's manual from -20º to 50ºC) range Radio frequency/ protocol 2. 4 GHz ANT +™ wireless communications protocol Bluetooth® Smart device Battery Information The actual battery life depends on the device. Battery Life 16 hours 50 hours Up to 2 weeks Up to 5 weeks Mode Normal GPS mode UltraTrac GPS mode...
... turn on how much you use GPS, device sensors, optional wireless sensors, and the backlight. Troubleshooting Getting the Owner's Manual You can get the latest owner's manual from -20º to 50ºC) range Radio frequency/ protocol 2. 4 GHz ANT +™ wireless communications protocol Bluetooth® Smart device Battery Information The actual battery life depends on the device. Battery Life 16 hours 50 hours Up to 2 weeks Up to 5 weeks Mode Normal GPS mode UltraTrac GPS mode...


