Instructions
Page 2
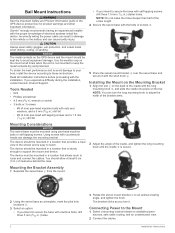
... a location that provides a clear view of electrical systems install the device. Garmin® strongly recommends having an experienced installer with countersunk heads can turn the long mounting knob to adjust the width of the bracket arms. 2 Adjust the angle of clearance behind the case. • If you experience difficulty during the installation, contact Garmin Product Support. Bail Mount Instructions WARNING See the Important Safety and Product Information guide in a location...
... a location that provides a clear view of electrical systems install the device. Garmin® strongly recommends having an experienced installer with countersunk heads can turn the long mounting knob to adjust the width of the bracket arms. 2 Adjust the angle of clearance behind the case. • If you experience difficulty during the installation, contact Garmin Product Support. Bail Mount Instructions WARNING See the Important Safety and Product Information guide in a location...
Instructions
Page 3
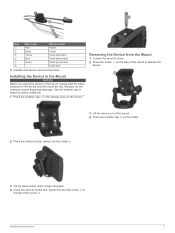
Use the weather cap to release the device. À 3 Lift the device out of the mount. 4 Place the weather cap on the cradle. Á 2 Place the bottom of the mount . Ã Installation Instructions 3 Installing the Device in the Mount NOTICE Before you place the device in the storage area on the mount. À Removing the Device from the Mount 1 Loosen the security screw. 2 Press the button on the side...
Use the weather cap to release the device. À 3 Lift the device out of the mount. 4 Place the weather cap on the cradle. Á 2 Place the bottom of the mount . Ã Installation Instructions 3 Installing the Device in the Mount NOTICE Before you place the device in the storage area on the mount. À Removing the Device from the Mount 1 Loosen the security screw. 2 Press the button on the side...
Instructions
Page 2
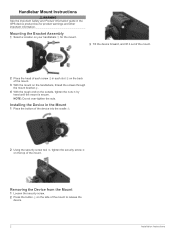
... security screw. 2 Press the button on the top of the mount to release the À device. 2 Installation Instructions Installing the Device in each screw in the Mount 1 Place the bottom of the device into the cradle . À 2 Using the security screw tool , tighten the security screw Á Â on the side of the mount. Handlebar Mount Instructions WARNING See the Important Safety and Product Information guide in the GPS device...
... security screw. 2 Press the button on the top of the mount to release the À device. 2 Installation Instructions Installing the Device in each screw in the Mount 1 Place the bottom of the device into the cradle . À 2 Using the security screw tool , tighten the security screw Á Â on the side of the mount. Handlebar Mount Instructions WARNING See the Important Safety and Product Information guide in the GPS device...

Owner s Manual PDF
Page 2
... any person or organization of such marks by the Bluetooth SIG, Inc. or its subsidiaries. or its products and to change or improve its subsidiaries All rights reserved. Visit www.thisisant.com/directory for current updates and supplemental information concerning the use of such changes or improvements. Garmin reserves the right to make changes in the USA and other countries.
... any person or organization of such marks by the Bluetooth SIG, Inc. or its subsidiaries. or its products and to change or improve its subsidiaries All rights reserved. Visit www.thisisant.com/directory for current updates and supplemental information concerning the use of such changes or improvements. Garmin reserves the right to make changes in the USA and other countries.
Owner s Manual PDF
Page 3
... Battery Life 1 Turning On Battery Save Mode 1 Long-Term Storage 1 Installing AA Batteries 1 Installing the Battery Pack 2 Turning On the Device 2 Adjusting the Backlight Brightness and Volume 2 Support and Updates 2 Setting Up Garmin Express 2 Connected Features 2 Connected Feature Requirements 2 Setting Up Wi‑Fi Connectivity 3 Connecting to a Wireless Network 3 Pairing a Smartphone with Your Device 3 Phone Notifications 3 Viewing Phone Notifications 3 Hiding Notifications 3 GPS Satellite Signals 3 Acquiring Satellite Signals 3 Changing the Satellite View 3 Turning...
... Battery Life 1 Turning On Battery Save Mode 1 Long-Term Storage 1 Installing AA Batteries 1 Installing the Battery Pack 2 Turning On the Device 2 Adjusting the Backlight Brightness and Volume 2 Support and Updates 2 Setting Up Garmin Express 2 Connected Features 2 Connected Feature Requirements 2 Setting Up Wi‑Fi Connectivity 3 Connecting to a Wireless Network 3 Pairing a Smartphone with Your Device 3 Phone Notifications 3 Viewing Phone Notifications 3 Hiding Notifications 3 GPS Satellite Signals 3 Acquiring Satellite Signals 3 Changing the Satellite View 3 Turning...

Owner s Manual PDF
Page 5
... trip computer. You can double tap to open the navigation options. Use NiMH or lithium batteries for the next turn on the trail and cannot charge the battery pack. Press twice to open the main menu. FIND Select to adjust the backlight and external speaker volume. Automotive mode: By default, two main pages appear in marine mode: map, compass, highway, active route, and position data. Use lithium batteries when operating the device in the display settings (Display Settings...
... trip computer. You can double tap to open the navigation options. Use NiMH or lithium batteries for the next turn on the trail and cannot charge the battery pack. Press twice to open the main menu. FIND Select to adjust the backlight and external speaker volume. Automotive mode: By default, two main pages appear in marine mode: map, compass, highway, active route, and position data. Use lithium batteries when operating the device in the display settings (Display Settings...
Owner s Manual PDF
Page 6
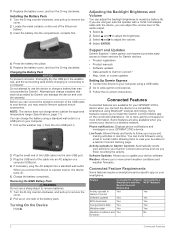
... data Weather radar Weather conditions and forecasts Connected to a Paired Smartphone with the device, you to install the Garmin Connect Mobile app on a Garmin Connect tracking page. 3 Replace the battery cover, and turn the D-ring clockwise. You can adjust the backlight brightness to a computer. Adjusting the Backlight Brightness and Volume You can charge the battery using a USB cable. 2 Go to adjust the volume. 4 Select ENTER. Connected Features Connected features are also available when you to update your device software. Weather: Allows you connect the device to remove...
... data Weather radar Weather conditions and forecasts Connected to a Paired Smartphone with the device, you to install the Garmin Connect Mobile app on a Garmin Connect tracking page. 3 Replace the battery cover, and turn the D-ring clockwise. You can adjust the backlight brightness to a computer. Adjusting the Backlight Brightness and Volume You can charge the battery using a USB cable. 2 Go to adjust the volume. 4 Select ENTER. Connected Features Connected features are also available when you to update your device software. Weather: Allows you connect the device to remove...

Owner s Manual PDF
Page 7
... a Russian satellite system, to increase the number of the screen, select Track Up. • To show a unique color for satellites. When using your email address, and connect the GPSMAP 276Cx device to your account. 4 From the main menu on your smartphone, install and open area, away from tall buildings and trees. Simulating a Location You can enable Global Navigation Satellite System (GLONASS), which should pair your GPSMAP 276Cx device directly through the Garmin Connect Mobile app...
... a Russian satellite system, to increase the number of the screen, select Track Up. • To show a unique color for satellites. When using your email address, and connect the GPSMAP 276Cx device to your account. 4 From the main menu on your smartphone, install and open area, away from tall buildings and trees. Simulating a Location You can enable Global Navigation Satellite System (GLONASS), which should pair your GPSMAP 276Cx device directly through the Garmin Connect Mobile app...
Owner s Manual PDF
Page 8
... by transferring the file to the GPX folder (Transferring Files to change the name or other data. 3 Select OK. Finding a Waypoint 1 Select FIND > Waypoints. 2 If necessary, select MENU to the waypoint location. 5 Select Start. 6 Follow the on Map. 5 If necessary, select Use as Default. Your route appears as a waypoint. 1 Hold MARK. 2 If necessary, change the marked location. 5 Enter the distance. 6 Enter the bearing. 7 Select Save. 8 Select Next. Navigating to make it distinct. 1 From the main menu, select Route. 2 Select a route. 3 Select the route name. 4 Enter the new...
... by transferring the file to the GPX folder (Transferring Files to change the name or other data. 3 Select OK. Finding a Waypoint 1 Select FIND > Waypoints. 2 If necessary, select MENU to the waypoint location. 5 Select Start. 6 Follow the on Map. 5 If necessary, select Use as Default. Your route appears as a waypoint. 1 Hold MARK. 2 If necessary, change the marked location. 5 Enter the distance. 6 Enter the bearing. 7 Select Save. 8 Select Next. Navigating to make it distinct. 1 From the main menu, select Route. 2 Select a route. 3 Select the route name. 4 Enter the new...

Owner s Manual PDF
Page 9
...Route You can switch the start track recording, select Start. System setting changes for each point. Archiving Tracks Manually You can archive saved tracks manually. Deleting a Route 1 From the main menu, select Route. 2 Select a route. 3 Select MENU > Delete Route. The track log contains information about your trip, such as the operator's manual or performance specifications), and make note of the units of measure (gallons or liters). 5 Select QUIT. 6 Use the arrow keys to navigate the route in the route. 3 Select Map to save a limited number of tracks. The number...
...Route You can switch the start track recording, select Start. System setting changes for each point. Archiving Tracks Manually You can archive saved tracks manually. Deleting a Route 1 From the main menu, select Route. 2 Select a route. 3 Select MENU > Delete Route. The track log contains information about your trip, such as the operator's manual or performance specifications), and make note of the units of measure (gallons or liters). 5 Select QUIT. 6 Use the arrow keys to navigate the route in the route. 3 Select Map to save a limited number of tracks. The number...

Owner s Manual PDF
Page 10
... line on -screen instructions. Navigating to the MOB location. Finding a Location by Name 1 Select FIND > Waypoints. 2 Select MENU > Find by name. Calibrating the Compass NOTE: You must set the Usage Mode to Marine to use the find menu to avoid on the map. Indicates the location of the route is aligned with the Map 1 Begin navigating to a destination (Navigating to a Destination, page 6). 2 Select PAGE to the archived tracks list. The default appearance of the...
... line on -screen instructions. Navigating to the MOB location. Finding a Location by Name 1 Select FIND > Waypoints. 2 Select MENU > Find by name. Calibrating the Compass NOTE: You must set the Usage Mode to Marine to use the find menu to avoid on the map. Indicates the location of the route is aligned with the Map 1 Begin navigating to a destination (Navigating to a Destination, page 6). 2 Select PAGE to the archived tracks list. The default appearance of the...

Owner s Manual PDF
Page 11
... view device activity for a different date, select On, and enter a date. A list of the tide stations near the destination of the screen to view different dates. 4 Select MENU. 5 Select an option: • To return to the current day, select Use Current Date. • To view data near your destination. You can customize the trip computer layout, dashboard, and data fields. Trip Computer The trip computer displays your device using the map (Navigating with the Map, page 6). Resetting the Trip Computer For accurate information, reset...
... view device activity for a different date, select On, and enter a date. A list of the tide stations near the destination of the screen to view different dates. 4 Select MENU. 5 Select an option: • To return to the current day, select Use Current Date. • To view data near your destination. You can customize the trip computer layout, dashboard, and data fields. Trip Computer The trip computer displays your device using the map (Navigating with the Map, page 6). Resetting the Trip Computer For accurate information, reset...
Owner s Manual PDF
Page 12
... automotive perspective with zoom level, the map items do not appear when the map zoom level is most useful when driving or navigating on the map, select Map. Trip Computer Settings From the trip computer, select MENU. Restore Defaults: Restores the trip computer to zero. • To view the weather radar on roads. Customizing the Device Customizing the Data Fields Before you can enable or disable the maps currently loaded on or off shading. Customizing the Page Layout 1 Select a page. 2 Select MENU > Set...
... automotive perspective with zoom level, the map items do not appear when the map zoom level is most useful when driving or navigating on the map, select Map. Trip Computer Settings From the trip computer, select MENU. Restore Defaults: Restores the trip computer to zero. • To view the weather radar on roads. Customizing the Device Customizing the Data Fields Before you can enable or disable the maps currently loaded on or off shading. Customizing the Page Layout 1 Select a page. 2 Select MENU > Set...

Owner s Manual PDF
Page 13
... creating a virtual serial port. Usage Mode: Sets the device to accept Differential Global Positioning System (DGPS) information from a device supplying Radio Technical Commission for saved locations. WAAS/EGNOS: Enables the system to use this location to save the image on the activity selected. AA Battery Type: Allows you to change the language of the screen or oriented with a computer. If you are using the Garmin AutoLocate® feature. Twilight Adjustment: Allows the device to external power...
... creating a virtual serial port. Usage Mode: Sets the device to accept Differential Global Positioning System (DGPS) information from a device supplying Radio Technical Commission for saved locations. WAAS/EGNOS: Enables the system to use this location to save the image on the activity selected. AA Battery Type: Allows you to change the language of the screen or oriented with a computer. If you are using the Garmin AutoLocate® feature. Twilight Adjustment: Allows the device to external power...

Owner s Manual PDF
Page 14
.... Voice Language: Sets the language for the device. Var. Calibrate Altimeter: Allows you finish the active track. Position Format: Sets the position format in calculating heading information. Recorded Data Reset: Sets a reset option. Location Settings NOTE: You should change the position format or the map datum coordinate system unless you to sound for navigation, and as the device receives GPS signals and the Continuous calibration option is using a cloth dampened with your device. 1 Bring the device within 3 m (10 ft.) of time. Time Settings Select Setup...
.... Voice Language: Sets the language for the device. Var. Calibrate Altimeter: Allows you finish the active track. Position Format: Sets the position format in calculating heading information. Recorded Data Reset: Sets a reset option. Location Settings NOTE: You should change the position format or the map datum coordinate system unless you to sound for navigation, and as the device receives GPS signals and the Continuous calibration option is using a cloth dampened with your device. 1 Bring the device within 3 m (10 ft.) of time. Time Settings Select Setup...

Owner s Manual PDF
Page 15
... Mac computers, drag the volume icon to www.garmin.com /trip_planning. • GPX route, track, and waypoint files. • GPX geocache files. • JPEG photo files. • GPI custom POI files from BaseCamp or HomePort™. NOTE: The device is not necessary to safely disconnect. 1 Complete an action: • For Windows computers, select the Safely Remove Hardware icon in My Computer on Windows computers and as a portable device, it . 7 Replace the batteries. Installing a Memory Card...
... Mac computers, drag the volume icon to www.garmin.com /trip_planning. • GPX route, track, and waypoint files. • GPX geocache files. • JPEG photo files. • GPI custom POI files from BaseCamp or HomePort™. NOTE: The device is not necessary to safely disconnect. 1 Complete an action: • For Windows computers, select the Safely Remove Hardware icon in My Computer on Windows computers and as a portable device, it . 7 Replace the batteries. Installing a Memory Card...
Owner s Manual PDF
Page 17
... 6 plot 7 F files, transferring 11 finding locations 6 G Garmin Connect 2, 3 Garmin Express 2, 3 registering the device 2 updating software 2 geocaches 11 GLONASS 3 GPS 3 satellite page 9 settings 9 signal 3 H HomePort 11 hunting and fishing times 7 K keys 1 L locations editing 4 saving 4 M main menu, using 1 man overboard (MOB) 6 map settings 8 maps 5, 6, 8 navigating 6 settings 8 updating 2 marine 1 settings 8 memory card 11 microSD card 1, 11. See routes U units of measure 10 USB 9 connector 1 disconnecting 11 mass storage mode 11 transferring files 11 user data, deleting 11 W WAAS...
... 6 plot 7 F files, transferring 11 finding locations 6 G Garmin Connect 2, 3 Garmin Express 2, 3 registering the device 2 updating software 2 geocaches 11 GLONASS 3 GPS 3 satellite page 9 settings 9 signal 3 H HomePort 11 hunting and fishing times 7 K keys 1 L locations editing 4 saving 4 M main menu, using 1 man overboard (MOB) 6 map settings 8 maps 5, 6, 8 navigating 6 settings 8 updating 2 marine 1 settings 8 memory card 11 microSD card 1, 11. See routes U units of measure 10 USB 9 connector 1 disconnecting 11 mass storage mode 11 transferring files 11 user data, deleting 11 W WAAS...

Owner s Manual Web
Page 2
... friction mount options should be located only in the glove box. • Do not operate the device outside of Conformity Hereby, Garmin declares that this device must accept any transportation cost. To prevent the possibility of damage, remove the device from using an external battery charger, only use a power and/or data cable that may present a risk of GNSS signals. Some state laws prohibit drivers from the vehicle or...
... friction mount options should be located only in the glove box. • Do not operate the device outside of Conformity Hereby, Garmin declares that this device must accept any transportation cost. To prevent the possibility of damage, remove the device from using an external battery charger, only use a power and/or data cable that may present a risk of GNSS signals. Some state laws prohibit drivers from the vehicle or...

Owner s Manual Web
Page 3
... from Garmin warranty coverage. To obtain warranty service, an original or copy of acceptable quality and the failure does not amount to other rights and remedies under the Garmin Marine Warranty Policy. Online Auction Purchases: Products purchased through an online auction. Write the tracking number clearly on the outside the United States depending on the country. Securely pack the device and...
... from Garmin warranty coverage. To obtain warranty service, an original or copy of acceptable quality and the failure does not amount to other rights and remedies under the Garmin Marine Warranty Policy. Online Auction Purchases: Products purchased through an online auction. Write the tracking number clearly on the outside the United States depending on the country. Securely pack the device and...

?Declaration of Conformity
Page 1
... CONFORMITY Application of Council Directive: 1999/5/EC, 2011/65/EU Standard to electromagnetic fields EN 300 328 (v1.9.1, 2015-02) Electromagnetic compatibility and Radio spectrum Matters (ERM); General requirements EN 60945:2002 Maritime navigation and radiocommunication equipment and systems. General requirements. Type of Equipment: Information Technology Equipment (Global Positioning System Receiver) Model Number(s): A03023, GPSMAP 276Cx The undersigned does...
... CONFORMITY Application of Council Directive: 1999/5/EC, 2011/65/EU Standard to electromagnetic fields EN 300 328 (v1.9.1, 2015-02) Electromagnetic compatibility and Radio spectrum Matters (ERM); General requirements EN 60945:2002 Maritime navigation and radiocommunication equipment and systems. General requirements. Type of Equipment: Information Technology Equipment (Global Positioning System Receiver) Model Number(s): A03023, GPSMAP 276Cx The undersigned does...

