User Manual
Page 1
Model and attachements are subject to change DESIGN EASY JUICER GASTROBACK® INSTRUCTIONS FOR USE AND INCLUDES RECIPES Art.-Nr. 40118 Read all provided instructions before first usage!
Model and attachements are subject to change DESIGN EASY JUICER GASTROBACK® INSTRUCTIONS FOR USE AND INCLUDES RECIPES Art.-Nr. 40118 Read all provided instructions before first usage!
User Manual
Page 2
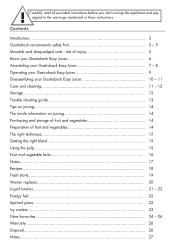
...Know your Gastroback Easy Juicer 6 Assembling your Gastroback Easy Juicer 7 - 8 Operating your Gastroback Easy Juicer 9 Disassembling your Gastroback Easy Juicer 10 - 11 Care and cleaning 11 - 12 Storage...12 Trouble shooting guide 13 Tips on juicing 14 The inside information on juicing 14 ...Using the pulp 15 Fruit and vegetable facts 16 Notes...17 Recipes...18 Fresh starts...19 Vitamin replacer 20 Liquid lunches 21 - 22 Energy fuel...22 Spirited juices 22 Icy coolers...23 Fibre favourites 24 - 26 Warranty...26 Disposal...26 Notes...27 ! Carefully read all provided instructions...
...Know your Gastroback Easy Juicer 6 Assembling your Gastroback Easy Juicer 7 - 8 Operating your Gastroback Easy Juicer 9 Disassembling your Gastroback Easy Juicer 10 - 11 Care and cleaning 11 - 12 Storage...12 Trouble shooting guide 13 Tips on juicing 14 The inside information on juicing 14 ...Using the pulp 15 Fruit and vegetable facts 16 Notes...17 Recipes...18 Fresh starts...19 Vitamin replacer 20 Liquid lunches 21 - 22 Energy fuel...22 Spirited juices 22 Icy coolers...23 Fibre favourites 24 - 26 Warranty...26 Disposal...26 Notes...27 ! Carefully read all provided instructions...
User Manual
Page 3
..., moisture in a clean, frost free environment where it is properly and completely assembled before operating and save for thus use the appliance to avoid overheating. • Do not operate the Easy Juicer continuously on heavy loads for your fingers or foreign objects. Always use the food pusher provided. • Do not touch the small cutting blades in operational...
..., moisture in a clean, frost free environment where it is properly and completely assembled before operating and save for thus use the appliance to avoid overheating. • Do not operate the Easy Juicer continuously on heavy loads for your fingers or foreign objects. Always use the food pusher provided. • Do not touch the small cutting blades in operational...

User Manual
Page 4
...and repair to an authorised specialised reparation shop. • Only use the appliance if it was excessively loaded. You should also install ...clean the line cord or the motorblock in the dishwasher, poor liquids over the appliance or douse or dip it directly without using the appliance. • Do not use units, spare parts...appliance or units of the appliance. Always use the food pusher provided. • Always uncoil the line...effectiveness of the juicer. Remove such dirt immediately and operate according to the instructions ´Care and cleaning` before installing the appliance....
...and repair to an authorised specialised reparation shop. • Only use the appliance if it was excessively loaded. You should also install ...clean the line cord or the motorblock in the dishwasher, poor liquids over the appliance or douse or dip it directly without using the appliance. • Do not use units, spare parts...appliance or units of the appliance. Always use the food pusher provided. • Always uncoil the line...effectiveness of the juicer. Remove such dirt immediately and operate according to the instructions ´Care and cleaning` before installing the appliance....

User Manual
Page 5
... of the juicer. • Only use the provided food pusher to push food through the feed chute. • Never hold your face or other body parts over the feed chute when the motor is running completely before pulling the plug out of the feed chute. • The blades on the edge and handle with care when cleaning with...
... of the juicer. • Only use the provided food pusher to push food through the feed chute. • Never hold your face or other body parts over the feed chute when the motor is running completely before pulling the plug out of the feed chute. • The blades on the edge and handle with care when cleaning with...
User Manual
Page 6
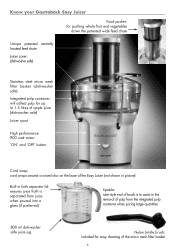
Know your Gastroback Easy Juicer Food pusher: for pushing whole fruit and vegetables down the patented wide feed chute Unique patented centrally located feed chute Juicer cover: (dishwasher safe) Stainless steel micro mesh filter basket (dishwasher safe) Integrated pulp container: will collect pulp for up to 1.5 litres of apple juice (dishwasher safe) Juicer spout High performance 900 watt motor 'ON...
Know your Gastroback Easy Juicer Food pusher: for pushing whole fruit and vegetables down the patented wide feed chute Unique patented centrally located feed chute Juicer cover: (dishwasher safe) Stainless steel micro mesh filter basket (dishwasher safe) Integrated pulp container: will collect pulp for up to 1.5 litres of apple juice (dishwasher safe) Juicer spout High performance 900 watt motor 'ON...
User Manual
Page 7
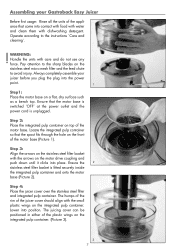
...instructions ´Care and cleaning´. ! Step 4: Place the juicer cover over the stainless steel filter and integrated pulp container. Lower into place. The juicing cover can be positioned in either of the juicer... of the appliance that come into contact with food with water and clean them with the small plastic wings on the ...basket with care and do not use any force. Assembling your juicer before you plug the plug into the power point. 1 Step1: Place the motor base on a flat, dry surface such as a bench top. Always completely assemble your Gastroback Easy Juicer...
...instructions ´Care and cleaning´. ! Step 4: Place the juicer cover over the stainless steel filter and integrated pulp container. Lower into place. The juicing cover can be positioned in either of the juicer... of the appliance that come into contact with food with water and clean them with the small plastic wings on the ...basket with care and do not use any force. Assembling your juicer before you plug the plug into the power point. 1 Step1: Place the motor base on a flat, dry surface such as a bench top. Always completely assemble your Gastroback Easy Juicer...
User Manual
Page 8
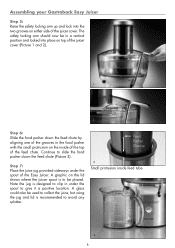
... is to be placed. Assembling your Gastroback Easy Juicer Step 5: Raise the safety locking arm up and lock into place on top of the juicer cover (Picture 1 and 2). 1 2 Step 6: Slide the food pusher down the feed chute (Picture 3). The safety locking arm should now be used to collect the juice, but using the jug and lid is designed...
... is to be placed. Assembling your Gastroback Easy Juicer Step 5: Raise the safety locking arm up and lock into place on top of the juicer cover (Picture 1 and 2). 1 2 Step 6: Slide the food pusher down the feed chute (Picture 3). The safety locking arm should now be used to collect the juice, but using the jug and lid is designed...
User Manual
Page 9
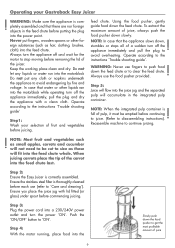
...instructions ´Trouble shooting guide` Step1: Wash your Gastroback Easy Juicer ! NOTE: When the integrated pulp container is completely assembled and that water or other foreign substances (such as these will fit into the juice jug and the separated pulp will flow into the feed chute whole. NOTE: In case that the appliance slows down the food pusher...;Care and cleaning`). Operate according to continue juicing. ! Step 5: Juice will accumulate in the feed chute before commencing juicing. Step 2: Ensure the Easy Juicer is thoroughly cleaned before removing the lid ...
...instructions ´Trouble shooting guide` Step1: Wash your Gastroback Easy Juicer ! NOTE: When the integrated pulp container is completely assembled and that water or other foreign substances (such as these will fit into the juice jug and the separated pulp will flow into the feed chute whole. NOTE: In case that the appliance slows down the food pusher...;Care and cleaning`). Operate according to continue juicing. ! Step 5: Juice will accumulate in the feed chute before commencing juicing. Step 2: Ensure the Easy Juicer is thoroughly cleaned before removing the lid ...
User Manual
Page 10
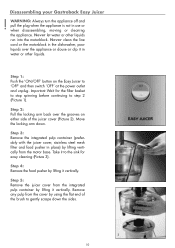
... appliance or douse or dip it vertically. Step 5: 2 Remove the juicer cover from the integrated pulp container by lifting it to the sink for the filter basket to stop spinning before continuing to step 2 (Picture 1). ...food pusher in use or when disassembling, moving or cleaning the appliance. Never clean the line cord or the motorblock in water or other liquids run into the motorblock. Take it vertically. Move the locking arm down the sides. 3 10 Remove any pulp from the motor base. Disassembling your Gastroback Easy Juicer ! Step 4: Remove the food pusher by using...
... appliance or douse or dip it vertically. Step 5: 2 Remove the juicer cover from the integrated pulp container by lifting it to the sink for the filter basket to stop spinning before continuing to step 2 (Picture 1). ...food pusher in use or when disassembling, moving or cleaning the appliance. Never clean the line cord or the motorblock in water or other liquids run into the motorblock. Take it vertically. Move the locking arm down the sides. 3 10 Remove any pulp from the motor base. Disassembling your Gastroback Easy Juicer ! Step 4: Remove the food pusher by using...
User Manual
Page 11
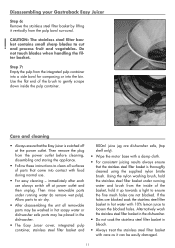
... hot water with food during normal use always switch off at power outlet and then unplug. Allow parts to loosen the blocked holes. CAUTION: The stainless steel filter basket contains small sharp blades to remove wet pulp). immediately after each use . • For easy cleaning - Using the nylon washing brush, hold it up towards a light to clean all removable parts may be...
... hot water with food during normal use always switch off at power outlet and then unplug. Allow parts to loosen the blocked holes. CAUTION: The stainless steel filter basket contains small sharp blades to remove wet pulp). immediately after each use . • For easy cleaning - Using the nylon washing brush, hold it up towards a light to clean all removable parts may be...

User Manual
Page 12
... Operate according to clean the motor base. Do not use . • If discolouration does occur, the plastic parts can be soaked in a frost-free, clean and dry location where it may occur with strongly coloured fruit and vegetables. Never use force when using or cleaning the juicer or the stainless steel... excessively loads (such as down-fall, voltage, heat, humidity). Please store the juicer in 10% lemon juice and water or they can be cleaned with cleaning soak the stainless steel filter basket in water or any other liquid. • Discolouration of the plastic may clog ...
... Operate according to clean the motor base. Do not use . • If discolouration does occur, the plastic parts can be soaked in a frost-free, clean and dry location where it may occur with strongly coloured fruit and vegetables. Never use force when using or cleaning the juicer or the stainless steel... excessively loads (such as down-fall, voltage, heat, humidity). Please store the juicer in 10% lemon juice and water or they can be cleaned with cleaning soak the stainless steel filter basket in water or any other liquid. • Discolouration of the plastic may clog ...
User Manual
Page 13
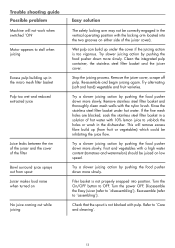
...hard) vegetable and fruit varieties. Disassemble the Easy Juicer (refer to ´Care and cleaning`. 13 Stop the juicing process. Re-assemble and begin juicing again. Remove stainless steel filter basket and thoroughly clean mesh walls with pulp. Turn the On/OFF ...juice flow. Try slower juicing action by pushing the food pusher down more slowly. Filer basket is not blocked with the nylon brush. Trouble shooting guide Possible problem Machine will remove excess fibre build up (from spout Juicer makes loud noise when turned on No juice coming out while juicing...
...hard) vegetable and fruit varieties. Disassemble the Easy Juicer (refer to ´Care and cleaning`. 13 Stop the juicing process. Re-assemble and begin juicing again. Remove stainless steel filter basket and thoroughly clean mesh walls with pulp. Turn the On/OFF ...juice flow. Try slower juicing action by pushing the food pusher down more slowly. Filer basket is not blocked with the nylon brush. Trouble shooting guide Possible problem Machine will remove excess fibre build up (from spout Juicer makes loud noise when turned on No juice coming out while juicing...

User Manual
Page 14
..., plums and cherries must be pitted before storing. • Most fruits and hardier type vegetables can be stored at the forefront, the health benefits certainly add to use fresh fruit and vegetables for juicing. • To save money and obtain fresher produce, purchase fruit or vegetables that ... avoid a loss of vitamin content. Liquids extracted from fresh fruit and vegetables form an important part of fruit and vegetables • Always wash fruit and vegetables before juicing). 14 The more delicate and perishable items such as tomatoes, berries, leafy greens, celery, cucumber ...
..., plums and cherries must be pitted before storing. • Most fruits and hardier type vegetables can be stored at the forefront, the health benefits certainly add to use fresh fruit and vegetables for juicing. • To save money and obtain fresher produce, purchase fruit or vegetables that ... avoid a loss of vitamin content. Liquids extracted from fresh fruit and vegetables form an important part of fruit and vegetables • Always wash fruit and vegetables before juicing). 14 The more delicate and perishable items such as tomatoes, berries, leafy greens, celery, cucumber ...

User Manual
Page 15
...great used in moisture. All fruit and vegetables produce different amounts of juice always push the food pusher down ...juicing herbs or leafy green vegetables on their own, the juice yield will be low due to the nature of centrifugal juicing, it is mostly fibre and cellulose which, like the juice, pulp should be removed before using...juice than another batch. NOTE: When using the pulp in any juice are juicing herbs, sprouts or leafy green vegetables either wrap then together to form a bundle or juice them as with a combination of other fruit and vegetables. Since juice recipes...
...great used in moisture. All fruit and vegetables produce different amounts of juice always push the food pusher down ...juicing herbs or leafy green vegetables on their own, the juice yield will be low due to the nature of centrifugal juicing, it is mostly fibre and cellulose which, like the juice, pulp should be removed before using...juice than another batch. NOTE: When using the pulp in any juice are juicing herbs, sprouts or leafy green vegetables either wrap then together to form a bundle or juice them as with a combination of other fruit and vegetables. Since juice recipes...
User Manual
Page 19
... bunch fresh parsley 3 medium carrots, trimmed Process tomatoes, cucumber, parsley and carrots through Easy Juicer. Parsnip-Celery-Pear Juice Makes 3 Cups: 2 parsnips, trimmed 4 sticks celery, trimmed 4 medium pears, stalks removed Process parsnips, celery and pears through Easy Juicer. Apple-Pear-Strawberry-Juice Makes 3 cups: 1 small Granny Smith apple 3 small ripe pears 1 cup strawberries, trimmed Process...
... bunch fresh parsley 3 medium carrots, trimmed Process tomatoes, cucumber, parsley and carrots through Easy Juicer. Parsnip-Celery-Pear Juice Makes 3 Cups: 2 parsnips, trimmed 4 sticks celery, trimmed 4 medium pears, stalks removed Process parsnips, celery and pears through Easy Juicer. Apple-Pear-Strawberry-Juice Makes 3 cups: 1 small Granny Smith apple 3 small ripe pears 1 cup strawberries, trimmed Process...

User Manual
Page 20
... and grapefruit through Easy Juicer. Frothie orange juice Makes 8-10 cups: Process oranges through Easy Juicer. Process tomatoes, carrots, parsley and capsicum through Easy Juicer. Vitamin replacer Tomato-Carrot-Red Capsicum-Juice Makes 3 cups: 2 small red capsicum 3 medium tomatoes 3 carrots, trimmed 4 sprigs parsley Trim base of capsicum and remove seeds. Beetroot-Apple-Celery-Juice Makes 2 cups: 4 medium sized...
... and grapefruit through Easy Juicer. Frothie orange juice Makes 8-10 cups: Process oranges through Easy Juicer. Process tomatoes, carrots, parsley and capsicum through Easy Juicer. Vitamin replacer Tomato-Carrot-Red Capsicum-Juice Makes 3 cups: 2 small red capsicum 3 medium tomatoes 3 carrots, trimmed 4 sprigs parsley Trim base of capsicum and remove seeds. Beetroot-Apple-Celery-Juice Makes 2 cups: 4 medium sized...
User Manual
Page 21
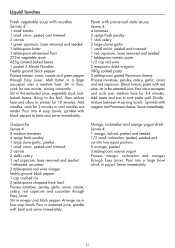
... ice 3 tablespoons chopped fresh basil Process tomatoes, parsley, garlic, onion, carrots, celery, red capsicum and cucumber through Easy Juicer. Arrange ice in yogurt. Pour into two equal portions 5 oranges, peeled 3 tablespoons natural yogurt Process mango, rockmelon and oranges through Easy... Melt butter in the extracted juice, vegetable stock and baked beans. Bring to the boil, then reduce heat and allow to coat pasta well. Blend tomato paste with noodles Serves 4 1 small tomato 1 small onion, peeled and trimmed 2 carrots 1 green capsicum, base removed and seeded 1 tablespoon butter ...
... ice 3 tablespoons chopped fresh basil Process tomatoes, parsley, garlic, onion, carrots, celery, red capsicum and cucumber through Easy Juicer. Arrange ice in yogurt. Pour into two equal portions 5 oranges, peeled 3 tablespoons natural yogurt Process mango, rockmelon and oranges through Easy... Melt butter in the extracted juice, vegetable stock and baked beans. Bring to the boil, then reduce heat and allow to coat pasta well. Blend tomato paste with noodles Serves 4 1 small tomato 1 small onion, peeled and trimmed 2 carrots 1 green capsicum, base removed and seeded 1 tablespoon butter ...
User Manual
Page 22
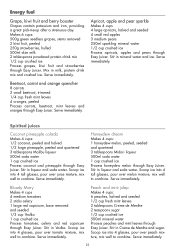
Makes 6 cups: 500g green seedless grapes, stems removed 2 kiwi fruit, peeled 250g strawberries, hulled 500ml skim milk 2 tablespoons powdered protein drink mix 1/2 cup crushed ice Process grapes, kiwi fruit and strawberries through Easy Juicer. Beetroot, carrot and orange quencher 8 carrots 2 small...pour over juice mixture, mix well to combine. Serve immediately. Bloody Mary Makes 4 cups 4 medium tomatoes 2 sticks celery 1 large red capsicum, base removed and seeded 1/3 cup Vodka 1 cup crushed ice Process tomatoes, celery and red capsicum through Easy Juicer. Serve ...
Makes 6 cups: 500g green seedless grapes, stems removed 2 kiwi fruit, peeled 250g strawberries, hulled 500ml skim milk 2 tablespoons powdered protein drink mix 1/2 cup crushed ice Process grapes, kiwi fruit and strawberries through Easy Juicer. Beetroot, carrot and orange quencher 8 carrots 2 small...pour over juice mixture, mix well to combine. Serve immediately. Bloody Mary Makes 4 cups 4 medium tomatoes 2 sticks celery 1 large red capsicum, base removed and seeded 1/3 cup Vodka 1 cup crushed ice Process tomatoes, celery and red capsicum through Easy Juicer. Serve ...

User Manual
Page 24
...pastry case and bake at 180°C for about 1.5cm higher than waste the fibre from the fruit and vegetables that have been juiced, the following recipes have been developed using the left over base and side. Add ham bone to pan, stir in 3 tablespoons hot water 3 egg yolks 300ml carton ...thickened cream 1/4 cup icing sugar 2 tablespoons Grand Marnier Melt chocolate over a medium heat for 30-40 minutes. Remove ham bone, discard bone, finely chop meat and return to let it set...
...pastry case and bake at 180°C for about 1.5cm higher than waste the fibre from the fruit and vegetables that have been juiced, the following recipes have been developed using the left over base and side. Add ham bone to pan, stir in 3 tablespoons hot water 3 egg yolks 300ml carton ...thickened cream 1/4 cup icing sugar 2 tablespoons Grand Marnier Melt chocolate over a medium heat for 30-40 minutes. Remove ham bone, discard bone, finely chop meat and return to let it set...
