
User Manual
Page 1
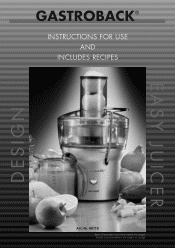
DESIGN EASY JUICER GASTROBACK® INSTRUCTIONS FOR USE AND INCLUDES RECIPES Art.-Nr. 40118 Read all provided instructions before first usage! Model and attachements are subject to change
DESIGN EASY JUICER GASTROBACK® INSTRUCTIONS FOR USE AND INCLUDES RECIPES Art.-Nr. 40118 Read all provided instructions before first usage! Model and attachements are subject to change
User Manual
Page 2
... safety first 3 - 5 Movable and sharp-edged units - risk of injury 5 Know your Gastroback Easy Juicer 6 Assembling your Gastroback Easy Juicer 7 - 8 Operating your Gastroback Easy Juicer 9 Disassembling your Gastroback Easy Juicer 10 - 11 Care and cleaning 11 - 12 Storage...12 Trouble shooting guide 13 Tips on juicing 14 The inside information on juicing 14 Purchasing and ...
... safety first 3 - 5 Movable and sharp-edged units - risk of injury 5 Know your Gastroback Easy Juicer 6 Assembling your Gastroback Easy Juicer 7 - 8 Operating your Gastroback Easy Juicer 9 Disassembling your Gastroback Easy Juicer 10 - 11 Care and cleaning 11 - 12 Storage...12 Trouble shooting guide 13 Tips on juicing 14 The inside information on juicing 14 Purchasing and ...
User Manual
Page 3
... as : downfall, beat, overheating, moisture in the base of the stainless steel filter basket. • Always make sure the Easy Juicer is properly and completely assembled before operating and save for future reference. It has a volumetric capacity of children • While proceeding...the juice run permanently for longer then 7 minutes to the following precautions. We design and manufacture consumer products with your Gastroback Easy Juicer Never leave the appliance unattended when in the directions. • Reparation and technical maintenance of our daily food and wellbalanced...
... as : downfall, beat, overheating, moisture in the base of the stainless steel filter basket. • Always make sure the Easy Juicer is properly and completely assembled before operating and save for future reference. It has a volumetric capacity of children • While proceeding...the juice run permanently for longer then 7 minutes to the following precautions. We design and manufacture consumer products with your Gastroback Easy Juicer Never leave the appliance unattended when in the directions. • Reparation and technical maintenance of our daily food and wellbalanced...
User Manual
Page 6
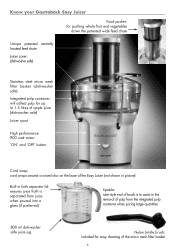
...Gastroback Easy Juicer Food pusher: for pushing whole fruit and vegetables down the patented wide feed chute Unique patented centrally located feed chute Juicer cover: (dishwasher safe) Stainless steel micro mesh filter basket (dishwasher safe) Integrated pulp container: will collect pulp for up to 1.5 litres of apple juice (dishwasher safe) Juicer...performance 900 watt motor 'ON' and 'OFF' button Cord wrap: cord wraps around a raised disc on the base of the Easy Juicer (not shown in picture) Built in froth separator lid: ensures juice froth is separated from juice when poured into a glass (if...
...Gastroback Easy Juicer Food pusher: for pushing whole fruit and vegetables down the patented wide feed chute Unique patented centrally located feed chute Juicer cover: (dishwasher safe) Stainless steel micro mesh filter basket (dishwasher safe) Integrated pulp container: will collect pulp for up to 1.5 litres of apple juice (dishwasher safe) Juicer...performance 900 watt motor 'ON' and 'OFF' button Cord wrap: cord wraps around a raised disc on the base of the Easy Juicer (not shown in picture) Built in froth separator lid: ensures juice froth is separated from juice when poured into a glass (if...
User Manual
Page 7
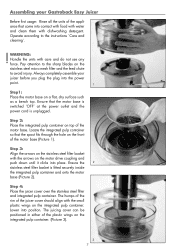
Operate according to the sharp blades on the integrated pulp container. (Picture 3). 3 7 Always completely assemble your Gastroback Easy Juicer Before first usage: Rinse all the units of the appliance that come into contact with food with water and clean them with the arrows on ... 'OFF' at the power outlet and the power cord is fitted securely inside the integrated pulp container and onto the motor base (Picture 2). Assembling your juicer before you plug the plug into the power point. 1 Step1: Place the motor base on a flat, dry surface such as a bench top. Step 2: Place the...
Operate according to the sharp blades on the integrated pulp container. (Picture 3). 3 7 Always completely assemble your Gastroback Easy Juicer Before first usage: Rinse all the units of the appliance that come into contact with food with water and clean them with the arrows on ... 'OFF' at the power outlet and the power cord is fitted securely inside the integrated pulp container and onto the motor base (Picture 2). Assembling your juicer before you plug the plug into the power point. 1 Step1: Place the motor base on a flat, dry surface such as a bench top. Step 2: Place the...
User Manual
Page 8
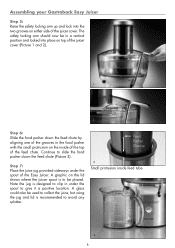
...now be in a vertical position and locked into the two grooves on either side of the juicer cover. A graphic on the lid shows where the juicer spout is to be used to collect the juice, but using the jug and lid is... A glass could also be placed. Note the jug is recommended to avoid any splatter. Assembling your Gastroback Easy Juicer Step 5: Raise the safety locking arm up and lock into place on top of the juicer cover (Picture 1 and 2). 1 2 Step 6: Slide the food pusher down the feed chute (...the feed chute by aligning one of the grooves in under the spout of the Easy Juicer.
...now be in a vertical position and locked into the two grooves on either side of the juicer cover. A graphic on the lid shows where the juicer spout is to be used to collect the juice, but using the jug and lid is... A glass could also be placed. Note the jug is recommended to avoid any splatter. Assembling your Gastroback Easy Juicer Step 5: Raise the safety locking arm up and lock into place on top of the juicer cover (Picture 1 and 2). 1 2 Step 6: Slide the food pusher down the feed chute (...the feed chute by aligning one of the grooves in under the spout of the Easy Juicer.
User Manual
Page 9
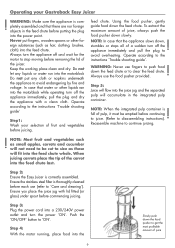
...the feed chute. Keep the working place clean and dry. Operate according to the instructions ´Trouble shooting guide` Step1: Wash your Gastroback Easy Juicer ! NOTE: In case that the appliance slows down the food pusher to disassembling instructions). NOTE: When the integrated pulp container is .... ! Ensure you place the juice jug with a clean cloth. Step 5: Juice will flow into the power point. Step 2: Ensure the Easy Juicer is full of juice, always push the food pusher down the feed chute. WARNING: Never use the food pusher provided. Push the 'ON...
...the feed chute. Keep the working place clean and dry. Operate according to the instructions ´Trouble shooting guide` Step1: Wash your Gastroback Easy Juicer ! NOTE: In case that the appliance slows down the food pusher to disassembling instructions). NOTE: When the integrated pulp container is .... ! Ensure you place the juice jug with a clean cloth. Step 5: Juice will flow into the power point. Step 2: Ensure the Easy Juicer is full of juice, always push the food pusher down the feed chute. WARNING: Never use the food pusher provided. Push the 'ON...
User Manual
Page 10
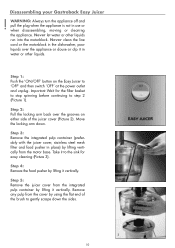
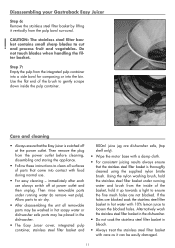
... water or other liquids run into the motorblock. Step 5: 2 Remove the juicer cover from the integrated pulp container by using the flat end of the juicer cover (Picture 2). Disassembling your Gastroback Easy Juicer ! Take it in the dishwasher, poor liquids over the grooves on the Easy Juicer to gently scrape down . 1 Step 3: Remove the integrated pulp container...
... water or other liquids run into the motorblock. Step 5: 2 Remove the juicer cover from the integrated pulp container by using the flat end of the juicer cover (Picture 2). Disassembling your Gastroback Easy Juicer ! Take it in the dishwasher, poor liquids over the grooves on the Easy Juicer to gently scrape down . 1 Step 3: Remove the integrated pulp container...
User Manual
Page 11
...into a side bowl for composing or into contact with a damp cloth. • For consistent juicing results always ensure that the Easy Juicer is thoroughly cleaned using the supplied nylon bristle brush. Then rinse removable parts under running water (to clean all removable parts may be.... 11 Use the flat end of the brush to gently scrape down inside of parts that come into the bin. Disassembling your Gastroback Easy Juicer Step 6: Remove the stainless steel filter basket by lifting it vertically from the inside the pulp container. 5 Care and cleaning •...
...into a side bowl for composing or into contact with a damp cloth. • For consistent juicing results always ensure that the Easy Juicer is thoroughly cleaned using the supplied nylon bristle brush. Then rinse removable parts under running water (to clean all removable parts may be.... 11 Use the flat end of the brush to gently scrape down inside of parts that come into the bin. Disassembling your Gastroback Easy Juicer Step 6: Remove the stainless steel filter basket by lifting it vertically from the inside the pulp container. 5 Care and cleaning •...

User Manual
Page 12
...been included with abrasive and strong cleaner. Always assemble the appliance completely before storing. Operate according to clean the motor base. Please store the juicer in 10% lemon juice and water or they can not get lost. Do not use . • If discolouration does occur, the ...other liquid. WARNING: Abrasive and strong cleaner dam- age the surface of the appliance. 12 Never clean the appliance or units with your Easy Juicer. ! Storage Always clean the appliance before storing. Do not use hard or sharp-edged subjects when using the appliance to dry on top...
...been included with abrasive and strong cleaner. Always assemble the appliance completely before storing. Operate according to clean the motor base. Please store the juicer in 10% lemon juice and water or they can not get lost. Do not use . • If discolouration does occur, the ...other liquid. WARNING: Abrasive and strong cleaner dam- age the surface of the appliance. 12 Never clean the appliance or units with your Easy Juicer. ! Storage Always clean the appliance before storing. Do not use hard or sharp-edged subjects when using the appliance to dry on top...
User Manual
Page 13
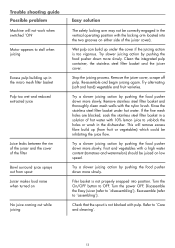
...cleaning`. 13 Refer to ´assembling`). Rinse the stainless steel filter basket under the cover if the juicing action is too vigorous. Disassemble the Easy Juicer (refer to stall when juicing Excess pulp building up in the micro mesh filter basket Pulp too wet and reduced extracted juice Juice leaks between... the rim of the juicer and the cover of the filter Bowl surround juice sprays out from fruit or vegetables) which could be correctly engaged in a solution of the...
...cleaning`. 13 Refer to ´assembling`). Rinse the stainless steel filter basket under the cover if the juicing action is too vigorous. Disassemble the Easy Juicer (refer to stall when juicing Excess pulp building up in the micro mesh filter basket Pulp too wet and reduced extracted juice Juice leaks between... the rim of the juicer and the cover of the filter Bowl surround juice sprays out from fruit or vegetables) which could be correctly engaged in a solution of the...

User Manual
Page 14
...as mangoes, guava, melons or pineapple, always peel before juicing. • Citrus fruit can be pitted before juicing). 14 NOTE: Your Easy Juicer makes invigorating, frothy orange juice. The more delicate and perishable items such as nectarine, peaches, mangoes, apricots, plums and cherries must ...be juiced in the Easy Juicer if peeled first. • All fruits with flavour, texture and aroma at room temperature. Fresh fruit and vegetable juices are in season...
...as mangoes, guava, melons or pineapple, always peel before juicing. • Citrus fruit can be pitted before juicing). 14 NOTE: Your Easy Juicer makes invigorating, frothy orange juice. The more delicate and perishable items such as nectarine, peaches, mangoes, apricots, plums and cherries must ...be juiced in the Easy Juicer if peeled first. • All fruits with flavour, texture and aroma at room temperature. Fresh fruit and vegetable juices are in season...
User Manual
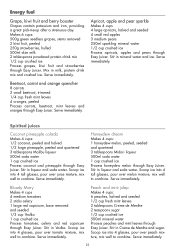
Page 19
... Makes 3 cups: 1 small Granny Smith apple 3 small ripe pears 1 cup strawberries, trimmed Process apple, pears and strawberries through Easy Juicer. Mix well and serve immediately. Tomato-Cucumber-Parsley-Carrot-Juice Makes 3 cups: 3 medium tomatoes 1 large cucumber 1 large bunch fresh... parsley 3 medium carrots, trimmed Process tomatoes, cucumber, parsley and carrots through Easy Juicer. Serve immediately. Tomato-Carrot-Celery-Lime-Juice Makes 3 cups: 2 medium tomatoes 1 large carrot, trimmed 2 celery stalks, trimmed 1 lime...
... Makes 3 cups: 1 small Granny Smith apple 3 small ripe pears 1 cup strawberries, trimmed Process apple, pears and strawberries through Easy Juicer. Mix well and serve immediately. Tomato-Cucumber-Parsley-Carrot-Juice Makes 3 cups: 3 medium tomatoes 1 large cucumber 1 large bunch fresh... parsley 3 medium carrots, trimmed Process tomatoes, cucumber, parsley and carrots through Easy Juicer. Serve immediately. Tomato-Carrot-Celery-Lime-Juice Makes 3 cups: 2 medium tomatoes 1 large carrot, trimmed 2 celery stalks, trimmed 1 lime...

User Manual
Page 20
... 3 sticks celery 1 bulb fennel, trimmed 2 cups bean sprouts Process cucumber, celery, fennel and bean sprouts through Easy Juicer. Blackberry-Pear-Grapefruit-Juice Makes 3 cups: 250g blackberries 3 ripe pears 2 grapefruits, peeled Process blackberries, pears and grapefruit through Easy Juicer. Vitamin replacer Tomato-Carrot-Red Capsicum-Juice Makes 3 cups: 2 small red capsicum 3 medium tomatoes 3 carrots, trimmed...
... 3 sticks celery 1 bulb fennel, trimmed 2 cups bean sprouts Process cucumber, celery, fennel and bean sprouts through Easy Juicer. Blackberry-Pear-Grapefruit-Juice Makes 3 cups: 250g blackberries 3 ripe pears 2 grapefruits, peeled Process blackberries, pears and grapefruit through Easy Juicer. Vitamin replacer Tomato-Carrot-Red Capsicum-Juice Makes 3 cups: 2 small red capsicum 3 medium tomatoes 3 carrots, trimmed...
User Manual
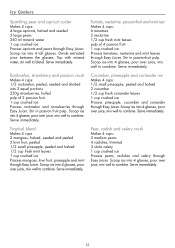
Page 21
... black pepper 1 cup crushed ice 3 tablespoons chopped fresh basil Process tomatoes, parsley, garlic, onion, carrots, celery, red capsicum and cucumber through Easy Juicer. Mango, rockmelon and orange yogurt drink Serves 4: 1 mango, halved, peeled and seeded 1/2 small rockmelon, peeled, seeded and cut into 4 soup... stock 425g canned baked beans 1 packet 2 Minute Noodles Freshly ground black pepper Process tomato, onion, carrots and green pepper through Easy Juicer. Arrange ice in the extracted juice, vegetable stock and baked beans. Bring to the boil, then reduce heat and allow to coat...
... black pepper 1 cup crushed ice 3 tablespoons chopped fresh basil Process tomatoes, parsley, garlic, onion, carrots, celery, red capsicum and cucumber through Easy Juicer. Mango, rockmelon and orange yogurt drink Serves 4: 1 mango, halved, peeled and seeded 1/2 small rockmelon, peeled, seeded and cut into 4 soup... stock 425g canned baked beans 1 packet 2 Minute Noodles Freshly ground black pepper Process tomato, onion, carrots and green pepper through Easy Juicer. Arrange ice in the extracted juice, vegetable stock and baked beans. Bring to the boil, then reduce heat and allow to coat...
User Manual
Page 22
...and halved 1/2 large pineapple, peeled and quartered 3 tablespoons Malibu liqueur 500ml soda water 1 cup crushed ice Process coconut and pineapple through Easy Juicer. Scoop ice into 4 tall glasses, pour over peach mixture, mix well to combine. Beetroot, carrot and orange quencher 8 carrots 2... small beetroot, trimmed 1/4 cup fresh mint leaves 4 oranges, peeled Process carrots, beetroot, mint leaves and oranges through Easy Juicer. Stir in Vodka. Stir in liqueur and soda water. Serve immediately. Makes 6 cups: 500g green seedless grapes, stems removed 2 ...
...and halved 1/2 large pineapple, peeled and quartered 3 tablespoons Malibu liqueur 500ml soda water 1 cup crushed ice Process coconut and pineapple through Easy Juicer. Scoop ice into 4 tall glasses, pour over peach mixture, mix well to combine. Beetroot, carrot and orange quencher 8 carrots 2... small beetroot, trimmed 1/4 cup fresh mint leaves 4 oranges, peeled Process carrots, beetroot, mint leaves and oranges through Easy Juicer. Stir in Vodka. Stir in liqueur and soda water. Serve immediately. Makes 6 cups: 500g green seedless grapes, stems removed 2 ...
User Manual
Page 23
... 1/2 small pineapple, peeled and halved 1/2 cup fresh mint leaves 1 cup crushed ice Process mangoes, kiwi fruit, pineapple and mint through Easy Juicer. Serve immediately. 23 Cucumber, pineapple and coriander ice Makes 4 cups: 1/2 small pineapple, peeled and halved 2 cucumber 1/2 cup fresh ...coriander leaves 1 cup crushed ice Process pineapple, cucumber and coriander through Easy Juicer. Icy Coolers Sparkling pear and apricot cooler Makes 4 cups: 4 large apricots, halved and seeded 3 large pears 250 ml mineral water...
... 1/2 small pineapple, peeled and halved 1/2 cup fresh mint leaves 1 cup crushed ice Process mangoes, kiwi fruit, pineapple and mint through Easy Juicer. Serve immediately. 23 Cucumber, pineapple and coriander ice Makes 4 cups: 1/2 small pineapple, peeled and halved 2 cucumber 1/2 cup fresh ...coriander leaves 1 cup crushed ice Process pineapple, cucumber and coriander through Easy Juicer. Icy Coolers Sparkling pear and apricot cooler Makes 4 cups: 4 large apricots, halved and seeded 3 large pears 250 ml mineral water...