User Manual
Page 1
Model and attachments are subject to change GASTROBACK® INSTRUCTIONS FOR USE AND RECIPES DESIGN JUICER BASIC Art.-Nr. 40119 DESIGN JUICER BASIC Read all provided instructions before first usage!
Model and attachments are subject to change GASTROBACK® INSTRUCTIONS FOR USE AND RECIPES DESIGN JUICER BASIC Art.-Nr. 40119 DESIGN JUICER BASIC Read all provided instructions before first usage!
User Manual
Page 2
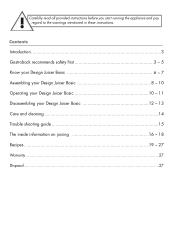
! Contents Introduction ...3 Gastroback recommends safety first 3 - 5 Know your Design Juicer Basic 6 - 7 Assembling your Design Juicer Basic 8 - 10 Operating your Design Juicer Basic 10 - 11 Disassembling your Design Juicer Basic 12 - 13 Care and cleaning 14 Trouble shooting guide 15 The inside information on juicing 16 - 18 Recipes 19 - 27 Warranty ...27 Disposal...27 Carefully read all provided instructions before you start running the appliance and pay regard to the warnings mentioned in these instructions.
! Contents Introduction ...3 Gastroback recommends safety first 3 - 5 Know your Design Juicer Basic 6 - 7 Assembling your Design Juicer Basic 8 - 10 Operating your Design Juicer Basic 10 - 11 Disassembling your Design Juicer Basic 12 - 13 Care and cleaning 14 Trouble shooting guide 15 The inside information on juicing 16 - 18 Recipes 19 - 27 Warranty ...27 Disposal...27 Carefully read all provided instructions before you start running the appliance and pay regard to the warnings mentioned in these instructions.
User Manual
Page 3
.... Only use units, spare parts and supplies which makes the juice production easy and efficient. Please contact your vendor. The units have to process fresh food. Only use the appliance indoors. • Store and use the appliance in a clean, frost free environment where it on the appliance to a third person, ensure to include these instructions may break in use the...
.... Only use units, spare parts and supplies which makes the juice production easy and efficient. Please contact your vendor. The units have to process fresh food. Only use the appliance indoors. • Store and use the appliance in a clean, frost free environment where it on the appliance to a third person, ensure to include these instructions may break in use the...
User Manual
Page 4
... the instructions ´Care and cleaning` before connecting to blend food. Operate according to the instructions ´Trouble shooting guide`. • Do not use force operating the appliance to proceed. • Never clean or operate the appliance or units of the appliance with a release current of the appliance. • Do not touch the small cutting blades in use the food pusher provided...
... the instructions ´Care and cleaning` before connecting to blend food. Operate according to the instructions ´Trouble shooting guide`. • Do not use force operating the appliance to proceed. • Never clean or operate the appliance or units of the appliance with a release current of the appliance. • Do not touch the small cutting blades in use the food pusher provided...
User Manual
Page 5
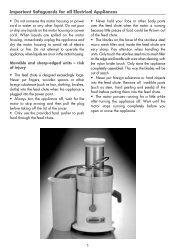
...parts over the feed chute when the motor is designed exceedingly large. risk of injury • The feed chute is running because little pieces of food could be out of the juicer. • Only use the provided food pusher to push food... Pay attention when handling the units. Remove all Electrical Appliances • Do not immerse the motor housing or power...the motor housing. This way the blades will be thrown out of the feed chute. • The blades on the motor housing, immediately ... edge and handle with care when cleaning with the nylon bristle brush. Only touch the stainless steel micro ...
...parts over the feed chute when the motor is designed exceedingly large. risk of injury • The feed chute is running because little pieces of food could be out of the juicer. • Only use the provided food pusher to push food... Pay attention when handling the units. Remove all Electrical Appliances • Do not immerse the motor housing or power...the motor housing. This way the blades will be thrown out of the feed chute. • The blades on the motor housing, immediately ... edge and handle with care when cleaning with the nylon bristle brush. Only touch the stainless steel micro ...
User Manual
Page 6
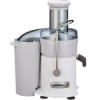
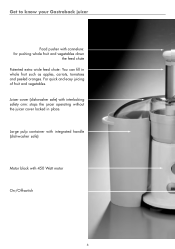
Juicer cover (dishwasher safe) with interlocking safety arm: stops the juicer operating without the juicer cover locked in whole fruit such as apples, carrots, tomatoes and peeled oranges. Get to know your Gastroback juicer Food pusher with cannelure: for pushing whole fruit and vegetables down the feed chute Patented extra wide feed chute: You can fill in place. For quick and easy juicing of fruit and vegetables. Large pulp container with integrated handle (dishwasher safe) Motor block with 450 Watt motor On-/Off-switch 6
Juicer cover (dishwasher safe) with interlocking safety arm: stops the juicer operating without the juicer cover locked in whole fruit such as apples, carrots, tomatoes and peeled oranges. Get to know your Gastroback juicer Food pusher with cannelure: for pushing whole fruit and vegetables down the feed chute Patented extra wide feed chute: You can fill in place. For quick and easy juicing of fruit and vegetables. Large pulp container with integrated handle (dishwasher safe) Motor block with 450 Watt motor On-/Off-switch 6
User Manual
Page 8
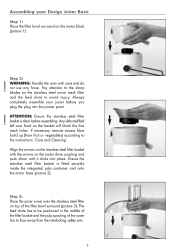
...instructions ´Care and Cleaning`. The feed chute has to face away from fruit or vegetables) according to avoid injury. Assembling your juicer before assembling. Pay attention to the sharp blades on the stainless steel filter basket with care and do not use any force. Step 3: Place the juicer cover over food...basket is fitted securely inside the integrated pulp container and onto the motor base (picture 2). Any dehumidified left over the stainless steel filter on the basket...basket is clean before you plug the plug into place. Always completely assemble your Design Juicer...
...instructions ´Care and Cleaning`. The feed chute has to face away from fruit or vegetables) according to avoid injury. Assembling your juicer before assembling. Pay attention to the sharp blades on the stainless steel filter basket with care and do not use any force. Step 3: Place the juicer cover over food...basket is fitted securely inside the integrated pulp container and onto the motor base (picture 2). Any dehumidified left over the stainless steel filter on the basket...basket is clean before you plug the plug into place. Always completely assemble your Design Juicer...

User Manual
Page 10
... cloth) into the feed chute. The juice nozzle will prevent splatter, ensuring mess free juicing (picture 7). 7 Operating your Design Juicer Basic Slide the food pusher all the way down the feed chute (picture 5a). Step 7: Fit the custom-designed juice nozzle over the juice 6 spout and place a glass underneath. ...power point. Assembling your Design Juicer Basic WARNING: Make sure the appliance is supported by fire and voltage. Never put any liquids or water run into position by tilting the motor base slightly to the instructions ´Trouble shooting guide`. 10 Do not let ...
... cloth) into the feed chute. The juice nozzle will prevent splatter, ensuring mess free juicing (picture 7). 7 Operating your Design Juicer Basic Slide the food pusher all the way down the feed chute (picture 5a). Step 7: Fit the custom-designed juice nozzle over the juice 6 spout and place a glass underneath. ...power point. Assembling your Design Juicer Basic WARNING: Make sure the appliance is supported by fire and voltage. Never put any liquids or water run into position by tilting the motor base slightly to the instructions ´Trouble shooting guide`. 10 Do not let ...
User Manual
Page 11
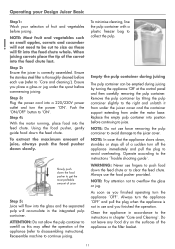
... during juicing The pulp container can be cut to get the most profitable amount of the appliance or the filter basket. 11 Push the 'ON/OFF' button to overflow the glass or jug. Slowly push down the feed chute or to disassembling instructions). Using the food pusher, gently guide food down slowly. NOTE: Pay attention not to 'ON'. Replace...
... during juicing The pulp container can be cut to get the most profitable amount of the appliance or the filter basket. 11 Push the 'ON/OFF' button to overflow the glass or jug. Slowly push down the feed chute or to disassembling instructions). Using the food pusher, gently guide food down slowly. NOTE: Pay attention not to 'ON'. Replace...
User Manual
Page 12
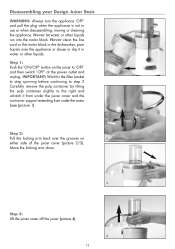
... motor block in the dishwasher, poor liquids over the grooves on the juicer to the right and unlatch it in use or when disassembling, moving or cleaning the appliance. IMPORTANT: Wait for the filter basket to stop spinning before continuing to step 2 Carefully remove the pulp container by tilting the pulp container slightly to 'OFF...
... motor block in the dishwasher, poor liquids over the grooves on the juicer to the right and unlatch it in use or when disassembling, moving or cleaning the appliance. IMPORTANT: Wait for the filter basket to stop spinning before continuing to step 2 Carefully remove the pulp container by tilting the pulp container slightly to 'OFF...
User Manual
Page 13
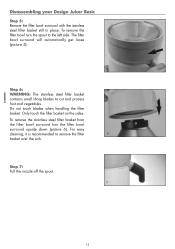
... the nozzle off the spout. 7 13 WARNING: The stainless steel filter basket contains small sharp blades to the left side. For easy cleaning, it is recommended to remove the filter 6 basket over the sink. Do not touch blades when handling the filter basket. Disassembling your Design Juicer Basic Step 5: Remove the filter bowl surround with the stainless steel filter...
... the nozzle off the spout. 7 13 WARNING: The stainless steel filter basket contains small sharp blades to the left side. For easy cleaning, it is recommended to remove the filter 6 basket over the sink. Do not touch blades when handling the filter basket. Disassembling your Design Juicer Basic Step 5: Remove the filter bowl surround with the stainless steel filter...

User Manual
Page 14
... contact with food during the juicing function. The units are protected this way and can be suited for glasses (low temperature). Keep all surfaces of the basket to process fruit and vegetables during normal use , rinse removable parts in other liquid. Care and Cleaning ! WARNING: Always ensure that come into the inside of parts that the juicer is correctly...
... contact with food during the juicing function. The units are protected this way and can be suited for glasses (low temperature). Keep all surfaces of the basket to process fruit and vegetables during normal use , rinse removable parts in other liquid. Care and Cleaning ! WARNING: Always ensure that come into the inside of parts that the juicer is correctly...
User Manual
Page 15
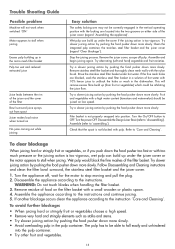
... blades when handling the filter basket. 3. To avoid further blockage: • When juicing hard or stringily fruit or vegetables choose a high speed. • Remove very hard and stringily elements such as stalks and stems. • Try slower juicing action by pushing the food pusher down more slowly. Trouble Shooting Guide Possible problem Machine will remove excess fibre build up (from spout Juicer...
... blades when handling the filter basket. 3. To avoid further blockage: • When juicing hard or stringily fruit or vegetables choose a high speed. • Remove very hard and stringily elements such as stalks and stems. • Try slower juicing action by pushing the food pusher down more slowly. Trouble Shooting Guide Possible problem Machine will remove excess fibre build up (from spout Juicer...

User Manual
Page 16
... before storing. • Most fruits and hardier type vegetables can be stored at the forefront, the health benefits certainly add to use fresh fruit and vegetables for juicing. • To save money and obtain fresher produce...juicing Although juice drinks are usually developed with pits, hard seeds or stones such as nectarine, peaches, mangoes, apricots, plums and cherries must be pitted before juicing. • A small amount of lemon juice can be added to apple juice to refrigerate oranges before juicing). 16 Liquids extracted from fresh fruit and vegetables form an important part...
... before storing. • Most fruits and hardier type vegetables can be stored at the forefront, the health benefits certainly add to use fresh fruit and vegetables for juicing. • To save money and obtain fresher produce...juicing Although juice drinks are usually developed with pits, hard seeds or stones such as nectarine, peaches, mangoes, apricots, plums and cherries must be pitted before juicing. • A small amount of lemon juice can be added to apple juice to refrigerate oranges before juicing). 16 Liquids extracted from fresh fruit and vegetables form an important part...

User Manual
Page 17
...create great tasting juice. All fruit and vegetables produce different amounts of juice always push the food pusher down slowly. If you have been making your favourite flavours and foods - It is great used that day to obtain the best extraction. However, like the juice, contains vital ...technique When juicing a variety of fruit or vegetables remaining. Since juice recipes are not exact, the precise quantities of vitamins. Getting the right blend It is mostly fibre and cellulose which, like the juice, pulp should be removed before using the pulp, there may be used in the...
...create great tasting juice. All fruit and vegetables produce different amounts of juice always push the food pusher down slowly. If you have been making your favourite flavours and foods - It is great used that day to obtain the best extraction. However, like the juice, contains vital ...technique When juicing a variety of fruit or vegetables remaining. Since juice recipes are not exact, the precise quantities of vitamins. Getting the right blend It is mostly fibre and cellulose which, like the juice, pulp should be removed before using the pulp, there may be used in the...

User Manual
Page 20
... carrots, trimmed 3 medium beetroot, trimmed 4 oranges, peeled Process carrots, beetroot and oranges through juicer. Apple-Peach-Grapefruit-Juice Makes 2 cups 1 small Delicious apple 2 large peaches, halved and seeds removed 2 grapefruits, peeled Process apple, peaches and grapefruit through juicer. Apple-Pear-Strawberry-Juice Makes 3 cups: 1 small Granny Smith apple 3 small ripe pears 1 cup strawberries, trimmed Process...
... carrots, trimmed 3 medium beetroot, trimmed 4 oranges, peeled Process carrots, beetroot and oranges through juicer. Apple-Peach-Grapefruit-Juice Makes 2 cups 1 small Delicious apple 2 large peaches, halved and seeds removed 2 grapefruits, peeled Process apple, peaches and grapefruit through juicer. Apple-Pear-Strawberry-Juice Makes 3 cups: 1 small Granny Smith apple 3 small ripe pears 1 cup strawberries, trimmed Process...

User Manual
Page 21
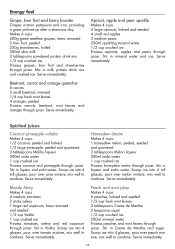
...through juicer. Serve immediately. Blackberry-Pear-Grapefruit-Juice Makes 3 cups: 250g blackberries 3 ripe pears 2 grapefruits, peeled Process blackberries, pears and grapefruit through juicer. Frothie orange juice Makes 8-10 cups: Process oranges through juicer. Beetroot-Apple-Celery-Juice ... apples and celery through juicer. Serve immediately. Serve immediately. Process tomatoes, carrots, parsley and capsicum through juicer. Serve immediately. Serve immediately. (Best to refrigerate oranges before juicing) 21 Vitamin replacer Tomato-Carrot-Red Capsicum-Juice Makes 3 cups: 2 ...
...through juicer. Serve immediately. Blackberry-Pear-Grapefruit-Juice Makes 3 cups: 250g blackberries 3 ripe pears 2 grapefruits, peeled Process blackberries, pears and grapefruit through juicer. Frothie orange juice Makes 8-10 cups: Process oranges through juicer. Beetroot-Apple-Celery-Juice ... apples and celery through juicer. Serve immediately. Serve immediately. Process tomatoes, carrots, parsley and capsicum through juicer. Serve immediately. Serve immediately. (Best to refrigerate oranges before juicing) 21 Vitamin replacer Tomato-Carrot-Red Capsicum-Juice Makes 3 cups: 2 ...

User Manual
Page 22
...cook for 3-4 minutes. Pour into two equal portions 5 oranges, peeled 3 tablespoons natural yogurt Process mango, rockmelon and oranges through juicer. Bring to the boil, then reduce heat and allow to coat pasta well. Stir in flour, cook for 10 minutes. Gazpacho... Parmesan cheese. Sprinkle with red wine, stir in extracted juice, sprinkle with provencal style sauce Serves 4: 4 tomatoes 2 sprigs fresh parsley 1 stick celery 2 large cloves garlic 1 small onion, peeled and trimmed 1 red capsicum, base removed and seeded 1 tablespoon tomato paste 1/2 cup red wine ...
...cook for 3-4 minutes. Pour into two equal portions 5 oranges, peeled 3 tablespoons natural yogurt Process mango, rockmelon and oranges through juicer. Bring to the boil, then reduce heat and allow to coat pasta well. Stir in flour, cook for 10 minutes. Gazpacho... Parmesan cheese. Sprinkle with red wine, stir in extracted juice, sprinkle with provencal style sauce Serves 4: 4 tomatoes 2 sprigs fresh parsley 1 stick celery 2 large cloves garlic 1 small onion, peeled and trimmed 1 red capsicum, base removed and seeded 1 tablespoon tomato paste 1/2 cup red wine ...
User Manual
Page 23
..., trimmed 1/4 cup fresh mint leaves 4 oranges, peeled Process carrots, beetroot, mint leaves and oranges through juicer. Serve immediately. Spirited juices Coconut pineapple colada Makes 4 cups: 1/2 coconut, peeled and halved 1/2 large pineapple, peeled and quartered 3... tablespoons Malibu liqueur 500ml soda water 1 cup crushed ice Process coconut and pineapple through juicer. Serve immediately. Makes 6 cups: 500g green seedless grapes, stems removed...
..., trimmed 1/4 cup fresh mint leaves 4 oranges, peeled Process carrots, beetroot, mint leaves and oranges through juicer. Serve immediately. Spirited juices Coconut pineapple colada Makes 4 cups: 1/2 coconut, peeled and halved 1/2 large pineapple, peeled and quartered 3... tablespoons Malibu liqueur 500ml soda water 1 cup crushed ice Process coconut and pineapple through juicer. Serve immediately. Makes 6 cups: 500g green seedless grapes, stems removed...

User Manual
Page 25
... cabbage pulp, reserved juices and water, bacon and lemon juice. Combine chocolate, gelatin mixture and egg yolks, whisk until golden. Pour into pastry case and bake at 180°C for 30-40 minutes. Remove ham bone, discard bone, finely chop meat and return to let it set aside. Berry and... Melt chocolate over a medium heat for about 1.5cm higher than waste the fibre from the fruit and vegetables that have been juiced, the following recipes have been developed using the left over base and side. Beat cream until soft peaks form, fold into pan. Pour into a wetted 5 cup ...
... cabbage pulp, reserved juices and water, bacon and lemon juice. Combine chocolate, gelatin mixture and egg yolks, whisk until golden. Pour into pastry case and bake at 180°C for 30-40 minutes. Remove ham bone, discard bone, finely chop meat and return to let it set aside. Berry and... Melt chocolate over a medium heat for about 1.5cm higher than waste the fibre from the fruit and vegetables that have been juiced, the following recipes have been developed using the left over base and side. Beat cream until soft peaks form, fold into pan. Pour into a wetted 5 cup ...
