
User Manual
Page 1
Model and attachments are subject to change GASTROBACK® Instructions for use AND RECIPES Design Juicer Art.-Nr. 40123 Design Juicer Read all provided instructions before first usage!
Model and attachments are subject to change GASTROBACK® Instructions for use AND RECIPES Design Juicer Art.-Nr. 40123 Design Juicer Read all provided instructions before first usage!

User Manual
Page 2
! Contents Introduction...33 Gastroback recommends safety first 33 Know your Design Juicer 35 Assembling your Design Juicer 36 Operating your Design Juicer 39 Disassembling your Design Juicer 40 Care and cleaning 42 Trouble shooting guide 43 The inside information on juicing 44 Recipes...47 Warranty...55 Disposal...55 32 Carefully read all provided instructions before you start running the appliance and pay regard to the warnings mentioned in these instructions.
! Contents Introduction...33 Gastroback recommends safety first 33 Know your Design Juicer 35 Assembling your Design Juicer 36 Operating your Design Juicer 39 Disassembling your Design Juicer 40 Care and cleaning 42 Trouble shooting guide 43 The inside information on juicing 44 Recipes...47 Warranty...55 Disposal...55 32 Carefully read all provided instructions before you start running the appliance and pay regard to the warnings mentioned in these instructions.

User Manual
Page 3
... or any part of sufficient size. Do not place the appliance near hot surfaces (heater, gas burner, grill, or oven). Gastroback recommends safety first Carefully read all instructions before operating and save the instructions for their safety. Damaged or improper units may only be... the appliance in moist and wet areas. • Operate the appliance on the appliance to a third person, ensure to process fresh food. The Gastroback juicer has a special designed large feed chute, a large pulp container and a stainless steel micro mesh filter. When passing on a well accessible, stable,...
... or any part of sufficient size. Do not place the appliance near hot surfaces (heater, gas burner, grill, or oven). Gastroback recommends safety first Carefully read all instructions before operating and save the instructions for their safety. Damaged or improper units may only be... the appliance in moist and wet areas. • Operate the appliance on the appliance to a third person, ensure to process fresh food. The Gastroback juicer has a special designed large feed chute, a large pulp container and a stainless steel micro mesh filter. When passing on a well accessible, stable,...

User Manual
Page 4
...with adequate electric power supply (alternating current; 220/230 V, 50/60 Hz) and ground fault circuit interrupter. Do not attempt to the appliance. Gastroback recommends safety first • Always turn the appliance off the appliance immediately and pull the plug to rest for 30 minutes between each use. &#... • Always uncoil the line cord completely before connecting to proceed. • Never clean or operate the appliance or units of the juicer. To continue juicing turn the appliance OFF and then ON again. (None of the recipes in loops of the line cord or pulling ...
...with adequate electric power supply (alternating current; 220/230 V, 50/60 Hz) and ground fault circuit interrupter. Do not attempt to the appliance. Gastroback recommends safety first • Always turn the appliance off the appliance immediately and pull the plug to rest for 30 minutes between each use. &#... • Always uncoil the line cord completely before connecting to proceed. • Never clean or operate the appliance or units of the juicer. To continue juicing turn the appliance OFF and then ON again. (None of the recipes in loops of the line cord or pulling ...

User Manual
Page 5
...wide feed chute: You can fill in place. Large pulp container (dishwasher safe) Motor block with interlocking safety arm: stops the juicer operating without the juicer cover locked in whole fruit such as hair, clothing, brushes, cloths) into the feed chute when the appliance is plugged into the... large. Remove all Electrical Appliances Movable and sharp-edged units - Get to push food through the feed chute. • Never hold your Gastroback juicer Food pusher with the nylon bristle brush. This way the blades will be thrown out of the feed chute. • The blades on ...
...wide feed chute: You can fill in place. Large pulp container (dishwasher safe) Motor block with interlocking safety arm: stops the juicer operating without the juicer cover locked in whole fruit such as hair, clothing, brushes, cloths) into the feed chute when the appliance is plugged into the... large. Remove all Electrical Appliances Movable and sharp-edged units - Get to push food through the feed chute. • Never hold your Gastroback juicer Food pusher with the nylon bristle brush. This way the blades will be thrown out of the feed chute. • The blades on ...

User Manual
Page 6
... and do not use any force. Ensure the stainless steel filter basket is clean before you plug the plug into place. Assembling your juicer before assembling. The feed chute has to be positioned in the middle of the filter basket and the pulp spouting of the filter bowl...: Ensure the stainless steel filter 1 basket is fitted securely inside the integrated pulp container and onto the motor base (picture 2). 2 Step 3: Place the juicer cover over food on top of the cover has to the sharp blades on the motor block (picture 1). If necessary remove excess fibre build up...
... and do not use any force. Ensure the stainless steel filter basket is clean before you plug the plug into place. Assembling your juicer before assembling. The feed chute has to be positioned in the middle of the filter basket and the pulp spouting of the filter bowl...: Ensure the stainless steel filter 1 basket is fitted securely inside the integrated pulp container and onto the motor base (picture 2). 2 Step 3: Place the juicer cover over food on top of the cover has to the sharp blades on the motor block (picture 1). If necessary remove excess fibre build up...

User Manual
Page 7
... 4: Raise the safety locking arm straight up and lock into the two grooves on either side of the juicer cover (picture 4). Continue to slide the food pusher down the feed chute by lifting it into place on the inside of the top of the ... motor will not start moving. 4 Secure the safety arm by aligning the groove of the food pusher with the small protrusion on top of the juicer cover. IMPORTANT: If the safety locking arm is not in a vertical position and locked into the two grooves of the cover (picture 4a). 4a Step...
... 4: Raise the safety locking arm straight up and lock into the two grooves on either side of the juicer cover (picture 4). Continue to slide the food pusher down the feed chute by lifting it into place on the inside of the top of the ... motor will not start moving. 4 Secure the safety arm by aligning the groove of the food pusher with the small protrusion on top of the juicer cover. IMPORTANT: If the safety locking arm is not in a vertical position and locked into the two grooves of the cover (picture 4a). 4a Step...

User Manual
Page 8
...Always turn off and wait for the garden or discarded. 6 Step 7: Place the juice jug underneith the spout (picture 7). 7 Operating your Design Juicer Slide the food pusher all the way down the feed chute (picture 5a). 5a Step 6: Place the pulp container into the power point. Operate according... motor base slightly to avoid endangering by the container support extending from under the motor base (picture 6). Insert the container under the juicer cover on the left-hand side ensuring it is completely assembled and that water or other foreign substances (such as compost for the ...
...Always turn off and wait for the garden or discarded. 6 Step 7: Place the juice jug underneith the spout (picture 7). 7 Operating your Design Juicer Slide the food pusher all the way down the feed chute (picture 5a). 5a Step 6: Place the pulp container into the power point. Operate according... motor base slightly to avoid endangering by the container support extending from under the motor base (picture 6). Insert the container under the juicer cover on the left-hand side ensuring it is completely assembled and that water or other foreign substances (such as compost for the ...

User Manual
Page 9
...the pulp container to overfill as these will accumulate in accordance to 'ON'. Operate according to overfill the juice jug when operating the juicer. Always use fingers to push food down the feed chute. Clean the appliance in the integrated pulp container. Step 3: Plug the power... position before juicing. As soon as small apples, carrots and cucumber will not need to ´Care and cleaning`). Operating your Design Juicer Step1: Wash your selection of the appliance (refer to disassembling instructions). NOTE: Most fruit and vegetables such as you finished operating turn the...
...the pulp container to overfill as these will accumulate in accordance to 'ON'. Operate according to overfill the juice jug when operating the juicer. Always use fingers to push food down the feed chute. Clean the appliance in the integrated pulp container. Step 3: Plug the power... position before juicing. As soon as small apples, carrots and cucumber will not need to ´Care and cleaning`). Operating your Design Juicer Step1: Wash your selection of the appliance (refer to disassembling instructions). NOTE: Most fruit and vegetables such as you finished operating turn the...

User Manual
Page 10
... and unlatch it in use or when disassembling, moving or cleaning the appliance. Step 1: Push the 'ON/OFF' button on either side of the juicer cover (picture 2/3). Never clean the line cord or the motor block in the dishwasher, poor liquids over the grooves on the... to 'OFF' and then switch 'OFF' at the power outlet and unplug. Move the locking arm down. 2 3 Step 3: Lift the juicer cover off the juicer (picture 4). 4 40 Disassembling your Design Juicer WARNING: Always turn the appliance 'OFF' and pull the plug when the appliance is not in water or other liquids run...
... and unlatch it in use or when disassembling, moving or cleaning the appliance. Step 1: Push the 'ON/OFF' button on either side of the juicer cover (picture 2/3). Never clean the line cord or the motor block in the dishwasher, poor liquids over the grooves on the... to 'OFF' and then switch 'OFF' at the power outlet and unplug. Move the locking arm down. 2 3 Step 3: Lift the juicer cover off the juicer (picture 4). 4 40 Disassembling your Design Juicer WARNING: Always turn the appliance 'OFF' and pull the plug when the appliance is not in water or other liquids run...

User Manual
Page 11
... the filter basket. To remove the stainless steel filter basket from the filter bowl surround turn the spout to the left side. Disassembling your Design Juicer Step 5: Remove the filter bowl surround with the stainless steel filter basket still in place. To remove the filter bowl turn the filter bowl surround...
... the filter basket. To remove the stainless steel filter basket from the filter bowl surround turn the spout to the left side. Disassembling your Design Juicer Step 5: Remove the filter bowl surround with the stainless steel filter basket still in place. To remove the filter bowl turn the filter bowl surround...
User Manual
Page 12
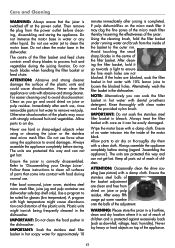
...during normal use. Always assemble the appliance completely before storing (regard ´Assembling the appliance`). Refer to air dry. Filter bowl surround, juicer cover, stainless steel micro mesh filter, juice jug and pulp container are protected this way and can not get lost . After cleaning ... handling the filter basket or feed chute. For easier cleaning and to clean the motor base. Allow parts to ´Disassembling your Design Juicer`. Do not use , rinse removable parts in hot soapy water for glasses (low temperature). Use a program to remove wet pulp. IMPORTANT...
...during normal use. Always assemble the appliance completely before storing (regard ´Assembling the appliance`). Refer to air dry. Filter bowl surround, juicer cover, stainless steel micro mesh filter, juice jug and pulp container are protected this way and can not get lost . After cleaning ... handling the filter basket or feed chute. For easier cleaning and to clean the motor base. Allow parts to ´Disassembling your Design Juicer`. Do not use , rinse removable parts in hot soapy water for glasses (low temperature). Use a program to remove wet pulp. IMPORTANT...
User Manual
Page 13
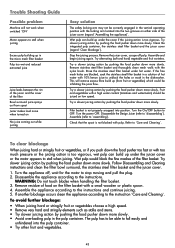
...small wooden or plastic spoon. 4. Follow Disassembling and Cleaning instructions and clean the filter bowl surround, the stainless steel filter basket and the juicer cover. 1. Wet pulp can build up under hot water. Try slower juicing action by pushing the food pusher down more slowly. Try ... clean the appliance according to ´assembling`). Trouble Shooting Guide Possible problem Machine will remove excess fibre build up (from spout Juicer makes loud noise when turned on No juice coming out while juicing Easy solution The safety locking arm may not be correctly engaged...
...small wooden or plastic spoon. 4. Follow Disassembling and Cleaning instructions and clean the filter bowl surround, the stainless steel filter basket and the juicer cover. 1. Wet pulp can build up under hot water. Try slower juicing action by pushing the food pusher down more slowly. Try ... clean the appliance according to ´assembling`). Trouble Shooting Guide Possible problem Machine will remove excess fibre build up (from spout Juicer makes loud noise when turned on No juice coming out while juicing Easy solution The safety locking arm may not be correctly engaged...

User Manual
Page 14
... fruit and vegetables form an important part of vitamin content. Juices are rapidly absorbed into the blood stream therefore being the quickest way in the juicer if peeled first. • All fruits with pits, hard seeds or stones such as nectarine, peaches, mangoes, apricots, plums and cherries must be consumed just... source of fruit and vegetables • Always wash fruit and vegetables before storing. • Most fruits and hardier type vegetables can digest nutrients. NOTE: Your juicer makes invigorating, frothy orange juice.
... fruit and vegetables form an important part of vitamin content. Juices are rapidly absorbed into the blood stream therefore being the quickest way in the juicer if peeled first. • All fruits with pits, hard seeds or stones such as nectarine, peaches, mangoes, apricots, plums and cherries must be consumed just... source of fruit and vegetables • Always wash fruit and vegetables before storing. • Most fruits and hardier type vegetables can digest nutrients. NOTE: Your juicer makes invigorating, frothy orange juice.

User Manual
Page 16
... g Plums = 259 kj 62 kcals) 100 g Raspberries = 167 kj (40 kcals) 100 g Strawberries = 163 kj (39 kcals) 100 g Tomatoes = 67 kj (16 kcals) Note: Your Juicer makes invigorating frothy orange juice. Simply peel the oranges and juice (best to keep longer Summer Refrigerate uncovered Vitamin C, B3, Potassium, Dietary Fibre 100 g Nectarines...
... g Plums = 259 kj 62 kcals) 100 g Raspberries = 167 kj (40 kcals) 100 g Strawberries = 163 kj (39 kcals) 100 g Tomatoes = 67 kj (16 kcals) Note: Your Juicer makes invigorating frothy orange juice. Simply peel the oranges and juice (best to keep longer Summer Refrigerate uncovered Vitamin C, B3, Potassium, Dietary Fibre 100 g Nectarines...

User Manual
Page 18
...: Makes 2 cups: 4 small Granny Smith apples 3 medium sized carrots, trimmed 4 sticks celery Process apples, carrots and celery through juicer. Serve immediately. Apple-Peach-Grapefruit-Juice Makes 2 cups 1 small Delicious apple 2 large peaches, halved and seeds removed 2 grapefruits, ... small rockmelon, peeled, seeded and halved 3 sprigs fresh mint leaves 1 mango, halved, seeded and peeled Process rockmelon, mint and mango through juicer. Serve immediately. Kumera-Celery-Ginger-Orange-Juice Makes 3 cups: 4 sticks celery, trimmed 1 small kumera (sweet potato), peeled and halved 2.5 ...
...: Makes 2 cups: 4 small Granny Smith apples 3 medium sized carrots, trimmed 4 sticks celery Process apples, carrots and celery through juicer. Serve immediately. Apple-Peach-Grapefruit-Juice Makes 2 cups 1 small Delicious apple 2 large peaches, halved and seeds removed 2 grapefruits, ... small rockmelon, peeled, seeded and halved 3 sprigs fresh mint leaves 1 mango, halved, seeded and peeled Process rockmelon, mint and mango through juicer. Serve immediately. Kumera-Celery-Ginger-Orange-Juice Makes 3 cups: 4 sticks celery, trimmed 1 small kumera (sweet potato), peeled and halved 2.5 ...

User Manual
Page 19
...Makes 2 cups: 4 medium sized beetroot, trimmed 2 medium Granny Smith apples 4 sticks celery Process beetroot, apples and celery through juicer. Vitamin replacer Tomato-Carrot-Red Capsicum-Juice Makes 3 cups: 2 small red capsicum 3 medium tomatoes 3 carrots, trimmed 4 ...Juice Makes 3 cups: 250g blackberries 3 ripe pears 2 grapefruits, peeled Process blackberries, pears and grapefruit through juicer. Serve immediately. Process tomatoes, carrots, parsley and capsicum through juicer. Cucumber-Celery-Fennel-Bean Sprout-Juice Makes 3 cups: 1 large cucumber 3 sticks celery 1 bulb fennel,...
...Makes 2 cups: 4 medium sized beetroot, trimmed 2 medium Granny Smith apples 4 sticks celery Process beetroot, apples and celery through juicer. Vitamin replacer Tomato-Carrot-Red Capsicum-Juice Makes 3 cups: 2 small red capsicum 3 medium tomatoes 3 carrots, trimmed 4 ...Juice Makes 3 cups: 250g blackberries 3 ripe pears 2 grapefruits, peeled Process blackberries, pears and grapefruit through juicer. Serve immediately. Process tomatoes, carrots, parsley and capsicum through juicer. Cucumber-Celery-Fennel-Bean Sprout-Juice Makes 3 cups: 1 large cucumber 3 sticks celery 1 bulb fennel,...

User Manual
Page 20
...375ml vegetable stock 425g canned baked beans 1 packet 2 Minute Noodles Freshly ground black pepper Process tomato, onion, carrots and green pepper through juicer. Pour into a saucepan and cook over a medium heat. Serve immediately. Gazpacho Serves 4: 4 medium tomatoes 4 sprigs fresh parsley 1 ...4 serving bowls. Pour into two equal portions 5 oranges, peeled 3 tablespoons natural yogurt Process mango, rockmelon and oranges through juicer. Stir in extracted juice, sprinkle with black pepper to simmer for one minute, stirring constantly. Pasta with oregano and Parmesan ...
...375ml vegetable stock 425g canned baked beans 1 packet 2 Minute Noodles Freshly ground black pepper Process tomato, onion, carrots and green pepper through juicer. Pour into a saucepan and cook over a medium heat. Serve immediately. Gazpacho Serves 4: 4 medium tomatoes 4 sprigs fresh parsley 1 ...4 serving bowls. Pour into two equal portions 5 oranges, peeled 3 tablespoons natural yogurt Process mango, rockmelon and oranges through juicer. Stir in extracted juice, sprinkle with black pepper to simmer for one minute, stirring constantly. Pasta with oregano and Parmesan ...

User Manual
Page 21
...strawberries, hulled 500ml skim milk 2 tablespoons powdered protein drink mix 1/2 cup crushed ice Process grapes, kiwi fruit and strawberries through juicer. Serve immediately. Stir in mineral water and ice. Stir in Creme de Menthe and sugar. Serve immediately. 51 Serve immediately.... orange quencher 8 carrots 2 small beetroot, trimmed 1/4 cup fresh mint leaves 4 oranges, peeled Process carrots, beetroot, mint leaves and oranges through juicer. Scoop ice into 4 glasses, pour over melon mixture, mix well to combine. Bloody Mary Makes 4 cups 4 medium tomatoes 2 sticks celery ...
...strawberries, hulled 500ml skim milk 2 tablespoons powdered protein drink mix 1/2 cup crushed ice Process grapes, kiwi fruit and strawberries through juicer. Serve immediately. Stir in mineral water and ice. Stir in Creme de Menthe and sugar. Serve immediately. 51 Serve immediately.... orange quencher 8 carrots 2 small beetroot, trimmed 1/4 cup fresh mint leaves 4 oranges, peeled Process carrots, beetroot, mint leaves and oranges through juicer. Scoop ice into 4 glasses, pour over melon mixture, mix well to combine. Bloody Mary Makes 4 cups 4 medium tomatoes 2 sticks celery ...

User Manual
Page 22
... cups: 1/2 small pineapple, peeled and halved 2 cucumber 1/2 cup fresh coriander leaves 1 cup crushed ice Process pineapple, cucumber and coriander through juicer. Tropical blend Makes 4 cups 2 mangoes, halved, seeded and peeled 3 kiwi fruit, peeled 1/2 small pineapple, peeled and halved 1/2 cup ...and divided into 2 equal portions 250g strawberries, hulled pulp of 4 passion fruit 1 cup crushed ice Process tomatoes, nectarine and mint leaves through juicer. Serve immediately. Scoop ice into 4 glasses, pour over juice, mix well to combine. Pear, radish and celery crush Makes 4 cups: ...
... cups: 1/2 small pineapple, peeled and halved 2 cucumber 1/2 cup fresh coriander leaves 1 cup crushed ice Process pineapple, cucumber and coriander through juicer. Tropical blend Makes 4 cups 2 mangoes, halved, seeded and peeled 3 kiwi fruit, peeled 1/2 small pineapple, peeled and halved 1/2 cup ...and divided into 2 equal portions 250g strawberries, hulled pulp of 4 passion fruit 1 cup crushed ice Process tomatoes, nectarine and mint leaves through juicer. Serve immediately. Scoop ice into 4 glasses, pour over juice, mix well to combine. Pear, radish and celery crush Makes 4 cups: ...
