
User Guide
Page 3
Contents Chapter 1: Using Your Gateway Flat-panel Monitor 1 Connecting the monitor 2 Setting up the optional stand 4 Attaching the USB stand 4 Adjusting monitor height tension 7 Adjusting monitor tilt tension 8 Connecting the USB hub 9 Setting up the optional speaker bar 10 Installing the speaker bar 10 Starting the monitor 11 Adjusting monitor settings 12 Monitor buttons 12 On-screen display options 13 Changing Windows screen settings 15 Changing color depth and screen resolution 15 EzTune software 15 Video modes 17 Power management 18 ENERGY STAR 18 Energy declaration 18 ...
Contents Chapter 1: Using Your Gateway Flat-panel Monitor 1 Connecting the monitor 2 Setting up the optional stand 4 Attaching the USB stand 4 Adjusting monitor height tension 7 Adjusting monitor tilt tension 8 Connecting the USB hub 9 Setting up the optional speaker bar 10 Installing the speaker bar 10 Starting the monitor 11 Adjusting monitor settings 12 Monitor buttons 12 On-screen display options 13 Changing Windows screen settings 15 Changing color depth and screen resolution 15 EzTune software 15 Video modes 17 Power management 18 ENERGY STAR 18 Energy declaration 18 ...
User Guide
Page 5
CHAPTER1 Using Your Gateway Flat-panel Monitor • Connecting the monitor • Setting up the optional stand • Setting up the optional speaker bar • Starting the monitor • Adjusting monitor settings • Changing Windows screen settings • Power management • Maintaining • Troubleshooting • Specifications 1
CHAPTER1 Using Your Gateway Flat-panel Monitor • Connecting the monitor • Setting up the optional stand • Setting up the optional speaker bar • Starting the monitor • Adjusting monitor settings • Changing Windows screen settings • Power management • Maintaining • Troubleshooting • Specifications 1
User Guide
Page 6
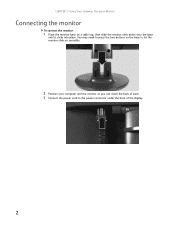
CHAPTER 1: Using Your Gateway Flat-panel Monitor Connecting the monitor To connect the monitor: 1 Place the monitor base on smoothly. 2 Position your computer and the monitor so you can reach the back of each. 3 Connect the power cord to let the monitor slide on a table top, then slide the monitor neck down onto the base until it clicks into place. You may need to press the two buttons on the base to the power connector under the back of the display. 2
CHAPTER 1: Using Your Gateway Flat-panel Monitor Connecting the monitor To connect the monitor: 1 Place the monitor base on smoothly. 2 Position your computer and the monitor so you can reach the back of each. 3 Connect the power cord to let the monitor slide on a table top, then slide the monitor neck down onto the base until it clicks into place. You may need to press the two buttons on the base to the power connector under the back of the display. 2
User Guide
Page 8
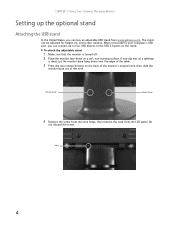
The stand can buy an adjustable USB stand from the LCD panel. When connected to the USB 2.0 ports on the back of the monitor's original neck, then slide the monitor base out of the table. 3 Press the two release buttons on the stand. Release Button Release Button 4 Remove the screw from the neck hinge, then remove the neck from www.gateway.com. Let the monitor base hang down on a tabletop is turned off. 2 Place...
The stand can buy an adjustable USB stand from the LCD panel. When connected to the USB 2.0 ports on the back of the monitor's original neck, then slide the monitor base out of the table. 3 Press the two release buttons on the stand. Release Button Release Button 4 Remove the screw from the neck hinge, then remove the neck from www.gateway.com. Let the monitor base hang down on a tabletop is turned off. 2 Place...
User Guide
Page 10
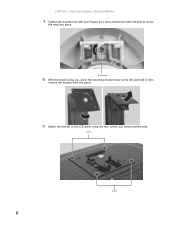
CHAPTER 1: Using Your Gateway Flat-panel Monitor 9 Tighten the thumbscrew with your fingers (or a flat screwdriver) under the base to the LCD panel using the four screws you removed previously. Thumbscrew 10 With the stand facing you, press the mounting bracket lever to the left and hold it, then remove the bracket from the stand. 11 Attach the bracket to secure the neck into place. Screws Screws 6
CHAPTER 1: Using Your Gateway Flat-panel Monitor 9 Tighten the thumbscrew with your fingers (or a flat screwdriver) under the base to the LCD panel using the four screws you removed previously. Thumbscrew 10 With the stand facing you, press the mounting bracket lever to the left and hold it, then remove the bracket from the stand. 11 Attach the bracket to secure the neck into place. Screws Screws 6
User Guide
Page 11
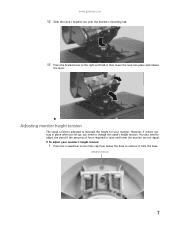
... required to remove it , then lower the neck into place and release the lever. Adjusting monitor height tension The stand is factory adjusted to change the stand's height tension. You also need to maintain the height for your monitor's height tension: 1 Press the screwdriver access hole cap from the base. To adjust your monitor. www.gateway.com 12 Slide the neck's bracket slot onto the bracket's mounting tab. 13...
... required to remove it , then lower the neck into place and release the lever. Adjusting monitor height tension The stand is factory adjusted to change the stand's height tension. You also need to maintain the height for your monitor's height tension: 1 Press the screwdriver access hole cap from the base. To adjust your monitor. www.gateway.com 12 Slide the neck's bracket slot onto the bracket's mounting tab. 13...
User Guide
Page 12
... the monitor is correct for your monitor's tilt tension: • Adjust the tilt tension screw (on the back of the stand, in the slot above the USB In port). You may need to turn the screw several times before the tension is about 1 inch (2.54 cm) below eye level. If the monitor changes its tilt angle when you let go . Height tension screw 3 Adjust the height tension screw so the monitor stays...
... the monitor is correct for your monitor's tilt tension: • Adjust the tilt tension screw (on the back of the stand, in the slot above the USB In port). You may need to turn the screw several times before the tension is about 1 inch (2.54 cm) below eye level. If the monitor changes its tilt angle when you let go . Height tension screw 3 Adjust the height tension screw so the monitor stays...
User Guide
Page 13
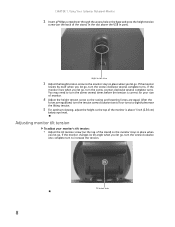
... you need to adjust lighting to accommodate each user's height and preference. To connect your USB stand's built-in USB 1.1 mode. To use ) is based upon the following guildelines. Screen distance from user The screen should be placed at or slightly below (about 1 inch or 25 mm) your eye level while you are based on your computer. USB In port Power connector USB 2.0 ports 2 To provide full power to your stand's USB ports, connect the AC power adapter to the power connector...
... you need to adjust lighting to accommodate each user's height and preference. To connect your USB stand's built-in USB 1.1 mode. To use ) is based upon the following guildelines. Screen distance from user The screen should be placed at or slightly below (about 1 inch or 25 mm) your eye level while you are based on your computer. USB In port Power connector USB 2.0 ports 2 To provide full power to your stand's USB ports, connect the AC power adapter to the power connector...
User Guide
Page 14
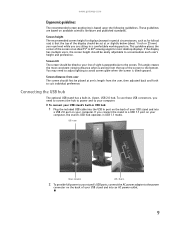
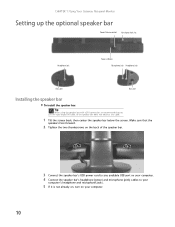
... the screen. CHAPTER 1: Using Your Gateway Flat-panel Monitor Setting up the optional speaker bar Power/Volume control Kensington lock slot Headphone jack Power indicator Microphone jack Headphone jack Bass port Bass port Installing the speaker bar To install the speaker bar: Tip When using the speaker bar with a DVI connection, we recommend that the speakers face forward. 2 Tighten the two thumbscrews on the back of the speaker bar. 3 Connect the speaker bar's USB power cord to any available USB port on...
... the screen. CHAPTER 1: Using Your Gateway Flat-panel Monitor Setting up the optional speaker bar Power/Volume control Kensington lock slot Headphone jack Power indicator Microphone jack Headphone jack Bass port Bass port Installing the speaker bar To install the speaker bar: Tip When using the speaker bar with a DVI connection, we recommend that the speakers face forward. 2 Tighten the two thumbscrews on the back of the speaker bar. 3 Connect the speaker bar's USB power cord to any available USB port on...
User Guide
Page 15
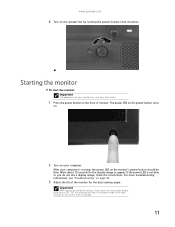
... Auto button before entering the OSD. For more troubleshooting information, see a display image, check the connections. This will automatically adjust the display image to appear. After your computer is not blue or you do not see "Troubleshooting" on the speaker bar by rotating the power/volume knob clockwise. Starting the monitor To start the monitor: Important The appearance of the monitor for the display image to the ideal settings for the current screen resolution. 11 www.gateway...
... Auto button before entering the OSD. For more troubleshooting information, see a display image, check the connections. This will automatically adjust the display image to appear. After your computer is not blue or you do not see "Troubleshooting" on the speaker bar by rotating the power/volume knob clockwise. Starting the monitor To start the monitor: Important The appearance of the monitor for the display image to the ideal settings for the current screen resolution. 11 www.gateway...
User Guide
Page 16
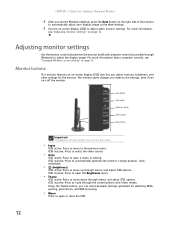
... that lets you adjust contrast, brightness, and other monitor settings. For more information, see "Adjusting monitor settings" on page 12. Input button Auto button Brightness button Theme button Menu button Important The appearance of the monitor to cycle through menus and adjust OSD options. OSD inactive: Press to automatically optimize the monitor's image position, clock, and phase. • (brightness) OSD active: Press to move to open or close the OSD. 12 CHAPTER 1: Using Your Gateway Flat-panel Monitor 4 After you see "Changing Windows screen settings" on page 15...
... that lets you adjust contrast, brightness, and other monitor settings. For more information, see "Adjusting monitor settings" on page 12. Input button Auto button Brightness button Theme button Menu button Important The appearance of the monitor to cycle through menus and adjust OSD options. OSD inactive: Press to automatically optimize the monitor's image position, clock, and phase. • (brightness) OSD active: Press to move to open or close the OSD. 12 CHAPTER 1: Using Your Gateway Flat-panel Monitor 4 After you see "Changing Windows screen settings" on page 15...

User Guide
Page 17
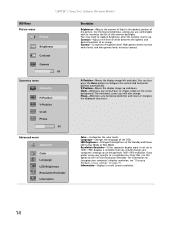
...On-screen display options Adjusting OSD settings To adjust the OSD settings: Tip While the OSD is automatically adjusted to the ideal settings for your monitor to its optimum settings. Advanced-Opens the Advanced menu, where you can adjust color balance, change the option. 5 Press the Input button to return to a previous menu. 6 When you can adjust brightness, contrast, and gamma. OSD Menu Main menu OSD menus Main Menu Auto Picture Geometry Advanced Reset Description Auto-Automatically adjusts your current screen resolution. 2 Press the Menu button. Reset-Resets the monitor to...
...On-screen display options Adjusting OSD settings To adjust the OSD settings: Tip While the OSD is automatically adjusted to the ideal settings for your monitor to its optimum settings. Advanced-Opens the Advanced menu, where you can adjust color balance, change the option. 5 Press the Input button to return to a previous menu. 6 When you can adjust brightness, contrast, and gamma. OSD Menu Main menu OSD menus Main Menu Auto Picture Geometry Advanced Reset Description Auto-Automatically adjusts your current screen resolution. 2 Press the Menu button. Reset-Resets the monitor to...
User Guide
Page 18
... display input is not set to turn off the Resolution Reminder. H-Position-Moves the display image left and right. For information on changing your computer's settings to use this option to 1440 × 900, displays a reminder that , use the optimum 1440 × 900 resolution. CHAPTER 1: Using Your Gateway Flat-panel Monitor OSD Menu Picture menu Picture Brightness Contrast Gamma 80 Geometry menu Geometry H-Position V-Position Clock Phase 50 Advanced menu Advanced Color Language LED Brightness Resolution Reminder Information Description Brightness-Adjusts the amount of light...
... display input is not set to turn off the Resolution Reminder. H-Position-Moves the display image left and right. For information on changing your computer's settings to use this option to 1440 × 900, displays a reminder that , use the optimum 1440 × 900 resolution. CHAPTER 1: Using Your Gateway Flat-panel Monitor OSD Menu Picture menu Picture Brightness Contrast Gamma 80 Geometry menu Geometry H-Position V-Position Clock Phase 50 Advanced menu Advanced Color Language LED Brightness Resolution Reminder Information Description Brightness-Adjusts the amount of light...
User Guide
Page 19
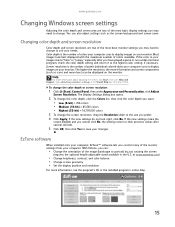
... maximum number of colors available. Help For more information about adjusting the screen, click Start, then click Help and Support. EzTune software When installed onto your computer, EzTune™ software lets you control many of the monitor settings from your monitor. www.gateway.com Changing Windows screen settings Adjusting the color depth and screen area are two of the most basic display settings you may need to portrait) by just rotating the screen (requires the optional height-adjustable stand available...
... maximum number of colors available. Help For more information about adjusting the screen, click Start, then click Help and Support. EzTune software When installed onto your computer, EzTune™ software lets you control many of the monitor settings from your monitor. www.gateway.com Changing Windows screen settings Adjusting the color depth and screen area are two of the most basic display settings you may need to portrait) by just rotating the screen (requires the optional height-adjustable stand available...
User Guide
Page 20
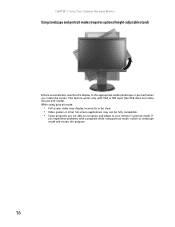
.... • Video games or other full-screen applications may not be fully compatible. • Some programs are not able to recognize and adapt to landscape mode and restart the program. 16 CHAPTER 1: Using Your Gateway Flat-panel Monitor Using landscape and portrait modes (requires optional height-adjustable stand) EzTune automatically switches the display to the appropriate mode (landscape or portrait) when you experience problems with VGA or DVI input (the OSD does not...
.... • Video games or other full-screen applications may not be fully compatible. • Some programs are not able to recognize and adapt to landscape mode and restart the program. 16 CHAPTER 1: Using Your Gateway Flat-panel Monitor Using landscape and portrait modes (requires optional height-adjustable stand) EzTune automatically switches the display to the appropriate mode (landscape or portrait) when you experience problems with VGA or DVI input (the OSD does not...
User Guide
Page 22
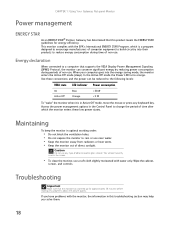
... manufacturers of computer equipment to build circuitry into the energy saving mode, the monitor enters the Active Off mode (sleep). In the Active Off mode the Power LED turns orange. CHAPTER 1: Using Your Gateway Flat-panel Monitor Power management ENERGY STAR As an ENERGY STAR® Partner, Gateway has determined that supports the VESA Display Power Management Signaling (DPMS) Protocol, the monitor can be reduced to reduce energy consumption during periods of...
... manufacturers of computer equipment to build circuitry into the energy saving mode, the monitor enters the Active Off mode (sleep). In the Active Off mode the Power LED turns orange. CHAPTER 1: Using Your Gateway Flat-panel Monitor Power management ENERGY STAR As an ENERGY STAR® Partner, Gateway has determined that supports the VESA Display Power Management Signaling (DPMS) Protocol, the monitor can be reduced to reduce energy consumption during periods of...
User Guide
Page 23
... the monitor out of sleep mode. • Restart your computer. For more information about connecting the video cable, see "Connecting the monitor" on page 2. www.gateway.com No power Make sure that the power cord is connected correctly to both the back of the monitor and the wall outlet. Color is not uniform • Press the Auto button to automatically adjust the display image to the ideal settings. • Make sure that the monitor warms...
... the monitor out of sleep mode. • Restart your computer. For more information about connecting the video cable, see "Connecting the monitor" on page 2. www.gateway.com No power Make sure that the power cord is connected correctly to both the back of the monitor and the wall outlet. Color is not uniform • Press the Auto button to automatically adjust the display image to the ideal settings. • Make sure that the monitor warms...
User Guide
Page 24
... (Start), Control Panel, Sounds and Audio Devices, the Volume tab, then click Advanced. Turn the knob counter-clockwise to decrease the volume and turn on , but no sound is connected to adjust the image. For optimum volume control using Windows sound controls. If the audio device's output volume is not sized or centered correctly • Press the Auto button to automatically adjust the display image to the ideal settings. • Use the position controls to . I want to adjust the display image position, see the device's user guide. Speaker...
... (Start), Control Panel, Sounds and Audio Devices, the Volume tab, then click Advanced. Turn the knob counter-clockwise to decrease the volume and turn on , but no sound is connected to adjust the image. For optimum volume control using Windows sound controls. If the audio device's output volume is not sized or centered correctly • Press the Auto button to automatically adjust the display image to the ideal settings. • Use the position controls to . I want to adjust the display image position, see the device's user guide. Speaker...
User Guide
Page 25
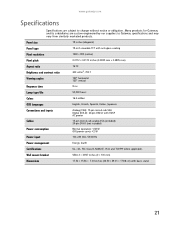
... (native) Pixel pitch 0.0112 × 0.0112 inches (0.2835 mm × 0.2835 mm) Aspect ratio Brightness and contrast ratio 16:10 300 cd/m2, 700:1 Viewing angles 150° horizontal 135° vertical Response time 8 ms Lamp type/life 50,000 hours Colors 16.2 million OSD languages English, French, Spanish, Italian, Japanese Connections and inputs Analog (VGA): 15-pin mini d-sub VGA Digital (DVI-D): 24-pin DVD-D with HDCP AC power Cables...
... (native) Pixel pitch 0.0112 × 0.0112 inches (0.2835 mm × 0.2835 mm) Aspect ratio Brightness and contrast ratio 16:10 300 cd/m2, 700:1 Viewing angles 150° horizontal 135° vertical Response time 8 ms Lamp type/life 50,000 hours Colors 16.2 million OSD languages English, French, Spanish, Italian, Japanese Connections and inputs Analog (VGA): 15-pin mini d-sub VGA Digital (DVI-D): 24-pin DVD-D with HDCP AC power Cables...
User Guide
Page 28
... kind into the monitor ventilation openings. ■ Some products are equipped with a TV Tuner, cable, or satellite receiver card, make sure that the switch is in the monitor case are followed. No user serviceable parts inside. Replacement parts and accessories Use only replacement parts and accessories recommended by Gateway. 4 Warning Do not use . The plug on this system, make sure that the total ampere rating on the products plugged into an...
... kind into the monitor ventilation openings. ■ Some products are equipped with a TV Tuner, cable, or satellite receiver card, make sure that the switch is in the monitor case are followed. No user serviceable parts inside. Replacement parts and accessories Use only replacement parts and accessories recommended by Gateway. 4 Warning Do not use . The plug on this system, make sure that the total ampere rating on the products plugged into an...


