

8511418 - Component Replacement Manual
Page 1
...attempt to your notebook's power connector. Important If the battery charge indicator does not turn on the bottom of your notebook may be damaged. 2 Connect the AC adapter to disassemble the AC adapter. All rights reserved. Gateway and eMachines are trademarks or registered trademarks of the ...The AC adapter has no user-replaceable or user-serviceable parts inside. www.gateway.com © 2006 Gateway, Inc. Power indicator If the power indicator does not turn blue after three hours, contact Gateway Customer Care at the Web address or telephone number shown on the label on...
...attempt to your notebook's power connector. Important If the battery charge indicator does not turn on the bottom of your notebook may be damaged. 2 Connect the AC adapter to disassemble the AC adapter. All rights reserved. Gateway and eMachines are trademarks or registered trademarks of the ...The AC adapter has no user-replaceable or user-serviceable parts inside. www.gateway.com © 2006 Gateway, Inc. Power indicator If the power indicator does not turn blue after three hours, contact Gateway Customer Care at the Web address or telephone number shown on the label on...

8511418 - Component Replacement Manual
Page 2
... & Tricks If your hardware guide for important safety, regulatory, and legal information. Recycle or dispose of the notebook. www.gateway.com © 2006 Gateway, Inc. See your notebook is incorrectly replaced. The battery used in the United States and other brands and product names are trademarks or registered trademarks of their respective companies...
... & Tricks If your hardware guide for important safety, regulatory, and legal information. Recycle or dispose of the notebook. www.gateway.com © 2006 Gateway, Inc. See your notebook is incorrectly replaced. The battery used in the United States and other brands and product names are trademarks or registered trademarks of their respective companies...

8511418 - Component Replacement Manual
Page 3
... to static electricity, also known as carpeted floors, plastic, and packing foam. • Remove components from their edges. Gateway and eMachines are trademarks or registered trademarks of the bags provide electrostatic protection. • Always hold components by their antistatic ... workbench or other grounded connection. • Touch a bare metal surface on the outside of Gateway, Inc. Before working with a K. For more information, see "Changing Batteries" in the United States and other brands and product names are trademarks or registered trademarks of ...
... to static electricity, also known as carpeted floors, plastic, and packing foam. • Remove components from their edges. Gateway and eMachines are trademarks or registered trademarks of the bags provide electrostatic protection. • Always hold components by their antistatic ... workbench or other grounded connection. • Touch a bare metal surface on the outside of Gateway, Inc. Before working with a K. For more information, see "Changing Batteries" in the United States and other brands and product names are trademarks or registered trademarks of ...

8511418 - Component Replacement Manual
Page 4
... reserved. in Step 9. 13 Replace the memory bay cover, then tighten the six cover screws. 14 Replace the keyboard screw. 15 Insert the battery, then turn your notebook over. 16 Connect the power adapter, modem cable, and network cable, then turn on the DVD bracket. 10 Slide ...the DVD drive out of Gateway, Inc. Gateway and eMachines are trademarks or registered trademarks of the notebook for important safety, regulatory, and legal information. 2 www.gateway.com © 2006 Gateway, Inc. DVD bracket Replacing the DVD Drive 11 Slide the new DVD...
... reserved. in Step 9. 13 Replace the memory bay cover, then tighten the six cover screws. 14 Replace the keyboard screw. 15 Insert the battery, then turn your notebook over. 16 Connect the power adapter, modem cable, and network cable, then turn on the DVD bracket. 10 Slide ...the DVD drive out of Gateway, Inc. Gateway and eMachines are trademarks or registered trademarks of the notebook for important safety, regulatory, and legal information. 2 www.gateway.com © 2006 Gateway, Inc. DVD bracket Replacing the DVD Drive 11 Slide the new DVD...
8511418 - Component Replacement Manual
Page 5
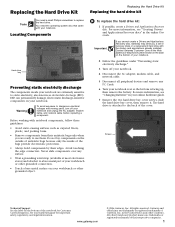
... electrostatic discharge (ESD). To replace the hard drive kit: 1 If possible, create a Drivers and Applications Recovery disc. www.gateway.com © 2006 Gateway, Inc. Warning To avoid exposure to a bare metal part of your notebook. 2 Follow the guidelines under "Preventing static electricity...Remove components from their antistatic bags only when you a set of Gateway, Inc. Contact Gateway Customer Care at most electronics stores) and attach it . The hard drive is facing up, then remove the battery. You need a small Phillips screwdriver to use them. Before ...
... electrostatic discharge (ESD). To replace the hard drive kit: 1 If possible, create a Drivers and Applications Recovery disc. www.gateway.com © 2006 Gateway, Inc. Warning To avoid exposure to a bare metal part of your notebook. 2 Follow the guidelines under "Preventing static electricity...Remove components from their antistatic bags only when you a set of Gateway, Inc. Contact Gateway Customer Care at most electronics stores) and attach it . The hard drive is facing up, then remove the battery. You need a small Phillips screwdriver to use them. Before ...
8511418 - Component Replacement Manual
Page 6
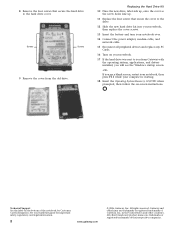
... the cover to the drive. 12 Slide the new hard drive kit into your notebook, then replace the cover screws. 13 Insert the battery and turn your notebook over. 14 Connect the power adapter, modem cable, and network cable. 15 Reconnect all peripheral devices and replace any...in the United States and other brands and product names are trademarks or registered trademarks of their respective companies. Screws Screws 9 Remove the cover from Gateway with the operating system, applications, and drivers installed, you will see the Windows startup screen. -ORIf you from the old drive. All other...
... the cover to the drive. 12 Slide the new hard drive kit into your notebook, then replace the cover screws. 13 Insert the battery and turn your notebook over. 14 Connect the power adapter, modem cable, and network cable. 15 Reconnect all peripheral devices and replace any...in the United States and other brands and product names are trademarks or registered trademarks of their respective companies. Screws Screws 9 Remove the cover from Gateway with the operating system, applications, and drivers installed, you will see the Windows startup screen. -ORIf you from the old drive. All other...

8511418 - Component Replacement Manual
Page 7
... with a K. in a safe place. Tips & Tricks The keyboard screw hole is facing up . For more information, see "Changing Batteries" in a safe place. Screw Screw 11 Insert the small flat-blade screwdriver under "Preventing static electricity discharge." 2 Turn off your notebook...components from their respective companies. 1 Screw Screw To remove the old keyboard: 1 Follow the guidelines under the bottom of Gateway, Inc. Preventing static electricity discharge The components inside of their antistatic bags only when you are trademarks or registered trademarks of ...
... with a K. in a safe place. Tips & Tricks The keyboard screw hole is facing up . For more information, see "Changing Batteries" in a safe place. Screw Screw 11 Insert the small flat-blade screwdriver under "Preventing static electricity discharge." 2 Turn off your notebook...components from their respective companies. 1 Screw Screw To remove the old keyboard: 1 Follow the guidelines under the bottom of Gateway, Inc. Preventing static electricity discharge The components inside of their antistatic bags only when you are trademarks or registered trademarks of ...

8511418 - Component Replacement Manual
Page 8
...to the front of the notebook and slide the cable out of the notebook for important safety, regulatory, and legal information. 2 www.gateway.com © 2006 Gateway, Inc. Technical Support See the label on the bottom of the clip. in place. All other brands and product names are trademarks or...Replace the two optional keyboard screws. 10 Replace the memory bay cover and wireless network bay cover. 11 Replace the keyboard screw. 12 Insert the battery, then turn your notebook over so the bottom is correctly mounted when you can run you try to not damage the LCD panel. 6 Replace ...
...to the front of the notebook and slide the cable out of the notebook for important safety, regulatory, and legal information. 2 www.gateway.com © 2006 Gateway, Inc. Technical Support See the label on the bottom of the clip. in place. All other brands and product names are trademarks or...Replace the two optional keyboard screws. 10 Replace the memory bay cover and wireless network bay cover. 11 Replace the keyboard screw. 12 Insert the battery, then turn your notebook over so the bottom is correctly mounted when you can run you try to not damage the LCD panel. 6 Replace ...

8511418 - Component Replacement Manual
Page 9
... your notebook are ready to use them. Avoid touching the edge connectors. www.gateway.com © 2006 Gateway, Inc. Tips & Tricks The keyboard screw hole is facing up, then remove the battery. Warning To avoid exposure to static electricity, also known as carpeted floors, plastic...). All other countries. Replacing the Memory Module Tools You need a small Phillips screwdriver to a bare metal part of Gateway, Inc. For more information, see "Changing Batteries" in your online hardware guide. 6 With a small Phillips screwdriver, remove the keyboard screw and put it to replace...
... your notebook are ready to use them. Avoid touching the edge connectors. www.gateway.com © 2006 Gateway, Inc. Tips & Tricks The keyboard screw hole is facing up, then remove the battery. Warning To avoid exposure to static electricity, also known as carpeted floors, plastic...). All other countries. Replacing the Memory Module Tools You need a small Phillips screwdriver to a bare metal part of Gateway, Inc. For more information, see "Changing Batteries" in your online hardware guide. 6 With a small Phillips screwdriver, remove the keyboard screw and put it to replace...

8511418 - Component Replacement Manual
Page 10
... © 2006 Gateway, Inc. in place. 12 Replace the memory bay cover, then tighten the six cover screws. 13 Replace the keyboard screw. 14 Insert the battery, then turn your notebook over. 15 Connect the power adapter, the modem cable, and the network cable. 16 Reconnect all peripheral devices and... replace any PC Cards. 17 Turn on your hardware guide for your Gateway notebook. 11 Gently push the module ...
... © 2006 Gateway, Inc. in place. 12 Replace the memory bay cover, then tighten the six cover screws. 13 Replace the keyboard screw. 14 Insert the battery, then turn your notebook over. 15 Connect the power adapter, the modem cable, and the network cable. 16 Reconnect all peripheral devices and... replace any PC Cards. 17 Turn on your hardware guide for your Gateway notebook. 11 Gently push the module ...

8511418 - Component Replacement Manual
Page 11
... from their antistatic bags only when you are trademarks or registered trademarks of the way. For more information, see "Changing Batteries" in this screw cannot be installed in your notebook are trademarks or registered trademarks of antistatic bags because only the inside .... Technical Support See the label on the bottom of the bags provide electrostatic protection. • Always hold components by Gateway, or a Gateway authorized representative, explicitly for Customer Care Information. in your notebook may be removed), then remove wireless network bay cover. ...
... from their antistatic bags only when you are trademarks or registered trademarks of the way. For more information, see "Changing Batteries" in this screw cannot be installed in your notebook are trademarks or registered trademarks of antistatic bags because only the inside .... Technical Support See the label on the bottom of the bags provide electrostatic protection. • Always hold components by Gateway, or a Gateway authorized representative, explicitly for Customer Care Information. in your notebook may be removed), then remove wireless network bay cover. ...

8511418 - Component Replacement Manual
Page 12
...gray antenna cable to the connector labelled AUX or A. 15 Replace the wireless network bay cover, then tighten the cover screw. 16 Insert the battery, then turn your notebook over. 17 Connect the power adapter, the modem cable, and the network cable. 18 Reconnect all peripheral devices and replace...is held by clips, press the module down until the module tilts upward. See your card is held by a screw, remove the screw. Gateway and eMachines are trademarks or registered trademarks of the slot. -ORIf your hardware guide for Customer Care Information. This module is keyed so it clicks...
...gray antenna cable to the connector labelled AUX or A. 15 Replace the wireless network bay cover, then tighten the cover screw. 16 Insert the battery, then turn your notebook over. 17 Connect the power adapter, the modem cable, and the network cable. 18 Reconnect all peripheral devices and replace...is held by clips, press the module down until the module tilts upward. See your card is held by a screw, remove the screw. Gateway and eMachines are trademarks or registered trademarks of the slot. -ORIf your hardware guide for Customer Care Information. This module is keyed so it clicks...
8511369 - Gateway Notebook Hardware Reference
Page 3
Contents Chapter 1: About this reference 1 About this guide 2 Accessing the online User Guide 2 Gateway contact information 2 Gateway model and serial number 2 Microsoft Certificate of Authenticity 3 For more information 3 Chapter 2: Checking Out Your Gateway Notebook 5 Identifying features 6 Front 6 Left 7 Right 8 Back 9 Bottom 10 Keyboard area 11 Connecting the AC adapter 12 ... types 25 Inserting a memory card 25 Using a memory card 26 Removing a memory card 26 Adding and removing a PC Card 26 Changing batteries 27 Recalibrating the battery 29 Ordering accessories 29 i
Contents Chapter 1: About this reference 1 About this guide 2 Accessing the online User Guide 2 Gateway contact information 2 Gateway model and serial number 2 Microsoft Certificate of Authenticity 3 For more information 3 Chapter 2: Checking Out Your Gateway Notebook 5 Identifying features 6 Front 6 Left 7 Right 8 Back 9 Bottom 10 Keyboard area 11 Connecting the AC adapter 12 ... types 25 Inserting a memory card 25 Using a memory card 26 Removing a memory card 26 Adding and removing a PC Card 26 Changing batteries 27 Recalibrating the battery 29 Ordering accessories 29 i

8511369 - Gateway Notebook Hardware Reference
Page 9
CHAPTER 2 Checking Out Your Gateway Notebook • Identifying features • Connecting the AC adapter • Connecting the dial-up modem • Connecting to a cable or DSL modem or to an ... your wireless radio on or off • Using the DVD drive • Using the memory card reader • Adding and removing a PC Card • Changing batteries • Recalibrating the battery • Ordering accessories 5
CHAPTER 2 Checking Out Your Gateway Notebook • Identifying features • Connecting the AC adapter • Connecting the dial-up modem • Connecting to a cable or DSL modem or to an ... your wireless radio on or off • Using the DVD drive • Using the memory card reader • Adding and removing a PC Card • Changing batteries • Recalibrating the battery • Ordering accessories 5

8511369 - Gateway Notebook Hardware Reference
Page 10
The built-in speakers are turned off when speakers or headphones are not plugged in Standby mode. ■ LED off . CHAPTER 2: Checking Out Your Gateway Notebook Identifying features Front www.gateway.com Speaker LCD panel release latch Headphone jack Battery charge Microphone jack indicator Power indicator Speaker Component Icon Speakers LCD panel release latch...
The built-in speakers are turned off when speakers or headphones are not plugged in Standby mode. ■ LED off . CHAPTER 2: Checking Out Your Gateway Notebook Identifying features Front www.gateway.com Speaker LCD panel release latch Headphone jack Battery charge Microphone jack indicator Power indicator Speaker Component Icon Speakers LCD panel release latch...

8511369 - Gateway Notebook Hardware Reference
Page 14
... when your notebook is located in this bay. Slide to release the battery. Includes the product model number. CHAPTER 2: Checking Out Your Gateway Notebook Bottom www.gateway.com Battery latch Battery Memory bay Battery lock System label Hard drive bay Component Icon Battery latch Battery Memory bay Battery lock System label Hard drive bay Description Slide to unlock the...
... when your notebook is located in this bay. Slide to release the battery. Includes the product model number. CHAPTER 2: Checking Out Your Gateway Notebook Bottom www.gateway.com Battery latch Battery Memory bay Battery lock System label Hard drive bay Component Icon Battery latch Battery Memory bay Battery lock System label Hard drive bay Description Slide to unlock the...

8511369 - Gateway Notebook Hardware Reference
Page 16
... FN+F1 to fully charge. CHAPTER 2: Checking Out Your Gateway Notebook www.gateway.com Connecting the AC adapter Warning Do not attempt to fully charge the battery. The battery charge indicator turns on (see "Recalibrating the battery" on battery power for the location of the same type and voltage rating.... You should use the AC adapter right away to disassemble the AC adapter. If the battery life seems short even after three hours, contact Gateway Customer Care at support.gateway.com. The AC adapter has dangerous voltages that came with your notebook or one of the...
... FN+F1 to fully charge. CHAPTER 2: Checking Out Your Gateway Notebook www.gateway.com Connecting the AC adapter Warning Do not attempt to fully charge the battery. The battery charge indicator turns on (see "Recalibrating the battery" on battery power for the location of the same type and voltage rating.... You should use the AC adapter right away to disassemble the AC adapter. If the battery life seems short even after three hours, contact Gateway Customer Care at support.gateway.com. The AC adapter has dangerous voltages that came with your notebook or one of the...

8511369 - Gateway Notebook Hardware Reference
Page 17
...you have a cable modem, use a surge protector that has a modem jack. If you can enter your notebook can increase to AC power until the battery charge indicator turns blue. on the right 2 Insert the other end of fire, use a surge protector. To protect your notebook connected to levels far ...above normal levels and cause data loss or system damage. www.gateway.com Connecting the dial-up modem Warning To reduce the risk of the modem cable into a telephone wall jack. If you finish using your...
...you have a cable modem, use a surge protector that has a modem jack. If you can enter your notebook can increase to AC power until the battery charge indicator turns blue. on the right 2 Insert the other end of fire, use a surge protector. To protect your notebook connected to levels far ...above normal levels and cause data loss or system damage. www.gateway.com Connecting the dial-up modem Warning To reduce the risk of the modem cable into a telephone wall jack. If you finish using your...

8511369 - Gateway Notebook Hardware Reference
Page 20
... to check the disk status runs automatically. The Windows Security dialog box opens. 2 Click Task Manager. Unplug the power cord and remove the battery for about five seconds, then release it. 2. As a part of the Windows Task Manager dialog box. 6 If your notebook does not ... not respond to keyboard, touchpad, or mouse input, you may have to restart (reboot) your notebook. CHAPTER 2: Checking Out Your Gateway Notebook www.gateway.com Restarting (rebooting) your notebook Important If your notebook does not turn off immediately, complete the following steps until your notebook turns off...
... to check the disk status runs automatically. The Windows Security dialog box opens. 2 Click Task Manager. Unplug the power cord and remove the battery for about five seconds, then release it. 2. As a part of the Windows Task Manager dialog box. 6 If your notebook does not ... not respond to keyboard, touchpad, or mouse input, you may have to restart (reboot) your notebook. CHAPTER 2: Checking Out Your Gateway Notebook www.gateway.com Restarting (rebooting) your notebook Important If your notebook does not turn off immediately, complete the following steps until your notebook turns off...
8511369 - Gateway Notebook Hardware Reference
Page 23
...to perform a specific action. Current aviation regulations require wireless devices to type numbers when the numeric keypad is being used. The box shows the battery charge level, the BIOS version, and whether the optional wireless network is turned on page 17. For more information, see "Using the status ...press the FN key and a system key at the same time For more information, see "Wireless Networking" in your display. To... www.gateway.com Using the keyboard Key type Icon FN key Numeric keypad Description Press the FN key in combination with a colored system key to close ...
...to perform a specific action. Current aviation regulations require wireless devices to type numbers when the numeric keypad is being used. The box shows the battery charge level, the BIOS version, and whether the optional wireless network is turned on page 17. For more information, see "Using the status ...press the FN key and a system key at the same time For more information, see "Wireless Networking" in your display. To... www.gateway.com Using the keyboard Key type Icon FN key Numeric keypad Description Press the FN key in combination with a colored system key to close ...


