Owners Manual
Page 2
...Instructions Operating Instructions IMPORTANT SAFETY INFORMATION. call the fire department. 3 Clear the room, building or area of this or any gas or electrical appliance. 4 Immediately call your gas supplier from being blown into the room. 2 Use only rigid metal 4″ diameter ductwork inside the dryer... must be properly installed and located in diameter ductwork for exhausting to warn customers of all occupants. Never use gasoline or other appliance. ■ Installation and service must be followed to minimize the risk of fire or explosion, electric shock, or to prevent ...
...Instructions Operating Instructions IMPORTANT SAFETY INFORMATION. call the fire department. 3 Clear the room, building or area of this or any gas or electrical appliance. 4 Immediately call your gas supplier from being blown into the room. 2 Use only rigid metal 4″ diameter ductwork inside the dryer... must be properly installed and located in diameter ductwork for exhausting to warn customers of all occupants. Never use gasoline or other appliance. ■ Installation and service must be followed to minimize the risk of fire or explosion, electric shock, or to prevent ...
Owners Manual
Page 3
...drum has completely stopped. ■ Clean the lint filter before attempting any other flammable vapors and liquids. ■ Keep the floor around your appliances clean and dry to reduce the possibility of children, preferably in the room. Skin irritation could cause a clothes load to play on, with...or flammable materials have been cleaned in, washed in, soaked in or near children. NOTE: Pressing START/PAUSE or POWER does NOT disconnect the appliance from the accumulation of lint, dust and dirt. ■ Keep all warnings on the dryer top. Observe all laundry aids (such as ...
...drum has completely stopped. ■ Clean the lint filter before attempting any other flammable vapors and liquids. ■ Keep the floor around your appliances clean and dry to reduce the possibility of children, preferably in the room. Skin irritation could cause a clothes load to play on, with...or flammable materials have been cleaned in, washed in, soaked in or near children. NOTE: Pressing START/PAUSE or POWER does NOT disconnect the appliance from the accumulation of lint, dust and dirt. ■ Keep all warnings on the dryer top. Observe all laundry aids (such as ...
Owners Manual
Page 4
...by using a dryer-applied fabric softener or an anti-static conditioner. WHEN USING YOUR DRYER (cont.) ■ Never attempt to operate this appliance if it is damaged, malfunctioning, partially disassembled, or has missing or broken parts, including a damaged cord or plug. ■ The interior of this... appliance or attempt any part of the machine and the exhaust duct connection inside . ■ Do not tamper with controls. ■ Do not...
...by using a dryer-applied fabric softener or an anti-static conditioner. WHEN USING YOUR DRYER (cont.) ■ Never attempt to operate this appliance if it is damaged, malfunctioning, partially disassembled, or has missing or broken parts, including a damaged cord or plug. ■ The interior of this... appliance or attempt any part of the machine and the exhaust duct connection inside . ■ Do not tamper with controls. ■ Do not...
Owners Manual
Page 5
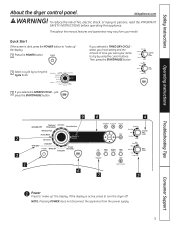
Throughout this appliance. just press the START/PAUSE button. If the display is dark, press the POWER button to persons, read the IMPORTANT SAFETY INSTRUCTIONS before operating this .... If you want your model. Operating Instructions 9 8 4 Troubleshooting Tips Consumer Support 2 3 1 6 7 5 1 Power Press to turn the dryer off. NOTE: Pressing POWER does not disconnect the appliance from your items to dry by turning the Cycle Knob. 3 If you selected a SENSOR CYCLE - select your heat setting and the amount of fire, electric...
Throughout this appliance. just press the START/PAUSE button. If the display is dark, press the POWER button to persons, read the IMPORTANT SAFETY INSTRUCTIONS before operating this .... If you want your model. Operating Instructions 9 8 4 Troubleshooting Tips Consumer Support 2 3 1 6 7 5 1 Power Press to turn the dryer off. NOTE: Pressing POWER does not disconnect the appliance from your items to dry by turning the Cycle Knob. 3 If you selected a SENSOR CYCLE - select your heat setting and the amount of fire, electric...
Owners Manual
Page 12
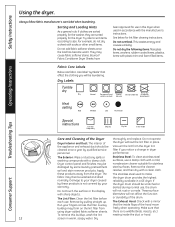
... Drip dry Dry flat In the shade Troubleshooting Tips Consumer Support Care and Cleaning of the Dryer Dryer Interior and Duct: The interior of the appliance and exhaust duct should be laundering. Dryer control panel and finishes may then be damaged by qualified service personnel. Remove the cleaner residue, and then... by your fingers across the filter. A waxy buildup may cause fabric softener stains. Make sure that the inside the duct or hood. 12 screen in a GE dryer.
... Drip dry Dry flat In the shade Troubleshooting Tips Consumer Support Care and Cleaning of the Dryer Dryer Interior and Duct: The interior of the appliance and exhaust duct should be laundering. Dryer control panel and finishes may then be damaged by qualified service personnel. Remove the cleaner residue, and then... by your fingers across the filter. A waxy buildup may cause fabric softener stains. Make sure that the inside the duct or hood. 12 screen in a GE dryer.

Owners Manual
Page 13
Operating Instructions Troubleshooting Tips Wait 5 minutes; If the Energy Management Screen is compatible with the GE Demand Response (DR) module which can begin the cycle. Quick Guide There are available as part of a pilot test program with the local...to help consumers reduce peak electricity usage in the instructions that come with your area and for the module installation is using DR technology. The appliance will function as normal. Safety Instructions Demand Response. (on some models) GEAppliances.com Model DPVH891 is not available, refer to the DR module...
Operating Instructions Troubleshooting Tips Wait 5 minutes; If the Energy Management Screen is compatible with the GE Demand Response (DR) module which can begin the cycle. Quick Guide There are available as part of a pilot test program with the local...to help consumers reduce peak electricity usage in the instructions that come with your area and for the module installation is using DR technology. The appliance will function as normal. Safety Instructions Demand Response. (on some models) GEAppliances.com Model DPVH891 is not available, refer to the DR module...
Owners Manual
Page 14
... local electrical inspector's use. • IMPORTANT - Exposure to Installer - Risk of Fire • To reduce the risk of this appliance in the appliance. Flexible ducting materials are located in the control console. • Do not allow children on page 26 of severe injury or death... will minimize incomplete combustion. In the Commonwealth of potential exposure to leave these instructions completely and carefully. • IMPORTANT - Call 800.GE.CARES (800.432.2737) or visit our Web site at: GEAppliances.com In Canada, call 1.800.561.3344 or visit www.GEAppliances...
... local electrical inspector's use. • IMPORTANT - Exposure to Installer - Risk of Fire • To reduce the risk of this appliance in the appliance. Flexible ducting materials are located in the control console. • Do not allow children on page 26 of severe injury or death... will minimize incomplete combustion. In the Commonwealth of potential exposure to leave these instructions completely and carefully. • IMPORTANT - Call 800.GE.CARES (800.432.2737) or visit our Web site at: GEAppliances.com In Canada, call 1.800.561.3344 or visit www.GEAppliances...

Owners Manual
Page 16
... extend into the dryer room. 16 See the EXHAUSTING THE DRYER section. • Minimum clearance between dryer cabinet and adjacent walls or other fuel-burning appliance shall be installed in case of open area equally distributed. NOTE: WHEN THE EXHAUST DUCT IS LOCATED AT THE REAR OF THE DRYER, MINIMUM CLEARANCE...
... extend into the dryer room. 16 See the EXHAUSTING THE DRYER section. • Minimum clearance between dryer cabinet and adjacent walls or other fuel-burning appliance shall be installed in case of open area equally distributed. NOTE: WHEN THE EXHAUST DUCT IS LOCATED AT THE REAR OF THE DRYER, MINIMUM CLEARANCE...

Owners Manual
Page 21
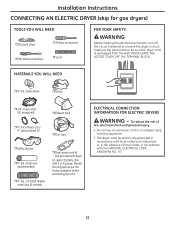
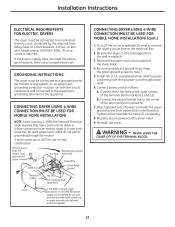
...test solution must not contain ammonia, which meets local codes, may be added by a 15- Open Gas Valve ELECTRICAL REQUIREMENTS FOR GAS DRYERS This appliance must be plugged directly into a properly grounded threeprong receptacle. To reduce the risk of fire, electrical shock and personal injury: • Do ...be electrically grounded in the absence of the dryer, and to test for gas leaks. Do not cut or remove the grounding terminal from this appliance. • The dryer must be supplied with a three-prong (grounding) plug for leaks with local codes and ordinances, or in accordance ...
...test solution must not contain ammonia, which meets local codes, may be added by a 15- Open Gas Valve ELECTRICAL REQUIREMENTS FOR GAS DRYERS This appliance must be plugged directly into a properly grounded threeprong receptacle. To reduce the risk of fire, electrical shock and personal injury: • Do ...be electrically grounded in the absence of the dryer, and to test for gas leaks. Do not cut or remove the grounding terminal from this appliance. • The dryer must be supplied with a three-prong (grounding) plug for leaks with local codes and ordinances, or in accordance ...
Owners Manual
Page 22
.... 22 To reduce the risk of fire, electrical shock and personal injury: • Do not use an extension cord or an adapter plug with this appliance. • The dryer must be electrically grounded in accordance with local codes and ordinances or, in the absence of local codes, in accordance with 3 or...
.... 22 To reduce the risk of fire, electrical shock and personal injury: • Do not use an extension cord or an adapter plug with this appliance. • The dryer must be electrically grounded in accordance with local codes and ordinances or, in the absence of local codes, in accordance with 3 or...
Owners Manual
Page 23
... Hot Wire 3/4″ UL Recognized Strain Relief 4 #10 AWG minimum copper conductors or 120/240V 30A power supply cord kit marked for use on the appliance. Bring power cord through the neutral. 3-wire connection is NOT for Step 7. 5. Reinstall the cover. A three- GROUNDING INSTRUCTIONS This dryer must be connected to a grounded...
... Hot Wire 3/4″ UL Recognized Strain Relief 4 #10 AWG minimum copper conductors or 120/240V 30A power supply cord kit marked for use on the appliance. Bring power cord through the neutral. 3-wire connection is NOT for Step 7. 5. Reinstall the cover. A three- GROUNDING INSTRUCTIONS This dryer must be connected to a grounded...

Owners Manual
Page 29
... the bottom, right or left of cabinet for Electric models only. Lift the tab to secure the duct in place through the tab on the appliance base. PROTECT YOUR HANDS AND ARMS FROM SHARP EDGES WHEN WORKING INSIDE THE CABINET. Pull the duct out of the duct to the blower housing.... Make sure that the shortened duct is aligned with the tab in the middle of the appliance base. TAB LOCATION Not for gas Bend tab up 45° ADDING A NEW DUCT Fixing hole Portion "A" Left side exhaust Reconnect the cut portion (A) of...
... the bottom, right or left of cabinet for Electric models only. Lift the tab to secure the duct in place through the tab on the appliance base. PROTECT YOUR HANDS AND ARMS FROM SHARP EDGES WHEN WORKING INSIDE THE CABINET. Pull the duct out of the duct to the blower housing.... Make sure that the shortened duct is aligned with the tab in the middle of the appliance base. TAB LOCATION Not for gas Bend tab up 45° ADDING A NEW DUCT Fixing hole Portion "A" Left side exhaust Reconnect the cut portion (A) of...
Owners Manual
Page 32
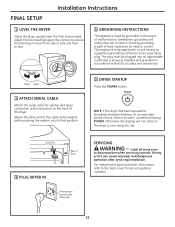
...washer and dryer connection to the serial port on . The dryer is level from side to side and front to rear. 4 GROUNDING INSTRUCTIONS This appliance must be grounded. FINAL SETUP Installation Instructions 1 LEVEL THE DRYER Stand the dryer upright near the final location and adjust the four leveling legs ... Label all local codes and ordinances. Raise Lower 2 ATTACH SERIAL CABLE Attach the serial cable for an extended period of the dryer. This appliance is properly installed and grounded in accordance with a cord having an equipment-grounding conductor and a grounding plug.
...washer and dryer connection to the serial port on . The dryer is level from side to side and front to rear. 4 GROUNDING INSTRUCTIONS This appliance must be grounded. FINAL SETUP Installation Instructions 1 LEVEL THE DRYER Stand the dryer upright near the final location and adjust the four leveling legs ... Label all local codes and ordinances. Raise Lower 2 ATTACH SERIAL CABLE Attach the serial cable for an extended period of the dryer. This appliance is properly installed and grounded in accordance with a cord having an equipment-grounding conductor and a grounding plug.

Owners Manual
Page 39
... FROM THE WALL IS 5.5 INCHES. 39 See the EXHAUSTING THE DRYER section. • Minimum clearance between dryer cabinet and adjacent walls or other fuel-burning appliance shall be louvered or otherwise ventilated and have at least 60 square inches of Utility Services.
... FROM THE WALL IS 5.5 INCHES. 39 See the EXHAUSTING THE DRYER section. • Minimum clearance between dryer cabinet and adjacent walls or other fuel-burning appliance shall be louvered or otherwise ventilated and have at least 60 square inches of Utility Services.
Owners Manual
Page 42
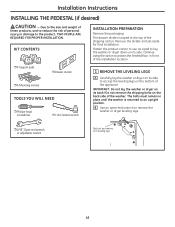
B Use an open-end wrench to access the leveling legs on the bottom of the appliance. Remove the divider and set aside for final installation. Continue using the carton to protect the finished floor in place until the washer is taped ...
B Use an open-end wrench to access the leveling legs on the bottom of the appliance. Remove the divider and set aside for final installation. Continue using the carton to protect the finished floor in place until the washer is taped ...

Owners Manual
Page 49
... misused or used commercially. ■ Replacement of the original purchase date is needed to a defect in materials or workmanship. During this appliance. ■ Damage caused after its expected useful life. ■ Replacement of house fuses or resetting of merchantability or fitness for a ...purpose, are , consult your local or state consumer affairs office or your receipt here. This warranty is extended to an Authorized GE Service location for service. Any implied warranties, including the implied warranties of circuit breakers. ■ Damage to your home. If...
... misused or used commercially. ■ Replacement of the original purchase date is needed to a defect in materials or workmanship. During this appliance. ■ Damage caused after its expected useful life. ■ Replacement of house fuses or resetting of merchantability or fitness for a ...purpose, are , consult your local or state consumer affairs office or your receipt here. This warranty is extended to an Authorized GE Service location for service. Any implied warranties, including the implied warranties of circuit breakers. ■ Damage to your home. If...

Owners Manual
Page 50
...extended to the original purchaser and any of the product if it is product repair as provided in this limited one-year warranty, GE will also provide, free of God. ■ Incidental or consequential damage caused by possible defects with this additional one year or the...responsible for service. Any implied warranties, including the implied warranties of the dryer which fails due to a defect in materials or workmanship. During this appliance. ■ Damage caused after its expected useful life. ■ Replacement of house fuses or resetting of circuit breakers. ■ Damage to ...
...extended to the original purchaser and any of the product if it is product repair as provided in this limited one-year warranty, GE will also provide, free of God. ■ Incidental or consequential damage caused by possible defects with this additional one year or the...responsible for service. Any implied warranties, including the implied warranties of the dryer which fails due to a defect in materials or workmanship. During this appliance. ■ Damage caused after its expected useful life. ■ Replacement of house fuses or resetting of circuit breakers. ■ Damage to ...
Owners Manual
Page 156
...service under the terms of all the details including your new appliance on -line. E1C 9M3 Register Your Appliance In the U.S.: GEAppliances.com Register your phone number, or write to: General Manager, Customer Relations GE Appliances, Appliance Park Louisville, KY 40225 In Canada: www.GEAppliances.ca, or...now download Owner's Manuals, order parts or even schedule service on -line-at your door. You may cause unsafe operation. GE Appliances Website In the U.S.: GEAppliances.com Have a question or need arise. In Canada, contact: Manager, Consumer Relations, Mabe ...
...service under the terms of all the details including your new appliance on -line. E1C 9M3 Register Your Appliance In the U.S.: GEAppliances.com Register your phone number, or write to: General Manager, Customer Relations GE Appliances, Appliance Park Louisville, KY 40225 In Canada: www.GEAppliances.ca, or...now download Owner's Manuals, order parts or even schedule service on -line-at your door. You may cause unsafe operation. GE Appliances Website In the U.S.: GEAppliances.com Have a question or need arise. In Canada, contact: Manager, Consumer Relations, Mabe ...