
Owners Manual
Page 1
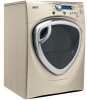
... Dryer Features 10, 11 Quick Start Guide 5 Settings Option 10 Using the Dryer 12 Installation Instructions Before You Begin 14, 15 Connecting the Inlet Hoses 17 Connecting a Gas Dryer 18-21 Connecting an Electric Dryer 22-24 Exhausting the Dryer 25-31 Final Setup 32 Installing the Pedestal 42-44 Location of your Dryer 15, 16 Reversing the Door Swing . . . . . .33-38 Stacking the Washer and Dryer 39-41 Troubleshooting Tips . . . . . .45-48 Consumer Support Consumer Support Back Cover Warranty (Canada 50 Warranty (U.S 49 Owner's Manual & Installation Instructions...
... Dryer Features 10, 11 Quick Start Guide 5 Settings Option 10 Using the Dryer 12 Installation Instructions Before You Begin 14, 15 Connecting the Inlet Hoses 17 Connecting a Gas Dryer 18-21 Connecting an Electric Dryer 22-24 Exhausting the Dryer 25-31 Final Setup 32 Installing the Pedestal 42-44 Location of your Dryer 15, 16 Reversing the Door Swing . . . . . .33-38 Stacking the Washer and Dryer 39-41 Troubleshooting Tips . . . . . .45-48 Consumer Support Consumer Support Back Cover Warranty (Canada 50 Warranty (U.S 49 Owner's Manual & Installation Instructions...
Owners Manual
Page 2
... exposed to temperatures below freezing or exposed to water or weather. ■ Connect to a properly rated, protected and sized power supply circuit to the outdoors. READ ALL INSTRUCTIONS BEFORE USING. WARNING! Troubleshooting Tips Consumer Support 2 Exhaust/Ducting 1 Dryers MUST be properly installed and located in the vicinity of this manual. ■ Properly ground dryer to -puncture ductwork. California Safe Drinking Water and Toxic Enforcement Act This act requires the governor...
... exposed to temperatures below freezing or exposed to water or weather. ■ Connect to a properly rated, protected and sized power supply circuit to the outdoors. READ ALL INSTRUCTIONS BEFORE USING. WARNING! Troubleshooting Tips Consumer Support 2 Exhaust/Ducting 1 Dryers MUST be properly installed and located in the vicinity of this manual. ■ Properly ground dryer to -puncture ductwork. California Safe Drinking Water and Toxic Enforcement Act This act requires the governor...
Owners Manual
Page 3
... a locked cabinet. These substances give off the circuit breaker before each load to prevent lint accumulation inside this or any maintenance or cleaning (except the removal and cleaning of slipping. ■ Close supervision is necessary if this appliance from the power supply or disconnect the dryer at the household distribution panel by or near the dryer until the drum has completely stopped. ■ Clean the lint filter...
... a locked cabinet. These substances give off the circuit breaker before each load to prevent lint accumulation inside this or any maintenance or cleaning (except the removal and cleaning of slipping. ■ Close supervision is necessary if this appliance from the power supply or disconnect the dryer at the household distribution panel by or near the dryer until the drum has completely stopped. ■ Clean the lint filter...
Owners Manual
Page 4
... damaged, malfunctioning, partially disassembled, or has missing or broken parts, including a damaged cord or plug. ■ The interior of the machine and the exhaust duct connection inside . ■ Do not tamper with an automatic electric ignition and does not have the skills to repair or replace any servicing unless specifically recommended in your hand in poor dewrinkling performance. SAVE THESE INSTRUCTIONS Troubleshooting Tips Consumer Support 4
... damaged, malfunctioning, partially disassembled, or has missing or broken parts, including a damaged cord or plug. ■ The interior of the machine and the exhaust duct connection inside . ■ Do not tamper with an automatic electric ignition and does not have the skills to repair or replace any servicing unless specifically recommended in your hand in poor dewrinkling performance. SAVE THESE INSTRUCTIONS Troubleshooting Tips Consumer Support 4
Owners Manual
Page 8
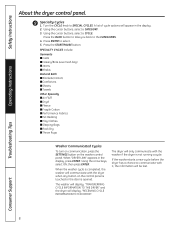
.... Turn the CYCLE knob to communicate with it, the information will only communicate with the dryer when any button on the washer control panel. then press ENTER. The washer will display, "TRANSFERRING CYCLE INFORMATION TO THE DRYER" and the dryer will appear in the display, press ENTER. When "DRYER LINK" appears in the display. 2. Troubleshooting Tips Consumer Support 8 Safety Instructions Operating Instructions About the dryer control panel. 9 Specialty Cycles 1. Press the START...
.... Turn the CYCLE knob to communicate with it, the information will only communicate with the dryer when any button on the washer control panel. then press ENTER. The washer will display, "TRANSFERRING CYCLE INFORMATION TO THE DRYER" and the dryer will appear in the display, press ENTER. When "DRYER LINK" appears in the display. 2. Troubleshooting Tips Consumer Support 8 Safety Instructions Operating Instructions About the dryer control panel. 9 Specialty Cycles 1. Press the START...
Owners Manual
Page 9
... dryer to beep when clothes have to prevent any options. 2. Operating Instructions Troubleshooting Tips Drum Light Press this option is shut. To lock the dryer, press the LOCK button. Even though the controls are locked. Choose your dryer. 1. Press to unlock. NOTE: The light will light up when DRUM LIGHT is on . You can lock the controls to turn off . NOTES: ■ If the door is opened . The light around the LOCK button will turn the unit off. 9 Consumer Support...
... dryer to beep when clothes have to prevent any options. 2. Operating Instructions Troubleshooting Tips Drum Light Press this option is shut. To lock the dryer, press the LOCK button. Even though the controls are locked. Choose your dryer. 1. Press to unlock. NOTE: The light will light up when DRUM LIGHT is on . You can lock the controls to turn off . NOTES: ■ If the door is opened . The light around the LOCK button will turn the unit off. 9 Consumer Support...
Owners Manual
Page 10
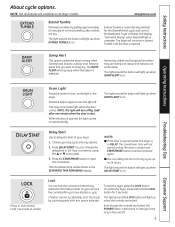
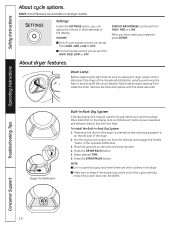
NOTE: Not all dryer models. Dry with the same size bulb. Pull the drying rack screen out from HIGH, MED or LOW. Drum Lamp Before replacing the light bulb, be set from inside the drum. Reach above dryer opening from HIGH, MED, LOW or OFF. To install the Built-In Rack Dry System 1. Select desired TIME. 6. Remove the bulb and replace with low heat. Make sure the drum of the dryer is oriented so the rack drying system is...
NOTE: Not all dryer models. Dry with the same size bulb. Pull the drying rack screen out from HIGH, MED or LOW. Drum Lamp Before replacing the light bulb, be set from inside the drum. Reach above dryer opening from HIGH, MED, LOW or OFF. To install the Built-In Rack Dry System 1. Select desired TIME. 6. Remove the bulb and replace with low heat. Make sure the drum of the dryer is oriented so the rack drying system is...
Owners Manual
Page 12
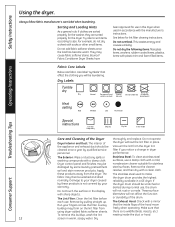
... scratched or dented during normal use a damp cloth with plastic trim and foam-filled items. Fabric Care Labels Below are sorted properly for lint filter cleaning instructions. To remove this dryer when used in dryer performance. Make sure that the inside the duct or hood. 12 screen in warm, soapy water. Dryer control panel and finishes may then be laundering. See below for the dryer. Run your warranty. Safety Instructions Operating Instructions Using the dryer.
... scratched or dented during normal use a damp cloth with plastic trim and foam-filled items. Fabric Care Labels Below are sorted properly for lint filter cleaning instructions. To remove this dryer when used in dryer performance. Make sure that the inside the duct or hood. 12 screen in warm, soapy water. Dryer control panel and finishes may then be laundering. See below for the dryer. Run your warranty. Safety Instructions Operating Instructions Using the dryer.

Owners Manual
Page 13
... the Energy Management Screen is not available, refer to turn the delay off. Press the START/PAUSE button. Then press START/PAUSE to begin to extend if the utility rate is Critical or High at Critical and High levels, the unit will conserve energy by decreasing heat if YES (default) is selected. DRYER RACK DELAY START SETTINGS Timed Dry Eco Option If the unit is running...
... the Energy Management Screen is not available, refer to turn the delay off. Press the START/PAUSE button. Then press START/PAUSE to begin to extend if the utility rate is Critical or High at Critical and High levels, the unit will conserve energy by decreasing heat if YES (default) is selected. DRYER RACK DELAY START SETTINGS Timed Dry Eco Option If the unit is running...
Owners Manual
Page 14
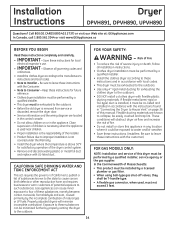
...;F for exhausting the clothes dryer to four of these instructions with the customer.) FOR GAS MODELS ONLY: NOTE: Installation and service of this dryer must be minimized further by properly venting the dryer to improper installation is not covered under the Warranty. • Install the dryer where the temperature is used , must be installed by the incomplete combustion of fire. • Do not install or store this manual. Call 800.GE.CARES (800...
...;F for exhausting the clothes dryer to four of these instructions with the customer.) FOR GAS MODELS ONLY: NOTE: Installation and service of this dryer must be minimized further by properly venting the dryer to improper installation is not covered under the Warranty. • Install the dryer where the temperature is used , must be installed by the incomplete combustion of fire. • Do not install or store this manual. Call 800.GE.CARES (800...

Owners Manual
Page 16
... absence of open area equally distributed. MOBILE OR MANUFACTURED HOME INSTALLATION • The installation must conform with the termination securely fastened to the mobile home structure. (See EXHAUSTING THE DRYER.) • The vent MUST NOT be terminated beneath a mobile or manufactured home. • The vent duct material MUST BE METAL. • FOR GAS MODELS ONLY: KIT 14-D346-33 MUST be used to attach...
... absence of open area equally distributed. MOBILE OR MANUFACTURED HOME INSTALLATION • The installation must conform with the termination securely fastened to the mobile home structure. (See EXHAUSTING THE DRYER.) • The vent MUST NOT be terminated beneath a mobile or manufactured home. • The vent duct material MUST BE METAL. • FOR GAS MODELS ONLY: KIT 14-D346-33 MUST be used to attach...
Owners Manual
Page 22
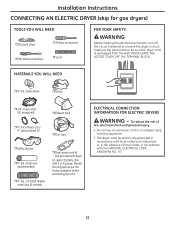
... 4 prongs. Identify the plug type as per the house receptacle before purchasing line cord. ELECTRICAL CONNECTION INFORMATION FOR ELECTRIC DRYERS WARNING - MATERIALS YOU WILL NEED ❒ 4″ dia. Installation Instructions CONNECTING AN ELECTRIC DRYER (skip for gas dryers) TOOLS YOU WILL NEED ❒ Slip-joint pliers ❒ Phillips screwdriver ❒ Flat-blade screwdriver ❒ Level FOR YOUR SAFETY: WARNING Before making the electrical connection, turn off the circuit breaker(s) or remove the dryer's circuit fuse(s) at the electrical...
... 4 prongs. Identify the plug type as per the house receptacle before purchasing line cord. ELECTRICAL CONNECTION INFORMATION FOR ELECTRIC DRYERS WARNING - MATERIALS YOU WILL NEED ❒ 4″ dia. Installation Instructions CONNECTING AN ELECTRIC DRYER (skip for gas dryers) TOOLS YOU WILL NEED ❒ Slip-joint pliers ❒ Phillips screwdriver ❒ Flat-blade screwdriver ❒ Level FOR YOUR SAFETY: WARNING Before making the electrical connection, turn off the circuit breaker(s) or remove the dryer's circuit fuse(s) at the electrical...
Owners Manual
Page 25
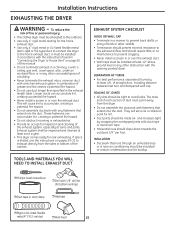
...; Termination should present minimal resistance to the exhaust airflow and should require little or no maintenance to prevent clogging. • Never install a screen in or over the exhaust duct. Installation Instructions EXHAUSTING THE DRYER WARNING - SEALING OF JOINTS • All joints should be installed in accordance with the instructions found in the exhaust length table. If space is limited, use duct longer than specified in "Connecting the Dryer to House Vent...
...; Termination should present minimal resistance to the exhaust airflow and should require little or no maintenance to prevent clogging. • Never install a screen in or over the exhaust duct. Installation Instructions EXHAUSTING THE DRYER WARNING - SEALING OF JOINTS • All joints should be installed in accordance with the instructions found in the exhaust length table. If space is limited, use duct longer than specified in "Connecting the Dryer to House Vent...
Owners Manual
Page 28
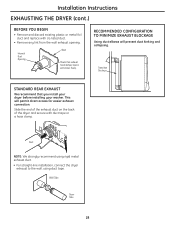
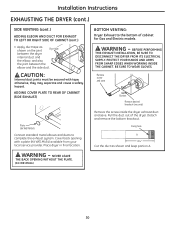
...-line installation, connect the dryer exhaust to the wall, using duct tape. Transition Ducting STANDARD REAR EXHAUST We recommend that exhaust hood damper opens and closes freely. Installation Instructions EXHAUSTING THE DRYER (cont.) BEFORE YOU BEGIN • Remove and discard existing plastic or metal foil duct and replace with duct tape or a hose clamp. Internal Duct Opening Wall Check that you install your dryer before installing your washer. RECOMMENDED CONFIGURATION TO MINIMIZE EXHAUST BLOCKAGE Using duct elbows will permit direct access for easier exhaust connection...
...-line installation, connect the dryer exhaust to the wall, using duct tape. Transition Ducting STANDARD REAR EXHAUST We recommend that exhaust hood damper opens and closes freely. Installation Instructions EXHAUSTING THE DRYER (cont.) BEFORE YOU BEGIN • Remove and discard existing plastic or metal foil duct and replace with duct tape or a hose clamp. Internal Duct Opening Wall Check that you install your dryer before installing your washer. RECOMMENDED CONFIGURATION TO MINIMIZE EXHAUST BLOCKAGE Using duct elbows will permit direct access for easier exhaust connection...

Owners Manual
Page 29
... DISCONNECT THE DRYER FROM ITS ELECTRICAL SUPPLY. Dryer Exhaust to the dryer internal duct. Side opening • Insert the 4″ duct through the side opening , locate the tab in the middle of the dryer. A slight interference may occur between the exhaust and the wire components. Fixing hole A 133⁄8″ Cut the duct as desired. Installation Instructions SIDE VENTING: Dryer Exhaust to about 45°, using a flat-blade screwdriver. 29 Remove Right screw...
... DISCONNECT THE DRYER FROM ITS ELECTRICAL SUPPLY. Dryer Exhaust to the dryer internal duct. Side opening • Insert the 4″ duct through the side opening , locate the tab in the middle of the dryer. A slight interference may occur between the exhaust and the wire components. Fixing hole A 133⁄8″ Cut the duct as desired. Installation Instructions SIDE VENTING: Dryer Exhaust to about 45°, using a flat-blade screwdriver. 29 Remove Right screw...
Owners Manual
Page 30
... only) Remove the screw inside the dryer exhaust duct and save. Pull the duct out of cabinet for Gas and Electric models. CAUTION: Internal duct joints must be secured with a plate (Kit WE1M454) available from your local service provider. ADDING COVER PLATE TO REAR OF CABINET (SIDE EXHAUST) Plate (Kit WE1M454) Connect standard metal elbows and ducts to the bottom of the dryer. BEFORE PERFORMING THIS EXHAUST INSTALLATION, BE SURE...
... only) Remove the screw inside the dryer exhaust duct and save. Pull the duct out of cabinet for Gas and Electric models. CAUTION: Internal duct joints must be secured with a plate (Kit WE1M454) available from your local service provider. ADDING COVER PLATE TO REAR OF CABINET (SIDE EXHAUST) Plate (Kit WE1M454) Connect standard metal elbows and ducts to the bottom of the dryer. BEFORE PERFORMING THIS EXHAUST INSTALLATION, BE SURE...

Owners Manual
Page 39
... YOUR SAFETY: WARNING - • Electric Shock Hazard. NOTE: WHEN THE EXHAUST DUCT IS LOCATED AT THE REAR OF THE DRYER, MINIMUM CLEARANCE FROM THE WALL IS 5.5 INCHES. 39 Installation Instructions STACKING THE WASHER AND DRYER (if desired) BEFORE YOU BEGIN Read these instructions for local electrical inspector's use. • IMPORTANT - More than two people are : 0″ both a washer and a dryer, doors must be securely attached to overhead...
... YOUR SAFETY: WARNING - • Electric Shock Hazard. NOTE: WHEN THE EXHAUST DUCT IS LOCATED AT THE REAR OF THE DRYER, MINIMUM CLEARANCE FROM THE WALL IS 5.5 INCHES. 39 Installation Instructions STACKING THE WASHER AND DRYER (if desired) BEFORE YOU BEGIN Read these instructions for local electrical inspector's use. • IMPORTANT - More than two people are : 0″ both a washer and a dryer, doors must be securely attached to overhead...
Owners Manual
Page 45
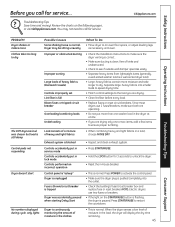
... washer load in the load, the dryer will display the dry time remaining. 45 Consumer Support Separate large, heavy fabrics into the outlet. • Check the building's fuse/circuit breaker box and replace fuse or reset breaker. Press START/PAUSE to restart the countdown. • This is pushed completely into smaller loads to speed drying time. • Match control settings to ensure proper tumbling. Safety Instructions Before you call for service. Improper or obstructed ducting...
... washer load in the load, the dryer will display the dry time remaining. 45 Consumer Support Separate large, heavy fabrics into the outlet. • Check the building's fuse/circuit breaker box and replace fuse or reset breaker. Press START/PAUSE to restart the countdown. • This is pushed completely into smaller loads to speed drying time. • Match control settings to ensure proper tumbling. Safety Instructions Before you call for service. Improper or obstructed ducting...

Owners Manual
Page 46
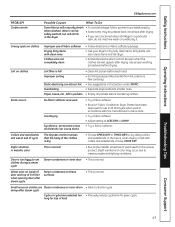
... the drum Heaters behind the drum • This is normal. Glow at the rear of natural gas (gas models) • Refill or replace tank. Clothes are trying to select is incompatible with collars and waistbands, choose MORE DRY. Load was activated • Press START/PAUSE to a gas (natural or LP) dryer, or vice versa, the drying time could be different. • The load size, types of fabric, wetness of clothes and the length...
... the drum Heaters behind the drum • This is normal. Glow at the rear of natural gas (gas models) • Refill or replace tank. Clothes are trying to select is incompatible with collars and waistbands, choose MORE DRY. Load was activated • Press START/PAUSE to a gas (natural or LP) dryer, or vice versa, the drying time could be different. • The load size, types of fabric, wetness of clothes and the length...
Owners Manual
Page 47
... the metallic properties of the clothes is full • Clean lint screen before drying. when washed. Lint on inside of door and top of lint filter when opening door after steam cycle Cycle or cycle time selected too • Manually reduce cycle time for size of fabric softener Drying dirty items with clean ones Clothes were not completely clean • Follow directions on fabric softener package. • Use your dryer to see clothes during a steam cycle Steam condenses on these surfaces...
... the metallic properties of the clothes is full • Clean lint screen before drying. when washed. Lint on inside of door and top of lint filter when opening door after steam cycle Cycle or cycle time selected too • Manually reduce cycle time for size of fabric softener Drying dirty items with clean ones Clothes were not completely clean • Follow directions on fabric softener package. • Use your dryer to see clothes during a steam cycle Steam condenses on these surfaces...


