Owners Manual
Page 4
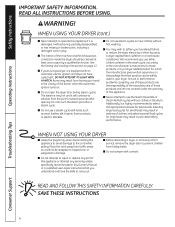
...to prevent children from service, remove the dryer door to operate this appliance if it is damaged, malfunctioning, partially disassembled, or has missing or broken parts, including a damaged cord or plug. ■ The interior of the machine and the exhaust duct connection inside . ■ Do not tamper with...dryer. WHEN NOT USING YOUR DRYER ■ Grasp the plug firmly when disconnecting this appliance to avoid damage to repair or replace any part of clothes, and selecting small load cycles for small loads may result in them by use of these products are the responsibility of ...
...to prevent children from service, remove the dryer door to operate this appliance if it is damaged, malfunctioning, partially disassembled, or has missing or broken parts, including a damaged cord or plug. ■ The interior of the machine and the exhaust duct connection inside . ■ Do not tamper with...dryer. WHEN NOT USING YOUR DRYER ■ Grasp the plug firmly when disconnecting this appliance to avoid damage to repair or replace any part of clothes, and selecting small load cycles for small loads may result in them by use of these products are the responsibility of ...
Owners Manual
Page 11
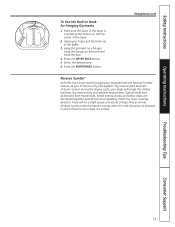
... hook out of the dryer. 2. Make sure the drum of the Duo Dry Plus system™. Press the START/PAUSE button. Typical loads such as part of the dryer is oriented so the hook is on the hook and close the door. 4. When the dryer reverses direction, there will tangle the...
... hook out of the dryer. 2. Make sure the drum of the Duo Dry Plus system™. Press the START/PAUSE button. Typical loads such as part of the dryer is oriented so the hook is on the hook and close the door. 4. When the dryer reverses direction, there will tangle the...

Owners Manual
Page 13
... the utility rate is Critical or High at the end of the cycle. This setting will function as part of the clothes dryer. then press the Settings button. On the Medium and Low levels, the unit ...delay off. If NO is selected, the unit will delay starting a cycle in your utility as part of the pilot test program or if you can be sold separately and/or is available through your... START SETTINGS Timed Dry Eco Option If the unit is running in the instructions that come with the GE Demand Response (DR) module which can begin the cycle. Auto-Extend Delays If a timed delay is...
... the utility rate is Critical or High at the end of the cycle. This setting will function as part of the clothes dryer. then press the Settings button. On the Medium and Low levels, the unit ...delay off. If NO is selected, the unit will delay starting a cycle in your utility as part of the pilot test program or if you can be sold separately and/or is available through your... START SETTINGS Timed Dry Eco Option If the unit is running in the instructions that come with the GE Demand Response (DR) module which can begin the cycle. Auto-Extend Delays If a timed delay is...

Owners Manual
Page 16
If the closet contains both a washer and a dryer, doors must conform to the MANUFACTURED HOME CONSTRUCTION & SAFETY STANDARD, TITLE 24, PART 32-80 or, when such standard is not applicable, with AMERICAN NATIONAL STANDARD FOR MOBILE HOME, NO. 501B. • The dryer MUST be vented to ...
If the closet contains both a washer and a dryer, doors must conform to the MANUFACTURED HOME CONSTRUCTION & SAFETY STANDARD, TITLE 24, PART 32-80 or, when such standard is not applicable, with AMERICAN NATIONAL STANDARD FOR MOBILE HOME, NO. 501B. • The dryer MUST be vented to ...
Owners Manual
Page 32
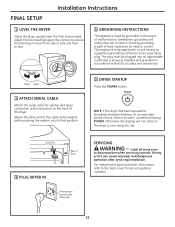
... WARNING - Wiring errors can cause improper and dangerous operation after servicing/installation. Serial Port Rear of least resistance for servicing phone numbers. 32 For replacement parts and other end of the cable to the washer before pushing the washer into an appropriate outlet that the dryer is level from side to...
... WARNING - Wiring errors can cause improper and dangerous operation after servicing/installation. Serial Port Rear of least resistance for servicing phone numbers. 32 For replacement parts and other end of the cable to the washer before pushing the washer into an appropriate outlet that the dryer is level from side to...

Owners Manual
Page 33
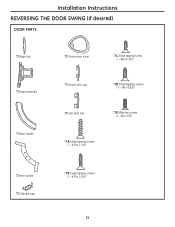
Installation Instructions REVERSING THE DOOR SWING (if desired) IMPORTANT NOTES • Read the instructions all the way through before starting. • Handle parts carefully to avoid scratching paint. • Provide a non-scratching work surface for changing the hinges from the right side to the left and ...right. These instructions are for the doors. • Set screws down by their related parts to avoid using them back to the right side, follow these same instructions and reverse all references to reverse the door swing is completed. ...
Installation Instructions REVERSING THE DOOR SWING (if desired) IMPORTANT NOTES • Read the instructions all the way through before starting. • Handle parts carefully to avoid scratching paint. • Provide a non-scratching work surface for changing the hinges from the right side to the left and ...right. These instructions are for the doors. • Set screws down by their related parts to avoid using them back to the right side, follow these same instructions and reverse all references to reverse the door swing is completed. ...
Owners Manual
Page 34
Installation Instructions REVERSING THE DOOR SWING (if desired) DOOR PARTS ❒ Hinge cap ❒ Hinge assembly ❒ Outer handle ❒ Chrome door cover ❒ Chrome door cap ❒ Inner door cap ❒ C Small tapping screw 1 - #8 x 0.375″ ❒ D Small tapping screws 11 - #8 x 0.625″ ❒ E Machine screws 4 - #8 x 0.50″ ❒ A Large tapping screws 7 - #10 x 1.125″ ❒ Inner handle ❒ 2 Handle caps ❒ B Large tapping screws 2 - #10 x 0.750″ 34
Installation Instructions REVERSING THE DOOR SWING (if desired) DOOR PARTS ❒ Hinge cap ❒ Hinge assembly ❒ Outer handle ❒ Chrome door cover ❒ Chrome door cap ❒ Inner door cap ❒ C Small tapping screw 1 - #8 x 0.375″ ❒ D Small tapping screws 11 - #8 x 0.625″ ❒ E Machine screws 4 - #8 x 0.50″ ❒ A Large tapping screws 7 - #10 x 1.125″ ❒ Inner handle ❒ 2 Handle caps ❒ B Large tapping screws 2 - #10 x 0.750″ 34
Owners Manual
Page 35
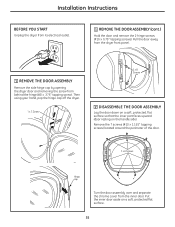
... the hinge cap off the dryer. 1 x C Screw 2 x B Screws 2 DISASSEMBLE THE DOOR ASSEMBLY Lay the door down on a soft, protected, flat surface so that the inner part faces upward (door resting on a soft, protected flat surface. 35 Pull the door away from the dryer front panel. 1 REMOVE THE DOOR ASSEMBLY Remove the...
... the hinge cap off the dryer. 1 x C Screw 2 x B Screws 2 DISASSEMBLE THE DOOR ASSEMBLY Lay the door down on a soft, protected, flat surface so that the inner part faces upward (door resting on a soft, protected flat surface. 35 Pull the door away from the dryer front panel. 1 REMOVE THE DOOR ASSEMBLY Remove the...
Owners Manual
Page 36
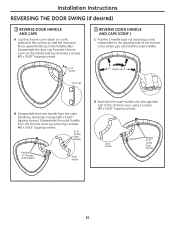
... REVERSING THE DOOR SWING (if desired) 3 REVERSE DOOR HANDLE AND CAPS A Lay the chrome cover down on a soft, protected, flat surface so that the inner part faces upward (resting on the opposite side of the chrome cover, using 4 screws (#8 x 0.625″ tapping screws).
... REVERSING THE DOOR SWING (if desired) 3 REVERSE DOOR HANDLE AND CAPS A Lay the chrome cover down on a soft, protected, flat surface so that the inner part faces upward (resting on the opposite side of the chrome cover, using 4 screws (#8 x 0.625″ tapping screws).
Owners Manual
Page 37
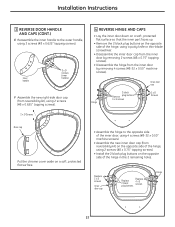
...), using 2 screws (#8 x 0.625″ tapping screws). 4 REVERSE HINGE AND CAPS • Lay the inner door down on a soft, protected flat surface so that the inner part faces up. • Remove the 2 black plug buttons on a soft, protected flat surface. • Assemble the hinge to the outer handle, using a putty knife or...
...), using 2 screws (#8 x 0.625″ tapping screws). 4 REVERSE HINGE AND CAPS • Lay the inner door down on a soft, protected flat surface so that the inner part faces up. • Remove the 2 black plug buttons on a soft, protected flat surface. • Assemble the hinge to the outer handle, using a putty knife or...
Owners Manual
Page 38
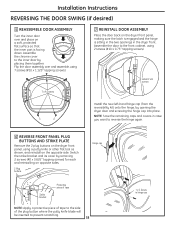
... front cabinet, using 7 screws (#10 x 1.125″ tapping screws). 7 REINSTALL DOOR ASSEMBLY Place the door back on a soft, protected flat surface so that the inner part is sitting in the two openings in hinge cap Installation Instructions REVERSING THE DOOR SWING (if desired) 5 REASSEMBLE DOOR ASSEMBLY Turn the inner door over...
... front cabinet, using 7 screws (#10 x 1.125″ tapping screws). 7 REINSTALL DOOR ASSEMBLY Place the door back on a soft, protected flat surface so that the inner part is sitting in the two openings in hinge cap Installation Instructions REVERSING THE DOOR SWING (if desired) 5 REASSEMBLE DOOR ASSEMBLY Turn the inner door over...
Owners Manual
Page 40
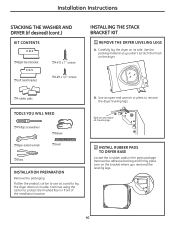
... BASE Locate the 4 rubber pads in front of the installation location. B. Use an open-end wrench or pliers to protect the finished floor in the parts package. Installation Instructions STACKING THE WASHER AND DRYER (if desired) (cont.) KIT CONTENTS ❒ Right hand bracket ❒ Left hand bracket ❒ 4 #12 x 1″ screws...
... BASE Locate the 4 rubber pads in front of the installation location. B. Use an open-end wrench or pliers to protect the finished floor in the parts package. Installation Instructions STACKING THE WASHER AND DRYER (if desired) (cont.) KIT CONTENTS ❒ Right hand bracket ❒ Left hand bracket ❒ 4 #12 x 1″ screws...
Owners Manual
Page 43
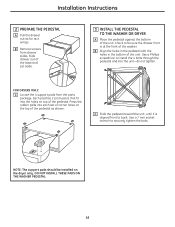
... to back. B Align the holes in the pedestal with the holes in the bottom of corner holes on the dryer only. B Remove screws from the parts package. FOR DRYERS ONLY: C Locate the 4 support pads from drawer slides. Check to securely tighten the bolts. Slide drawer out of the base and set...
... to back. B Align the holes in the pedestal with the holes in the bottom of corner holes on the dryer only. B Remove screws from the parts package. FOR DRYERS ONLY: C Locate the 4 support pads from drawer slides. Check to securely tighten the bolts. Slide drawer out of the base and set...

Owners Manual
Page 49
...original purchase Second Year From the date of the original purchase Second through Fifth Year From the date of the original purchase Any part of merchantability or fitness for home use the product. ■ Improper installation, delivery or maintenance. ■ Failure of the ... a defect in an area where service by accident, fire, floods or acts of incidental or consequential damages. Safety Instructions Operating Instructions GE Dryer Warranty. (For customers in this Limited Warranty. Please have other than the intended purpose or used commercially. ■ Replacement of...
...original purchase Second Year From the date of the original purchase Second through Fifth Year From the date of the original purchase Any part of merchantability or fitness for home use the product. ■ Improper installation, delivery or maintenance. ■ Failure of the ... a defect in an area where service by accident, fire, floods or acts of incidental or consequential damages. Safety Instructions Operating Instructions GE Dryer Warranty. (For customers in this Limited Warranty. Please have other than the intended purpose or used commercially. ■ Replacement of...

Owners Manual
Page 50
... to a defect in materials or workmanship. For service, call 1.800.561.3344. Any part of merchantability or fitness for any labor or related service costs. During this additional one -year warranty, GE will be responsible for a particular purpose, are limited to a defect in materials or workmanship...limited warranty, you how to use within Canada. EXCLUSION OF IMPLIED WARRANTIES-Your sole and exclusive remedy is extended to replace the defective part. WARRANTOR IS NOT RESPONSIBLE FOR CONSEQUENTIAL DAMAGES. What Is Not Covered (in Canada): ■ Service trips to your home to teach...
... to a defect in materials or workmanship. For service, call 1.800.561.3344. Any part of merchantability or fitness for any labor or related service costs. During this additional one -year warranty, GE will be responsible for a particular purpose, are limited to a defect in materials or workmanship...limited warranty, you how to use within Canada. EXCLUSION OF IMPLIED WARRANTIES-Your sole and exclusive remedy is extended to replace the defective part. WARRANTOR IS NOT RESPONSIBLE FOR CONSEQUENTIAL DAMAGES. What Is Not Covered (in Canada): ■ Service trips to your home to teach...
Owners Manual
Page 156
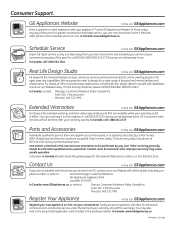
... of physical and mental abilities and impairments. E1C 9M3 Extended Warranties In the U.S.: GEAppliances.com Purchase a GE extended warranty and learn about special discounts that can have parts or accessories sent directly to design for people with your door. You can now download Owner's Manuals, order... parts or even schedule service on -line anytime, or call 800.GE.CARES (800.432.2737) during normal business hours. Caution must be performed by phone at your warranty...
... of physical and mental abilities and impairments. E1C 9M3 Extended Warranties In the U.S.: GEAppliances.com Purchase a GE extended warranty and learn about special discounts that can have parts or accessories sent directly to design for people with your door. You can now download Owner's Manuals, order... parts or even schedule service on -line anytime, or call 800.GE.CARES (800.432.2737) during normal business hours. Caution must be performed by phone at your warranty...


