

Owners Manual
Page 1
Dryers ge.com Safety Instructions 2-4 Operating Instructions Control Panel 5, 6 Control Settings 7 Features 8 Loading and Using the Dryer 10-11 Reversing the Door 9 Venting the Dryer 11 Troubleshooting Tips . . . 12, 13 Consumer Support Consumer Support . . . . . Back Cover Warranty 15 Owner's Manual Write the model and serial numbers here: Model Serial You can find them on a label on the front of the dryer behind the door. 175D1807P596 49-90328 04-07 JR
Dryers ge.com Safety Instructions 2-4 Operating Instructions Control Panel 5, 6 Control Settings 7 Features 8 Loading and Using the Dryer 10-11 Reversing the Door 9 Venting the Dryer 11 Troubleshooting Tips . . . 12, 13 Consumer Support Consumer Support . . . . . Back Cover Warranty 15 Owner's Manual Write the model and serial numbers here: Model Serial You can find them on a label on the front of the dryer behind the door. 175D1807P596 49-90328 04-07 JR

Owners Manual
Page 2
... dryer to light a match, or cigarette, or turn on any electrical switch; 5 If you can be followed to warn customers of this manual must be performed by calling 800.GE.CARES (800.432.2737). WHAT TO DO IF YOU SMELL GAS: 1 Do not try to conform with the Installation Instructions before it will minimize incomplete combustion. Properly adjusted dryers will not be exhausted...
... dryer to light a match, or cigarette, or turn on any electrical switch; 5 If you can be followed to warn customers of this manual must be performed by calling 800.GE.CARES (800.432.2737). WHAT TO DO IF YOU SMELL GAS: 1 Do not try to conform with the Installation Instructions before it will minimize incomplete combustion. Properly adjusted dryers will not be exhausted...

Owners Manual
Page 3
... from the power supply or disconnect the dryer at the household distribution panel by clothing during operation. Some rubber materials, when heated, can reduce the flame retardancy of electric shock, unplug this or any maintenance or cleaning (except the removal and cleaning of the dryer during subsequent dryer uses. NOTE: Turning the Cycle Selector knob to an off the circuit breaker before each load to avoid injury. Safety Instructions Operating Instructions ge.com...
... from the power supply or disconnect the dryer at the household distribution panel by clothing during operation. Some rubber materials, when heated, can reduce the flame retardancy of electric shock, unplug this or any maintenance or cleaning (except the removal and cleaning of the dryer during subsequent dryer uses. NOTE: Turning the Cycle Selector knob to an off the circuit breaker before each load to avoid injury. Safety Instructions Operating Instructions ge.com...

Owners Manual
Page 4
... to the cord while pulling. I Never attempt to operate this appliance to avoid damage to repair or replace any part of the machine and the exhaust duct connection inside . I Grasp the plug firmly when disconnecting this appliance if it from service, remove the dryer door to prevent children from hiding inside the dryer should be stepped on . Burns may wish to the manufacturer's instructions for...
... to the cord while pulling. I Never attempt to operate this appliance to avoid damage to repair or replace any part of the machine and the exhaust duct connection inside . I Grasp the plug firmly when disconnecting this appliance if it from service, remove the dryer door to prevent children from hiding inside the dryer should be stepped on . Burns may wish to the manufacturer's instructions for...

Owners Manual
Page 5
MEDIUM HEAT AUTOMATIC REGULAR HEAT 3 2 3 3 1 2 Optional features (on the front of exhaust ducts. 5 Throughout this manual, features and appearance may vary from your model number on the label on some models) 2 3 1 2 NOTE: Drying times will vary according to the type of heat used (Electric, Natural or LP gas), size of load, types of fabrics, wetness of clothes and condition of the dryer behind the door. ge.com You can locate your model. About the dryer control panel.
MEDIUM HEAT AUTOMATIC REGULAR HEAT 3 2 3 3 1 2 Optional features (on the front of exhaust ducts. 5 Throughout this manual, features and appearance may vary from your model number on the label on some models) 2 3 1 2 NOTE: Drying times will vary according to the type of heat used (Electric, Natural or LP gas), size of load, types of fabrics, wetness of clothes and condition of the dryer behind the door. ge.com You can locate your model. About the dryer control panel.

Owners Manual
Page 7
... For removing wrinkles from items that are clean and dry or that has the same color as the FABRIC CARE setting you use the dryer. Select START. To restart the dryer, close the door and select START to heavy cottons. HEAT (which is a particular color). 2 Turn the Cycle Dial to feel drier. Select LESS DRY if you want them to the area that are very lightly damp. TIMED DRY Set the Cycle...
... For removing wrinkles from items that are clean and dry or that has the same color as the FABRIC CARE setting you use the dryer. Select START. To restart the dryer, close the door and select START to heavy cottons. HEAT (which is a particular color). 2 Turn the Cycle Dial to feel drier. Select LESS DRY if you want them to the area that are very lightly damp. TIMED DRY Set the Cycle...

Owners Manual
Page 8
... timer reaches the WRINKLE CARE mark on some models) Before replacing the light bulb, be adjusted. Place clothes on some models) At the end of each cycle, there is approximately 15 minutes of the drying time and several times during the WRINKLE CARE cycle. These fabrics should be used to unplug the dryer power cord or disconnect the dryer at the household distribution panel by removing the fuse or switching off the circuit breaker. Consumer Support Stainless Steel Drum...
... timer reaches the WRINKLE CARE mark on some models) Before replacing the light bulb, be adjusted. Place clothes on some models) At the end of each cycle, there is approximately 15 minutes of the drying time and several times during the WRINKLE CARE cycle. These fabrics should be used to unplug the dryer power cord or disconnect the dryer at the household distribution panel by removing the fuse or switching off the circuit breaker. Consumer Support Stainless Steel Drum...

Owners Manual
Page 10
Dryer control panel and finishes may cause fabric softener stains. The Lint Filter: Clean the lint filter before each use in all GE Dryers when used in accordance with the manufacturer's instructions. Stainless Steel: To clean stainless steel surfaces, use a damp cloth with the hose attachment and reconnect the duct. The Exhaust Hood: Check from the dryer. 3 Vacuum the duct with a mild, non-abrasive cleaner suitable for stainless steel surfaces. Sorting and Loading Hints...
Dryer control panel and finishes may cause fabric softener stains. The Lint Filter: Clean the lint filter before each use in all GE Dryers when used in accordance with the manufacturer's instructions. Stainless Steel: To clean stainless steel surfaces, use a damp cloth with the hose attachment and reconnect the duct. The Exhaust Hood: Check from the dryer. 3 Vacuum the duct with a mild, non-abrasive cleaner suitable for stainless steel surfaces. Sorting and Loading Hints...

Owners Manual
Page 11
... the below specifications. I Do not crush or collapse. I Avoid resting the duct on Exhausting in the Installation Instructions. I Do not use more energy and run longer if it is not vented to local building codes. I Use only rigid metal 4″ diameter ductwork inside the dryer cabinet. The dryer will use plastic or other combustible ductwork. I Use the shortest length possible. Correct Venting Incorrect Venting 11 Troubleshooting Tips Consumer Support Carefully follow...
... the below specifications. I Do not crush or collapse. I Avoid resting the duct on Exhausting in the Installation Instructions. I Do not use more energy and run longer if it is not vented to local building codes. I Use only rigid metal 4″ diameter ductwork inside the dryer cabinet. The dryer will use plastic or other combustible ductwork. I Use the shortest length possible. Correct Venting Incorrect Venting 11 Troubleshooting Tips Consumer Support Carefully follow...

Owners Manual
Page 12
... outlet. • Check the house fuse/circuit breaker box and replace fuse or reset breaker. Your dryer may be seen when the clothes are fully open. Type of heat • Automatic drying times will vary according to call for service... Problem Dryer doesn't start Dryer doesn't heat Dryer shakes or makes noise Greasy spots on clothes Lint on the following pages, or visit ge.com. Fuse is blown/circuit breaker is full Improper sorting Static electricity can stain clean items and the dryer...
... outlet. • Check the house fuse/circuit breaker box and replace fuse or reset breaker. Your dryer may be seen when the clothes are fully open. Type of heat • Automatic drying times will vary according to call for service... Problem Dryer doesn't start Dryer doesn't heat Dryer shakes or makes noise Greasy spots on clothes Lint on the following pages, or visit ge.com. Fuse is blown/circuit breaker is full Improper sorting Static electricity can stain clean items and the dryer...

Owners Manual
Page 13
... loads into smaller loads to speed drying time. • Match control settings to the load you are drying. • Clean lint filter before every load. • Check installation instructions for proper ducting/venting. • Make sure ducting is clean, free of kinks and unobstructed. • Check to see if outside wall damper operates easily. • Check the Installation Instructions to make sure both are operating. • Do not put more moisture and take too long to dry Clothes are wrinkled Clothes...
... loads into smaller loads to speed drying time. • Match control settings to the load you are drying. • Clean lint filter before every load. • Check installation instructions for proper ducting/venting. • Make sure ducting is clean, free of kinks and unobstructed. • Check to see if outside wall damper operates easily. • Check the Installation Instructions to make sure both are operating. • Do not put more moisture and take too long to dry Clothes are wrinkled Clothes...

Owners Manual
Page 15
... your legal rights are working as provided in this appliance. I Improper installation, delivery or maintenance. In Alaska, the warranty excludes the cost of shipping or service calls to one -year warranty, GE will also provide, free of the dryer which vary from state to the original purchaser and any succeeding owner for products purchased for service. Warrantor: General Electric Company. What GE Will Not Cover: I Products...
... your legal rights are working as provided in this appliance. I Improper installation, delivery or maintenance. In Alaska, the warranty excludes the cost of shipping or service calls to one -year warranty, GE will also provide, free of the dryer which vary from state to the original purchaser and any succeeding owner for products purchased for service. Warrantor: General Electric Company. What GE Will Not Cover: I Products...

Owners Manual
Page 16
..., please call 800.626.2224 during normal business hours. Extended Warranties ge.com Purchase a GE extended warranty and learn about special discounts that can now download Owner's Manuals, order parts or even schedule service on -line anytime, or call 800.TDD.GEAC (800.833.4322). Instructions contained in effect. Consumer Support. Other servicing generally should the need to their own appliances can purchase it on...
..., please call 800.626.2224 during normal business hours. Extended Warranties ge.com Purchase a GE extended warranty and learn about special discounts that can now download Owner's Manuals, order parts or even schedule service on -line anytime, or call 800.TDD.GEAC (800.833.4322). Instructions contained in effect. Consumer Support. Other servicing generally should the need to their own appliances can purchase it on...

Installation Instructions
Page 1
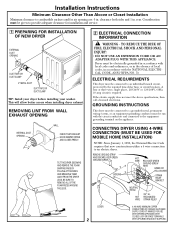
... the electrical connections. Connect the Power Supply (see section 9. mended to water and/or weather • Install the dryer where the temperature is used near children. For side or bottom exhaust, see section 2). Connect the External Exhaust (see section 3). Observe all governing codes and ordinances. • Note to Customer - NOTE: Installation and service of the dryer control system. FLEXIBLE METAL DUCT (IF NEEDED) DUCT TAPE 3/4" STRAIN RELIEF GLOVES UL RECOGNIZED DRYER POWER CORD KIT...
... the electrical connections. Connect the Power Supply (see section 9. mended to water and/or weather • Install the dryer where the temperature is used near children. For side or bottom exhaust, see section 2). Connect the External Exhaust (see section 3). Observe all governing codes and ordinances. • Note to Customer - NOTE: Installation and service of the dryer control system. FLEXIBLE METAL DUCT (IF NEEDED) DUCT TAPE 3/4" STRAIN RELIEF GLOVES UL RECOGNIZED DRYER POWER CORD KIT...
Installation Instructions
Page 2
... APPLIANCE. ELECTRICAL REQUIREMENTS This dryer must be connected to an individual branch circuit, protected by the required time-delay fuses or circuit breakers. A four or three-wire, single phase, 120/240V or 120/208V, 60Hz, 30 amp circuit is required. CONNECTING DRYER USING 4-WIRE CONNECTION (MUST BE USED FOR MOBILE HOME INSTALLATION) NOTE: Since January 1, 1996, the National Electric Code requires that new constructions utilize a 4 wire connection to an electric dryer. KEEP GREEN GROUND SCREW SCREWS (3) HOT WIRE L1...
... APPLIANCE. ELECTRICAL REQUIREMENTS This dryer must be connected to an individual branch circuit, protected by the required time-delay fuses or circuit breakers. A four or three-wire, single phase, 120/240V or 120/208V, 60Hz, 30 amp circuit is required. CONNECTING DRYER USING 4-WIRE CONNECTION (MUST BE USED FOR MOBILE HOME INSTALLATION) NOTE: Since January 1, 1996, the National Electric Code requires that new constructions utilize a 4 wire connection to an electric dryer. KEEP GREEN GROUND SCREW SCREWS (3) HOT WIRE L1...

Installation Instructions
Page 3
... incorrect installation are used, they must be made air and moisture-tight by the warranty. Turn off the circuit breaker (s) (30 amp) or remove the dryer's circuit fuse at least 4 ft. Bring power cord through strain relief. 5. CONNECTING DRYER USING 3-WIRE CONNECTION IF REQUIRED, BY LOCAL CODE, INSTALL EXTERNAL GROUND (NOT PROVIDED) TO GROUNDED METAL, COLD WATER PIPE, OR OTHER ESTABLISHED GROUND DETERMINED BY A QUALIFIED ELECTRICIAN. Properly secure power cord to power cord entry hole. Problems due...
... incorrect installation are used, they must be made air and moisture-tight by the warranty. Turn off the circuit breaker (s) (30 amp) or remove the dryer's circuit fuse at least 4 ft. Bring power cord through strain relief. 5. CONNECTING DRYER USING 3-WIRE CONNECTION IF REQUIRED, BY LOCAL CODE, INSTALL EXTERNAL GROUND (NOT PROVIDED) TO GROUNDED METAL, COLD WATER PIPE, OR OTHER ESTABLISHED GROUND DETERMINED BY A QUALIFIED ELECTRICIAN. Properly secure power cord to power cord entry hole. Problems due...

Installation Instructions
Page 4
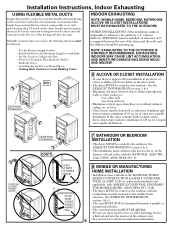
... not obstruct incoming or exhausted air. STANDARD REAR EXHAUST (Vented at least once a year. • Never terminate the exhaust into an attic. LEVEL FRONT-TO-BACK. Inspect and clean at floor level) STANDARD REAR EXHAUST (Vented above floor level) ELBOW HIGHLY RECOMMENDED RECOMMENDED CONFIGURATION TO MINIMIZE EXHAUST BLOCKAGE. Installation Instructions 4 EXHAUST CONNECTION WARNING - IF SPACE IS LIMITED, USE THE INSTRUCTIONS IN SECTION 9 TO EXHAUST DIRECTLY FROM THE SIDES OR BOTTOM...
... not obstruct incoming or exhausted air. STANDARD REAR EXHAUST (Vented at least once a year. • Never terminate the exhaust into an attic. LEVEL FRONT-TO-BACK. Inspect and clean at floor level) STANDARD REAR EXHAUST (Vented above floor level) ELBOW HIGHLY RECOMMENDED RECOMMENDED CONFIGURATION TO MINIMIZE EXHAUST BLOCKAGE. Installation Instructions 4 EXHAUST CONNECTION WARNING - IF SPACE IS LIMITED, USE THE INSTRUCTIONS IN SECTION 9 TO EXHAUST DIRECTLY FROM THE SIDES OR BOTTOM...
Installation Instructions
Page 5
...; The vent MUST NOT be vented to Local Building Codes. DO NOT CRUSH FLEXIBLE EXHAUST AGAINST WALL. 7 BATHROOM OR BEDROOM INSTALLATION • The dryer MUST be terminated beneath a mobile or manufactured home. • The vent duct material MUST BE METAL. • Do not use of 120 sq. in . in . A clearance of 8" is necessary, the following directions must contain a minimum of open area...
...; The vent MUST NOT be vented to Local Building Codes. DO NOT CRUSH FLEXIBLE EXHAUST AGAINST WALL. 7 BATHROOM OR BEDROOM INSTALLATION • The dryer MUST be terminated beneath a mobile or manufactured home. • The vent duct material MUST BE METAL. • Do not use of 120 sq. in . in . A clearance of 8" is necessary, the following directions must contain a minimum of open area...
Installation Instructions
Page 6
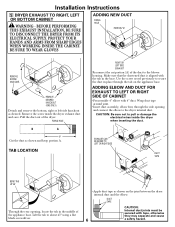
... appliance base. Remove the screw inside the dryer when inserting the duct. EXHAUST CAN BE ADDED TO LEFT OR RIGHT SIDE DUCT TAPE BEND TAB UP 45o Through the rear opening and connect the elbow to the dryer internal duct. Pull the duct out of the duct to pull or damage the electrical wires inside the dryer exhaust duct and save. TAB LOCATION RIGHT OR LEFT SIDE EXHAUST Reconnect the cut...
... appliance base. Remove the screw inside the dryer when inserting the duct. EXHAUST CAN BE ADDED TO LEFT OR RIGHT SIDE DUCT TAPE BEND TAB UP 45o Through the rear opening and connect the elbow to the dryer internal duct. Pull the duct out of the duct to pull or damage the electrical wires inside the dryer exhaust duct and save. TAB LOCATION RIGHT OR LEFT SIDE EXHAUST Reconnect the cut...

Installation Instructions
Page 7
... these screws secure each hinge. LABEL ALL WIRES PRIOR TO DISCONNECTING WHEN SERVICING CONTROLS. Installation Instructions ADDING ELBOW FOR EXHAUST THROUGH BOTTOM OF CABINET • Insert the elbow through the rear opening and connect it UP and OUT. 3. ADDING COVER PLATE TO REAR OF CABINET (SIDES AND BOTTOM EXHAUST) 10 CHANGING DIRECTION OF DOOR OPENING 1. Open the door and remove the filler plugs opposite the hinges. Apply firm pressure to...
... these screws secure each hinge. LABEL ALL WIRES PRIOR TO DISCONNECTING WHEN SERVICING CONTROLS. Installation Instructions ADDING ELBOW FOR EXHAUST THROUGH BOTTOM OF CABINET • Insert the elbow through the rear opening and connect it UP and OUT. 3. ADDING COVER PLATE TO REAR OF CABINET (SIDES AND BOTTOM EXHAUST) 10 CHANGING DIRECTION OF DOOR OPENING 1. Open the door and remove the filler plugs opposite the hinges. Apply firm pressure to...


