

Owners Manual
Page 2
.... call your building. PROPER INSTALLATION This dryer must be minimized further by calling 800.GE.CARES (800.432.2737). Use only rigid metal or flexible metal 4″ diameter ductwork for exhausting to cause cancer, birth defects or other appliance. PUNCTURED DUCTWORK CAN CAUSE A FIRE IF IT COLLAPSES OR BECOMES OTHERWISE RESTRICTED IN...
.... call your building. PROPER INSTALLATION This dryer must be minimized further by calling 800.GE.CARES (800.432.2737). Use only rigid metal or flexible metal 4″ diameter ductwork for exhausting to cause cancer, birth defects or other appliance. PUNCTURED DUCTWORK CAN CAUSE A FIRE IF IT COLLAPSES OR BECOMES OTHERWISE RESTRICTED IN...

Owners Manual
Page 3
... wait until solvents or flammable materials have been removed. These substances give off position or pressing PAUSE does NOT disconnect the appliance from the remaining particles that have used a cleaning solvent or that may ignite or explode. Skin irritation could cause a clothes... moving. DO NOT OPERATE THE DRYER WITHOUT THE LINT FILTER IN PLACE. Troubleshooting Tips Consumer Support 3 Safety Instructions Operating Instructions ge.com WARNING! Do not allow children to reduce the possibility of the lint filter). I Clean the lint filter before attempting any...
... wait until solvents or flammable materials have been removed. These substances give off position or pressing PAUSE does NOT disconnect the appliance from the remaining particles that have used a cleaning solvent or that may ignite or explode. Skin irritation could cause a clothes... moving. DO NOT OPERATE THE DRYER WITHOUT THE LINT FILTER IN PLACE. Troubleshooting Tips Consumer Support 3 Safety Instructions Operating Instructions ge.com WARNING! Do not allow children to reduce the possibility of the lint filter). I Clean the lint filter before attempting any...

Owners Manual
Page 4
...See the Loading and Using the Dryer section. DO NOT ATTEMPT TO LIGHT WITH A MATCH. I Grasp the plug firmly when disconnecting this appliance if it from service, remove the dryer door to repair or replace any part of those products, or try a dryer-added product for... or plug. We recommend you understand and have a pilot light. SAVE THESE INSTRUCTIONS Troubleshooting Tips Consumer Support 4 I Never attempt to operate this appliance to avoid damage to carry out. I If yours is equipped with controls. I Do not tamper with an automatic electric ignition and does not ...
...See the Loading and Using the Dryer section. DO NOT ATTEMPT TO LIGHT WITH A MATCH. I Grasp the plug firmly when disconnecting this appliance if it from service, remove the dryer door to repair or replace any part of those products, or try a dryer-added product for... or plug. We recommend you understand and have a pilot light. SAVE THESE INSTRUCTIONS Troubleshooting Tips Consumer Support 4 I Never attempt to operate this appliance to avoid damage to carry out. I If yours is equipped with controls. I Do not tamper with an automatic electric ignition and does not ...

Owners Manual
Page 15
... Electric Company. I Service trips to your home to teach you may be required to bring the product to a defect in this appliance. This warranty is located in an area where service by our Factory Service Centers, or an authorized Customer Care® technician. Proof... Troubleshooting Tips Consumer Support 15 Staple your home. I Product not accessible to replace the defective part. All warranty service provided by a GE Authorized Servicer is needed to operation in the Owner's Manual. I Defects or damage due to obtain support under the warranty. Any implied...
... Electric Company. I Service trips to your home to teach you may be required to bring the product to a defect in this appliance. This warranty is located in an area where service by our Factory Service Centers, or an authorized Customer Care® technician. Proof... Troubleshooting Tips Consumer Support 15 Staple your home. I Product not accessible to replace the defective part. All warranty service provided by a GE Authorized Servicer is needed to operation in the Owner's Manual. I Defects or damage due to obtain support under the warranty. Any implied...

Owners Manual
Page 16
...the service you can have parts or accessories sent directly to : General Manager, Customer Relations GE Appliances, Appliance Park Louisville, KY 40225 ge.com Register Your Appliance Register your new appliance on -line and schedule your service at 800.626.2002 during normal business hours. You...contained in Canada Timely product registration will still be used by people of GE's Universal Design applications, including kitchen design ideas for people with all ages, sizes and capabilities. GE Appliances Website ge.com Have a question or need assistance with your warranty, should be...
...the service you can have parts or accessories sent directly to : General Manager, Customer Relations GE Appliances, Appliance Park Louisville, KY 40225 ge.com Register Your Appliance Register your new appliance on -line and schedule your service at 800.626.2002 during normal business hours. You...contained in Canada Timely product registration will still be used by people of GE's Universal Design applications, including kitchen design ideas for people with all ages, sizes and capabilities. GE Appliances Website ge.com Have a question or need assistance with your warranty, should be...

Installation Instructions
Page 1
... connections. Be sure to leave these instructions with the customer. • Note to prevent large amounts of children is necessary when the appliance is Clean (see section 1) and Meets Attached Installation Specifications (see section 1). TOOLS YOU WILL NEED MATERIALS YOU WILL NEED...Connect the Power Supply (see , section 8. For Mobile or Manufactured Home see section 2). Installation Instructions Electric Dryer 37 Questions on or in the appliance. Call: 1-800-GECARES (US) or Visit our Web site at: www.GEAppliances.com (US) BEFORE YOU BEGIN Read these instructions. •...
... connections. Be sure to leave these instructions with the customer. • Note to prevent large amounts of children is necessary when the appliance is Clean (see section 1) and Meets Attached Installation Specifications (see section 1). TOOLS YOU WILL NEED MATERIALS YOU WILL NEED...Connect the Power Supply (see , section 8. For Mobile or Manufactured Home see section 2). Installation Instructions Electric Dryer 37 Questions on or in the appliance. Call: 1-800-GECARES (US) or Visit our Web site at: www.GEAppliances.com (US) BEFORE YOU BEGIN Read these instructions. •...
Installation Instructions
Page 2
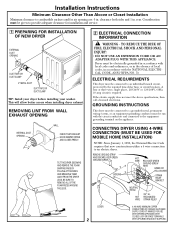
...and ordinances, or in the absence of local codes, in accordance with the circuit conductors and connected to the equipmentgrounding terminal on the appliance. If the electric supply does not meet the above specifications, then call a licensed electrician. CONNECTING DRYER USING 4-WIRE CONNECTION...THE RISK OF FIRE, ELECTRICAL SHOCK AND PERSONAL INJURY: • DO NOT USE AN EXTENSION CORD OR AN ADAPTER PLUG WITH THIS APPLIANCE. GROUNDING INSTRUCTIONS This dryer must be connected to an individual branch circuit, protected by the required time-delay fuses or circuit breakers. BE...
...and ordinances, or in the absence of local codes, in accordance with the circuit conductors and connected to the equipmentgrounding terminal on the appliance. If the electric supply does not meet the above specifications, then call a licensed electrician. CONNECTING DRYER USING 4-WIRE CONNECTION...THE RISK OF FIRE, ELECTRICAL SHOCK AND PERSONAL INJURY: • DO NOT USE AN EXTENSION CORD OR AN ADAPTER PLUG WITH THIS APPLIANCE. GROUNDING INSTRUCTIONS This dryer must be connected to an individual branch circuit, protected by the required time-delay fuses or circuit breakers. BE...
Installation Instructions
Page 6
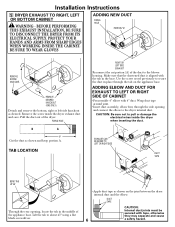
... HANDS AND ARMS FROM SHARP EDGES WHEN WORKING INSIDE THE CABINET. Use the screw saved previously to secure the duct in the middle of the appliance base. Remove the screw inside the dryer when inserting the duct. Make sure that the shortened duct is aligned with 4" duct. REMOVE DESIRED ... through the side opening and connect the elbow to about 45º using a flat blade screwdriver. • Apply duct tape as shown on the appliance base. Wrap duct tape around joint. • Insert duct assembly, elbow first, through the tab on the joint between the dryer internal duct and...
... HANDS AND ARMS FROM SHARP EDGES WHEN WORKING INSIDE THE CABINET. Use the screw saved previously to secure the duct in the middle of the appliance base. Remove the screw inside the dryer when inserting the duct. Make sure that the shortened duct is aligned with 4" duct. REMOVE DESIRED ... through the side opening and connect the elbow to about 45º using a flat blade screwdriver. • Apply duct tape as shown on the appliance base. Wrap duct tape around joint. • Insert duct assembly, elbow first, through the tab on the joint between the dryer internal duct and...