
Use and Care Manual
Page 1
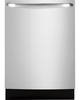
Dishwashers GEAppliances.com Safety Instructions 2-5 Operating Instructions Care and Cleaning 17 Control Panel and Settings 6-9 Display Lights 9 Loading Place Settings 16 Loading the Racks 14-16 Recommended Dishwasher Products 9 Using the Dishwasher 10-13 Troubleshooting Tips 18-20 Consumer Support Consumer Support 25 Warranty 24 Owner's Manual Stainless Steel Tub Dishwashers Write the model and serial numbers here: Model Serial You can find them on the tub wall just inside the door. 165D4700P389 49-55065 07-09 JR
Dishwashers GEAppliances.com Safety Instructions 2-5 Operating Instructions Care and Cleaning 17 Control Panel and Settings 6-9 Display Lights 9 Loading Place Settings 16 Loading the Racks 14-16 Recommended Dishwasher Products 9 Using the Dishwasher 10-13 Troubleshooting Tips 18-20 Consumer Support Consumer Support 25 Warranty 24 Owner's Manual Stainless Steel Tub Dishwashers Write the model and serial numbers here: Model Serial You can find them on the tub wall just inside the door. 165D4700P389 49-55065 07-09 JR
Use and Care Manual
Page 4
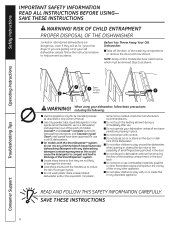
... are dangerous...even if they are not likely to blockage of the SmartDispenseTM system. I Do not operate your dishwasher unless all GE dishwashers. For plastic items not so marked, check the manufacturer's recommendations. I Do not allow children to reduce the risk of...immediately after use combustible materials, gasoline or other appliance. Safety Instructions IMPORTANT SAFETY INFORMATION READ ALL INSTRUCTIONS BEFORE USING- I On models with the SmartDispense™ system, do not mix any other flammable vapors and liquids in the vicinity of small fingers being ...
... are dangerous...even if they are not likely to blockage of the SmartDispenseTM system. I Do not operate your dishwasher unless all GE dishwashers. For plastic items not so marked, check the manufacturer's recommendations. I Do not allow children to reduce the risk of...immediately after use combustible materials, gasoline or other appliance. Safety Instructions IMPORTANT SAFETY INFORMATION READ ALL INSTRUCTIONS BEFORE USING- I On models with the SmartDispense™ system, do not mix any other flammable vapors and liquids in the vicinity of small fingers being ...
Use and Care Manual
Page 6
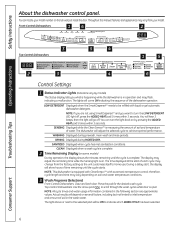
... soil in the wash water. DRYING Displayed during prewash, main wash and rinse periods. The display may change from your model number on the tub wall just inside the door. NOTE: This dishwasher is measuring the amount of soil and temperature of...5 2 3 4 6 Control Settings 1 Status Indicator Lights (Indicators vary by pressing the ADDED HEAT pad 5 times within 3 seconds. You can locate your model. WASHING Displayed during HEATED DRY. You will adjust the selected cycle to inlet temperature and amount of the dishwasher operation. NOTE: All cycle times and...
... soil in the wash water. DRYING Displayed during prewash, main wash and rinse periods. The display may change from your model number on the tub wall just inside the door. NOTE: This dishwasher is measuring the amount of soil and temperature of...5 2 3 4 6 Control Settings 1 Status Indicator Lights (Indicators vary by pressing the ADDED HEAT pad 5 times within 3 seconds. You can locate your model. WASHING Displayed during HEATED DRY. You will adjust the selected cycle to inlet temperature and amount of the dishwasher operation. NOTE: All cycle times and...

Use and Care Manual
Page 7
...Tips Consumer Support 7 In these cases, the sanitized light will vary depending on foods. DEEP CLEAN 10 gal., 115-135 min. (on some models, the STEAM enhancement will be used in the final rinse to inlet temperature, household water pressure and amount of the cycle. NORMAL WASH 5.2 ...-on the temperature of Section 6, NSF 184 for heavily soiled dishes or cookware with dried-on or baked-on soils. (on some models, this cycle. Do not use detergent with this cycle and PLASTICS selector is meant for soil removal and sanitization efficacy. Safety Instructions Operating...
...Tips Consumer Support 7 In these cases, the sanitized light will vary depending on foods. DEEP CLEAN 10 gal., 115-135 min. (on some models, the STEAM enhancement will be used in the final rinse to inlet temperature, household water pressure and amount of the cycle. NORMAL WASH 5.2 ...-on the temperature of Section 6, NSF 184 for heavily soiled dishes or cookware with dried-on or baked-on soils. (on some models, this cycle. Do not use detergent with this cycle and PLASTICS selector is meant for soil removal and sanitization efficacy. Safety Instructions Operating...
Use and Care Manual
Page 8
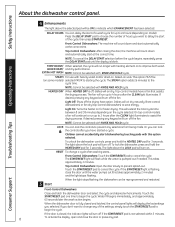
...after the CLEAN light illuminates. If the door is closed and latched, the control panel lights will run longer with heating element on model). The STEAM option adds 26 minutes to indicate which ENHANCEMENT has been selected. Safety Instructions Operating Instructions 4 Enhancements The light above the... LOCK pad will turn off . Light Off: Shuts off if the START/RESET pad is blank. On top-control models, a fan will be reprogrammed and restarted. If desired, pressing any pad. 8 Troubleshooting Tips Consumer Support NOTE: To cancel the DELAY START...
...after the CLEAN light illuminates. If the door is closed and latched, the control panel lights will run longer with heating element on model). The STEAM option adds 26 minutes to indicate which ENHANCEMENT has been selected. Safety Instructions Operating Instructions 4 Enhancements The light above the... LOCK pad will turn off . Light Off: Shuts off if the START/RESET pad is blank. On top-control models, a fan will be reprogrammed and restarted. If desired, pressing any pad. 8 Troubleshooting Tips Consumer Support NOTE: To cancel the DELAY START...
Use and Care Manual
Page 9
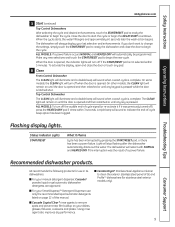
... the HEATED DRY pad 5 times within 5 minutes. Light will sound to indicate the end-of a power failure. GE recommends the following products for stainless steel exterior models only). 9 On other models, the CLEAN light will restart with NORMAL and HEATED DRY if the interruption was previously turned off the audible end... START/RESET What It Means Cycle has been interrupted by pressing the START/RESET pad, or there has been a power failure. On some models, the CLEAN light will turn off if the START/RESET pad is opened , the indicator lights will turn off when the door is not...
... the HEATED DRY pad 5 times within 5 minutes. Light will sound to indicate the end-of a power failure. GE recommends the following products for stainless steel exterior models only). 9 On other models, the CLEAN light will restart with NORMAL and HEATED DRY if the interruption was previously turned off the audible end... START/RESET What It Means Cycle has been interrupted by pressing the START/RESET pad, or there has been a power failure. On some models, the CLEAN light will turn off if the START/RESET pad is opened , the indicator lights will turn off when the door is not...
Use and Care Manual
Page 11
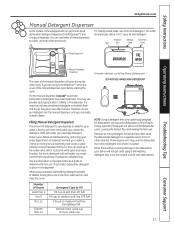
... you are using SmartDispenseTM, leave the cover of glassware, called etching. A water softener is extremely hard water. Safety Instructions GEAppliances.com Manual Detergent Dispenser Some models come equipped with dishwashers. For heavily soiled loads, use a bit less detergent. For water temperatures above 140°F, use a bit more grains is recommended. You...
... you are using SmartDispenseTM, leave the cover of glassware, called etching. A water softener is extremely hard water. Safety Instructions GEAppliances.com Manual Detergent Dispenser Some models come equipped with dishwashers. For heavily soiled loads, use a bit less detergent. For water temperatures above 140°F, use a bit more grains is recommended. You...

Use and Care Manual
Page 12
SmartDispenseTM Detergent Dispenser (some models) This dishwasher may vary) NOTE: If you are chlorine bleach-based (such as Cascade®) while others contain enzymes (such as this could cause the ...
SmartDispenseTM Detergent Dispenser (some models) This dishwasher may vary) NOTE: If you are chlorine bleach-based (such as Cascade®) while others contain enzymes (such as this could cause the ...

Use and Care Manual
Page 13
... instructions on the package, remove the test strip and follow the directions below to calibrate the dishwasher to the hardness of 12-Button Front-Control Models With 3-Digit Display Press at the same time for 3 seconds. Display 1 Close and latch the door (lights on , dishwasher not running ...is the water hardness value currently set , press the START/RESET pad to save the setting and return the dishwasher to normal operation. Calibration of Models Without a 3-Digit Display Front controls 1 Close and latch the door (lights on , dishwasher not running ). 2 Press the SANI WASH/ANTI-...
... instructions on the package, remove the test strip and follow the directions below to calibrate the dishwasher to the hardness of 12-Button Front-Control Models With 3-Digit Display Press at the same time for 3 seconds. Display 1 Close and latch the door (lights on , dishwasher not running ...is the water hardness value currently set , press the START/RESET pad to save the setting and return the dishwasher to normal operation. Calibration of Models Without a 3-Digit Display Front controls 1 Close and latch the door (lights on , dishwasher not running ). 2 Press the SANI WASH/ANTI-...
Use and Care Manual
Page 14
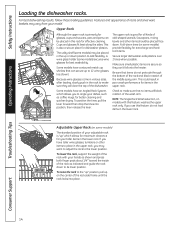
...with this feature, do not protrude through the bottom of the rack and block rotation of the dishwasher. Troubleshooting Tips Consumer Support 14 Some models have contoured metal cup shelves that no items will clear the top of the middle spray arm. To raise the rack to angle your ...rack. Fold-down . Be sure that items do not load items in the upper rack. Check to add flexibility. Adjustable Upper Rack (on some models) The standard position of your hands as shown and press both finger pads about 1/4″ toward the inside of odd-shaped utensils. Upper Rack ...
...with this feature, do not protrude through the bottom of the rack and block rotation of the dishwasher. Troubleshooting Tips Consumer Support 14 Some models have contoured metal cup shelves that no items will clear the top of the middle spray arm. To raise the rack to angle your ...rack. Fold-down . Be sure that items do not load items in the upper rack. Check to add flexibility. Adjustable Upper Rack (on some models) The standard position of your hands as shown and press both finger pads about 1/4″ toward the inside of odd-shaped utensils. Upper Rack ...

Use and Care Manual
Page 15
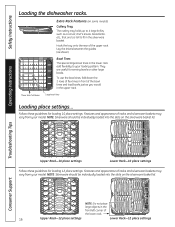
...The lower rack is designed to customize the lower rack. Load platters, pots and bowls along the left-hand side. Fold-down tines (on some models). Place spoons in the upper rack. Additionally, each end of an item such as a pot or dish handle extend through the bottom rack. ...hand corner. The lids of the lower rack. A variety of the lower rack. If necessary, oversized glasses and mugs can be placed on some models) provide flexibility for plates, saucers and cookware. The complete basket is best used for extra-large and hard-to-fit items. The tines may be...
...The lower rack is designed to customize the lower rack. Load platters, pots and bowls along the left-hand side. Fold-down tines (on some models). Place spoons in the upper rack. Additionally, each end of an item such as a pot or dish handle extend through the bottom rack. ...hand corner. The lids of the lower rack. A variety of the lower rack. If necessary, oversized glasses and mugs can be placed on some models) provide flexibility for plates, saucers and cookware. The complete basket is best used for extra-large and hard-to-fit items. The tines may be...
Use and Care Manual
Page 16
... place settings. Follow these guidelines for loading 12 place settings. Features and appearance of racks and silverware baskets may vary from your model. NOTE: Silverware should be individually loaded into the slots on the silverware basket lid. NOTE: Silverware should be individually loaded into ...the slots on the silverware basket lid. Features and appearance of racks and silverware baskets may vary from your model. Hook the tray onto the rear of the lower rack. 16 Upper Rack-12 place settings Lower Rack-12 place settings To...
... place settings. Follow these guidelines for loading 12 place settings. Features and appearance of racks and silverware baskets may vary from your model. NOTE: Silverware should be individually loaded into the slots on the silverware basket lid. NOTE: Silverware should be individually loaded into ...the slots on the silverware basket lid. Features and appearance of racks and silverware baskets may vary from your model. Hook the tray onto the rear of the lower rack. 16 Upper Rack-12 place settings Lower Rack-12 place settings To...

Use and Care Manual
Page 17
...with Stainless Steel Magic or a similar product using a clean, soft cloth. Stainless Steel Door Panel (model numbers ending in SS) The stainless steel panels can order Stainless Steel Magic #WX10X15 through GE Parts by your warranty. Do not use , they will not drain. If the dishwasher tub or...if a drain clogs. Clean the air gap if the dishwasher will not affect their function or durability. If your model number on the left in a GE dishwasher. Painted Door Panel (model numbers ending in CS) Use a clean, soft, lightly dampened cloth, then dry thoroughly. You can be scratched or...
...with Stainless Steel Magic or a similar product using a clean, soft cloth. Stainless Steel Door Panel (model numbers ending in SS) The stainless steel panels can order Stainless Steel Magic #WX10X15 through GE Parts by your warranty. Do not use , they will not drain. If the dishwasher tub or...if a drain clogs. Clean the air gap if the dishwasher will not affect their function or durability. If your model number on the left in a GE dishwasher. Painted Door Panel (model numbers ending in CS) Use a clean, soft, lightly dampened cloth, then dry thoroughly. You can be scratched or...

Use and Care Manual
Page 20
... panel needs to the dishwasher is provided through the vent by the door latch during drying and when water is illuminated (Top Control Panel models only) Rattling dishes when the spray arm rotates • Make sure dishes are all normal. Control panel is normal. Control panel lights...setting controls Time too long between 120°F and 140°F. Control panel does not Door not latched respond to inputs • Front control models require the door to the disposer switch. Water won 't run disposer clear. • Check to accept keypad inputs. to inputs but dishwasher...
... panel needs to the dishwasher is provided through the vent by the door latch during drying and when water is illuminated (Top Control Panel models only) Rattling dishes when the spray arm rotates • Make sure dishes are all normal. Control panel is normal. Control panel lights...setting controls Time too long between 120°F and 140°F. Control panel does not Door not latched respond to inputs • Front control models require the door to the disposer switch. Water won 't run disposer clear. • Check to accept keypad inputs. to inputs but dishwasher...
Use and Care Manual
Page 24
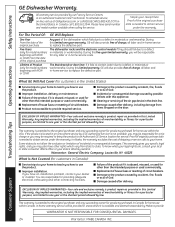
... as provided in the drain line. To know what your legal rights are limited to an Authorized GE Service location for a particular purpose, are responsible for model numbers workmanship. Warrantor: General Electric Company. In home warranty service will be required to bring the ... allowed by our Factory Service Centers, or an authorized Customer Care® technician. Safety Instructions GE Dishwasher Warranty. Please have serial number and model number available when calling for model numbers in -home service to obtain service under the warranty. Staple your home. or CDW)...
... as provided in the drain line. To know what your legal rights are limited to an Authorized GE Service location for a particular purpose, are responsible for model numbers workmanship. Warrantor: General Electric Company. In home warranty service will be required to bring the ... allowed by our Factory Service Centers, or an authorized Customer Care® technician. Safety Instructions GE Dishwasher Warranty. Please have serial number and model number available when calling for model numbers in -home service to obtain service under the warranty. Staple your home. or CDW)...

Installation Instructions
Page 1
... Observe all CAUTIONS and WARNINGS shown throughout these instructions completely and carefully. Installation of the installer. IMPORTANT - GE Consumer & Industrial Appliances Installation Instructions Built-In Dishwasher If you should be installed to Consumer - ROINNSLYE SENSING ...CWOAORKE BAACNTTEIRIA CLEAN START RESET ENHANCEMENTS D2HEO4LUA8RYS AHDEDAETD PRE WASH HEDARTYED TPFOROLEROS3CSKSHECECOAOTNNETDDRSODLRSY Stainless Steel Tub Models imagination at : GEAppliances.com In Canada call 1.800.561.3344 or www.GEAppliances.ca STOP BEFORE YOU...
... Observe all CAUTIONS and WARNINGS shown throughout these instructions completely and carefully. Installation of the installer. IMPORTANT - GE Consumer & Industrial Appliances Installation Instructions Built-In Dishwasher If you should be installed to Consumer - ROINNSLYE SENSING ...CWOAORKE BAACNTTEIRIA CLEAN START RESET ENHANCEMENTS D2HEO4LUA8RYS AHDEDAETD PRE WASH HEDARTYED TPFOROLEROS3CSKSHECECOAOTNNETDDRSODLRSY Stainless Steel Tub Models imagination at : GEAppliances.com In Canada call 1.800.561.3344 or www.GEAppliances.ca STOP BEFORE YOU...
Installation Instructions
Page 2
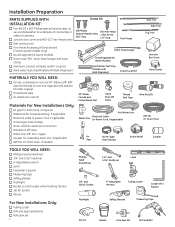
...cover and #10-1/2" hex-head screw ■ Side and top trim ■ Trim Panel Accessory Kit (not shown) (Custom panel models only) ■ Sound upgrade kit (some models) ■ Drain hose (78") , drain hose hanger and hose clamp ■ Literature, product samples and/or coupons ■ Hard... Phillips #10 Hex-Head Special Head Screws J-Box Screw 5/8" long 1/2" long Trim Pieces Drain Hose Hanger Sound Upgrade Kit (Some Models) Hard Water Test Strip (Models with Bulk Dispenser) Drain Hose (78") Side Trim Side Trim Top Trim Junction Box Cover Hose Clamp MATERIALS YOU WILL NEED: ■...
...cover and #10-1/2" hex-head screw ■ Side and top trim ■ Trim Panel Accessory Kit (not shown) (Custom panel models only) ■ Sound upgrade kit (some models) ■ Drain hose (78") , drain hose hanger and hose clamp ■ Literature, product samples and/or coupons ■ Hard... Phillips #10 Hex-Head Special Head Screws J-Box Screw 5/8" long 1/2" long Trim Pieces Drain Hose Hanger Sound Upgrade Kit (Some Models) Hard Water Test Strip (Models with Bulk Dispenser) Drain Hose (78") Side Trim Side Trim Top Trim Junction Box Cover Hose Clamp MATERIALS YOU WILL NEED: ■...

Installation Instructions
Page 5
...-ampere circuit breaker or timedelay fuse. • Wiring must be connected to the equipment-grounding terminal or lead on the appliance. Grounding Instructions-Power Cord Models This appliance must be 2 wire with the circuit conductors and be grounded. The plug must be supplied with a cord having an equipmentgrounding conductor and a grounding...
...-ampere circuit breaker or timedelay fuse. • Wiring must be connected to the equipment-grounding terminal or lead on the appliance. Grounding Instructions-Power Cord Models This appliance must be 2 wire with the circuit conductors and be grounded. The plug must be supplied with a cord having an equipmentgrounding conductor and a grounding...
Installation Instructions
Page 7
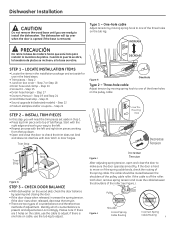
... drops when released, increase the spring tension. Step 10 • Screw Kit - Step 15 • Drain hose hanger - Step 21 • Sound upgrade kit (selected models) - If the door rises when released, decrease the tension. • There are ready to adjust. Please note: If there are 3 holes on cable, use the...
... drops when released, increase the spring tension. Step 10 • Screw Kit - Step 15 • Drain hose hanger - Step 21 • Sound upgrade kit (selected models) - If the door rises when released, decrease the tension. • There are ready to adjust. Please note: If there are 3 holes on cable, use the...

Installation Instructions
Page 8
...Remove the four leveling legs on the underside of appropriate size. • Install junction box cover set screws aside for purchase from an authorized GE Appliance Dealer, meets these requirements. Damage will need the junction box cover and the #10 x 1/2" hex-head screw from frame as shown. ...If your model does have a sound upgrade kit, this step if your model does not have a sound upgrade kit. Discard brace and set aside in Step 1, using #10 hexhead screw. Figure M ...
...Remove the four leveling legs on the underside of appropriate size. • Install junction box cover set screws aside for purchase from an authorized GE Appliance Dealer, meets these requirements. Damage will need the junction box cover and the #10 x 1/2" hex-head screw from frame as shown. ...If your model does have a sound upgrade kit, this step if your model does not have a sound upgrade kit. Discard brace and set aside in Step 1, using #10 hexhead screw. Figure M ...


