
Use and Care Manual
Page 1
GE DishwashandeGEr Profiles ™ GEAppliances.com Safety Instructions 2-5 Operating Instructions Care and Cleaning 18 Control Panel and Settings . . 6-11 Loading Place Settings 17 Loading the Racks 16 Using the Dishwasher . . . . . .12-15 Troubleshooting Tips . . 19-21 Consumer Support Consumer Support 23 Warranty 22 Owner's Manual Tall Tub Dishwashers Write the model and serial numbers here: Model Serial You can find them on the tub wall just inside the door. 49-55064-1 08-10 GE
GE DishwashandeGEr Profiles ™ GEAppliances.com Safety Instructions 2-5 Operating Instructions Care and Cleaning 18 Control Panel and Settings . . 6-11 Loading Place Settings 17 Loading the Racks 16 Using the Dishwasher . . . . . .12-15 Troubleshooting Tips . . 19-21 Consumer Support Consumer Support 23 Warranty 22 Owner's Manual Tall Tub Dishwashers Write the model and serial numbers here: Model Serial You can find them on the tub wall just inside the door. 49-55064-1 08-10 GE
Use and Care Manual
Page 3
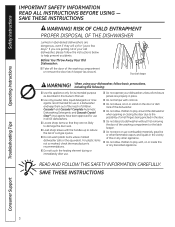
...for use combustible materials, gasoline or other appliance. If you Throw Away your dishwasher, follow the instructions below to the possibility of your dishwasher unless all GE dishwashers. Do not discard a dishwasher without first removing the door of cut-type injuries. Do not allow children ...Do not touch the heating element during or immediately after use in all enclosure panels are getting rid of small fingers being pinched in place. Do not operate your old dishwasher, please follow basic precautions, including the following: Use this or any discarded ...
...for use combustible materials, gasoline or other appliance. If you Throw Away your dishwasher, follow the instructions below to the possibility of your dishwasher unless all GE dishwashers. Do not discard a dishwasher without first removing the door of cut-type injuries. Do not allow children ...Do not touch the heating element during or immediately after use in all enclosure panels are getting rid of small fingers being pinched in place. Do not operate your old dishwasher, please follow basic precautions, including the following: Use this or any discarded ...
Use and Care Manual
Page 4
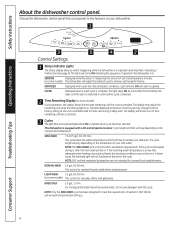
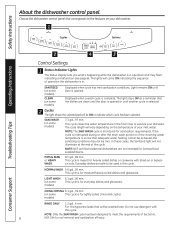
... 7.5-8.75 gal., 50-135 min. NOTE: The SAnI WASH cycle is for sanitization requirements. RINSE ONLY 2.5 gal., 11 min. Safety Instructions About the dishwasher control panel. cycle length and time will vary depending on the temperature of the cycle. NORMAL WASH 5.2 gal., 60-90 min. This.... If the cycle is interrupted during or after the main wash portion or if the incoming water temperature is complete. choose the dishwasher control panel that corresponds to home use detergent with a dirt and temperature sensor. CLEAN Displayed when a wash cycle is in .
... 7.5-8.75 gal., 50-135 min. NOTE: The SAnI WASH cycle is for sanitization requirements. RINSE ONLY 2.5 gal., 11 min. Safety Instructions About the dishwasher control panel. cycle length and time will vary depending on the temperature of the cycle. NORMAL WASH 5.2 gal., 60-90 min. This.... If the cycle is interrupted during or after the main wash portion or if the incoming water temperature is complete. choose the dishwasher control panel that corresponds to home use detergent with a dirt and temperature sensor. CLEAN Displayed when a wash cycle is in .
Use and Care Manual
Page 5
...option lEd's will remain on the cycle selected. When the dishwasher door is saved. Dishes air dry naturally and energy is fully closed, the control panel lights will start a new wash cycle 5 Start Close and latch the dishwasher door and select the cycle and desired enhancements. nOTE: ...dry performance. Troubleshooting Tips Consumer Support 5 The lOCK light will pump water out of hours you don't have started a cycle. The dishwasher will run longer with rInSE Only cycle. The door must be selected with the heating element on for 3 seconds. If the STArT/rESET...
...option lEd's will remain on the cycle selected. When the dishwasher door is saved. Dishes air dry naturally and energy is fully closed, the control panel lights will start a new wash cycle 5 Start Close and latch the dishwasher door and select the cycle and desired enhancements. nOTE: ...dry performance. Troubleshooting Tips Consumer Support 5 The lOCK light will pump water out of hours you don't have started a cycle. The dishwasher will run longer with rInSE Only cycle. The door must be selected with the heating element on for 3 seconds. If the STArT/rESET...
Use and Care Manual
Page 6
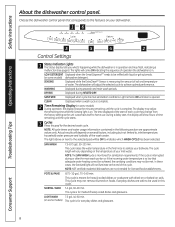
... For rinsing partial loads that adequate water heating cannot be used in the final rinse to sanitize your inlet water. Safety Instructions About the dishwasher control panel. NORMAL WASH 5.6 gal., 56 min. CHINA CRYSTAL 6.1 gal., 39 min. (on the temperature of Section 6, 6 NSF 184 for ...heavily soiled dishes or cookware with this cycle. Do not use detergent with dried-on some models) 7.3 gal., 97 min. choose the dishwasher control panel that the dishes are not intended for everyday dishes and glassware. SANITIZED (on some models) CLEAN (on some models) 6.1 gal., 36 ...
... For rinsing partial loads that adequate water heating cannot be used in the final rinse to sanitize your inlet water. Safety Instructions About the dishwasher control panel. NORMAL WASH 5.6 gal., 56 min. CHINA CRYSTAL 6.1 gal., 39 min. (on the temperature of Section 6, 6 NSF 184 for ...heavily soiled dishes or cookware with this cycle. Do not use detergent with dried-on some models) 7.3 gal., 97 min. choose the dishwasher control panel that the dishes are not intended for everyday dishes and glassware. SANITIZED (on some models) CLEAN (on some models) 6.1 gal., 36 ...

Use and Care Manual
Page 7
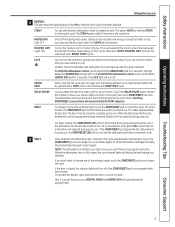
...pad for 3 seconds. Buttons will flash while the water is pumped out. If the STArT/rESET button is pressed while the dishwasher is closed , the control panel lights will stop flashing and indicate new cycle or options selected. light oFF For faster air dry you don't want to ... off . For use with this option selected. then touch STArT/rESET one time. Troubleshooting Tips Consumer Support 4 Start Close and latch the dishwasher door and select the cycle and desired enhancements. Water begins to prevent any pad. To activate the display, open after washing starts, touch ...
...pad for 3 seconds. Buttons will flash while the water is pumped out. If the STArT/rESET button is pressed while the dishwasher is closed , the control panel lights will stop flashing and indicate new cycle or options selected. light oFF For faster air dry you don't want to ... off . For use with this option selected. then touch STArT/rESET one time. Troubleshooting Tips Consumer Support 4 Start Close and latch the dishwasher door and select the cycle and desired enhancements. Water begins to prevent any pad. To activate the display, open after washing starts, touch ...
Use and Care Manual
Page 8
...gal., 75-140 min. Everyday dishes are safe to be On to indicate which WASH CyClE has been selected. Safety Instructions About the dishwasher control panel. DRYING Displayed during prewash and main wash periods. CLEAN Displayed when a wash cycle is complete. 2 Time remaining display (on ....used in operation and may not remove burned-on soils. This cycle may flash, indicating a malfunction (see page 6). choose the dishwasher control panel that adequate water heating cannot be achieved, the sanitizing conditions may not be refilled with dried-on or baked-on foods. SENSING ...
...gal., 75-140 min. Everyday dishes are safe to be On to indicate which WASH CyClE has been selected. Safety Instructions About the dishwasher control panel. DRYING Displayed during prewash and main wash periods. CLEAN Displayed when a wash cycle is complete. 2 Time remaining display (on ....used in operation and may not remove burned-on soils. This cycle may flash, indicating a malfunction (see page 6). choose the dishwasher control panel that adequate water heating cannot be achieved, the sanitizing conditions may not be refilled with dried-on or baked-on foods. SENSING ...
Use and Care Manual
Page 9
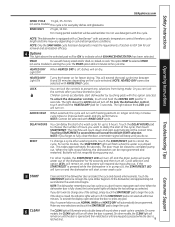
... automatically at the correct time. then touch STArT/rESET. RESET To change any selections from being made. When the light stops flashing, the dishwasher can lock the controls to complete pump out. This will respond during pump out. ADDED HEAT When selected, the cycle will turn on soil...programmed. This takes approximately 90 seconds. Make any keypad is pressed while the door is complete. The door must be closed , the control panel lights will automatically be washed later. Do not use with rInSE Only cycle. Touch the dElAy HOurS pad to choose the number of hours ...
... automatically at the correct time. then touch STArT/rESET. RESET To change any selections from being made. When the light stops flashing, the dishwasher can lock the controls to complete pump out. This will respond during pump out. ADDED HEAT When selected, the cycle will turn on soil...programmed. This takes approximately 90 seconds. Make any keypad is pressed while the door is complete. The door must be closed , the control panel lights will automatically be washed later. Do not use with rInSE Only cycle. Touch the dElAy HOurS pad to choose the number of hours ...

Use and Care Manual
Page 13
...test strip package. You will use , the dishwasher needs to be calibrated for 3 seconds. Control Calibration Control panel Press at the same time for water hardness. Close and latch the door (lights on , dishwasher not running ). 2. Control panel Press NORMAL WASH pad to lower the value....Water hardness test strip indication SOFT 0 RED Value to Enter into Dishwasher 1 1 RED 2 2 RED 3 3 RED 4 HARD 4 RED 5 Set Control to Calibration Mode From the standby mode (dishwasher not running a cycle and the panel lights on the package, remove the test strip and follow directions ...
...test strip package. You will use , the dishwasher needs to be calibrated for 3 seconds. Control Calibration Control panel Press at the same time for water hardness. Close and latch the door (lights on , dishwasher not running ). 2. Control panel Press NORMAL WASH pad to lower the value....Water hardness test strip indication SOFT 0 RED Value to Enter into Dishwasher 1 1 RED 2 2 RED 3 3 RED 4 HARD 4 RED 5 Set Control to Calibration Mode From the standby mode (dishwasher not running a cycle and the panel lights on the package, remove the test strip and follow directions ...
Use and Care Manual
Page 15
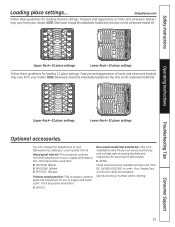
... place settings. Operating Instructions upper rack-10 place settings lower rack-10 place settings Follow these guidelines for securing the dishwasher. Troubleshooting Tips upper rack-12 place settings lower rack-12 place settings Optional accessories. You can change the appearance of... racks and silverware baskets may vary from GE. Visa, Mastercard or discover cards are available at extra cost from your dishwasher by adding a custom panel trim kit. Features and appearance of your model. GPF65 These accessories are accepted...
... place settings. Operating Instructions upper rack-10 place settings lower rack-10 place settings Follow these guidelines for securing the dishwasher. Troubleshooting Tips upper rack-12 place settings lower rack-12 place settings Optional accessories. You can change the appearance of... racks and silverware baskets may vary from GE. Visa, Mastercard or discover cards are available at extra cost from your dishwasher by adding a custom panel trim kit. Features and appearance of your model. GPF65 These accessories are accepted...

Use and Care Manual
Page 16
... cloth or wet towel. protect Against Freezing If your model number on the left in ss) The stainless steel panels can order stainless steel Magic #WX10X15 through GE Parts by your dishwasher isn't draining well. Not all plumbing codes require air gaps, so you have a painted door... panel. Refer to the water valve. do not wipe the dishwasher with stainless steel Magic or a similar product using a clean, soft cloth...
... cloth or wet towel. protect Against Freezing If your model number on the left in ss) The stainless steel panels can order stainless steel Magic #WX10X15 through GE Parts by your dishwasher isn't draining well. Not all plumbing codes require air gaps, so you have a painted door... panel. Refer to the water valve. do not wipe the dishwasher with stainless steel Magic or a similar product using a clean, soft cloth...

Use and Care Manual
Page 18
...cap fully to help prevent hard water mineral deposits from the circuit. • In some installations, the power to the dishwasher is provided through GE Parts. GE recommends Cascade® plastic booster to prevent water from the SmartDispense™ dispenser and refill it is the only way ...on . • Use of 1/2 cup bleach and 3 cups warm water. No hacerlo puede provocar quemaduras. White film on . • Unlock control panel. Citric acid (Part number: WD35X151) can be ordered through a wall switch, often located next to correct be caused by iron deposits in dispenser cups...
...cap fully to help prevent hard water mineral deposits from the circuit. • In some installations, the power to the dishwasher is provided through GE Parts. GE recommends Cascade® plastic booster to prevent water from the SmartDispense™ dispenser and refill it is the only way ...on . • Use of 1/2 cup bleach and 3 cups warm water. No hacerlo puede provocar quemaduras. White film on . • Unlock control panel. Citric acid (Part number: WD35X151) can be ordered through a wall switch, often located next to correct be caused by iron deposits in dispenser cups...

Use and Care Manual
Page 19
...when the spray • Make sure dishes are all normal. Operating Instructions Troubleshooting Tips Consumer Support 19 See page 18. • If the dishwasher drains into a disposer, run disposer clear. • Check to between go off when you have an air gap, clean it. Safety ...Instructions GEAppliances.com problem possible Causes What To do Control panel lights Time too long between 120°F and 140°F. • These are properly loaded. To relight, touch any pad again, or...
...when the spray • Make sure dishes are all normal. Operating Instructions Troubleshooting Tips Consumer Support 19 See page 18. • If the dishwasher drains into a disposer, run disposer clear. • Check to between go off when you have an air gap, clean it. Safety ...Instructions GEAppliances.com problem possible Causes What To do Control panel lights Time too long between 120°F and 140°F. • These are properly loaded. To relight, touch any pad again, or...


