Installation Instructions
Page 1
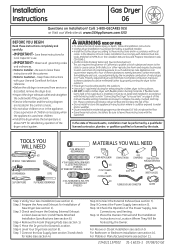
...• Do not install or store this manual. For Bathroom or Bedroom Installation see section 11. 234D1113P002 31-16225-1 07/08/10 GE For Mobile or Manufactured Home see section 10. Be sure to leave these instructions with your Use and Care Book for local inspector's use... plastic ducting materials. FLEXIBLE METAL (SEMI-RIGID) UL LISTED TRANSITION DUCT (IF NEEDED) KIT WX08X10077 (INCLUDES 2 ELBOWS) 4" DIA. Step 6 Level Your Dryer (see section 2). Step 9 Connect the Power Supply (see section 1). Step 11 Place the Owners Manual and the Installation Instructions in a Location Where They...
...• Do not install or store this manual. For Bathroom or Bedroom Installation see section 11. 234D1113P002 31-16225-1 07/08/10 GE For Mobile or Manufactured Home see section 10. Be sure to leave these instructions with your Use and Care Book for local inspector's use... plastic ducting materials. FLEXIBLE METAL (SEMI-RIGID) UL LISTED TRANSITION DUCT (IF NEEDED) KIT WX08X10077 (INCLUDES 2 ELBOWS) 4" DIA. Step 6 Level Your Dryer (see section 2). Step 9 Connect the Power Supply (see section 1). Step 11 Place the Owners Manual and the Installation Instructions in a Location Where They...

Installation Instructions
Page 2
... must conform to floor. of, and in their absence, the NATIONAL FUEL GAS CODE, ANSI Z223. • This gas dryer is to provide adequate clearance for use with natural gas. Installation Instructions Minimum Clearance Other Than Alcove or Closet Installation Minimum clearance ... 1/8-in.National Pipe Taper thread plugged tapping, accessible for air opening are: 0 in excess of 0.5 PSI (3.4 KPa). • The dryer must be 1/2-in . Consideration must use new flexible connectors when installing gas appliances. Contact your local service organization can cause leaks and personal ...
... must conform to floor. of, and in their absence, the NATIONAL FUEL GAS CODE, ANSI Z223. • This gas dryer is to provide adequate clearance for use with natural gas. Installation Instructions Minimum Clearance Other Than Alcove or Closet Installation Minimum clearance ... 1/8-in.National Pipe Taper thread plugged tapping, accessible for air opening are: 0 in excess of 0.5 PSI (3.4 KPa). • The dryer must be 1/2-in . Consideration must use new flexible connectors when installing gas appliances. Contact your local service organization can cause leaks and personal ...

Installation Instructions
Page 4
...with the NATIONAL ELECTRICAL CODE, ANSI/NFPA NO. 70. They will : • Increase the drying times and the energy cost. • Reduce the dryer life. • Accumulate lint, creating a potential fire hazard. or 20- Problems due to a properly grounded branch circuit, protected by the warranty. ENSURE...must be made air and moisture-tight by at least 12 in the table below . ELECTRICAL REQUIREMENTS This appliance must point away from the dryer. • Do not assemble the ductwork with 120V, 60Hz, and connected to incorrect installation are not covered by a 15- If ...
...with the NATIONAL ELECTRICAL CODE, ANSI/NFPA NO. 70. They will : • Increase the drying times and the energy cost. • Reduce the dryer life. • Accumulate lint, creating a potential fire hazard. or 20- Problems due to a properly grounded branch circuit, protected by the warranty. ENSURE...must be made air and moisture-tight by at least 12 in the table below . ELECTRICAL REQUIREMENTS This appliance must point away from the dryer. • Do not assemble the ductwork with 120V, 60Hz, and connected to incorrect installation are not covered by a 15- If ...

Installation Instructions
Page 5
...creating a potential fire hazard. •Never install a screen in any fasteners that extend into a common duct with the instructions found in "Connecting The Dryer To House Vent" on page 6 of this manual. •Do not terminate exhaust in a chimney, a wall, a ceiling, gas vent, crawl... length table. STANDARD REAR EXHAUST (Vented above floor level) ELBOW HIGHLY RECOMMENDED RECOMMENDED CONFIGUR A TION TO MINIMIZE EXHAUST BLOCKAGE. THIS DRYER COMES READY FOR REAR EXHAUSTING. EXTERNAL DUCT OPENING CSA (AGA) APPROVED NEW FLEXIBLE GAS LINE CONNECTOR GAS INLET PIPE DUCT TAPE OR...
...creating a potential fire hazard. •Never install a screen in any fasteners that extend into a common duct with the instructions found in "Connecting The Dryer To House Vent" on page 6 of this manual. •Do not terminate exhaust in a chimney, a wall, a ceiling, gas vent, crawl... length table. STANDARD REAR EXHAUST (Vented above floor level) ELBOW HIGHLY RECOMMENDED RECOMMENDED CONFIGUR A TION TO MINIMIZE EXHAUST BLOCKAGE. THIS DRYER COMES READY FOR REAR EXHAUSTING. EXTERNAL DUCT OPENING CSA (AGA) APPROVED NEW FLEXIBLE GAS LINE CONNECTOR GAS INLET PIPE DUCT TAPE OR...
Installation Instructions
Page 6
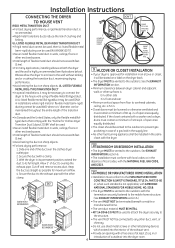
...4m). • For many applications, installing elbows at least 25 sq. See the EXHAUST INFORMATION section. • Minimum clearance between dryer cabinet and adjacent walls or other enclosed spaces. of open area equally distributed. Slide one end of crushing and kinking. FLEXIBLE •...HOME CONSTRUCTION & SAFETY STANDARD, TITLE 24, PART 32-80 DO or, when such standard is recommended. Installation Instructions CONNECTING THE DRYER DON'T TO HOUSE VENT RIGID METAL TRANSITION DUCT • For best drying performance, a rigid metal transition duct is not applicable,...
...4m). • For many applications, installing elbows at least 25 sq. See the EXHAUST INFORMATION section. • Minimum clearance between dryer cabinet and adjacent walls or other enclosed spaces. of open area equally distributed. Slide one end of crushing and kinking. FLEXIBLE •...HOME CONSTRUCTION & SAFETY STANDARD, TITLE 24, PART 32-80 DO or, when such standard is recommended. Installation Instructions CONNECTING THE DRYER DON'T TO HOUSE VENT RIGID METAL TRANSITION DUCT • For best drying performance, a rigid metal transition duct is not applicable,...
Installation Instructions
Page 7
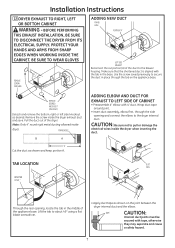
...desired. Pull the duct out of the appliance base. DUCT TAPE CAUTION: Internal duct joints must be secured with 4" duct. Installation Instructions 12 DRYER EXHAUST TO RIGHT, LEFT OR BOTTOM CABINET WARNING - PROTECT YOUR HANDS AND ARMS FROM SHARP EDGES WHEN WORKING INSIDE THE CABINET. Make sure ...that the shortened duct is aligned with the tab in the middle of the dryer. Use the screw saved previously to pull or damage the electrical wires inside the dryer when inserting the duct . Wrap duct tape around joint. • Insert duct assembly, elbow first...
...desired. Pull the duct out of the appliance base. DUCT TAPE CAUTION: Internal duct joints must be secured with 4" duct. Installation Instructions 12 DRYER EXHAUST TO RIGHT, LEFT OR BOTTOM CABINET WARNING - PROTECT YOUR HANDS AND ARMS FROM SHARP EDGES WHEN WORKING INSIDE THE CABINET. Make sure ...that the shortened duct is aligned with the tab in the middle of the dryer. Use the screw saved previously to pull or damage the electrical wires inside the dryer when inserting the duct . Wrap duct tape around joint. • Insert duct assembly, elbow first...
Installation Instructions
Page 8
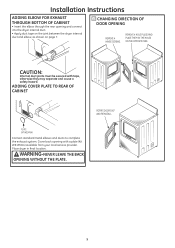
...OPENING WITHOUT THE PLATE. 8 CAUTION: Internal duct joints must be secured with a plate (Kit WE1M454) available from your local service provider. Place dryer in final location. REMOVE 4 HOLE PLUGS AND PLACE THEM IN THE HOLES ON THE OPPOSITE SIDE. ADDING COVER PLATE TO REAR OF CABINET ROTATE ... may separate and cause a safety hazard. PL ATE (KIT WE1M454) Connect standard metal elbows and ducts to the dryer internal duct. • Apply duct tape on the joint between the dryer internal duct and elbow, as shown on page 7. 13 CHANGING DIRECTION OF DOOR OPENING REMOVE 4 HINGE SCREWS.
...OPENING WITHOUT THE PLATE. 8 CAUTION: Internal duct joints must be secured with a plate (Kit WE1M454) available from your local service provider. Place dryer in final location. REMOVE 4 HOLE PLUGS AND PLACE THEM IN THE HOLES ON THE OPPOSITE SIDE. ADDING COVER PLATE TO REAR OF CABINET ROTATE ... may separate and cause a safety hazard. PL ATE (KIT WE1M454) Connect standard metal elbows and ducts to the dryer internal duct. • Apply duct tape on the joint between the dryer internal duct and elbow, as shown on page 7. 13 CHANGING DIRECTION OF DOOR OPENING REMOVE 4 HINGE SCREWS.

Installation Instructions
Page 9
... onto the washer fill valve connector. If a rubber flat washer is very hard. 4. Ensure the rubber flat washer is in place and attach the dryer's long inlet hose to reduce buildup of scale inside the steam generator if the home water supply is already in place and screw the female... CAN CAUSE IMPROPER AND DANGEROUS OPERATION AFTER SERVICING/ INSTALLATION. For replacement parts and other end of your right to protection under the terms of the dryer's long inlet hose to the couplings may result . Damage to the fill valve connector at the same time. Turn the cold water faucet off....
... onto the washer fill valve connector. If a rubber flat washer is very hard. 4. Ensure the rubber flat washer is in place and attach the dryer's long inlet hose to reduce buildup of scale inside the steam generator if the home water supply is already in place and screw the female... CAN CAUSE IMPROPER AND DANGEROUS OPERATION AFTER SERVICING/ INSTALLATION. For replacement parts and other end of your right to protection under the terms of the dryer's long inlet hose to the couplings may result . Damage to the fill valve connector at the same time. Turn the cold water faucet off....


