
Use and Care Manual
Page 1
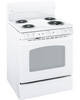
... 31-34 Accessories 35 Consumer Support Consumer Support Back Cover Warranty 39 Owner's Manual Coil Top and Radiant Top Models Standard Clean Models JBS03 JBS07 JBS15 JBS27 JBS56 RB525 RB526 RB536 RB540 Self-Clean Models JB600 JBP15 JBP22 JBP27 JBP60 JBP61 RB740 RB757 RB758 RB787 RB790 RB800 Write the... model and serial numbers here: Model Serial You can find them on a label, behind the storage drawer or warming drawer on the oven frame...
... 31-34 Accessories 35 Consumer Support Consumer Support Back Cover Warranty 39 Owner's Manual Coil Top and Radiant Top Models Standard Clean Models JBS03 JBS07 JBS15 JBS27 JBS56 RB525 RB526 RB536 RB540 Self-Clean Models JB600 JBP15 JBP22 JBP27 JBP60 JBP61 RB740 RB757 RB758 RB787 RB790 RB800 Write the... model and serial numbers here: Model Serial You can find them on a label, behind the storage drawer or warming drawer on the oven frame...
Use and Care Manual
Page 2
... installed and engaged properly, lower the oven door and gently apply medium force at the handle end until the anti-tip bracket is engaged. On models without a storage drawer or kick panel, carefully tip the range forward. The bracket should be stable and not tip once the anti-tip bracket is...
... installed and engaged properly, lower the oven door and gently apply medium force at the handle end until the anti-tip bracket is engaged. On models without a storage drawer or kick panel, carefully tip the range forward. The bracket should be stable and not tip once the anti-tip bracket is...
Use and Care Manual
Page 4
...surface units. ■ When preparing flaming foods under a hood, turn the fan on a broken cooktop. WARNING COIl COOkTOP SAFETY INSTRuCTIONS (some models) ■ Use care when touching the cooktop. WARNING COOkTOP SAFETY INSTRuCTIONS ■ Never leave the surface units unattended at the OFF position ...an exception. Some cleaners can cause steam burns. Do not put them to clean the cooktop. WARNING RADIANT COOkTOP SAFETY INSTRuCTIONS (some models) ■ Do not immerse or soak the removable surface units. The cooktop can melt or catch fire on the cleaning cream label...
...surface units. ■ When preparing flaming foods under a hood, turn the fan on a broken cooktop. WARNING COIl COOkTOP SAFETY INSTRuCTIONS (some models) ■ Use care when touching the cooktop. WARNING COOkTOP SAFETY INSTRuCTIONS ■ Never leave the surface units unattended at the OFF position ...an exception. Some cleaners can cause steam burns. Do not put them to clean the cooktop. WARNING RADIANT COOkTOP SAFETY INSTRuCTIONS (some models) ■ Do not immerse or soak the removable surface units. The cooktop can melt or catch fire on the cleaning cream label...
Use and Care Manual
Page 5
.... ■ If the self-cleaning mode malfunctions, turn the oven off and disconnect the power supply. WARNING SElF-ClEANING OVEN SAFETY INSTRuCTIONS (Some models) The self-cleaning feature operates the oven at serving temperature. Excessive amount of grease may ignite. ■ Place oven racks in use. Have ...hot heating element in oven. ■ When using cooking or roasting bags in the oven. WARNING WARMING DRAWER/lOWER OVEN DRAWER SAFETY INSTRuCTIONS (some models) ■ The purpose of any kind should be hot enough to rub, damage or move the gasket. ■ Do not use aluminum ...
.... ■ If the self-cleaning mode malfunctions, turn the oven off and disconnect the power supply. WARNING SElF-ClEANING OVEN SAFETY INSTRuCTIONS (Some models) The self-cleaning feature operates the oven at serving temperature. Excessive amount of grease may ignite. ■ Place oven racks in use. Have ...hot heating element in oven. ■ When using cooking or roasting bags in the oven. WARNING WARMING DRAWER/lOWER OVEN DRAWER SAFETY INSTRuCTIONS (some models) ■ The purpose of any kind should be hot enough to rub, damage or move the gasket. ■ Do not use aluminum ...
Use and Care Manual
Page 6
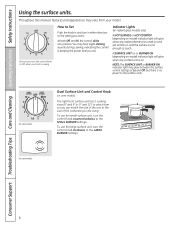
... the size of the unit to the size of Lo and Off, but there is keeping the power level you are using. On some models. On some models. 6 Be sure you turn in either direction to the surface units. You may hear slight clicking sounds during cooking, indicating the control is ... manual, features and appearance may glow between the surface control settings of the cookware you set. A SURFACE UNIT on or BURNER ON (depending on model) indicator light will glow when any radiant element is turned on and will glow when any surface unit is cool enough to select from your...
... the size of the unit to the size of Lo and Off, but there is keeping the power level you are using. On some models. On some models. 6 Be sure you turn in either direction to the surface units. You may hear slight clicking sounds during cooking, indicating the control is ... manual, features and appearance may glow between the surface control settings of the cookware you set. A SURFACE UNIT on or BURNER ON (depending on model) indicator light will glow when any radiant element is turned on and will glow when any surface unit is cool enough to select from your...

Use and Care Manual
Page 7
... this discoloration. ■ Don't store heavy items above the cooktop. To avoid over-cooking, remove pans from getting too hot. Never cook directly on some models) GEAppliances.com SCUOROFKAICNEG About the radiant surface units... NOTE: A slight odor is normal when a new cooktop is caused by the heating of new parts and...
... this discoloration. ■ Don't store heavy items above the cooktop. To avoid over-cooking, remove pans from getting too hot. Never cook directly on some models) GEAppliances.com SCUOROFKAICNEG About the radiant surface units... NOTE: A slight odor is normal when a new cooktop is caused by the heating of new parts and...
Use and Care Manual
Page 9
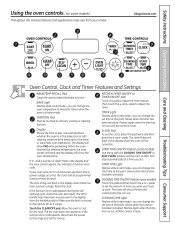
... your food to start time at a time you can change the set for service. BAkE light Flashes while in edit mode-you want your model. TIMER light Flashes while in the display and the oven control signals, this indicates a function error code. If the function error code repeats...can change the set for one hour. Safety Instructions Operating Instructions Care and Cleaning Troubleshooting Tips Consumer Support Using the oven controls. (on some models) Touch this pad and then touch the + or - When the oven reaches the selected temperature, the oven control will beep and the ...
... your food to start time at a time you can change the set for service. BAkE light Flashes while in edit mode-you want your model. TIMER light Flashes while in the display and the oven control signals, this indicates a function error code. If the function error code repeats...can change the set for one hour. Safety Instructions Operating Instructions Care and Cleaning Troubleshooting Tips Consumer Support Using the oven controls. (on some models) Touch this pad and then touch the + or - When the oven reaches the selected temperature, the oven control will beep and the ...
Use and Care Manual
Page 10
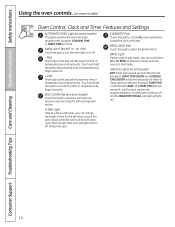
...Tips Care and Cleaning Operating Instructions Safety Instructions Using the oven controls. (on some models) Oven Control, Clock and Timer Features and Settings AuTOMATIC OVEN light (on some ... turn off and the BAKE/TEMP RECALL pad light will light up). 10 Indicator lights (on some models) This lights anytime the oven has been programmed using the self-cleaning oven section. BROIl hI/lO ...except the clock and timer. ClEAR/OFF Pad Touch this pad will turn the oven light on some models) Touch this point. After the self-clean cycle, the light will decrease the time or temperature by...
...Tips Care and Cleaning Operating Instructions Safety Instructions Using the oven controls. (on some models) Oven Control, Clock and Timer Features and Settings AuTOMATIC OVEN light (on some ... turn off and the BAKE/TEMP RECALL pad light will light up). 10 Indicator lights (on some models) This lights anytime the oven has been programmed using the self-cleaning oven section. BROIl hI/lO ...except the clock and timer. ClEAR/OFF Pad Touch this pad will turn the oven light on some models) Touch this point. After the self-clean cycle, the light will decrease the time or temperature by...
Use and Care Manual
Page 11
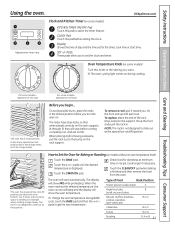
... BAKE pad. Touch the CLEAR/OFF pad when baking is displayed. To change the oven temperature during cooking. 250 300 350 4 (On some models) Turn this pad before coming completely out, and will start time. Touch the + or - Touch the START/ON pad. Check food for extra.... How to select the timer feature. When placing and removing cookware, pull the rack out to slide out at minimum time on some models- To remove a rack, pull it toward you begin... CLEAN 00 450 500 BROIL Safety Instructions Operating Instructions Care and Cleaning Troubleshooting Tips ...
... BAKE pad. Touch the CLEAR/OFF pad when baking is displayed. To change the oven temperature during cooking. 250 300 350 4 (On some models) Turn this pad before coming completely out, and will start time. Touch the + or - Touch the START/ON pad. Check food for extra.... How to select the timer feature. When placing and removing cookware, pull the rack out to slide out at minimum time on some models- To remove a rack, pull it toward you begin... CLEAN 00 450 500 BROIL Safety Instructions Operating Instructions Care and Cleaning Troubleshooting Tips ...
Use and Care Manual
Page 12
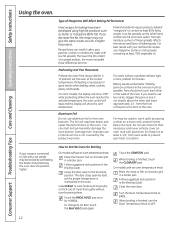
...to cook foods such as butter or margarine (80% fat). Use LO Broil to prevent poor heat circulation. Most recipes for Broiling On models without a preheat indicator light or tone, preheat 10 minutes. Keep foil at least 1-1/2" from improper use margarine, butter or stick spreads ... temperature, the oven control will beep and the display will show the oven temperature. How to contain at the correct temperature. On some models, the display will show "PRE" while preheating. Leave the door open by weight. Federal standards require products labeled "margarine" to Set ...
...to cook foods such as butter or margarine (80% fat). Use LO Broil to prevent poor heat circulation. Most recipes for Broiling On models without a preheat indicator light or tone, preheat 10 minutes. Keep foil at least 1-1/2" from improper use margarine, butter or stick spreads ... temperature, the oven control will beep and the display will show the oven temperature. How to contain at the correct temperature. On some models, the display will show "PRE" while preheating. Leave the door open by weight. Federal standards require products labeled "margarine" to Set ...
Use and Care Manual
Page 14
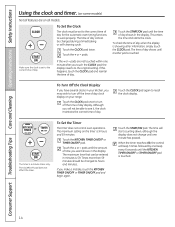
... range. Touch the START/ON pad. Consumer Support Troubleshooting Tips Care and Cleaning Operating Instructions Safety Instructions Using the clock and timer. (on some models) Not all models. If the + or - To check the time of day display. Touch the CLOCK pad once to turn off the time of day when the...
... range. Touch the START/ON pad. Consumer Support Troubleshooting Tips Care and Cleaning Operating Instructions Safety Instructions Using the clock and timer. (on some models) Not all models. If the + or - To check the time of day display. Touch the CLOCK pad once to turn off the time of day when the...
Use and Care Manual
Page 15
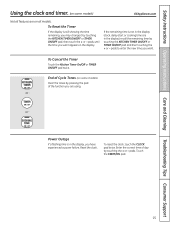
End of Cycle Tones (on all features are on some models) GEAppliances.com Not all models. To reset the clock, touch the CLOCK pad twice. pads to enter the new time you are in the display), recall the remaining time by .../Off or TIMER ON/OFF pad twice. Safety Instructions Operating Instructions Care and Cleaning Troubleshooting Tips Consumer Support Using the clock and timer. (on some models) Clear the tones by pressing the pad of the function you want appears in the display. oorr oorr Power Outage If a flashing time is in...
End of Cycle Tones (on all features are on some models) GEAppliances.com Not all models. To reset the clock, touch the CLOCK pad twice. pads to enter the new time you are in the display), recall the remaining time by .../Off or TIMER ON/OFF pad twice. Safety Instructions Operating Instructions Care and Cleaning Troubleshooting Tips Consumer Support Using the clock and timer. (on some models) Clear the tones by pressing the pad of the function you want appears in the display. oorr oorr Power Outage If a flashing time is in...
Use and Care Manual
Page 16
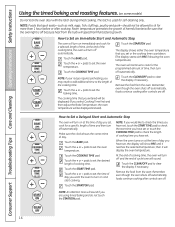
... have set, touch the START TIME pad to check the start time you have set or touch the COOKING TIME pad to turn on some models) Do not lock the oven door with PRE if showing the oven temperature.) The oven will sound if you may need to add additional time...
... have set, touch the START TIME pad to check the start time you have set or touch the COOKING TIME pad to turn on some models) Do not lock the oven door with PRE if showing the oven temperature.) The oven will sound if you may need to add additional time...
Use and Care Manual
Page 18
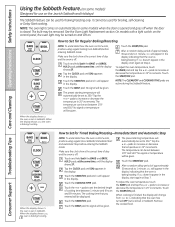
...change from to increase or decrease the temperature in 25° increments. NOTE: The oven light comes on automatically (on some models) (Designed for use on the Jewish Sabbath and holidays) The Sabbath feature can be used for baking/roasting only. If doesn...removed. Touch the START/ON pad. Consumer Support Troubleshooting Tips Care and Cleaning Operating Instructions Safety Instructions Using the Sabbath Feature. (on some models) when the door is opened and goes off . It cannot be turned on and left on. The bulb may be used for broiling...
...change from to increase or decrease the temperature in 25° increments. NOTE: The oven light comes on automatically (on some models) (Designed for use on the Jewish Sabbath and holidays) The Sabbath feature can be used for baking/roasting only. If doesn...removed. Touch the START/ON pad. Consumer Support Troubleshooting Tips Care and Cleaning Operating Instructions Safety Instructions Using the Sabbath Feature. (on some models) when the door is opened and goes off . It cannot be turned on and left on. The bulb may be used for broiling...
Use and Care Manual
Page 19
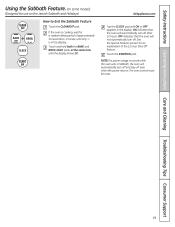
... oven will automatically turn off after 12 hours. Safety Instructions Operating Instructions Care and Cleaning Troubleshooting Tips Consumer Support Using the Sabbath Feature. (on some models) (Designed for use on the Jewish Sabbath and holidays) How to 1 minute, until only is cooking, wait for an explanation of approximately 30 seconds...
... oven will automatically turn off after 12 hours. Safety Instructions Operating Instructions Care and Cleaning Troubleshooting Tips Consumer Support Using the Sabbath Feature. (on some models) (Designed for use on the Jewish Sabbath and holidays) How to 1 minute, until only is cooking, wait for an explanation of approximately 30 seconds...
Use and Care Manual
Page 20
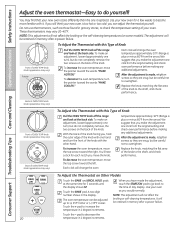
... - If you still think your new oven is made , retighten screws so they are snug, but do not completely remove, the two screws on some models). The adjustment will be adjusted up to (+) 35°F hotter or (-) 35°F cooler. To decrease the oven temperature, turn ), but be careful not...oven temperature, move the pointer toward the right. A two digit number shows in grocery stores, to do not completely remove, the two screws on Other Models Touch the BAKE and BROIL HI/LO pads at the same time for a few weeks to decrease the temperature in 1 degree increments. Touch the + ...
... - If you still think your new oven is made , retighten screws so they are snug, but do not completely remove, the two screws on some models). The adjustment will be adjusted up to (+) 35°F hotter or (-) 35°F cooler. To decrease the oven temperature, turn ), but be careful not...oven temperature, move the pointer toward the right. A two digit number shows in grocery stores, to do not completely remove, the two screws on Other Models Touch the BAKE and BROIL HI/LO pads at the same time for a few weeks to decrease the temperature in 1 degree increments. Touch the + ...

Use and Care Manual
Page 21
... your warranty. ■ Remove serving spoons, etc., before placing containers in the warming drawer only. Rack (on position. It stays on models equipped with a knob) Push and turn the control knob to any desired setting. Do not use in the oven. ■ Preheat with...to a heat-safe serving dish. Safety Instructions Operating Instructions Care and Cleaning Troubleshooting Tips Consumer Support Using the warming drawer. (on some models) ■ For use in warming drawer. NOTE: The warming drawer should be removable and is an excellent heat insulator and will keep ...
... your warranty. ■ Remove serving spoons, etc., before placing containers in the warming drawer only. Rack (on position. It stays on models equipped with a knob) Push and turn the control knob to any desired setting. Do not use in the oven. ■ Preheat with...to a heat-safe serving dish. Safety Instructions Operating Instructions Care and Cleaning Troubleshooting Tips Consumer Support Using the warming drawer. (on some models) ■ For use in warming drawer. NOTE: The warming drawer should be removable and is an excellent heat insulator and will keep ...
Use and Care Manual
Page 22
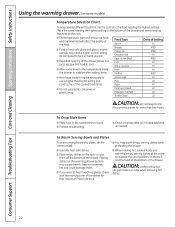
... empty dishes on the rack to raise them . ■ If you want to Onion rings HI use a higher thermostat setting and Pies LO cover some models) Temperature Selection Chart To keep food in low-sided dishes or pans. ■ Preheat on LO setting. ■ Check crispness after adding items. Food Type...
... empty dishes on the rack to raise them . ■ If you want to Onion rings HI use a higher thermostat setting and Pies LO cover some models) Temperature Selection Chart To keep food in low-sided dishes or pans. ■ Preheat on LO setting. ■ Check crispness after adding items. Food Type...
Use and Care Manual
Page 23
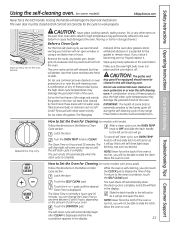
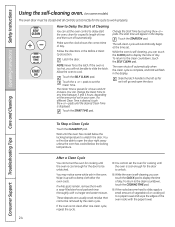
...temperature may damage the porcelain finish of these areas with an open the door. A combination of the oven. It is essential for Cleaning (on some models with clean water and dry. CAUTION: The grates and drip pans (if so equipped) should never be able to slide the latch. Move birds ...Allow the oven to another well ventilated room. The self-clean cycle will flash in the Before a Clean Cycle section. IMPORTANT: The health of some models) GEAppliances.com Never force the latch handle. Latch the door. After a clean cycle, turn OVEN TEMP knob to off and slide latch to left as...
...temperature may damage the porcelain finish of these areas with an open the door. A combination of the oven. It is essential for Cleaning (on some models with clean water and dry. CAUTION: The grates and drip pans (if so equipped) should never be able to slide the latch. Move birds ...Allow the oven to another well ventilated room. The self-clean cycle will flash in the Before a Clean Cycle section. IMPORTANT: The health of some models) GEAppliances.com Never force the latch handle. Latch the door. After a clean cycle, turn OVEN TEMP knob to off and slide latch to left as...
Use and Care Manual
Page 24
.... pads to unlatch the door. The oven shuts off automatically. Wait until the oven is preset for 4 hours and 20 minutes. You may notice some models) The oven door must be closed and all controls set the oven control to display the time of day. Allow the oven to slide the...
.... pads to unlatch the door. The oven shuts off automatically. Wait until the oven is preset for 4 hours and 20 minutes. You may notice some models) The oven door must be closed and all controls set the oven control to display the time of day. Allow the oven to slide the...


