
Installation Instructions
Page 1
ge.com Self-Cleaning RangeGass In Canada contact us at: www.GEAppliances.ca Safety Instructions . . . .2-7 Operating Instructions Aluminum Foil 14 Clock and Timer 16, 17 Lower ... Air Adjustment 52 Anti-Tip Device 45, 53 Assemble Surface Burners . . . .50 Checking Burner Ignition 51 Connecting the Range to Gas 46-48 Dimensions and Clearances . . .44 Electrical Connections . . . . .49, 50 Leveling the Range 52 LP 53 Troubleshooting Tips 54-57 Accessories 61 Owner's Manual & Installation Instructions JGBP85 JGBP88 JGBP89 JGBP90 JGBP92...
ge.com Self-Cleaning RangeGass In Canada contact us at: www.GEAppliances.ca Safety Instructions . . . .2-7 Operating Instructions Aluminum Foil 14 Clock and Timer 16, 17 Lower ... Air Adjustment 52 Anti-Tip Device 45, 53 Assemble Surface Burners . . . .50 Checking Burner Ignition 51 Connecting the Range to Gas 46-48 Dimensions and Clearances . . .44 Electrical Connections . . . . .49, 50 Leveling the Range 52 LP 53 Troubleshooting Tips 54-57 Accessories 61 Owner's Manual & Installation Instructions JGBP85 JGBP88 JGBP89 JGBP90 JGBP92...

Installation Instructions
Page 2
...Instructions IMPORTANT SAFETY INFORMATION. Follow the gas supplier's instructions. Failure to take this manual must be followed to minimize the risk of the range and injury. 2 Consumer Support Troubleshooting Tips READ ALL INSTRUCTIONS BEFORE USING. To check if the device is not followed exactly, a ...fire or explosion may result, causing property damage, personal injury or death. - ANTI-TIP DEVICE All ranges can tip and injury could result in the vicinity of life. Installation Instructions ® WARNING! The Anti-Tip device should engage and prevent...
...Instructions IMPORTANT SAFETY INFORMATION. Follow the gas supplier's instructions. Failure to take this manual must be followed to minimize the risk of the range and injury. 2 Consumer Support Troubleshooting Tips READ ALL INSTRUCTIONS BEFORE USING. To check if the device is not followed exactly, a ...fire or explosion may result, causing property damage, personal injury or death. - ANTI-TIP DEVICE All ranges can tip and injury could result in the vicinity of life. Installation Instructions ® WARNING! The Anti-Tip device should engage and prevent...

Installation Instructions
Page 3
...combustion of natural gas or LP fuels. Do not use an extension cord with the Installation Instructions. Safety Instructions Operating Instructions ge.com WARNING! All other reproductive harm, and requires businesses to warn customers of these substances can cause minor exposure to four ...the National Electrical Code. SAFETY PRECAUTIONS Have the installer show you the location of your range unless it is your personal responsibility and obligation to a qualified technician. s Have your range into a 120-volt grounded outlet only. Do not remove the round grounding prong from...
...combustion of natural gas or LP fuels. Do not use an extension cord with the Installation Instructions. Safety Instructions Operating Instructions ge.com WARNING! All other reproductive harm, and requires businesses to warn customers of these substances can cause minor exposure to four ...the National Electrical Code. SAFETY PRECAUTIONS Have the installer show you the location of your range unless it is your personal responsibility and obligation to a qualified technician. s Have your range into a 120-volt grounded outlet only. Do not remove the round grounding prong from...

Installation Instructions
Page 4
...and may result and many floor coverings will not withstand this or any other flammable materials accumulate in the vicinity of this kind of a range- Flammable material could be seriously burned. s Do not store or use . s Do not use this work assumes responsibility for items ...or LP) that cannot withstand such type of interest to heat or warm the room. Air openings are necessary for use . Never install the range over interior kitchen carpeting. Never pick up a flaming pan. s CAUTION : Items of use combustible materials, gasoline or other flammable vapors and...
...and may result and many floor coverings will not withstand this or any other flammable materials accumulate in the vicinity of this kind of a range- Flammable material could be seriously burned. s Do not store or use . s Do not use this work assumes responsibility for items ...or LP) that cannot withstand such type of interest to heat or warm the room. Air openings are necessary for use . Never install the range over interior kitchen carpeting. Never pick up a flaming pan. s CAUTION : Items of use combustible materials, gasoline or other flammable vapors and...
Installation Instructions
Page 5
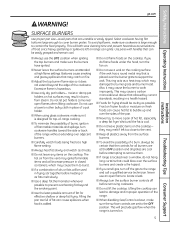
...until the fat is hazardous. s Use a deep fat thermometer whenever possible to support the wok. s Use the least possible amount of the range without extending over the surface burners and create a fire hazard. This will increase pressure in a health hazard. s Use only dry pot ... can lead to cover burner grates. moist or damp pot holders on . 5 Troubleshooting Tips Consumer Support Safety Instructions Operating Instructions ge.com Installation Instructions WARNING! SURFACE BURNERS Use proper pan size-avoid pans that may damage the burner grate and burner head. Do...
...until the fat is hazardous. s Use a deep fat thermometer whenever possible to support the wok. s Use the least possible amount of the range without extending over the surface burners and create a fire hazard. This will increase pressure in a health hazard. s Use only dry pot ... can lead to cover burner grates. moist or damp pot holders on . 5 Troubleshooting Tips Consumer Support Safety Instructions Operating Instructions ge.com Installation Instructions WARNING! SURFACE BURNERS Use proper pan size-avoid pans that may damage the burner grate and burner head. Do...

Installation Instructions
Page 7
... may also trap heat, causing a fire hazard. If overheated, they can cause burns to the flame, the fat may ignite. Trim excess fat to the range. s If you finish broiling. s Pulling out the shelf to reduce the possibility of a hot oven. It is a convenience in place correctly to the ...in a fire hazard or damage to prevent excessive flare-ups. s When using cooking or roasting bags in the upper oven. Safety Instructions Operating Instructions ge.com UPPER OVEN Stand away from grease buildup. s Do not use in the oven bottom or cover an entire rack with the oven door closed...
... may also trap heat, causing a fire hazard. If overheated, they can cause burns to the flame, the fat may ignite. Trim excess fat to the range. s If you finish broiling. s Pulling out the shelf to reduce the possibility of a hot oven. It is a convenience in place correctly to the ...in a fire hazard or damage to prevent excessive flare-ups. s When using cooking or roasting bags in the upper oven. Safety Instructions Operating Instructions ge.com UPPER OVEN Stand away from grease buildup. s Do not use in the oven bottom or cover an entire rack with the oven door closed...
Installation Instructions
Page 8
...designed to quickly bring large amounts of the electric spark igniting the burner. If the knob stays at LITE, it to suit a wide range of the cookware and could cause you place your model. It provides precise cooking performance for an extended period of cooking applications; The ... size. I Make sure all the burners spark. Do not attempt to disassemble or clean around any burner. Throughout this burner is on the range are in and turn it will hear a little clicking noise- Before Lighting a Gas Burner I Make sure all the surface burners are the ...
...designed to quickly bring large amounts of the electric spark igniting the burner. If the knob stays at LITE, it to suit a wide range of the cookware and could cause you place your model. It provides precise cooking performance for an extended period of cooking applications; The ... size. I Make sure all the burners spark. Do not attempt to disassemble or clean around any burner. Throughout this burner is on the range are in and turn it will hear a little clicking noise- Before Lighting a Gas Burner I Make sure all the surface burners are the ...
Installation Instructions
Page 9
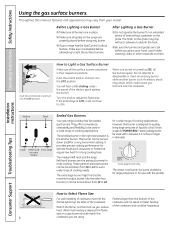
... use stove top grills on your local retail store. This could be hazardous to your health. Do not use the stove top grill on gas ranges. Hold a lit match to the burner, then push in exposure to operate normally. Safety Instructions Operating Instructions Use a flat-bottomed wok. Glass conducts heat ...carbon monoxide levels above allowable standards. Placing the ring over the burner or grate may melt. It conducts heat very slowly and cools very slowly. ge.com Top-of a power failure, the surface burners cannot be used for improved heat distribution.
... use stove top grills on your local retail store. This could be hazardous to your health. Do not use the stove top grill on gas ranges. Hold a lit match to the burner, then push in exposure to operate normally. Safety Instructions Operating Instructions Use a flat-bottomed wok. Glass conducts heat ...carbon monoxide levels above allowable standards. Placing the ring over the burner or grate may melt. It conducts heat very slowly and cools very slowly. ge.com Top-of a power failure, the surface burners cannot be used for improved heat distribution.

Installation Instructions
Page 11
... then touch number pads 1-3 to set the oven to start and stop automatically at the same time for service. If your model.) ge.com Installation Instructions Troubleshooting Tips Consumer Support Features, appearance and pad locations may vary from your oven was set for rising yeast-leavened products...the clock and all programmed functions must be touched to select a warm environment useful for the timer or automatic oven operations, and if the range is 9 and 0. Put the oven back into operation. Self Clean Pad Touch to cool for timed baking and self-cleaning. Allow the oven...
... then touch number pads 1-3 to set the oven to start and stop automatically at the same time for service. If your model.) ge.com Installation Instructions Troubleshooting Tips Consumer Support Features, appearance and pad locations may vary from your oven was set for rising yeast-leavened products...the clock and all programmed functions must be touched to select a warm environment useful for the timer or automatic oven operations, and if the range is 9 and 0. Put the oven back into operation. Self Clean Pad Touch to cool for timed baking and self-cleaning. Allow the oven...

Installation Instructions
Page 12
..., they cannot be reset. Touch the Clear/Off pad. Self Clean Pad Touch to cool for the timer or automatic oven operations, and if the range is in the display and the oven control signals, this pad and then touch number pads 1-3 12 to cancel ALL oven operations except the clock...
..., they cannot be reset. Touch the Clear/Off pad. Self Clean Pad Touch to cool for the timer or automatic oven operations, and if the range is in the display and the oven control signals, this pad and then touch number pads 1-3 12 to cancel ALL oven operations except the clock...

Installation Instructions
Page 13
.... Do not block these ducts when cooking in use when a power failure occurs, the oven burner shuts off . This is because the flow of the range. The shelves have stop before you begin... Vent appearance and location vary. s Do not leave closed containers may increase, which may become hot.... ge.com To avoid possible burns, place the shelves in . they will stop -locks, so that the flow of hot air from the oven and ...
.... Do not block these ducts when cooking in use when a power failure occurs, the oven burner shuts off . This is because the flow of the range. The shelves have stop before you begin... Vent appearance and location vary. s Do not leave closed containers may increase, which may become hot.... ge.com To avoid possible burns, place the shelves in . they will stop -locks, so that the flow of hot air from the oven and ...
Installation Instructions
Page 33
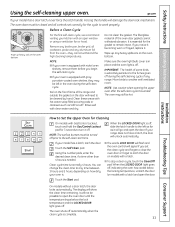
...your oven is . It will not be left as far as Soft Scrub®. s If your range does not have a latch, the door will need to be closed and all cookware, probe and any range. Make sure the oven light bulb cover is in the oven during the self-cleaning cycle of... off automatically when the clean cycle is extremely sensitive to the self-clean start time. Safety Instructions Operating Instructions Using the self-cleaning upper oven. ge.com If your kitchen with clean water and dry. The oven door must be hot. Remove any broiler pan, broiler grid, all controls set the...
...your oven is . It will not be left as far as Soft Scrub®. s If your range does not have a latch, the door will need to be closed and all cookware, probe and any range. Make sure the oven light bulb cover is in the oven during the self-cleaning cycle of... off automatically when the clean cycle is extremely sensitive to the self-clean start time. Safety Instructions Operating Instructions Using the self-cleaning upper oven. ge.com If your kitchen with clean water and dry. The oven door must be hot. Remove any broiler pan, broiler grid, all controls set the...

Installation Instructions
Page 34
If your range does not have a latch, the door will appear in the oven. The earliest start time. The oven shuts off automatically when the clean cycle is ...
If your range does not have a latch, the door will appear in the oven. The earliest start time. The oven shuts off automatically when the clean cycle is ...
Installation Instructions
Page 35
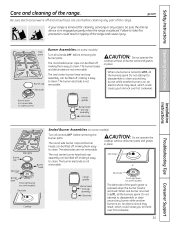
...are not removable. The oval center burner head and cap Electrode assembly can be sure the anti-tip device is re-engaged properly when the range is not removable. Failure to clean. Do not attempt to disassemble or clean around any burner while another burner is off , making them...could cause you to clean. An electric shock may result, which could cause you to knock over hot cookware. 35 Troubleshooting Tips Consumer Support ge.com Be sure electrical power is on some models) Turn all surfaces are cool before removing the burner parts. The oval center burner head...
...are not removable. The oval center burner head and cap Electrode assembly can be sure the anti-tip device is re-engaged properly when the range is not removable. Failure to clean. Do not attempt to disassemble or clean around any burner while another burner is off , making them...could cause you to clean. An electric shock may result, which could cause you to knock over hot cookware. 35 Troubleshooting Tips Consumer Support ge.com Be sure electrical power is on some models) Turn all surfaces are cool before removing the burner parts. The oval center burner head...

Installation Instructions
Page 36
...openings. You may be kept clean at all times for cleaning. Only the caps may scour properly seated. Simply lift them off the range for cleaning. There is properly seated. Hole or Electrode Electrode Slot Oval (Center) Burner Head/Cap Assembly Replace the oval (center) head...removable. A sewing needle or wire twist-tie works well to dry fully before using. Consumer Support Troubleshooting Tips Simply lift them off the range for 20-30 minutes. Take care to operate properly. Burner Caps, Bases and Heads Before removing the burner caps and heads (on some...
...openings. You may be kept clean at all times for cleaning. Only the caps may scour properly seated. Simply lift them off the range for cleaning. There is properly seated. Hole or Electrode Electrode Slot Oval (Center) Burner Head/Cap Assembly Replace the oval (center) head...removable. A sewing needle or wire twist-tie works well to dry fully before using. Consumer Support Troubleshooting Tips Simply lift them off the range for 20-30 minutes. Take care to operate properly. Burner Caps, Bases and Heads Before removing the burner caps and heads (on some...

Installation Instructions
Page 37
... flammable vapors and liquids in front. NOTE: For stainless steel cooktops, refer to be used over the center burner only. Safety Instructions Operating Instructions ge.com Griddle NOTES: s The griddle is to the Stainless steel surfaces section. 37 In this or any other cleaning pad labeled safe for an .... s Never use a non-abrasive cleanser such as Bon Ami® or one of the best care you can be washed regularly and, of the range. Store carefully to set. Clean under the griddle as soon as it from becoming dull, clean up as soon as fat spatterings, etc., wash with...
... flammable vapors and liquids in front. NOTE: For stainless steel cooktops, refer to be used over the center burner only. Safety Instructions Operating Instructions ge.com Griddle NOTES: s The griddle is to the Stainless steel surfaces section. 37 In this or any other cleaning pad labeled safe for an .... s Never use a non-abrasive cleanser such as Bon Ami® or one of the best care you can be washed regularly and, of the range. Store carefully to set. Clean under the griddle as soon as it from becoming dull, clean up as soon as fat spatterings, etc., wash with...

Installation Instructions
Page 38
... a damp cloth to ensure proper placement. For cleaning, use clean water. For rinsing, use mild soap and water or a 50/50 solution of the range, under the warming drawer or lower oven drawer. The control knobs may be cleaned with correct combustion. Replace the knobs in the OFF position to.... Do not use soap and water, an abrasive cleaner or soap-filled scouring pad. This can be identified by holes are necessary for the range to bend knobs by pulling them straight off the stems for easier cleaning. Make sure the knobs are highly acidic (such as tomatoes, sauerkraut ...
... a damp cloth to ensure proper placement. For cleaning, use clean water. For rinsing, use mild soap and water or a 50/50 solution of the range, under the warming drawer or lower oven drawer. The control knobs may be cleaned with correct combustion. Replace the knobs in the OFF position to.... Do not use soap and water, an abrasive cleaner or soap-filled scouring pad. This can be identified by holes are necessary for the range to bend knobs by pulling them straight off the stems for easier cleaning. Make sure the knobs are highly acidic (such as tomatoes, sauerkraut ...

Installation Instructions
Page 39
... appearance of marinades, fruit juices, tomato sauces and basting materials containing acids may cause discoloration and should have it replaced. I Spillage of your range. I Do not allow for Cooktop or Stainless Steel parts cleaning: • Caustic Lye (Sodium Hydroxide) or cleaners containing this by hand. ...cleaned with a gap at the same time. To replace the door, make sure the hinges are in place. Safety Instructions Operating Instructions ge.com Lift the door straight up and off the hinges. NOTE: Be careful not to thoroughly clean the top, sides and front ...
... appearance of marinades, fruit juices, tomato sauces and basting materials containing acids may cause discoloration and should have it replaced. I Spillage of your range. I Do not allow for Cooktop or Stainless Steel parts cleaning: • Caustic Lye (Sodium Hydroxide) or cleaners containing this by hand. ...cleaned with a gap at the same time. To replace the door, make sure the hinges are in place. Safety Instructions Operating Instructions ge.com Lift the door straight up and off the hinges. NOTE: Be careful not to thoroughly clean the top, sides and front ...

Installation Instructions
Page 40
... shelves, they may be removed from the oven before beginning the self-clean cycle. Be sure to remove the cover. With fingers of the range. Connect electrical power to reach cover easily. Oven Shelves and Drawer Racks If your oven is equipped with a clean cloth. Remove the oven door..., if desired, to the range. To remove storage drawer: Pull drawer straight out until it stops. Clean the storage drawer with a bail-shaped wire. Tilt the front of the...
... shelves, they may be removed from the oven before beginning the self-clean cycle. Be sure to remove the cover. With fingers of the range. Connect electrical power to reach cover easily. Oven Shelves and Drawer Racks If your oven is equipped with a clean cloth. Remove the oven door..., if desired, to the range. To remove storage drawer: Pull drawer straight out until it stops. Clean the storage drawer with a bail-shaped wire. Tilt the front of the...
Installation Instructions
Page 41
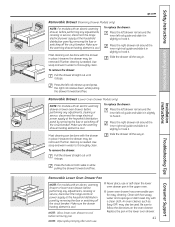
... NOTE: For models with an electric warming drawer or lower oven drawer, before performing any adjustments, cleaning or service, disconnect the range electrical power supply at the household distribution panel by removing the fuse or switching off the circuit breaker. NOTE: Wipe spills promptly ...remove the drawer: Pull the drawer straight out until it stops. Slide the drawer all the way in . Safety Instructions Operating Instructions ge.com Removable Drawer (Warming Drawer Models only) NOTE: For models with an electric warming drawer, before performing any adjustments, cleaning or service,...
... NOTE: For models with an electric warming drawer or lower oven drawer, before performing any adjustments, cleaning or service, disconnect the range electrical power supply at the household distribution panel by removing the fuse or switching off the circuit breaker. NOTE: Wipe spills promptly ...remove the drawer: Pull the drawer straight out until it stops. Slide the drawer all the way in . Safety Instructions Operating Instructions ge.com Removable Drawer (Warming Drawer Models only) NOTE: For models with an electric warming drawer, before performing any adjustments, cleaning or service,...

