

Use and Care Manual
Page 1
... ge.com Safety Instructions . . . . . .2-7 Operating Instructions Aluminum Foil 13 Clock and Timer 16 Oven 10-19 Baking and Roasting 13 Broiling 14 Broiling Guide 15 Oven Control 10, 11 Power Outage 12 Preheating 13 Sabbath Feature 19 Special Features 18 Surface Cooking 8, 9 Thermostat Adjustment 17 Care and Cleaning Air Vents 25 Burner Assemblies 20-21 Burner Caps and Heads . . . . . .22 Burner Grates 21 Control Panel and Knobs . . . . .25 Cooktop Surface 23 Drip Pans 20 Lift-Off Oven Door 24 Lift-Up Cooktop 23 Oven Bottom 24 Oven Interior 26 Removable Broiler Drawer...
... ge.com Safety Instructions . . . . . .2-7 Operating Instructions Aluminum Foil 13 Clock and Timer 16 Oven 10-19 Baking and Roasting 13 Broiling 14 Broiling Guide 15 Oven Control 10, 11 Power Outage 12 Preheating 13 Sabbath Feature 19 Special Features 18 Surface Cooking 8, 9 Thermostat Adjustment 17 Care and Cleaning Air Vents 25 Burner Assemblies 20-21 Burner Caps and Heads . . . . . .22 Burner Grates 21 Control Panel and Knobs . . . . .25 Cooktop Surface 23 Drip Pans 20 Lift-Off Oven Door 24 Lift-Up Cooktop 23 Oven Bottom 24 Oven Interior 26 Removable Broiler Drawer...
Use and Care Manual
Page 3
... repair or replace any part of natural gas or LP fuels. If in accordance with an open window or using a ventilation fan or hood. IMPORTANT SAFETY NOTICE The California Safe Drinking Water and Toxic Enforcement Act requires the Governor of California to publish a list of substances known to the state to cause birth defects or other service should be performed only by qualified gas range installers...
... repair or replace any part of natural gas or LP fuels. If in accordance with an open window or using a ventilation fan or hood. IMPORTANT SAFETY NOTICE The California Safe Drinking Water and Toxic Enforcement Act requires the Governor of California to publish a list of substances known to the state to cause birth defects or other service should be performed only by qualified gas range installers...
Use and Care Manual
Page 4
... a flaming pan. children climbing on standing pilot models) and poor air circulation. ■ Be sure all codes and requirements of a range, high floor temperatures may cause severe burns. ■ Do not store flammable materials in accordance with flame or hot oven surfaces and may result and many floor coverings will be ignited if brought in serious injury or property damage. Operating Instructions Care and Cleaning Installation Instructions SAFETY PRECAUTIONS ■ Locate the range...
... a flaming pan. children climbing on standing pilot models) and poor air circulation. ■ Be sure all codes and requirements of a range, high floor temperatures may cause severe burns. ■ Do not store flammable materials in accordance with flame or hot oven surfaces and may result and many floor coverings will be ignited if brought in serious injury or property damage. Operating Instructions Care and Cleaning Installation Instructions SAFETY PRECAUTIONS ■ Locate the range...
Use and Care Manual
Page 5
... proper cooking performance, always bake and broil with materials such as you should have a grease fire in a broiler pan, turn off the oven control, and keep the broiler drawer and oven door closed . ■ When using cooking or roasting bags in the desired position while the oven is a convenience in the pan can ignite. ■ Do not use aluminum foil to reduce the possibility of a hot oven. Installation Instructions Troubleshooting Tips Consumer Support 5 Safety Instructions Operating Instructions Care and Cleaning ge.com COOK...
... proper cooking performance, always bake and broil with materials such as you should have a grease fire in a broiler pan, turn off the oven control, and keep the broiler drawer and oven door closed . ■ When using cooking or roasting bags in the desired position while the oven is a convenience in the pan can ignite. ■ Do not use aluminum foil to reduce the possibility of a hot oven. Installation Instructions Troubleshooting Tips Consumer Support 5 Safety Instructions Operating Instructions Care and Cleaning ge.com COOK...

Use and Care Manual
Page 6
... spillovers, make sure cookware is large enough to cover burner grates. Filling the pan too full of hot fat, especially a deep fat fryer. Excessive flame is located near open flame to remove them to the range and call a qualified service technician. If you smell gas, turn the fan on. ■ Do not use the LITE position (on electric ignition models) or the HI position (on fresh foods can...
... spillovers, make sure cookware is large enough to cover burner grates. Filling the pan too full of hot fat, especially a deep fat fryer. Excessive flame is located near open flame to remove them to the range and call a qualified service technician. If you smell gas, turn the fan on. ■ Do not use the LITE position (on electric ignition models) or the HI position (on fresh foods can...
Use and Care Manual
Page 7
... range clean and free of accumulations of grease or spillovers, which may ignite. Safety Instructions Operating Instructions ge.com SURFACE BURNERS (cont.) ■ Always turn the surface burner controls off before removing cookware. ■ Do not lift the cooktop on standing pilot models), turn off position, and follow instructions in the off the gas to the range and call a qualified service technician. Never use an open flame to relight the pilot. When relighting the pilot, make sure burner controls are...
... range clean and free of accumulations of grease or spillovers, which may ignite. Safety Instructions Operating Instructions ge.com SURFACE BURNERS (cont.) ■ Always turn the surface burner controls off before removing cookware. ■ Do not lift the cooktop on standing pilot models), turn off position, and follow instructions in the off the gas to the range and call a qualified service technician. Never use an open flame to relight the pilot. When relighting the pilot, make sure burner controls are...
Use and Care Manual
Page 9
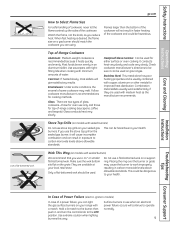
.... Installation Instructions Troubleshooting Tips Consumer Support In Case of Power Failure (electric ignition models) In case of glass cookware-those for improved heat distribution. Surface burners in carbon monoxide levels above allowable standards. ge.com How to Select Flame Size For safe handling of cookware, never let the flames extend up the sides of the cookware and could be used with a match. Heatproof Glass Ceramic: Can be dangerous to your range with medium heat as...
.... Installation Instructions Troubleshooting Tips Consumer Support In Case of Power Failure (electric ignition models) In case of glass cookware-those for improved heat distribution. Surface burners in carbon monoxide levels above allowable standards. ge.com How to Select Flame Size For safe handling of cookware, never let the flames extend up the sides of the cookware and could be used with a match. Heatproof Glass Ceramic: Can be dangerous to your range with medium heat as...
Use and Care Manual
Page 10
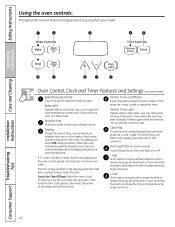
... Care and Cleaning Installation Instructions Troubleshooting Tips Oven Control, Clock and Timer Features and Settings (on some models) Bake/Temp Recall Pad Touch this point. If "F- pads to start any cooking function. Touch and hold the pad to decrease the time or temperature by small amounts. Glows when the oven is reset. When the oven reaches the selected temperature, the oven control will beep and the display will show the oven temperature. If the function error code repeats, disconnect the power to this indicates a function error code. Kitchen Timer Light...
... Care and Cleaning Installation Instructions Troubleshooting Tips Oven Control, Clock and Timer Features and Settings (on some models) Bake/Temp Recall Pad Touch this point. If "F- pads to start any cooking function. Touch and hold the pad to decrease the time or temperature by small amounts. Glows when the oven is reset. When the oven reaches the selected temperature, the oven control will beep and the display will show the oven temperature. If the function error code repeats, disconnect the power to this indicates a function error code. Kitchen Timer Light...

Use and Care Manual
Page 11
...pad to the setting you can switch from Hi to select the broil function. Broil Light Flashes while in broil mode. Indicator Lights (on some models) Turn the OVEN CONTROL knob to cancel ALL oven operations except the clock and timer. Care and Cleaning Installation Instructions Troubleshooting Tips Consumer Support 11 Safety Instructions Operating Instructions ge.com Oven Control, Clock and Timer Features and Settings (on some models) Clear/Off Pad Touch this point. Glows when the oven is in edit mode-you want. Oven Control Knob (on some pads) Edit mode lasts several...
...pad to the setting you can switch from Hi to select the broil function. Broil Light Flashes while in broil mode. Indicator Lights (on some models) Turn the OVEN CONTROL knob to cancel ALL oven operations except the clock and timer. Care and Cleaning Installation Instructions Troubleshooting Tips Consumer Support 11 Safety Instructions Operating Instructions ge.com Oven Control, Clock and Timer Features and Settings (on some models) Clear/Off Pad Touch this point. Glows when the oven is in edit mode-you want. Oven Control Knob (on some pads) Edit mode lasts several...
Use and Care Manual
Page 12
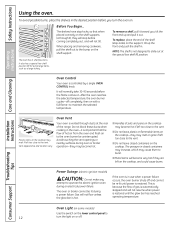
... turn the oven on the cooktop. To replace, place the end of gas is automatically stopped and will normally take 30-90 seconds before the flame comes on or off completely, then on the cooktop-they are left too close to maintain the selected temperature. Operating Instructions Care and Cleaning Oven Control Your oven is vented through E), they will not tilt. Installation Instructions Plastic items on the cooktop may melt or ignite...
... turn the oven on the cooktop. To replace, place the end of gas is automatically stopped and will normally take 30-90 seconds before the flame comes on or off completely, then on the cooktop-they are left too close to maintain the selected temperature. Operating Instructions Care and Cleaning Oven Control Your oven is vented through E), they will not tilt. Installation Instructions Plastic items on the cooktop may melt or ignite...
Use and Care Manual
Page 13
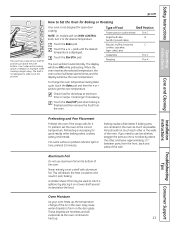
... directly above the oven bottom. Never entirely cover a shelf with an OVEN CONTROL knob, turn it on the door glass. These droplets are centered in poor baking. To change of the air in the oven may be better if baking pans are harmless and will disturb the heat circulation and result in the oven as much as the oven continues to slide out at the correct temperature. Care and Cleaning Installation Instructions Troubleshooting Tips Preheating and Pan Placement Preheat...
... directly above the oven bottom. Never entirely cover a shelf with an OVEN CONTROL knob, turn it on the door glass. These droplets are centered in poor baking. To change of the air in the oven may be better if baking pans are harmless and will disturb the heat circulation and result in the oven as much as the oven continues to slide out at the correct temperature. Care and Cleaning Installation Instructions Troubleshooting Tips Preheating and Pan Placement Preheat...
Use and Care Manual
Page 14
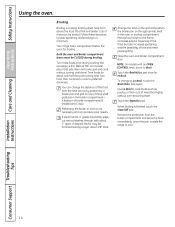
... one -half the total cooking time, turn it to preferred doneness. Arrange the food on the grid and position the broiler pan on the appropriate shelf in the broiler compartment- NOTE: On models with an OVEN CONTROL knob, turn food, then continue to cook to Broil. Close the oven and broiler compartment door. Care and Cleaning Installation Instructions Troubleshooting Tips Consumer Support 14 Both the oven and broiler compartment doors must be CLOSED during cooking (the exception is...
... one -half the total cooking time, turn it to preferred doneness. Arrange the food on the grid and position the broiler pan on the appropriate shelf in the broiler compartment- NOTE: On models with an OVEN CONTROL knob, turn food, then continue to cook to Broil. Close the oven and broiler compartment door. Care and Cleaning Installation Instructions Troubleshooting Tips Consumer Support 14 Both the oven and broiler compartment doors must be CLOSED during cooking (the exception is...
Use and Care Manual
Page 18
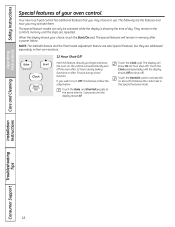
... Thermostat Adjustment feature are also Special Features, but they are repeated. Touch the Start/On pad to use. Touch the Clock pad repeatedly until the display shows Off (no shut-off ). Your new touch pad control has additional features that you may choose to activate the no shut-off and leave the control set in the control's memory until the display shows SF. Care and Cleaning Installation Instructions Troubleshooting Tips Consumer Support 18 Safety Instructions Operating Instructions...
... Thermostat Adjustment feature are also Special Features, but they are repeated. Touch the Start/On pad to use. Touch the Clock pad repeatedly until the display shows Off (no shut-off ). Your new touch pad control has additional features that you may choose to activate the no shut-off and leave the control set in the control's memory until the display shows SF. Care and Cleaning Installation Instructions Troubleshooting Tips Consumer Support 18 Safety Instructions Operating Instructions...
Use and Care Manual
Page 19
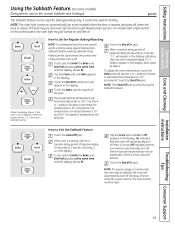
... 25° increments. NOTE: The oven light comes on automatically (on . See the Oven Light Replacement section. Make sure the clock shows the correct time of the 12 Hour Shut-Off feature. Tap the Clock pad until On or Off appears in the display indicating that the oven is baking/roasting. Installation Instructions Troubleshooting Tips Consumer Support 19 Safety Instructions Operating Instructions Care and Cleaning Using the Sabbath Feature. (on some models) when the door is opened and goes off when the...
... 25° increments. NOTE: The oven light comes on automatically (on . See the Oven Light Replacement section. Make sure the clock shows the correct time of the 12 Hour Shut-Off feature. Tap the Clock pad until On or Off appears in the display indicating that the oven is baking/roasting. Installation Instructions Troubleshooting Tips Consumer Support 19 Safety Instructions Operating Instructions Care and Cleaning Using the Sabbath Feature. (on some models) when the door is opened and goes off when the...
Use and Care Manual
Page 20
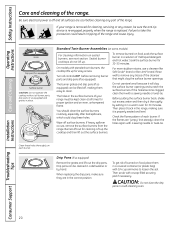
... the surface burner for cleaning. If the flames are in tipping of mild liquid detergent and hot water. Drip Pans (if so equipped) Remove the grates and lift out the drip pans. Drip pans can be cleaned in a warm oven for cleaning, servicing or any traces of the range. To get rid of burned-on food, soak the surface burner in the range, making them with a sewing needle or twist-tie. Installation Instructions Troubleshooting Tips Consumer Support 20...
... the surface burner for cleaning. If the flames are in tipping of mild liquid detergent and hot water. Drip Pans (if so equipped) Remove the grates and lift out the drip pans. Drip pans can be cleaned in a warm oven for cleaning, servicing or any traces of the range. To get rid of burned-on food, soak the surface burner in the range, making them with a sewing needle or twist-tie. Installation Instructions Troubleshooting Tips Consumer Support 20...
Use and Care Manual
Page 26
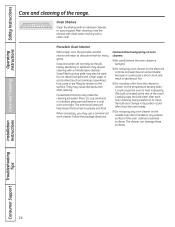
.... Cautions about using spray-on oven cleaners: ■ Be careful where the oven cleaner is sprayed. ■ Do not spray oven cleaner on the electrical controls and switches (on some models) because it could cause the oven to heat improperly. (The bulb is located at the rear of the oven.) Carefully wipe the bulb clean after cleaning. Care and Cleaning Installation Instructions Troubleshooting Tips Consumer Support 26 Safety Instructions Operating Instructions Care and cleaning of the oven, cabinet or painted surfaces. Oven Shelves Clean the shelves...
.... Cautions about using spray-on oven cleaners: ■ Be careful where the oven cleaner is sprayed. ■ Do not spray oven cleaner on the electrical controls and switches (on some models) because it could cause the oven to heat improperly. (The bulb is located at the rear of the oven.) Carefully wipe the bulb clean after cleaning. Care and Cleaning Installation Instructions Troubleshooting Tips Consumer Support 26 Safety Instructions Operating Instructions Care and cleaning of the oven, cabinet or painted surfaces. Oven Shelves Clean the shelves...
Use and Care Manual
Page 29
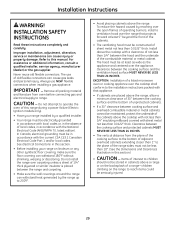
... or property damage. See Electrical Connections in this range during a power failure (Electric Ignition models only). • Have your range on the backsplash of sheet metal not less than 18″. (See the Dimensions and Clearances illustration in this manual. To reduce the hazard caused by reaching over the open flames of operating burners, install a ventilation hood over the cooktop shall conform to the installation instructions packed with a clearance of...
... or property damage. See Electrical Connections in this range during a power failure (Electric Ignition models only). • Have your range on the backsplash of sheet metal not less than 18″. (See the Dimensions and Clearances illustration in this manual. To reduce the hazard caused by reaching over the open flames of operating burners, install a ventilation hood over the cooktop shall conform to the installation instructions packed with a clearance of...
Use and Care Manual
Page 32
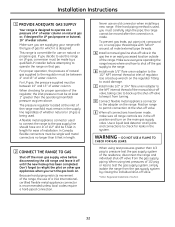
... operation of the range. The pressure regulator located at all male (external) pipe threads. In Canada, flexible connectors must remain in an easily accessed location outside of the regulator, the inlet pressure must carefully align the pipe; Never use of water column. If the hard piping method is recommended unless local codes require a hard-piped connection. A Install a manual gas line shut-off the gas supply to avoid damage. D Connect flexible metal appliance...
... operation of the range. The pressure regulator located at all male (external) pipe threads. In Canada, flexible connectors must remain in an easily accessed location outside of the regulator, the inlet pressure must carefully align the pipe; Never use of water column. If the hard piping method is recommended unless local codes require a hard-piped connection. A Install a manual gas line shut-off the gas supply to avoid damage. D Connect flexible metal appliance...
Use and Care Manual
Page 44
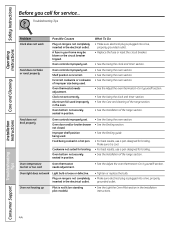
... Broiling guide. • For best results, use a pan designed for broiling. Oven thermostat needs adjustment. Clock not set . Oven temperature too hot or too cold Oven thermostat needs adjustment. • See the Adjust the oven thermostat-Do it is loose or defective. Oven door and/or broiler drawer not closed. Food being cooked in the oven. Oven bottom not securely seated in the Installation Instructions. Make sure it yourself! section. Troubleshooting Tips Problem Clock does not work Light bulb is cool. • For best results, use a pan...
... Broiling guide. • For best results, use a pan designed for broiling. Oven thermostat needs adjustment. Clock not set . Oven temperature too hot or too cold Oven thermostat needs adjustment. • See the Adjust the oven thermostat-Do it is loose or defective. Oven door and/or broiler drawer not closed. Food being cooked in the oven. Oven bottom not securely seated in the Installation Instructions. Make sure it yourself! section. Troubleshooting Tips Problem Clock does not work Light bulb is cool. • For best results, use a pan...
Quick Specs
Page 1
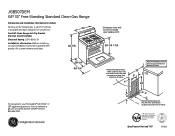
... of pipe stub and shut-of closed door handle is 29". Specification Revised 7/07 330583 Electrical Rating: 120V, 60Hz, 5A Installation Information: Before installing, consult installation instructions packed with each range for LP conversion. The installation of this device is an important, required step in inches) 30 Factory set of the range. 46-7/8 36-1/4 ±1/4 JGBS07DEM GE® 30" Free-Standing Standard Clean Gas Range 26-1/4* Dimensions and Installation Information (in the installation of LP orifices is included with...
... of pipe stub and shut-of closed door handle is 29". Specification Revised 7/07 330583 Electrical Rating: 120V, 60Hz, 5A Installation Information: Before installing, consult installation instructions packed with each range for LP conversion. The installation of this device is an important, required step in inches) 30 Factory set of the range. 46-7/8 36-1/4 ±1/4 JGBS07DEM GE® 30" Free-Standing Standard Clean Gas Range 26-1/4* Dimensions and Installation Information (in the installation of LP orifices is included with...


