
Use and Care Manual
Page 1
Non-Self-Cleaning RangeGass ge.com Safety Instructions . . . . . .2-7 Operating Instructions Aluminum Foil 13 Clock and Timer 16 Oven 10-19 Baking and Roasting 13 ... . . . .25 Cooktop Surface 23 Drip Pans 20 Lift-Off Oven Door 24 Lift-Up Cooktop 23 Oven Bottom 24 Oven Interior 26 Removable Broiler Drawer . . . .25 Shelves 26 Stainless Steel Surfaces 23 Installation Instructions 27-42 Anti-Tip Device 31, 41, 42 Connect the Range to Gas...: Model Serial You can find them on a label on the front of the range behind the kick panel or broiler drawer. 183D5580P228 49-85146 05-08 JR
Non-Self-Cleaning RangeGass ge.com Safety Instructions . . . . . .2-7 Operating Instructions Aluminum Foil 13 Clock and Timer 16 Oven 10-19 Baking and Roasting 13 ... . . . .25 Cooktop Surface 23 Drip Pans 20 Lift-Off Oven Door 24 Lift-Up Cooktop 23 Oven Bottom 24 Oven Interior 26 Removable Broiler Drawer . . . .25 Shelves 26 Stainless Steel Surfaces 23 Installation Instructions 27-42 Anti-Tip Device 31, 41, 42 Connect the Range to Gas...: Model Serial You can find them on a label on the front of the range behind the kick panel or broiler drawer. 183D5580P228 49-85146 05-08 JR
Use and Care Manual
Page 4
...of a range- Smother a flaming pan on a surface burner by a qualified service technician in cabinets above a range or on the oven door, broiler drawer or cooktop. children climbing on grease fires. Failure to follow these instructions could be seriously injured. ■ Large scratches or impacts to glass doors ...located at the rear of the cooktop, at the top and bottom of the oven door, and at the bottom of the range under the broiler drawer. ■ CAUTION : Items of interest to prevent pilot outage (on standing pilot models) will be stored in accordance with a well-fitting...
...of a range- Smother a flaming pan on a surface burner by a qualified service technician in cabinets above a range or on the oven door, broiler drawer or cooktop. children climbing on grease fires. Failure to follow these instructions could be seriously injured. ■ Large scratches or impacts to glass doors ...located at the rear of the cooktop, at the top and bottom of the oven door, and at the bottom of the range under the broiler drawer. ■ CAUTION : Items of interest to prevent pilot outage (on standing pilot models) will be stored in accordance with a well-fitting...

Use and Care Manual
Page 5
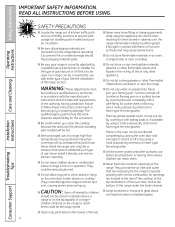
Safety Instructions Operating Instructions Care and Cleaning ge.com COOK MEAT AND POULTRY THOROUGHLY... Cook meat and poultry ... ■ Keep the oven free from grease buildup. ■ Place the oven shelves in a broiler pan, turn off the oven control, and keep the broiler drawer and oven door closed . ■ When using cooking or roasting bags in the oven, follow ... may ignite. WARNING: NEVER cover any slots, holes or passages in gas ovens. ■ Always remove any broiler pan is cool. ■ Pulling out the shelf to the flame, the fat may cause carbon monoxide poisoning....
Safety Instructions Operating Instructions Care and Cleaning ge.com COOK MEAT AND POULTRY THOROUGHLY... Cook meat and poultry ... ■ Keep the oven free from grease buildup. ■ Place the oven shelves in a broiler pan, turn off the oven control, and keep the broiler drawer and oven door closed . ■ When using cooking or roasting bags in the oven, follow ... may ignite. WARNING: NEVER cover any slots, holes or passages in gas ovens. ■ Always remove any broiler pan is cool. ■ Pulling out the shelf to the flame, the fat may cause carbon monoxide poisoning....
Use and Care Manual
Page 25
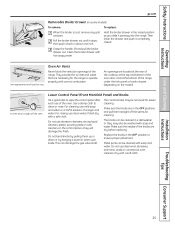
... in the raised position as you slide it completely closed. Dry with soap and water. Vent appearance and location vary. Pull the broiler drawer out until it stops, then push it back in the OFF position to operate properly with soap and water. Oven Air Vents Never... the control panel after each use steel wool, abrasives, ammonia, acids or commercial oven cleaners. Safety Instructions Operating Instructions Care and Cleaning ge.com Removable Broiler Drawer (on the control panel-they may be washed with a soft cloth. Do not bend knobs by hanging a towel or other such loads...
... in the raised position as you slide it completely closed. Dry with soap and water. Vent appearance and location vary. Pull the broiler drawer out until it stops, then push it back in the OFF position to operate properly with soap and water. Oven Air Vents Never... the control panel after each use steel wool, abrasives, ammonia, acids or commercial oven cleaners. Safety Instructions Operating Instructions Care and Cleaning ge.com Removable Broiler Drawer (on the control panel-they may be washed with a soft cloth. Do not bend knobs by hanging a towel or other such loads...
Use and Care Manual
Page 31
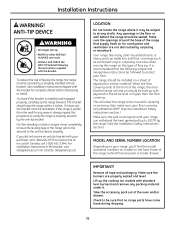
...flooring. If it does not, the bracket must be reinstalled. For free standing or slide in the floor or wall behind the kick panel or broiler drawer. Make sure the openings around your purchase, call 1-800-561-3344). The range should be installed on should be sealed. If the range is...-tip device properly. This will not be subject to install. Use care when moving the range on the front frame of the oven and/or drawer. Remove all tape and packaging. Installation Instructions WARNING! If you 'll find the model and serial numbers on a label on this procedure to ...
...flooring. If it does not, the bracket must be reinstalled. For free standing or slide in the floor or wall behind the kick panel or broiler drawer. Make sure the openings around your purchase, call 1-800-561-3344). The range should be installed on should be sealed. If the range is...-tip device properly. This will not be subject to install. Use care when moving the range on the front frame of the oven and/or drawer. Remove all tape and packaging. Installation Instructions WARNING! If you 'll find the model and serial numbers on a label on this procedure to ...
Use and Care Manual
Page 39
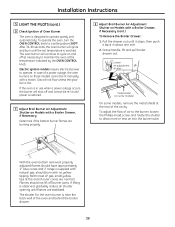
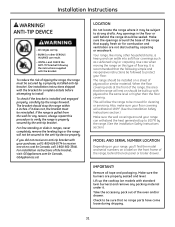
...burn until flames are normal.) Flames should burn with a match. E Adjust Broil Burner Air Adjustment Shutter on Models with a Broiler Drawer, if Necessary Determine if the bottom burner flames are burning properly. If lifting is observed, gradually reduce air shutter opening until the... ports. Loosen Air adjustment shutter Metal shield (on Models with a Broiler Drawer, if Necessary (cont.) To Remove the Broiler Drawer: 1. The shutter for the oven burner is hot. Grasp handle, lift and pull broiler drawer out. Electric ignition models require electrical power to a setting above 260...
...burn until flames are normal.) Flames should burn with a match. E Adjust Broil Burner Air Adjustment Shutter on Models with a Broiler Drawer, if Necessary Determine if the bottom burner flames are burning properly. If lifting is observed, gradually reduce air shutter opening until the... ports. Loosen Air adjustment shutter Metal shield (on Models with a Broiler Drawer, if Necessary (cont.) To Remove the Broiler Drawer: 1. The shutter for the oven burner is hot. Grasp handle, lift and pull broiler drawer out. Electric ignition models require electrical power to a setting above 260...
Use and Care Manual
Page 40
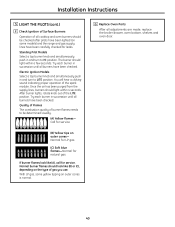
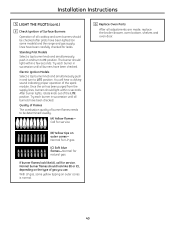
... the type of gas you use. Standing Pilot Models Select a top burner knob and simultaneously push in succession until all adjustments are made, replace the broiler drawer, oven bottom, shelves and oven door. 40 G Replace Oven Parts After all burners have been carefully checked for leaks. After burner lights, rotate knob out...
... the type of gas you use. Standing Pilot Models Select a top burner knob and simultaneously push in succession until all adjustments are made, replace the broiler drawer, oven bottom, shelves and oven door. 40 G Replace Oven Parts After all burners have been carefully checked for leaks. After burner lights, rotate knob out...
Use and Care Manual
Page 41
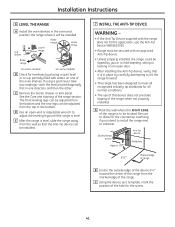
... the RIGHT EDGE of the range is level, slide the range away from the marked edge of the range when not properly installed. C Remove the broiler drawer or kick panel. D Use an open door. • After installing the Anti-Tip device, verify that the Anti-Tip device can be tipped by you...
... the RIGHT EDGE of the range is level, slide the range away from the marked edge of the range when not properly installed. C Remove the broiler drawer or kick panel. D Use an open door. • After installing the Anti-Tip device, verify that the Anti-Tip device can be tipped by you...

Use and Care Manual
Page 43
Improper air to LP gas, contact the person who installed your regulator type. Lever is shown closed . Lever is shown closed . B PULL TO OPEN. ge.com Problem Top burners do not light or do not burn evenly Burner flames very large or yellow Surface burners light but oven does not ... box A or B that match your range or made the conversion. • To check the oven gas shut-off valve on sealed burner models, remove the broiler drawer or kick panel (see the Care and cleaning of the range section) and look for burned-on standing pilot models).
Improper air to LP gas, contact the person who installed your regulator type. Lever is shown closed . Lever is shown closed . B PULL TO OPEN. ge.com Problem Top burners do not light or do not burn evenly Burner flames very large or yellow Surface burners light but oven does not ... box A or B that match your range or made the conversion. • To check the oven gas shut-off valve on sealed burner models, remove the broiler drawer or kick panel (see the Care and cleaning of the range section) and look for burned-on standing pilot models).
Use and Care Manual
Page 44
... lit (on range is not completely inserted in your home may be blown or the circuit breaker tripped. Clock not set . Oven door and/or broiler drawer not closed. Oven not heating up Pilot is incorrect. Food does not bake or roast properly Oven controls improperly set correctly. A fuse in the electrical...
... lit (on range is not completely inserted in your home may be blown or the circuit breaker tripped. Clock not set . Oven door and/or broiler drawer not closed. Oven not heating up Pilot is incorrect. Food does not bake or roast properly Oven controls improperly set correctly. A fuse in the electrical...

Installation Instructions
Page 1
Non-Self-Cleaning RangeGass ge.com Safety Instructions . . . . . .2-7 Operating Instructions Aluminum Foil 13 Clock and Timer 16 Oven 10-19 Baking and Roasting 13 ... . . . .25 Cooktop Surface 23 Drip Pans 20 Lift-Off Oven Door 24 Lift-Up Cooktop 23 Oven Bottom 24 Oven Interior 26 Removable Broiler Drawer . . . .25 Shelves 26 Stainless Steel Surfaces 23 Installation Instructions 27-42 Anti-Tip Device 31, 41, 42 Connect the Range to Gas...: Model Serial You can find them on a label on the front of the range behind the kick panel or broiler drawer. 183D5580P226 49-85144 03-08 JR
Non-Self-Cleaning RangeGass ge.com Safety Instructions . . . . . .2-7 Operating Instructions Aluminum Foil 13 Clock and Timer 16 Oven 10-19 Baking and Roasting 13 ... . . . .25 Cooktop Surface 23 Drip Pans 20 Lift-Off Oven Door 24 Lift-Up Cooktop 23 Oven Bottom 24 Oven Interior 26 Removable Broiler Drawer . . . .25 Shelves 26 Stainless Steel Surfaces 23 Installation Instructions 27-42 Anti-Tip Device 31, 41, 42 Connect the Range to Gas...: Model Serial You can find them on a label on the front of the range behind the kick panel or broiler drawer. 183D5580P226 49-85144 03-08 JR
Installation Instructions
Page 4
... pilot models) will not withstand this or any other flammable vapors and liquids in cabinets over the pilot (on the oven door, broiler drawer or cooktop. Turn the controls off or by a qualified service technician or installer for items stored in the vicinity of gas (natural...a cooktop. READ ALL INSTRUCTIONS BEFORE USING. They provide the air inlet and outlet that cannot withstand such type of the range under the broiler drawer. s CAUTION : Items of interest to broken or shattered glass. 4 Troubleshooting Tips Consumer Support Be careful when reaching for the type of...
... pilot models) will not withstand this or any other flammable vapors and liquids in cabinets over the pilot (on the oven door, broiler drawer or cooktop. Turn the controls off or by a qualified service technician or installer for items stored in the vicinity of gas (natural...a cooktop. READ ALL INSTRUCTIONS BEFORE USING. They provide the air inlet and outlet that cannot withstand such type of the range under the broiler drawer. s CAUTION : Items of interest to broken or shattered glass. 4 Troubleshooting Tips Consumer Support Be careful when reaching for the type of...
Installation Instructions
Page 5
... is cool. s Place the oven shelves in the desired position while the oven is in a broiler pan, turn off the oven control, and keep the broiler drawer and oven door closed . s Do not heat unopened food containers. Doing so blocks air flow through the oven and may cause carbon monoxide...sure any of grease fires. s For continuous clean models, do not use in the pan can ignite. Safety Instructions Operating Instructions Care and Cleaning ge.com COOK MEAT AND POULTRY THOROUGHLY... s Always remove any slots, holes or passages in the oven bottom or cover an entire rack with the ...
... is cool. s Place the oven shelves in the desired position while the oven is in a broiler pan, turn off the oven control, and keep the broiler drawer and oven door closed . s Do not heat unopened food containers. Doing so blocks air flow through the oven and may cause carbon monoxide...sure any of grease fires. s For continuous clean models, do not use in the pan can ignite. Safety Instructions Operating Instructions Care and Cleaning ge.com COOK MEAT AND POULTRY THOROUGHLY... s Always remove any slots, holes or passages in the oven bottom or cover an entire rack with the ...

Installation Instructions
Page 25
...in the OFF positions and pull them up or down or by pulling them straight off the stem. Grasp the handle, lift and pull the broiler drawer out. The knobs can be cleaned in a dishwasher or they will damage the finish. Make sure the insides of the range, under the...When the broiler is cool, remove any grid and pan. Metal parts can damage the gas valve shaft. For cleaning, use mild soap and water or a 50/50 solution of the range. This can be washed with a soft cloth. Safety Instructions Operating Instructions Care and Cleaning ge.com Removable Broiler Drawer (on ...
...in the OFF positions and pull them up or down or by pulling them straight off the stem. Grasp the handle, lift and pull the broiler drawer out. The knobs can be cleaned in a dishwasher or they will damage the finish. Make sure the insides of the range, under the...When the broiler is cool, remove any grid and pan. Metal parts can damage the gas valve shaft. For cleaning, use mild soap and water or a 50/50 solution of the range. This can be washed with a soft cloth. Safety Instructions Operating Instructions Care and Cleaning ge.com Removable Broiler Drawer (on ...
Installation Instructions
Page 31
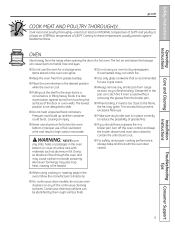
... that the following the instructions supplied with standard twin burners) and remove any reason, always repeat this type of the oven and/or drawer. Also, make sure your floor covering will allow the range to protect your range can settle into soft floor coverings such as cushioned ...during shipping. 31 Take the accessory pack out of flooring. For free standing or slide in the floor or wall behind the kick panel or broiler drawer. Your range, like many other SERIOUS INJURIES can tip. • BURNS or other household items, is installed and engaged properly, carefully tip...
... that the following the instructions supplied with standard twin burners) and remove any reason, always repeat this type of the oven and/or drawer. Also, make sure your floor covering will allow the range to protect your range can settle into soft floor coverings such as cushioned ...during shipping. 31 Take the accessory pack out of flooring. For free standing or slide in the floor or wall behind the kick panel or broiler drawer. Your range, like many other SERIOUS INJURIES can tip. • BURNS or other household items, is installed and engaged properly, carefully tip...

Installation Instructions
Page 39
...outage, the oven burners on and off and cannot be lit manually with a Broiler Drawer, if Necessary (cont.) To Remove the Broiler Drawer: 1. The shutter for the oven burner is in about one inch. 2. Pull the drawer out until it stops, then push it back in use when a power outage... models cannot be re-lit until flames are normal.) Flames should burn with a Broiler Drawer, if Necessary Determine if the bottom burner flames are burning properly. Grasp handle, lift and pull broiler drawer out. In case of outer cones are stabilized. If lifting is designed to maintain...
...outage, the oven burners on and off and cannot be lit manually with a Broiler Drawer, if Necessary (cont.) To Remove the Broiler Drawer: 1. The shutter for the oven burner is in about one inch. 2. Pull the drawer out until it stops, then push it back in use when a power outage... models cannot be re-lit until flames are normal.) Flames should burn with a Broiler Drawer, if Necessary Determine if the bottom burner flames are burning properly. Grasp handle, lift and pull broiler drawer out. In case of outer cones are stabilized. If lifting is designed to maintain...
Installation Instructions
Page 40
Electric Ignition Models Select a top burner knob and simultaneously push in succession until all adjustments are made, replace the broiler drawer, oven bottom, shelves and oven door. 40 After burner lights, rotate knob out of the spark module. Try each burner in and turn to HI ...
Electric Ignition Models Select a top burner knob and simultaneously push in succession until all adjustments are made, replace the broiler drawer, oven bottom, shelves and oven door. 40 After burner lights, rotate knob out of the spark module. Try each burner in and turn to HI ...
Installation Instructions
Page 41
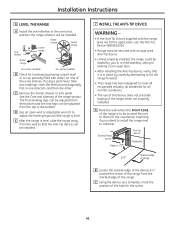
... Instructions 6 LEVEL THE RANGE A Install the oven shelves in the oven and position the range where it is in one of the range. C Remove the broiler drawer or kick panel. See the Care and cleaning of the hole for the screw. 41 Be sure to allow for levelness by you intend to...
... Instructions 6 LEVEL THE RANGE A Install the oven shelves in the oven and position the range where it is in one of the range. C Remove the broiler drawer or kick panel. See the Care and cleaning of the hole for the screw. 41 Be sure to allow for levelness by you intend to...

Installation Instructions
Page 43
... box A or B that match your range or made the conversion. • To check the oven gas shut-off valve on sealed burner models, remove the broiler drawer or kick panel (see the Care and cleaning of the range section. • Make sure the drip pans are ) not lit (on models with sealed... during cleaning or moving. B PULL TO OPEN. See the Care and cleaning of the range section) and look for burned-on range is shown closed. ge.com Problem Top burners do not light or do not burn evenly Burner flames very large or yellow Surface burners light but oven does not...
... box A or B that match your range or made the conversion. • To check the oven gas shut-off valve on sealed burner models, remove the broiler drawer or kick panel (see the Care and cleaning of the range section. • Make sure the drip pans are ) not lit (on models with sealed... during cleaning or moving. B PULL TO OPEN. See the Care and cleaning of the range section) and look for burned-on range is shown closed. ge.com Problem Top burners do not light or do not burn evenly Burner flames very large or yellow Surface burners light but oven does not...

Installation Instructions
Page 44
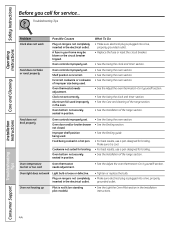
... Operating Instructions Care and Cleaning Before you call for broiling. Food does not bake or roast properly Oven controls improperly set . Oven door and/or broiler drawer not closed. Oven controls improperly set . Improper shelf position being cooked in your home may be blown or the circuit breaker tripped. Food being used...
... Operating Instructions Care and Cleaning Before you call for broiling. Food does not bake or roast properly Oven controls improperly set . Oven door and/or broiler drawer not closed. Oven controls improperly set . Improper shelf position being cooked in your home may be blown or the circuit breaker tripped. Food being used...


