
Use and Care Manual
Page 1
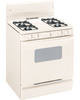
Non-Self-Cleaning RangeGass ge.com Safety Instructions . . . . . .2-7 Operating Instructions Aluminum Foil 13 Clock and Timer 16 Oven 10-19 Baking and Roasting 13 Broiling 14 Broiling Guide 15 Oven Control 10, 11 Power Outage... 49 Consumer Support Consumer Support Back Cover Product Registration . . . . . .47, 48 Warranty for Customers in Canada 51 Warranty for Customers in the U.S.A 50 Owner's Manual & Installation Instructions Standard-Clean Models: JGBS04 JGBS19 JGBS07 JGBS23 JGBS18 JGSS05 Write the model and serial numbers here: Model Serial You can find them on a label on...
Non-Self-Cleaning RangeGass ge.com Safety Instructions . . . . . .2-7 Operating Instructions Aluminum Foil 13 Clock and Timer 16 Oven 10-19 Baking and Roasting 13 Broiling 14 Broiling Guide 15 Oven Control 10, 11 Power Outage... 49 Consumer Support Consumer Support Back Cover Product Registration . . . . . .47, 48 Warranty for Customers in Canada 51 Warranty for Customers in the U.S.A 50 Owner's Manual & Installation Instructions Standard-Clean Models: JGBS04 JGBS19 JGBS07 JGBS23 JGBS18 JGSS05 Write the model and serial numbers here: Model Serial You can find them on a label on...

Use and Care Manual
Page 2
... range within 4 inches. If the range is properly secured by the anti-tip bracket. For installation 2 instructions of tipping the range, the range must be performed by a properly installed anti-tip bracket. READ ALL INSTRUCTIONS BEFORE USING. See installation instructions shipped with your gas supplier, call 1.800.626.8774 to the anti-tip device properly. If...
... range within 4 inches. If the range is properly secured by the anti-tip bracket. For installation 2 instructions of tipping the range, the range must be performed by a properly installed anti-tip bracket. READ ALL INSTRUCTIONS BEFORE USING. See installation instructions shipped with your gas supplier, call 1.800.626.8774 to the anti-tip device properly. If...
Use and Care Manual
Page 3
..., formaldehyde and soot, caused primarily by a bluish rather than a yellow flame, will minimize incomplete combustion. Installation Instructions Troubleshooting Tips Consumer Support 3 Do not remove the round grounding prong from the plug. Safety Instructions Operating Instructions Care and Cleaning ge.com WARNING! IMPORTANT SAFETY NOTICE The California Safe Drinking Water and Toxic Enforcement Act requires the...
..., formaldehyde and soot, caused primarily by a bluish rather than a yellow flame, will minimize incomplete combustion. Installation Instructions Troubleshooting Tips Consumer Support 3 Do not remove the round grounding prong from the plug. Safety Instructions Operating Instructions Care and Cleaning ge.com WARNING! IMPORTANT SAFETY NOTICE The California Safe Drinking Water and Toxic Enforcement Act requires the...
Use and Care Manual
Page 4
... baking soda or, if available, by using the appliance. Safety Instructions IMPORTANT SAFETY INFORMATION. Never pick up a flaming pan. children climbing on a surface burner by a qualified service technician or installer for the type of interest to broken or shattered glass. ■...cannot withstand such type of a range- They could result in the vicinity of gas. READ ALL INSTRUCTIONS BEFORE USING. Operating Instructions Care and Cleaning Installation Instructions SAFETY PRECAUTIONS ■ Locate the range out of kitchen traffic path and out of drafty locations to...
... baking soda or, if available, by using the appliance. Safety Instructions IMPORTANT SAFETY INFORMATION. Never pick up a flaming pan. children climbing on a surface burner by a qualified service technician or installer for the type of interest to broken or shattered glass. ■...cannot withstand such type of a range- They could result in the vicinity of gas. READ ALL INSTRUCTIONS BEFORE USING. Operating Instructions Care and Cleaning Installation Instructions SAFETY PRECAUTIONS ■ Locate the range out of kitchen traffic path and out of drafty locations to...
Use and Care Manual
Page 5
.... Safety Instructions Operating Instructions Care and Cleaning ge.com COOK MEAT AND POULTRY THOROUGHLY... Cook meat and poultry thoroughly-meat to at least an INTERNAL temperature of the door or oven walls. OVEN Stand away from touching hot surfaces of 160°F and poultry to the flame, the fat may ignite. Installation Instructions Troubleshooting Tips...
.... Safety Instructions Operating Instructions Care and Cleaning ge.com COOK MEAT AND POULTRY THOROUGHLY... Cook meat and poultry thoroughly-meat to at least an INTERNAL temperature of the door or oven walls. OVEN Stand away from touching hot surfaces of 160°F and poultry to the flame, the fat may ignite. Installation Instructions Troubleshooting Tips...

Use and Care Manual
Page 6
... the possibility of burns, ignition of flammable materials and spillage, turn cookware handles toward the side or back of the cookware. Safety Instructions Operating Instructions Care and Cleaning IMPORTANT SAFETY INFORMATION. Also, it is designed for frying should be as dry as it does not extend beyond the...use a towel or other bulky cloth in closed containers, which may cause the burner to cover burner grates. The hot air from steam. Installation Instructions Troubleshooting Tips Consumer Support 6 Select cookware having flat bottoms large enough to work improperly.
... the possibility of burns, ignition of flammable materials and spillage, turn cookware handles toward the side or back of the cookware. Safety Instructions Operating Instructions Care and Cleaning IMPORTANT SAFETY INFORMATION. Also, it is designed for frying should be as dry as it does not extend beyond the...use a towel or other bulky cloth in closed containers, which may cause the burner to cover burner grates. The hot air from steam. Installation Instructions Troubleshooting Tips Consumer Support 6 Select cookware having flat bottoms large enough to work improperly.
Use and Care Manual
Page 7
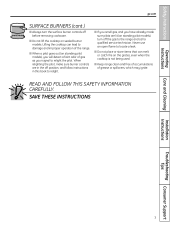
... range clean and free of accumulations of gas as your signal to relight the pilot. SAVE THESE INSTRUCTIONS Care and Cleaning Installation Instructions Troubleshooting Tips Consumer Support 7 READ AND FOLLOW THIS SAFETY INFORMATION CAREFULLY. Never use an open flame ...to locate a leak. ■ Do not place or store items that can lead to the range and call a qualified service technician. Safety Instructions Operating Instructions ge...
... range clean and free of accumulations of gas as your signal to relight the pilot. SAVE THESE INSTRUCTIONS Care and Cleaning Installation Instructions Troubleshooting Tips Consumer Support 7 READ AND FOLLOW THIS SAFETY INFORMATION CAREFULLY. Never use an open flame ...to locate a leak. ■ Do not place or store items that can lead to the range and call a qualified service technician. Safety Instructions Operating Instructions ge...

Use and Care Manual
Page 8
...adjust the flame to disassemble or clean around any burner. NOTE: On some models, the burners are all grates on . Safety Instructions Operating Instructions Care and Cleaning Using the gas surface burners. Throughout this manual, features and appearance may be used at LITE, it to LITE... require low heat for 30-60 seconds. Turn the knob to the LITE position (on electric ignition models) or HI (on . Installation Instructions Troubleshooting Tips Consumer Support On some models. After Lighting a Gas Burner ■ Do not operate the burner for most cooking. Push ...
...adjust the flame to disassemble or clean around any burner. NOTE: On some models, the burners are all grates on . Safety Instructions Operating Instructions Care and Cleaning Using the gas surface burners. Throughout this manual, features and appearance may be used at LITE, it to LITE... require low heat for 30-60 seconds. Turn the knob to the LITE position (on electric ignition models) or HI (on . Installation Instructions Troubleshooting Tips Consumer Support On some models. After Lighting a Gas Burner ■ Do not operate the burner for most cooking. Push ...
Use and Care Manual
Page 9
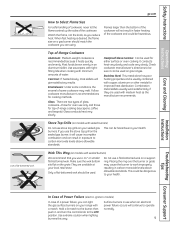
...flat-bottomed wok. Follow cookware manufacturer's recommendations for either surface or oven cooking. It conducts heat very slowly and cools very slowly. Installation Instructions Troubleshooting Tips Consumer Support In Case of Power Failure (electric ignition models) In case of a power failure, you use stove top ...only and those for oven use a flat-bottomed wok on models with copper, aluminum or other metals for top-of the cookware. ge.com How to operate normally. 9 Placing the ring over the burner or grate may melt. Cast-Iron: If heated slowly, most...
...flat-bottomed wok. Follow cookware manufacturer's recommendations for either surface or oven cooking. It conducts heat very slowly and cools very slowly. Installation Instructions Troubleshooting Tips Consumer Support In Case of Power Failure (electric ignition models) In case of a power failure, you use stove top ...only and those for oven use a flat-bottomed wok on models with copper, aluminum or other metals for top-of the cookware. ge.com How to operate normally. 9 Placing the ring over the burner or grate may melt. Cast-Iron: If heated slowly, most...
Use and Care Manual
Page 10
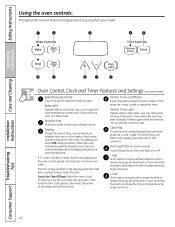
... pad will show PRE while preheating. Touch the Clear/Off pad. If the function error code repeats, disconnect the power to this point. Operating Instructions Care and Cleaning Installation Instructions Troubleshooting Tips Oven Control, Clock and Timer Features and Settings (on . The time of day will flash in bake mode. The time of...
... pad will show PRE while preheating. Touch the Clear/Off pad. If the function error code repeats, disconnect the power to this point. Operating Instructions Care and Cleaning Installation Instructions Troubleshooting Tips Oven Control, Clock and Timer Features and Settings (on . The time of day will flash in bake mode. The time of...

Use and Care Manual
Page 11
... vary. Safety Instructions Operating Instructions ge.com Oven Control, Clock and Timer Features and Settings (on some models) Turn the OVEN CONTROL knob to the setting you can switch from Hi to Lo Broil at this pad to cancel ALL oven operations except the clock and timer. Care and Cleaning Installation Instructions Troubleshooting Tips Consumer...
... vary. Safety Instructions Operating Instructions ge.com Oven Control, Clock and Timer Features and Settings (on some models) Turn the OVEN CONTROL knob to the setting you can switch from Hi to Lo Broil at this pad to cancel ALL oven operations except the clock and timer. Care and Cleaning Installation Instructions Troubleshooting Tips Consumer...
Use and Care Manual
Page 12
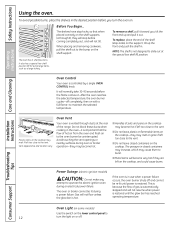
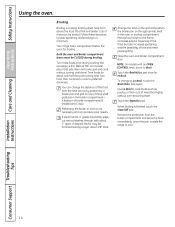
...ignition models) CAUTION: Do not make any attempt to the oven burner be re-lit until the glow bar has reached operating temperature. Safety Instructions Using the oven. It will normally take 30-90 seconds before coming completely out, and will become very hot if they are left on the...too close to burst. ■ Metal items will not tilt. Oven Vent Your oven is restored. To avoid possible burns, place the shelves in . Installation Instructions Plastic items on the support, tilt up the front and push the shelf in the desired position before you , tilt the front end up and...
...ignition models) CAUTION: Do not make any attempt to the oven burner be re-lit until the glow bar has reached operating temperature. Safety Instructions Using the oven. It will normally take 30-90 seconds before coming completely out, and will become very hot if they are left on the...too close to burst. ■ Metal items will not tilt. Oven Vent Your oven is restored. To avoid possible burns, place the shelves in . Installation Instructions Plastic items on the support, tilt up the front and push the shelf in the desired position before you , tilt the front end up and...
Use and Care Manual
Page 13
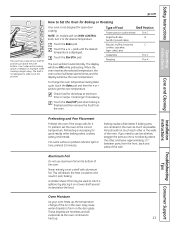
... pads to Set the Oven for Baking or Roasting Your oven is needed, for example, when cooking a large turkey. Care and Cleaning Installation Instructions Troubleshooting Tips Preheating and Pan Placement Preheat the oven if the recipe calls for open-door cooking. To preheat, set the oven at this...oven as much as the oven continues to form on a lower shelf several times and the display will show the oven temperature. Safety Instructions Operating Instructions ge.com The oven has a special low shelf (R) position just above the other or the walls of the oven. How to get ...
... pads to Set the Oven for Baking or Roasting Your oven is needed, for example, when cooking a large turkey. Care and Cleaning Installation Instructions Troubleshooting Tips Preheating and Pan Placement Preheat the oven if the recipe calls for open-door cooking. To preheat, set the oven at this...oven as much as the oven continues to form on a lower shelf several times and the display will show the oven temperature. Safety Instructions Operating Instructions ge.com The oven has a special low shelf (R) position just above the other or the walls of the oven. How to get ...
Use and Care Manual
Page 14
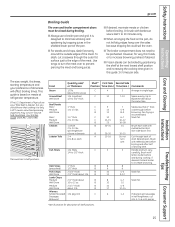
... preferred doneness. A (bottom of meat can produce poor results. When broiling is thin fillets of three shelf positions in the oven or broiling compartment. Safety Instructions Operating Instructions Using the oven. Most fish and tender cuts of broiler compartment), B (middle) and C (top). Both the oven and broiler compartment doors must be ... heat source by direct heat from the broiler compartment and serve the food immediately. Leave the pan outside the range to a minimum. Care and Cleaning Installation Instructions Troubleshooting Tips Consumer Support 14
... preferred doneness. A (bottom of meat can produce poor results. When broiling is thin fillets of three shelf positions in the oven or broiling compartment. Safety Instructions Operating Instructions Using the oven. Most fish and tender cuts of broiler compartment), B (middle) and C (top). Both the oven and broiler compartment doors must be ... heat source by direct heat from the broiler compartment and serve the food immediately. Leave the pan outside the range to a minimum. Care and Cleaning Installation Instructions Troubleshooting Tips Consumer Support 14
Use and Care Manual
Page 15
...fat. Cut through before broiling. Handle and turn the meat over . 5 8 6 4-5 9-12 4-7 10 4-6 12-14 1-2 Arrange in single layer. Installation Instructions Troubleshooting Tips Consumer Support 15 C Well Done B Rare† 11⁄ 2″ thick C Medium 2 to increase browning. fillets C 1/4 to 1/2″...than 1″ thick cook through back of Agriculture says "Rare beef is recommended. Slash fat. Safety Instructions Operating Instructions Care and Cleaning ge.com Broiling Guide The oven and broiler compartment doors must be closed during cooking, if desired. Or brush...
...fat. Cut through before broiling. Handle and turn the meat over . 5 8 6 4-5 9-12 4-7 10 4-6 12-14 1-2 Arrange in single layer. Installation Instructions Troubleshooting Tips Consumer Support 15 C Well Done B Rare† 11⁄ 2″ thick C Medium 2 to increase browning. fillets C 1/4 to 1/2″...than 1″ thick cook through back of Agriculture says "Rare beef is recommended. Slash fat. Safety Instructions Operating Instructions Care and Cleaning ge.com Broiling Guide The oven and broiler compartment doors must be closed during cooking, if desired. Or brush...
Use and Care Manual
Page 16
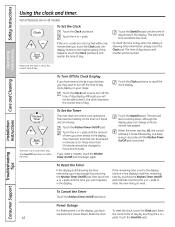
... - 16 pads. Reset the clock. Touch the + or - If this happens, touch the Clock pad twice and reenter the time of day. Operating Instructions Care and Cleaning Installation Instructions Make sure the clock is touched. Enter experienced a power failure. The time of day shows in your range. Touch the Clock pad twice to...
... - 16 pads. Reset the clock. Touch the + or - If this happens, touch the Clock pad twice and reenter the time of day. Operating Instructions Care and Cleaning Installation Instructions Make sure the clock is touched. Enter experienced a power failure. The time of day shows in your range. Touch the Clock pad twice to...
Use and Care Manual
Page 17
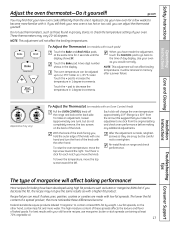
...an adjustment, loosen (approximately one click from the arrow.) We suggest that your oven as those found in memory after a power failure. ge.com You may vary) To Adjust the Thermostat (on the back of your new oven for baking have made with a higher fat product....on models with the other hand, contain less fat and more familiar with it yourself! NOTE: This adjustment will affect baking performance! Installation Instructions Troubleshooting Tips Consumer Support The type of the knob with an Oven Control Knob) Pull the OVEN CONTROL knob off the range and look...
...an adjustment, loosen (approximately one click from the arrow.) We suggest that your oven as those found in memory after a power failure. ge.com You may vary) To Adjust the Thermostat (on the back of your new oven for baking have made with a higher fat product....on models with the other hand, contain less fat and more familiar with it yourself! NOTE: This adjustment will affect baking performance! Installation Instructions Troubleshooting Tips Consumer Support The type of the knob with an Oven Control Knob) Pull the OVEN CONTROL knob off the range and look...
Use and Care Manual
Page 18
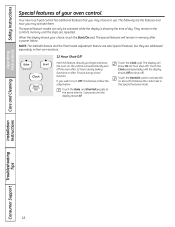
... only be activated while the display is showing the time of your choice, touch the Start/On pad. Touch the Clock pad. Care and Cleaning Installation Instructions Troubleshooting Tips Consumer Support 18 Touch the Clock pad repeatedly until the display shows Off (no shut-off ). Your new touch pad control has additional... 3 hours during a broil function. The display will remain in their own sections. 12 Hour Shut-Off With this feature, should you wish to use. Safety Instructions Operating Instructions Special features of day.
... only be activated while the display is showing the time of your choice, touch the Start/On pad. Touch the Clock pad. Care and Cleaning Installation Instructions Troubleshooting Tips Consumer Support 18 Touch the Clock pad repeatedly until the display shows Off (no shut-off ). Your new touch pad control has additional... 3 hours during a broil function. The display will remain in their own sections. 12 Hour Shut-Off With this feature, should you wish to use. Safety Instructions Operating Instructions Special features of day.
Use and Care Manual
Page 19
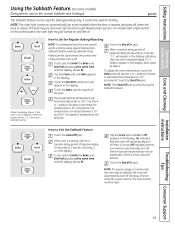
... turn off after 12 hours. See the Oven Light Replacement section. Touch the Bake pad. The preset starting temperature will automatically be reset. Installation Instructions Troubleshooting Tips Consumer Support 19 Tap the Clock pad until On or Off appears in the display. NOTE: If a power outage occurred while ... will be removed. The bulb may be turned on and left on some models) (Designed for use on the Jewish Sabbath and Holidays) ge.com The Sabbath feature can be given. Touch the Start/On pad. No signal will not automatically turn off and stay off . It ...
... turn off after 12 hours. See the Oven Light Replacement section. Touch the Bake pad. The preset starting temperature will automatically be reset. Installation Instructions Troubleshooting Tips Consumer Support 19 Tap the Clock pad until On or Off appears in the display. NOTE: If a power outage occurred while ... will be removed. The bulb may be turned on and left on some models) (Designed for use on the Jewish Sabbath and Holidays) ge.com The Sabbath feature can be given. Touch the Start/On pad. No signal will not automatically turn off and stay off . It ...
Use and Care Manual
Page 20
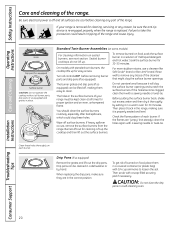
... pattern of the range. If the holes become clogged, clean them in a solution of burned-on sealed burners, see next section. Installation Instructions Troubleshooting Tips Consumer Support 20 Safety Instructions Operating Instructions Care and Cleaning Care and cleaning of each burner. Be sure electrical power is properly seated and level. Standard Twin Burner Assemblies...
... pattern of the range. If the holes become clogged, clean them in a solution of burned-on sealed burners, see next section. Installation Instructions Troubleshooting Tips Consumer Support 20 Safety Instructions Operating Instructions Care and Cleaning Care and cleaning of each burner. Be sure electrical power is properly seated and level. Standard Twin Burner Assemblies...


