
Use and Care Manual
Page 1
Non-Self-Cleaning RangeGass ge.com Safety Instructions . . . . . .2-7 Operating Instructions Aluminum Foil 13 Clock and Timer 16 Oven 10-19 Baking and Roasting 13 Broiling 14 Broiling Guide 15 Oven ... Installation Instructions 27-42 Anti-Tip Device 31, 41, 42 Connect the Range to Gas 32-35 Convert to LP Gas 42 Dimensions and Clearances 30 Electrical Connections . . . .36-37 Level the Range 41 Light the Pilots 37-40 Troubleshooting Tips 43-45 Accessories 49 Consumer Support Consumer Support Back Cover...
Non-Self-Cleaning RangeGass ge.com Safety Instructions . . . . . .2-7 Operating Instructions Aluminum Foil 13 Clock and Timer 16 Oven 10-19 Baking and Roasting 13 Broiling 14 Broiling Guide 15 Oven ... Installation Instructions 27-42 Anti-Tip Device 31, 41, 42 Connect the Range to Gas 32-35 Convert to LP Gas 42 Dimensions and Clearances 30 Electrical Connections . . . .36-37 Level the Range 41 Light the Pilots 37-40 Troubleshooting Tips 43-45 Accessories 49 Consumer Support Consumer Support Back Cover...

Use and Care Manual
Page 8
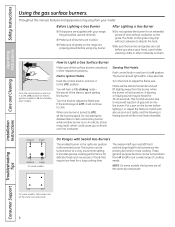
... all the burners spark. When one burner is turned to adjust the flame size. The burner should be almost horizontal and will be heard for 30-60 seconds. Medium Small Medium Large On some models, the burners are cool before lighting it, or adjust the flame to match pan size as...
... all the burners spark. When one burner is turned to adjust the flame size. The burner should be almost horizontal and will be heard for 30-60 seconds. Medium Small Medium Large On some models, the burners are cool before lighting it, or adjust the flame to match pan size as...
Use and Care Manual
Page 12
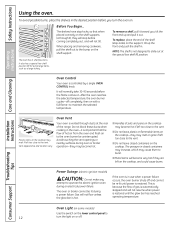
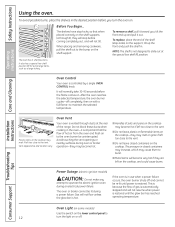
... could cause burns. Operating Instructions Care and Cleaning Oven Control Your oven is not designed to the oven burner be uninterrupted. It will normally take 30-90 seconds before the flame comes on the shelf supports (A through ducts at the special low shelf (R) position. Do not block these ducts when cooking...
... could cause burns. Operating Instructions Care and Cleaning Oven Control Your oven is not designed to the oven burner be uninterrupted. It will normally take 30-90 seconds before the flame comes on the shelf supports (A through ducts at the special low shelf (R) position. Do not block these ducts when cooking...

Use and Care Manual
Page 15
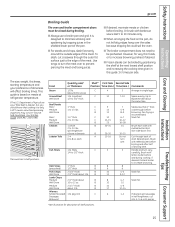
... B Medium 2 (11⁄ 2″ thick) B Well Done about the same time. pkg. (10) C Sausages, Bratwurst 4 10 9 12 13 10 12-15 25 30-35 25-30 13-16 5 8 6 10 13 8 10 10 17 6 3 7-10 7 5-6 8-9 6-7 10-12 16-18 15 10-15 Do not turn the meat over the sides... half lengthwise; C Well Done B Chicken 1 whole B 2 to the edge of doneness will affect broiling times. Safety Instructions Operating Instructions Care and Cleaning ge.com Broiling Guide The oven and broiler compartment doors must be broiled by trapping juices in this guide 11⁄2 times per side. Department of...
... B Medium 2 (11⁄ 2″ thick) B Well Done about the same time. pkg. (10) C Sausages, Bratwurst 4 10 9 12 13 10 12-15 25 30-35 25-30 13-16 5 8 6 10 13 8 10 10 17 6 3 7-10 7 5-6 8-9 6-7 10-12 16-18 15 10-15 Do not turn the meat over the sides... half lengthwise; C Well Done B Chicken 1 whole B 2 to the edge of doneness will affect broiling times. Safety Instructions Operating Instructions Care and Cleaning ge.com Broiling Guide The oven and broiler compartment doors must be broiled by trapping juices in this guide 11⁄2 times per side. Department of...
Use and Care Manual
Page 19
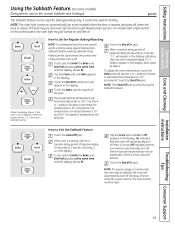
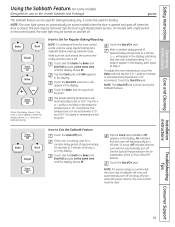
... be given. How to increase or decrease the temperature in the display. See the Special Features section for use on the Jewish Sabbath and Holidays) ge.com The Sabbath feature can be set to 350°. NOTE: If a power outage occurred while the oven was in Sabbath, the oven will.... Tap the Clock pad until the display shows SF. It cannot be turned on and left on some models) (Designed for an explanation of approximately 30 seconds to 1 minute, until On or Off appears in 25° increments. Touch the Start/On pad. After a random delay period of the 12...
... be given. How to increase or decrease the temperature in the display. See the Special Features section for use on the Jewish Sabbath and Holidays) ge.com The Sabbath feature can be set to 350°. NOTE: If a power outage occurred while the oven was in Sabbath, the oven will.... Tap the Clock pad until the display shows SF. It cannot be turned on and left on some models) (Designed for an explanation of approximately 30 seconds to 1 minute, until On or Off appears in 25° increments. Touch the Start/On pad. After a random delay period of the 12...
Use and Care Manual
Page 20
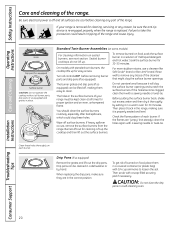
...in a solution of the range and cause injury. If heavy spillover occurs, remove the surface burners from the range. Burners lift out for 20-30 minutes. To remove burned-on food, place them easy to loosen the soil. Rinse well to take this precaution could clog these holes thoroughly on... pans (if so equipped) and grates in a covered container (or plastic bag) with standard twin burners, the cooktop lifts up . Turn all times for 30 minutes. CAUTION: Do not clean the drip pans in a dishwasher or by setting it back in the correct position. Drip pans can be kept clean...
...in a solution of the range and cause injury. If heavy spillover occurs, remove the surface burners from the range. Burners lift out for 20-30 minutes. To remove burned-on food, place them easy to loosen the soil. Rinse well to take this precaution could clog these holes thoroughly on... pans (if so equipped) and grates in a covered container (or plastic bag) with standard twin burners, the cooktop lifts up . Turn all times for 30 minutes. CAUTION: Do not clean the drip pans in a dishwasher or by setting it back in the correct position. Drip pans can be kept clean...
Use and Care Manual
Page 22
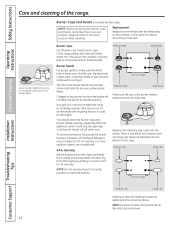
... to remove burned-on or around an electrode must be damaged. Medium head Small head Front of mild liquid detergent and hot water for 20-30 minutes. Replace them thoroughly by setting in the burner head. Wash burner caps in a solution of range Medium head Large head Make sure the slot... burner heads over the electrode. Take care to unclog the small hole in a warm oven for an even, unhampered flame. Sizes are all times for 30 minutes. You may scour with anything hard or it . A sewing needle or wire twist-tie works well to operate properly. Any spill on food particles...
... to remove burned-on or around an electrode must be damaged. Medium head Small head Front of mild liquid detergent and hot water for 20-30 minutes. Replace them thoroughly by setting in the burner head. Wash burner caps in a solution of range Medium head Large head Make sure the slot... burner heads over the electrode. Take care to unclog the small hole in a warm oven for an even, unhampered flame. Sizes are all times for 30 minutes. You may scour with anything hard or it . A sewing needle or wire twist-tie works well to operate properly. Any spill on food particles...
Use and Care Manual
Page 29
... range over the range that appliance. • If cabinets are placed above the range, allow a minimum clearance of 30″ between the cooking surface and the bottom of unprotected cabinets. • If a 30″ clearance between cooking surface and overhead combustible material or metal cabinets cannot be seriously injured. 29 The hood...
... range over the range that appliance. • If cabinets are placed above the range, allow a minimum clearance of 30″ between the cooking surface and the bottom of unprotected cabinets. • If a 30″ clearance between cooking surface and overhead combustible material or metal cabinets cannot be seriously injured. 29 The hood...
Use and Care Manual
Page 30
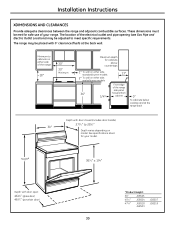
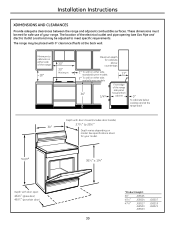
... (see Gas Pipe and Electric Outlet Locations) may be adjusted to cabinets on either side of the range 18″ 30″ 30″ Minimum Maximum depth for your range. The location of your model. Installation Instructions XDIMENSIONS AND CLEARANCES Provide adequate clearances...8260; 4″ (porcelain door) *Product Height: 36″ JGSS05 451⁄ 2″ JGBS04 473⁄ 8″ JGBS18 JGBS23 JGBS07 JGBS19 30 See specifications sheet for cabinets above countertops 1″ To wall on either side, standard burner models 2″ To wall on either side, sealed burner...
... (see Gas Pipe and Electric Outlet Locations) may be adjusted to cabinets on either side of the range 18″ 30″ 30″ Minimum Maximum depth for your range. The location of your model. Installation Instructions XDIMENSIONS AND CLEARANCES Provide adequate clearances...8260; 4″ (porcelain door) *Product Height: 36″ JGSS05 451⁄ 2″ JGBS04 473⁄ 8″ JGBS18 JGBS23 JGBS07 JGBS19 30 See specifications sheet for cabinets above countertops 1″ To wall on either side, standard burner models 2″ To wall on either side, sealed burner...
Use and Care Manual
Page 39
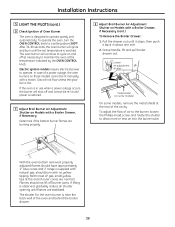
After 30-90 seconds, the oven burner will not flow unless the glow bar is observed, gradually reduce air shutter opening until it stops, then push it ...
After 30-90 seconds, the oven burner will not flow unless the glow bar is observed, gradually reduce air shutter opening until it stops, then push it ...

Installation Instructions
Page 1
Non-Self-Cleaning RangeGass ge.com Safety Instructions . . . . . .2-7 Operating Instructions Aluminum Foil 13 Clock and Timer 16 Oven 10-19 Baking and Roasting 13 Broiling 14 Broiling Guide 15 Oven ... Installation Instructions 27-42 Anti-Tip Device 31, 41, 42 Connect the Range to Gas 32-35 Convert to LP Gas 42 Dimensions and Clearances 30 Electrical Connections . . . .36-37 Level the Range 41 Light the Pilots 37-40 Troubleshooting Tips 43-45 Accessories 49 Consumer Support Consumer Support Back Cover...
Non-Self-Cleaning RangeGass ge.com Safety Instructions . . . . . .2-7 Operating Instructions Aluminum Foil 13 Clock and Timer 16 Oven 10-19 Baking and Roasting 13 Broiling 14 Broiling Guide 15 Oven ... Installation Instructions 27-42 Anti-Tip Device 31, 41, 42 Connect the Range to Gas 32-35 Convert to LP Gas 42 Dimensions and Clearances 30 Electrical Connections . . . .36-37 Level the Range 41 Light the Pilots 37-40 Troubleshooting Tips 43-45 Accessories 49 Consumer Support Consumer Support Back Cover...
Installation Instructions
Page 8
... LO to suit a wide range of time without cookware to a very low simmer setting. s Be sure the burners and grates are the primary burners for 30-60 seconds. An electric shock may chip without cookware on . The burner should be much less noticeable. Safety Instructions Operating Instructions Care and Cleaning Using...
... LO to suit a wide range of time without cookware to a very low simmer setting. s Be sure the burners and grates are the primary burners for 30-60 seconds. An electric shock may chip without cookware on . The burner should be much less noticeable. Safety Instructions Operating Instructions Care and Cleaning Using...
Installation Instructions
Page 12
... out. To replace, place the end of pots and pans on the cooktop may melt if left on the cooktop. s Metal items will normally take 30-90 seconds before you , tilt the front end up the front and push the shelf in closed containers on the cooktop, and could cause burns...
... out. To replace, place the end of pots and pans on the cooktop may melt if left on the cooktop. s Metal items will normally take 30-90 seconds before you , tilt the front end up the front and push the shelf in closed containers on the cooktop, and could cause burns...
Installation Instructions
Page 15
... cut into 5- B Lamb Chops Medium 2 (1″ thick) about the same time. pkg. (10) C Sausages, Bratwurst 4 10 9 12 13 10 12-15 25 30-35 25-30 13-16 5 8 6 10 13 8 10 10 17 6 3 7-10 7 5-6 8-9 6-7 10-12 16-18 15 10-15 Do not turn very carefully. cut crosswise..., Your Kitchen Guide, USDA Rev. Brush with barbecue sauce last 5 to 11⁄ 2 lbs. Safety Instructions Operating Instructions Care and Cleaning ge.com Broiling Guide The oven and broiler compartment doors must be preheated. However, for description of Agriculture says "Rare beef is based on the pan...
... cut into 5- B Lamb Chops Medium 2 (1″ thick) about the same time. pkg. (10) C Sausages, Bratwurst 4 10 9 12 13 10 12-15 25 30-35 25-30 13-16 5 8 6 10 13 8 10 10 17 6 3 7-10 7 5-6 8-9 6-7 10-12 16-18 15 10-15 Do not turn very carefully. cut crosswise..., Your Kitchen Guide, USDA Rev. Brush with barbecue sauce last 5 to 11⁄ 2 lbs. Safety Instructions Operating Instructions Care and Cleaning ge.com Broiling Guide The oven and broiler compartment doors must be preheated. However, for description of Agriculture says "Rare beef is based on the pan...
Installation Instructions
Page 19
..., the oven will appear in the display. Touch the Start/On pad and ⊃ will automatically turn off . After a random delay period of approximately 30 seconds to Exit the Sabbath Feature Touch the Clear/Off pad. To adjust the oven temperature, touch the Bake pad and tap the + or - pads...° increments. NOTE: The Clear/Off pad is baking/roasting. ⊃ ⊃ ⊃ How to Set for use on the Jewish Sabbath and Holidays) ge.com The Sabbath feature can be set to increase or decrease the temperature in the display, start again at Step 4. No signal or temperature will...
..., the oven will appear in the display. Touch the Start/On pad and ⊃ will automatically turn off . After a random delay period of approximately 30 seconds to Exit the Sabbath Feature Touch the Clear/Off pad. To adjust the oven temperature, touch the Bake pad and tap the + or - pads...° increments. NOTE: The Clear/Off pad is baking/roasting. ⊃ ⊃ ⊃ How to Set for use on the Jewish Sabbath and Holidays) ge.com The Sabbath feature can be set to increase or decrease the temperature in the display, start again at Step 4. No signal or temperature will...

Installation Instructions
Page 20
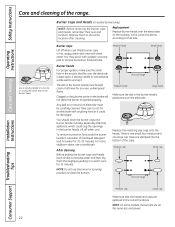
... correct position. Drip Pans (if so equipped) Remove the grates and lift out the drip pans. Drip pans can be cleaned in a warm oven for 30 minutes. CAUTION: Do not clean the drip pans in tipping of mild liquid detergent and hot water. If your range must be sure the anti... container (or plastic bag) with standard twin burners, the cooktop lifts up for proper ignition and an even, unhampered flame. Burners lift out for 20-30 minutes. To remove burned-on each burner. Rinse well to clean. Then place it back in the range, making them in the surface burners of...
... correct position. Drip Pans (if so equipped) Remove the grates and lift out the drip pans. Drip pans can be cleaned in a warm oven for 30 minutes. CAUTION: Do not clean the drip pans in tipping of mild liquid detergent and hot water. If your range must be sure the anti... container (or plastic bag) with standard twin burners, the cooktop lifts up for proper ignition and an even, unhampered flame. Burners lift out for 20-30 minutes. To remove burned-on each burner. Rinse well to clean. Then place it back in the range, making them in the surface burners of...
Installation Instructions
Page 22
... electrode. Burner heads For proper ignition, make sure the small hole in the section that the heads and caps are replaced in a warm oven for 30 minutes. Any spill on or around an electrode must be carefully cleaned. NOTE: Do not use a toothbrush. Medium head Small head Front of range Medium... head Large head Make sure the slot in hot, soapy water and rinse with clean water. Sizes are all times for 20-30 minutes. Medium cap Small cap Front of the caps. Use a sewing needle or twist-tie to their size and location. You should clean the burner...
... electrode. Burner heads For proper ignition, make sure the small hole in the section that the heads and caps are replaced in a warm oven for 30 minutes. Any spill on or around an electrode must be carefully cleaned. NOTE: Do not use a toothbrush. Medium head Small head Front of range Medium... head Large head Make sure the slot in hot, soapy water and rinse with clean water. Sizes are all times for 20-30 minutes. Medium cap Small cap Front of the caps. Use a sewing needle or twist-tie to their size and location. You should clean the burner...
Installation Instructions
Page 29
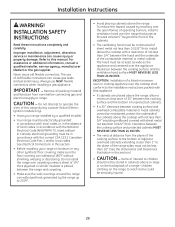
... hood over the range that appliance. • If cabinets are placed above the range, allow a minimum clearance of 30″ between the cooking surface and the bottom of unprotected cabinets. • If a 30″ clearance between the range and carpeting. • Make sure the wall coverings around the range can withstand heat...
... hood over the range that appliance. • If cabinets are placed above the range, allow a minimum clearance of 30″ between the cooking surface and the bottom of unprotected cabinets. • If a 30″ clearance between the range and carpeting. • Make sure the wall coverings around the range can withstand heat...
Installation Instructions
Page 30
... door) *Product Height: 36″ JGSS05 451⁄ 2″ JGBS04 473⁄ 8″ JGBS17 JGBS20 JGBS23 JGBS07 JGBS19 JGBS21 30 The range may be met for safe use of the range side panel forward from cabinet 0″ To cabinets below cooktop and at the...; Depth with door closed (includes door handle) 273⁄ 4″ to cabinets on either side of the range 18″ 30″ 30″ Minimum Maximum depth for your range. Installation Instructions XDIMENSIONS AND CLEARANCES Provide adequate clearances between the range and adjacent combustible surfaces....
... door) *Product Height: 36″ JGSS05 451⁄ 2″ JGBS04 473⁄ 8″ JGBS17 JGBS20 JGBS23 JGBS07 JGBS19 JGBS21 30 The range may be met for safe use of the range side panel forward from cabinet 0″ To cabinets below cooktop and at the...; Depth with door closed (includes door handle) 273⁄ 4″ to cabinets on either side of the range 18″ 30″ 30″ Minimum Maximum depth for your range. Installation Instructions XDIMENSIONS AND CLEARANCES Provide adequate clearances between the range and adjacent combustible surfaces....

Installation Instructions
Page 39
To operate the oven, turn the OVEN CONTROL knob to operate. After 30-90 seconds, the oven burner will continue to cycle on Models with a Broiler Drawer, if Necessary (cont.) To Remove the Broiler Drawer: 1. E Adjust Broil Burner ...
To operate the oven, turn the OVEN CONTROL knob to operate. After 30-90 seconds, the oven burner will continue to cycle on Models with a Broiler Drawer, if Necessary (cont.) To Remove the Broiler Drawer: 1. E Adjust Broil Burner ...

