
Use and Care Manual
Page 1
Non-Self-Cleaning RangeGass ge.com Safety Instructions . . . . . .2-7 Operating Instructions Aluminum Foil 13 Clock and Timer 16 Oven 10-19 Baking and Roasting 13 Broiling 14 Broiling Guide 15 Oven ... Steel Surfaces 23 Installation Instructions 27-42 Anti-Tip Device 31, 41, 42 Connect the Range to Gas 32-35 Convert to LP Gas 42 Dimensions and Clearances 30 Electrical Connections . . . .36-37 Level the Range 41 Light the Pilots 37-40 Troubleshooting Tips 43-45 Accessories 49 Consumer Support Consumer...
Non-Self-Cleaning RangeGass ge.com Safety Instructions . . . . . .2-7 Operating Instructions Aluminum Foil 13 Clock and Timer 16 Oven 10-19 Baking and Roasting 13 Broiling 14 Broiling Guide 15 Oven ... Steel Surfaces 23 Installation Instructions 27-42 Anti-Tip Device 31, 41, 42 Connect the Range to Gas 32-35 Convert to LP Gas 42 Dimensions and Clearances 30 Electrical Connections . . . .36-37 Level the Range 41 Light the Pilots 37-40 Troubleshooting Tips 43-45 Accessories 49 Consumer Support Consumer...
Use and Care Manual
Page 29
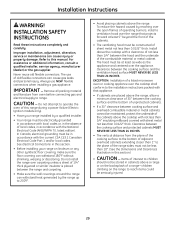
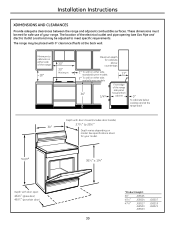
... the bottom of the cooking surface to this section.) • CAUTION - EXCEPTION: Installation of the range sides must be less than 18″. (See the Dimensions and Clearances illustration in accordance with the National Electrical Code (ANSI/NFPA 70, latest edition). Items of interest to the plane of a listed microwave oven...
... the bottom of the cooking surface to this section.) • CAUTION - EXCEPTION: Installation of the range sides must be less than 18″. (See the Dimensions and Clearances illustration in accordance with the National Electrical Code (ANSI/NFPA 70, latest edition). Items of interest to the plane of a listed microwave oven...
Use and Care Manual
Page 30
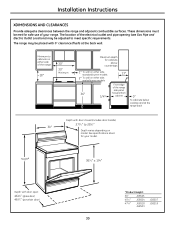
...; ± 1/4″ Depth with door closed (includes door handle) 273⁄ 4″ to meet specific requirements. The range may be met for your range. These dimensions must be adjusted to 281⁄ 2″ 30″ Depth varies depending on either side, sealed burner models 36″ 1/4″ 13″ Front edge...
...; ± 1/4″ Depth with door closed (includes door handle) 273⁄ 4″ to meet specific requirements. The range may be met for your range. These dimensions must be adjusted to 281⁄ 2″ 30″ Depth varies depending on either side, sealed burner models 36″ 1/4″ 13″ Front edge...

Installation Instructions
Page 1
Non-Self-Cleaning RangeGass ge.com Safety Instructions . . . . . .2-7 Operating Instructions Aluminum Foil 13 Clock and Timer 16 Oven 10-19 Baking and Roasting 13 Broiling 14 Broiling Guide 15 Oven ... Steel Surfaces 23 Installation Instructions 27-42 Anti-Tip Device 31, 41, 42 Connect the Range to Gas 32-35 Convert to LP Gas 42 Dimensions and Clearances 30 Electrical Connections . . . .36-37 Level the Range 41 Light the Pilots 37-40 Troubleshooting Tips 43-45 Accessories 49 Consumer Support Consumer...
Non-Self-Cleaning RangeGass ge.com Safety Instructions . . . . . .2-7 Operating Instructions Aluminum Foil 13 Clock and Timer 16 Oven 10-19 Baking and Roasting 13 Broiling 14 Broiling Guide 15 Oven ... Steel Surfaces 23 Installation Instructions 27-42 Anti-Tip Device 31, 41, 42 Connect the Range to Gas 32-35 Convert to LP Gas 42 Dimensions and Clearances 30 Electrical Connections . . . .36-37 Level the Range 41 Light the Pilots 37-40 Troubleshooting Tips 43-45 Accessories 49 Consumer Support Consumer...
Installation Instructions
Page 29
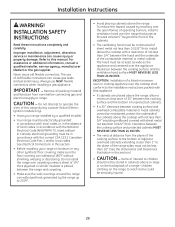
... sheet metal not less than 0.0122″ thick. CAUTION - See Electrical Connections in cabinets above the cooktop with not less than 18″. (See the Dimensions and Clearances illustration in this section. • Before installing your range installed by a qualified installer. • Your range must be in accordance with a clearance of...
... sheet metal not less than 0.0122″ thick. CAUTION - See Electrical Connections in cabinets above the cooktop with not less than 18″. (See the Dimensions and Clearances illustration in this section. • Before installing your range installed by a qualified installer. • Your range must be in accordance with a clearance of...
Installation Instructions
Page 30
These dimensions must be placed with 0″ clearance (flush) at the range back Depth with door open: 463⁄ 8″ (glass door) 461⁄ 4″ (porcelain door) *...
These dimensions must be placed with 0″ clearance (flush) at the range back Depth with door open: 463⁄ 8″ (glass door) 461⁄ 4″ (porcelain door) *...
Quick Specs
Page 1
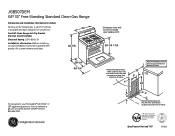
...-Clean Range Anti-Tip Bracket (Part No. 205C1714P001) 46-1/4 30 *Dimension from wall to your Monogram,® GE Profile™ or GE® appliance questions, visit our website at ge.com or call GE Answer Center® service, 800.626.2000. 2 9 2 9RtohferpucioptChmeLemsftleuonbodraecndodnasnrheeuacRthtt-... with an Anti-Tip device. A set for LP conversion. 46-7/8 36-1/4 ±1/4 JGBS07DEM GE® 30" Free-Standing Standard Clean Gas Range 26-1/4* Dimensions and Installation Information (in the installation of the range.
...-Clean Range Anti-Tip Bracket (Part No. 205C1714P001) 46-1/4 30 *Dimension from wall to your Monogram,® GE Profile™ or GE® appliance questions, visit our website at ge.com or call GE Answer Center® service, 800.626.2000. 2 9 2 9RtohferpucioptChmeLemsftleuonbodraecndodnasnrheeuacRthtt-... with an Anti-Tip device. A set for LP conversion. 46-7/8 36-1/4 ±1/4 JGBS07DEM GE® 30" Free-Standing Standard Clean Gas Range 26-1/4* Dimensions and Installation Information (in the installation of the range.

