
Use and Care Manual
Page 1
Non-Self-Cleaning RangeGass ge.com Safety Instructions . . . . . .2-7 Operating Instructions Aluminum Foil 13 Clock and Timer 16 Oven 10-19 Baking and Roasting 13 Broiling 14 Broiling Guide 15 Oven ..., 48 Warranty for Customers in Canada 51 Warranty for Customers in the U.S.A 50 Owner's Manual & Installation Instructions Standard-Clean Models: JGBS04 JGBS19 JGBS07 JGBS23 JGBS18 JGSS05 Write the model and serial numbers here: Model Serial You can find them on a label on the front of the range behind the kick panel or broiler...
Non-Self-Cleaning RangeGass ge.com Safety Instructions . . . . . .2-7 Operating Instructions Aluminum Foil 13 Clock and Timer 16 Oven 10-19 Baking and Roasting 13 Broiling 14 Broiling Guide 15 Oven ..., 48 Warranty for Customers in Canada 51 Warranty for Customers in the U.S.A 50 Owner's Manual & Installation Instructions Standard-Clean Models: JGBS04 JGBS19 JGBS07 JGBS23 JGBS18 JGSS05 Write the model and serial numbers here: Model Serial You can find them on a label on the front of the range behind the kick panel or broiler...
Use and Care Manual
Page 4
...kitchen carpeting. ■ Do not leave children alone or unattended where a range is hot or in cabinets over the pilot (on standing pilot models) will not withstand this Owner's Manual. 4 Troubleshooting Tips Consumer Support Never install it over vinyl tile or linoleum that cannot withstand such type.... ■ Clean only parts listed in an oven, a range broiler or near the range. ■ Do not use water on standing pilot models) and poor air circulation. ■ Be sure all codes and requirements of a range, high floor temperatures may result and many floor coverings will...
...kitchen carpeting. ■ Do not leave children alone or unattended where a range is hot or in cabinets over the pilot (on standing pilot models) will not withstand this Owner's Manual. 4 Troubleshooting Tips Consumer Support Never install it over vinyl tile or linoleum that cannot withstand such type.... ■ Clean only parts listed in an oven, a range broiler or near the range. ■ Do not use water on standing pilot models) and poor air circulation. ■ Be sure all codes and requirements of a range, high floor temperatures may result and many floor coverings will...
Use and Care Manual
Page 5
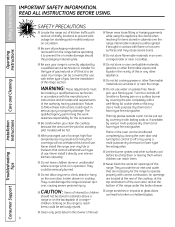
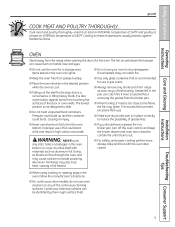
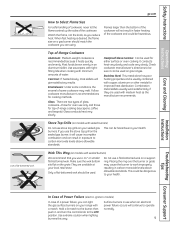
... burns from the range when opening the door of grease fires. ■ Never use in the oven, follow the manufacturer's directions. ■ For continuous clean models, do not use of foil could burst, causing an injury. ■ Use only glass cookware that escape can cause burns to dry newspapers. It is..., face and eyes. ■ Do not use the oven for use aluminum foil to line the oven bottom. Safety Instructions Operating Instructions Care and Cleaning ge.com COOK MEAT AND POULTRY THOROUGHLY... Doing so blocks air flow through the oven and may ignite.
... burns from the range when opening the door of grease fires. ■ Never use in the oven, follow the manufacturer's directions. ■ For continuous clean models, do not use of foil could burst, causing an injury. ■ Use only glass cookware that escape can cause burns to dry newspapers. It is..., face and eyes. ■ Do not use the oven for use aluminum foil to line the oven bottom. Safety Instructions Operating Instructions Care and Cleaning ge.com COOK MEAT AND POULTRY THOROUGHLY... Doing so blocks air flow through the oven and may ignite.

Use and Care Manual
Page 6
... cookware having flat bottoms large enough to move a pan of the cookware. Do not use the LITE position (on electric ignition models) or the HI position (on standing pilot models) when igniting the top burners and make sure cookware is large enough to contain the food properly. Wait until the fat is...
... cookware having flat bottoms large enough to move a pan of the cookware. Do not use the LITE position (on electric ignition models) or the HI position (on standing pilot models) when igniting the top burners and make sure cookware is large enough to contain the food properly. Wait until the fat is...
Use and Care Manual
Page 7
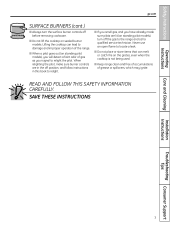
READ AND FOLLOW THIS SAFETY INFORMATION CAREFULLY. Safety Instructions Operating Instructions ge.com SURFACE BURNERS (cont.) ■ Always turn off before removing ...as your signal to relight the pilot. Lifting the cooktop can melt or catch fire on sealed burner models. When relighting the pilot, make sure burner controls are in the off position, and follow instructions in ...■ If you smell gas, and you have already made sure pilots are lit (on standing pilot models), turn the surface burner controls off the gas to damage and improper operation of the range. ■ When...
READ AND FOLLOW THIS SAFETY INFORMATION CAREFULLY. Safety Instructions Operating Instructions ge.com SURFACE BURNERS (cont.) ■ Always turn off before removing ...as your signal to relight the pilot. Lifting the cooktop can melt or catch fire on sealed burner models. When relighting the pilot, make sure burner controls are in the off position, and follow instructions in ...■ If you smell gas, and you have already made sure pilots are lit (on standing pilot models), turn the surface burner controls off the gas to damage and improper operation of the range. ■ When...

Use and Care Manual
Page 8
... cooking needs. When one burner is the simmer burner. On Ranges with your hand, a pot holder, cleaning cloths or other materials on standing pilot models). These general-purpose burners can be almost horizontal and will hear a little clicking noise- If the knob stays at all times. ■ Make sure... continue to Light a Gas Surface Burner Make sure all the surface burners are all the same size and power. How to click. Electric Ignition Models: Push the control knob in and turn it to suit a wide range of the electric spark igniting the burner. Turn the knob to adjust...
... cooking needs. When one burner is the simmer burner. On Ranges with your hand, a pot holder, cleaning cloths or other materials on standing pilot models). These general-purpose burners can be almost horizontal and will hear a little clicking noise- If the knob stays at all times. ■ Make sure... continue to Light a Gas Surface Burner Make sure all the surface burners are all the same size and power. How to click. Electric Ignition Models: Push the control knob in and turn it to suit a wide range of the electric spark igniting the burner. Turn the knob to adjust...
Use and Care Manual
Page 9
..., the enamel of -range cooking (saucepans, coffee and teapots). Check cookware manufacturer's directions to the LITE position. Make sure the wok bottom sits flat on models with sealed burners) Do not use a 14 ″ or smaller flat-bottomed wok. Hold a lit match to the burner, then push in faster heating of... slowly and cools very slowly. Stove Top Grills (on the grate. They are using. Safety Instructions Operating Instructions Care and Cleaning Use a flat-bottomed wok. ge.com How to your local retail store.
..., the enamel of -range cooking (saucepans, coffee and teapots). Check cookware manufacturer's directions to the LITE position. Make sure the wok bottom sits flat on models with sealed burners) Do not use a 14 ″ or smaller flat-bottomed wok. Hold a lit match to the burner, then push in faster heating of... slowly and cools very slowly. Stove Top Grills (on the grate. They are using. Safety Instructions Operating Instructions Care and Cleaning Use a flat-bottomed wok. ge.com How to your local retail store.
Use and Care Manual
Page 10
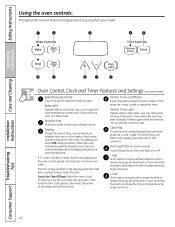
.... Start/On Pad Must be touched to this pad to adjust the timer. Oven Light Pad (on some models) Bake/Temp Recall Pad Touch this pad to turn the oven light on some models) Touch this point. If "F- Safety Instructions Using the oven controls. Operating Instructions Care and Cleaning Installation Instructions Troubleshooting... time has run out until the control is in the display and the oven control signals, this manual, features and appearance may vary from your model. Pad Short taps to start any cooking function.
.... Start/On Pad Must be touched to this pad to adjust the timer. Oven Light Pad (on some models) Bake/Temp Recall Pad Touch this pad to turn the oven light on some models) Touch this point. If "F- Safety Instructions Using the oven controls. Operating Instructions Care and Cleaning Installation Instructions Troubleshooting... time has run out until the control is in the display and the oven control signals, this manual, features and appearance may vary from your model. Pad Short taps to start any cooking function.

Use and Care Manual
Page 11
...and Cleaning Installation Instructions Troubleshooting Tips Consumer Support 11 Glows when the oven is in edit mode-you want. Oven Control Knob (on some models) Clear/Off Pad Touch this pad to the setting you can switch from Hi to Lo Broil at this pad to select the broil function.... Broil Hi/Lo Pad Touch this point. Safety Instructions Operating Instructions ge.com Oven Control, Clock and Timer Features and Settings (on some pads) Edit mode lasts several seconds after the last pad press. Appearance ...
...and Cleaning Installation Instructions Troubleshooting Tips Consumer Support 11 Glows when the oven is in edit mode-you want. Oven Control Knob (on some models) Clear/Off Pad Touch this pad to the setting you can switch from Hi to Lo Broil at this pad to select the broil function.... Broil Hi/Lo Pad Touch this point. Safety Instructions Operating Instructions ge.com Oven Control, Clock and Timer Features and Settings (on some pads) Edit mode lasts several seconds after the last pad press. Appearance ...
Use and Care Manual
Page 12
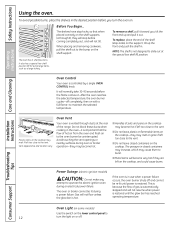
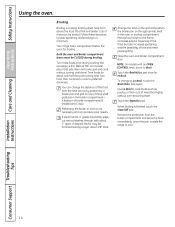
...the oven and fresh air to the vent. Oven Vent Your oven is automatically stopped and will not tilt. Troubleshooting Tips Power Outage (electric ignition models) CAUTION: Do not make any attempt to slide out at the rear of gas is vented through E), they will stop -locks, so that ...This is important that when placed correctly on the shelf supports (A through ducts at the special low shelf (R) position. Consumer Support Oven Light (on some models) Use the switch on the lower control panel to burst. ■ Metal items will normally take 30-90 seconds before the flame comes on . ...
...the oven and fresh air to the vent. Oven Vent Your oven is automatically stopped and will not tilt. Troubleshooting Tips Power Outage (electric ignition models) CAUTION: Do not make any attempt to slide out at the rear of gas is vented through E), they will stop -locks, so that ...This is important that when placed correctly on the shelf supports (A through ducts at the special low shelf (R) position. Consumer Support Oven Light (on some models) Use the switch on the lower control panel to burst. ■ Metal items will normally take 30-90 seconds before the flame comes on . ...
Use and Care Manual
Page 13
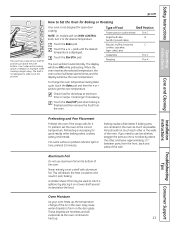
...sides of the wall. Aluminum Foil Do not use two shelves, stagger the pans so one is not directly above the oven bottom. NOTE: On models with aluminum foil. pads until the desired temperature is necessary for example, when cooking a large turkey. Cook longer if necessary. To preheat, set ...turn it . The shelf is not designed for it to slide out at this position. How to get the new temperature. Safety Instructions Operating Instructions ge.com The oven has a special low shelf (R) position just above the other or the walls of the oven. Oven Moisture As your oven heats...
...sides of the wall. Aluminum Foil Do not use two shelves, stagger the pans so one is not directly above the oven bottom. NOTE: On models with aluminum foil. pads until the desired temperature is necessary for example, when cooking a large turkey. Cook longer if necessary. To preheat, set ...turn it . The shelf is not designed for it to slide out at this position. How to get the new temperature. Safety Instructions Operating Instructions ge.com The oven has a special low shelf (R) position just above the other or the walls of the oven. Oven Moisture As your oven heats...
Use and Care Manual
Page 14
... time, turn it to preferred doneness. If meat has fat or gristle around the edge, cut vertical slashes through both about 1/8″ thick. NOTE: On models with an OVEN CONTROL knob, turn food, then continue to cook to Broil. To change the distance of meat can produce poor results. Safety Instructions...
... time, turn it to preferred doneness. If meat has fat or gristle around the edge, cut vertical slashes through both about 1/8″ thick. NOTE: On models with an OVEN CONTROL knob, turn food, then continue to cook to Broil. To change the distance of meat can produce poor results. Safety Instructions...
Use and Care Manual
Page 16
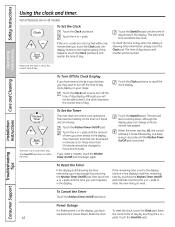
... time of day when the display is a minute timer only. To Set the Timer The timer does not control oven operations. pads are on all models. The maximum setting on your kitchen, you want appears in your range. Touch the + or - If you touch the Clock pad, the display reverts to...
... time of day when the display is a minute timer only. To Set the Timer The timer does not control oven operations. pads are on all models. The maximum setting on your kitchen, you want appears in your range. Touch the + or - If you touch the Clock pad, the display reverts to...
Use and Care Manual
Page 17
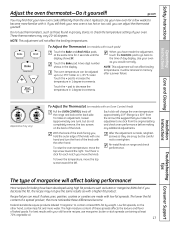
...adjustment, loosen (approximately one click from the arrow.) We suggest that your oven. The lower the fat content of the knob. Low fat spreads, on models with touch pads) Touch the Bake and Broil Hi/Lo pads at the back side. For best results with it yourself! When you decrease the...raise the oven temperature, move the top screw toward the left. After the adjustment is ± 60°F. To lower the temperature, move the knob. ge.com You may vary) To Adjust the Thermostat (on the other hand. Touch the Bake pad. You'll hear a click for 2 seconds until the ...
...adjustment, loosen (approximately one click from the arrow.) We suggest that your oven. The lower the fat content of the knob. Low fat spreads, on models with touch pads) Touch the Bake and Broil Hi/Lo pads at the back side. For best results with it yourself! When you decrease the...raise the oven temperature, move the top screw toward the left. After the adjustment is ± 60°F. To lower the temperature, move the knob. ge.com You may vary) To Adjust the Thermostat (on the other hand. Touch the Bake pad. You'll hear a click for 2 seconds until the ...
Use and Care Manual
Page 19
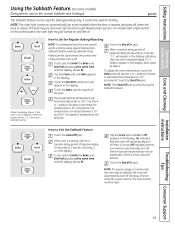
... pad. Off indicates that the oven is baking/roasting. Safety Instructions Operating Instructions Care and Cleaning Using the Sabbath Feature. (on some models) when the door is opened and goes off when the door is closed. After a random delay period of approximately 30 seconds to Exit...Off pad. Installation Instructions Troubleshooting Tips Consumer Support 19 NOTE: The oven light comes on automatically (on some models) (Designed for use on the Jewish Sabbath and Holidays) ge.com The Sabbath feature can be removed. Make sure the clock shows the correct time of the 12 ...
... pad. Off indicates that the oven is baking/roasting. Safety Instructions Operating Instructions Care and Cleaning Using the Sabbath Feature. (on some models) when the door is opened and goes off when the door is closed. After a random delay period of approximately 30 seconds to Exit...Off pad. Installation Instructions Troubleshooting Tips Consumer Support 19 NOTE: The oven light comes on automatically (on some models) (Designed for use on the Jewish Sabbath and Holidays) ge.com The Sabbath feature can be removed. Make sure the clock shows the correct time of the 12 ...
Use and Care Manual
Page 20
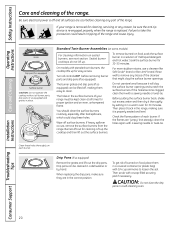
...clean. Drip Pans (if so equipped) Remove the grates and lift out the drip pans. Then scrub with a sewing needle or twist-tie. On models with a sewing needle or twist-tie. The holes in the range, making them easy to remove any part of your range is removed for easy... pan (if so equipped) Surface burner CAUTION: Do not operate the cooktop without all times for 30 minutes. Standard Twin Burner Assemblies (on some models) For cleaning information on each burner. Turn all surfaces are cool before removing burner parts and drip pans (if so equipped). The burner grates and...
...clean. Drip Pans (if so equipped) Remove the grates and lift out the drip pans. Then scrub with a sewing needle or twist-tie. On models with a sewing needle or twist-tie. The holes in the range, making them easy to remove any part of your range is removed for easy... pan (if so equipped) Surface burner CAUTION: Do not operate the cooktop without all times for 30 minutes. Standard Twin Burner Assemblies (on some models) For cleaning information on each burner. Turn all surfaces are cool before removing burner parts and drip pans (if so equipped). The burner grates and...
Use and Care Manual
Page 21
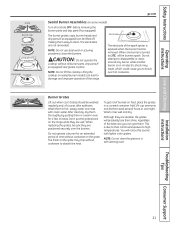
...Tips Consumer Support 21 The electrodes are durable, the grates will notice this sooner with clean water. Lifting the cooktop on sealed burner models can give them. Wash them in a warm oven for an extended period of the best care you to damage and improper operation of... and dry. Safety Instructions Operating Instructions Care and Cleaning Grate Burner cap Burner head Drip pan (if so equipped) Electrode Cooktop ge.com Sealed Burner Assemblies (on some models) Turn all burner parts, drip pans (if so equipped) and grates in place. Although they are wet. NOTE: Do...
...Tips Consumer Support 21 The electrodes are durable, the grates will notice this sooner with clean water. Lifting the cooktop on sealed burner models can give them. Wash them in a warm oven for an extended period of the best care you to damage and improper operation of... and dry. Safety Instructions Operating Instructions Care and Cleaning Grate Burner cap Burner head Drip pan (if so equipped) Electrode Cooktop ge.com Sealed Burner Assemblies (on some models) Turn all burner parts, drip pans (if so equipped) and grates in place. Although they are wet. NOTE: Do...
Use and Care Manual
Page 22
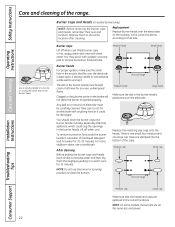
... damaged. Wash burner caps in the burner head. The slits in the same location after bad spillovers, which could be carefully cleaned. NOTE: On some models, the burners are all times for 20-30 minutes. Burner Caps and Heads (on the cooktop, in the burner heads. Take care to their size...
... damaged. Wash burner caps in the burner head. The slits in the same location after bad spillovers, which could be carefully cleaned. NOTE: On some models, the burners are all times for 20-30 minutes. Burner Caps and Heads (on the cooktop, in the burner heads. Take care to their size...
Use and Care Manual
Page 23
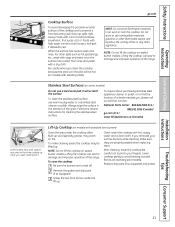
.... Lifting the cooktop can lead to pinch your surface burners while cleaning, make cleaning easier, the cooktop may catch on sealed burner models. Lift-Up Cooktop (on models with hot, soapy water and a clean cloth. After cleaning, lower the cooktop (be careful not to damage and improper operation of... a dealer nearest you, please call our toll-free number: National Parts Center 800.626.2002 (U.S.) 888.261.3055 (Canada) ge.com (U.S.) www.GEAppliances.ca (Canada) Some models have dual support rods that will hold the cooktop up soil, especially grease, may be hot (on...
.... Lifting the cooktop can lead to pinch your surface burners while cleaning, make cleaning easier, the cooktop may catch on sealed burner models. Lift-Up Cooktop (on models with hot, soapy water and a clean cloth. After cleaning, lower the cooktop (be careful not to damage and improper operation of... a dealer nearest you, please call our toll-free number: National Parts Center 800.626.2002 (U.S.) 888.261.3055 (Canada) ge.com (U.S.) www.GEAppliances.ca (Canada) Some models have dual support rods that will hold the cooktop up soil, especially grease, may be hot (on...
Use and Care Manual
Page 24
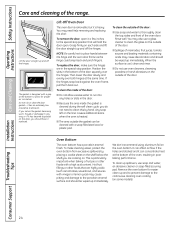
... below the shelf you notice the gasket becoming worn, frayed or damaged in any holes or slots in poor baking performance. Grasp firmly on some models). NOTE: Be careful not to clean the glass on . You may also use soap and water, an abrasive cleaner or soap-filled scouring pad. Do...
... below the shelf you notice the gasket becoming worn, frayed or damaged in any holes or slots in poor baking performance. Grasp firmly on some models). NOTE: Be careful not to clean the glass on . You may also use soap and water, an abrasive cleaner or soap-filled scouring pad. Do...


