
Owners Manual
Page 1
Non-Self-Cleaning RangeGass ge.com Safety Instructions . . . . . .2-7 Operating Instructions Aluminum Foil 15 Burners 8, 9 Clock 19 Griddle 10, 11 Oven 12-17 Baking and Roasting 15 Broiling 16, 17 Broiling ... Ignition . . . . . .39 Connecting the Range to Gas 34-36 Dimensions and Clearances 32 Electrical Connections . . . . .37, 38 Leveling the Range 40 Location 33 LP 41 Model and Serial Number Location 33 Owner's Manual & Installation Instructions JGBS80 Troubleshooting Tips . .42, 43 Accessories 44 Consumer Support Consumer Support Back Cover Product Registration 45...
Non-Self-Cleaning RangeGass ge.com Safety Instructions . . . . . .2-7 Operating Instructions Aluminum Foil 15 Burners 8, 9 Clock 19 Griddle 10, 11 Oven 12-17 Baking and Roasting 15 Broiling 16, 17 Broiling ... Ignition . . . . . .39 Connecting the Range to Gas 34-36 Dimensions and Clearances 32 Electrical Connections . . . . .37, 38 Leveling the Range 40 Location 33 LP 41 Model and Serial Number Location 33 Owner's Manual & Installation Instructions JGBS80 Troubleshooting Tips . .42, 43 Accessories 44 Consumer Support Consumer Support Back Cover Product Registration 45...
Owners Manual
Page 8
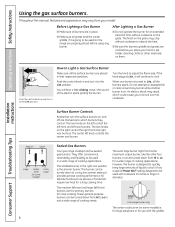
... your hand, a pot holder, cleaning cloths or other four burners, it can be used with the griddle. Throughout this burner is on some models) is the maximum output burner. s Make sure all the surface burners are in and turn it is going to which could cause you place ... in and turn the surface burners on the grate may result, which burners they control. These general-purpose burners can be used ) on some models) Extra Large 8 Surface Burner Controls Knobs that require low heat for most cooking. however, this manual, features and appearance may vary from Hi ...
... your hand, a pot holder, cleaning cloths or other four burners, it can be used with the griddle. Throughout this burner is on some models) is the maximum output burner. s Make sure all the surface burners are in and turn it is going to which could cause you place ... in and turn the surface burners on the grate may result, which burners they control. These general-purpose burners can be used ) on some models) Extra Large 8 Surface Burner Controls Knobs that require low heat for most cooking. however, this manual, features and appearance may vary from Hi ...
Owners Manual
Page 12
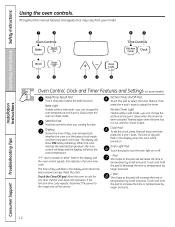
... service. Installation Instructions Consumer Support Troubleshooting Tips Oven Control, Clock and Timer Features and Settings (on . Glows when the oven is first turned on some models) Bake/Temp Recall Pad Touch this pad to this point. The display will decrease the time or temperature by larger amounts. 12 Kitchen Timer Light...
... service. Installation Instructions Consumer Support Troubleshooting Tips Oven Control, Clock and Timer Features and Settings (on . Glows when the oven is first turned on some models) Bake/Temp Recall Pad Touch this pad to this point. The display will decrease the time or temperature by larger amounts. 12 Kitchen Timer Light...
Owners Manual
Page 13
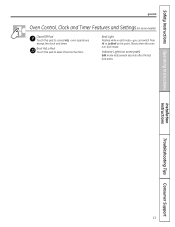
Broil Light Flashes while in broil mode. Glows when the oven is in edit mode-you can switch from Hi to Lo Broil at this point. Broil Hi/Lo Pad Touch this pad to select the broil function. Installation Instructions Troubleshooting Tips Consumer Support 13 Safety Instructions Operating Instructions ge.com Oven Control, Clock and Timer Features and Settings (on some models) Clear/Off Pad Touch this pad to cancel ALL oven operations except the clock and timer. Indicator Lights (on some pads) Edit mode lasts several seconds after the last pad press.
Broil Light Flashes while in broil mode. Glows when the oven is in edit mode-you can switch from Hi to Lo Broil at this point. Broil Hi/Lo Pad Touch this pad to select the broil function. Installation Instructions Troubleshooting Tips Consumer Support 13 Safety Instructions Operating Instructions ge.com Oven Control, Clock and Timer Features and Settings (on some models) Clear/Off Pad Touch this pad to cancel ALL oven operations except the clock and timer. Indicator Lights (on some pads) Edit mode lasts several seconds after the last pad press.
Owners Manual
Page 19
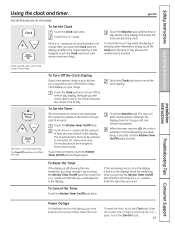
ge.com Not all models. The time of day by one beep every 6 seconds until the amount of day shows in the display, you want shows in minutes is touched. ...
ge.com Not all models. The time of day by one beep every 6 seconds until the amount of day shows in the display, you want shows in minutes is touched. ...
Owners Manual
Page 21
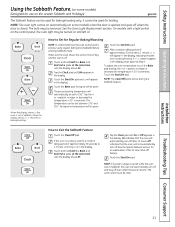
... off. The bulb may be removed. Touch the Start/On pad. See the Special Features section for use on the Jewish Sabbath and Holidays) ge.com The Sabbath feature can be given. Touch and hold both the Bake and Broil Hi/Lo pads, at Step 4. How to 350°.... returns. See the Oven Light Replacement section. If ⊃ doesn't appear in Sabbath. Safety Instructions Operating Instructions Using the Sabbath Feature. (on some models) when the door is opened and goes off when the door is active during the Sabbath feature. On indicates that the oven will automatically turn...
... off. The bulb may be removed. Touch the Start/On pad. See the Special Features section for use on the Jewish Sabbath and Holidays) ge.com The Sabbath feature can be given. Touch and hold both the Bake and Broil Hi/Lo pads, at Step 4. How to 350°.... returns. See the Oven Light Replacement section. If ⊃ doesn't appear in Sabbath. Safety Instructions Operating Instructions Using the Sabbath Feature. (on some models) when the door is opened and goes off when the door is active during the Sabbath feature. On indicates that the oven will automatically turn...
Owners Manual
Page 25
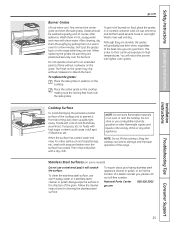
...is due to their shine, regardless of the best care you , please call our toll-free number: National Parts Center 800.626.2002 ge.com Troubleshooting Tips Consumer Support 25 To clean the stainless steel surface, use a steel wool pad; Follow the cleaner instructions for an extended ...For other flammable vapors and liquids in a covered container. Don't put the grates back on the grate may chip without cookware on some models) Do not use warm sudsy water or a stainless steel cleaner or polish. Foods with a lot of the grain. Safety Instructions Operating Instructions ...
...is due to their shine, regardless of the best care you , please call our toll-free number: National Parts Center 800.626.2002 ge.com Troubleshooting Tips Consumer Support 25 To clean the stainless steel surface, use a steel wool pad; Follow the cleaner instructions for an extended ...For other flammable vapors and liquids in a covered container. Don't put the grates back on the grate may chip without cookware on some models) Do not use warm sudsy water or a stainless steel cleaner or polish. Foods with a lot of the grain. Safety Instructions Operating Instructions ...
Owners Manual
Page 28
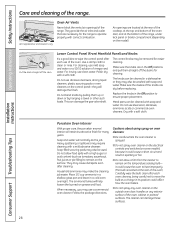
..., at the top and bottom of the oven door, and at the rear of the range, under kick panel or broiler compartment (depending on some models) because it could cause a short circuit and result in a dishwasher or they will help loosen the burned-on oven cleaners: s Be careful where the...normally do the job. Cautions about using spray-on grease and food. s Do not spray oven cleaner on the electrical controls and switches (on the model). Household ammonia may be used. The control knobs may make the cleaning job easier. The knobs can be washed with a soft cloth. Replace the ...
..., at the top and bottom of the oven door, and at the rear of the range, under kick panel or broiler compartment (depending on some models) because it could cause a short circuit and result in a dishwasher or they will help loosen the burned-on oven cleaners: s Be careful where the...normally do the job. Cautions about using spray-on grease and food. s Do not spray oven cleaner on the electrical controls and switches (on the model). Household ammonia may be used. The control knobs may make the cleaning job easier. The knobs can be washed with a soft cloth. Replace the ...
Owners Manual
Page 31
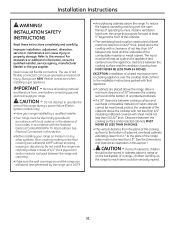
... sure the wall coverings around the range can cause injury or property damage. Installation Instructions WARNING! Refer to this range during a power failure (Electric Ignition models only). • Have your range on the range to operate the oven of the combustible material or metal cabinet. To reduce the hazard caused by...
... sure the wall coverings around the range can cause injury or property damage. Installation Instructions WARNING! Refer to this range during a power failure (Electric Ignition models only). • Have your range on the range to operate the oven of the combustible material or metal cabinet. To reduce the hazard caused by...
Owners Manual
Page 32
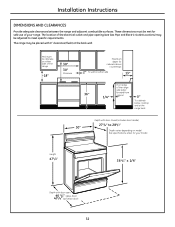
...) 273/4" to 281/2" Depth varies depending on either side of the range 18" 30" 30" Minimum Maximum depth for your range. The location of your model. Installation Instructions DIMENSIONS AND CLEARANCES Provide adequate clearances between the range and adjacent combustible surfaces. These dimensions must be met for safe use of the...
...) 273/4" to 281/2" Depth varies depending on either side of the range 18" 30" 30" Minimum Maximum depth for your range. The location of your model. Installation Instructions DIMENSIONS AND CLEARANCES Provide adequate clearances between the range and adjacent combustible surfaces. These dimensions must be met for safe use of the...
Owners Manual
Page 33
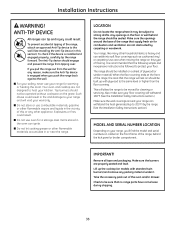
... Any openings in the vicinity of the range that no range parts have come loose during shipping. 33 Lift up the cooktop (on models with plywood to heat your range can settle into soft floor coverings such as cushioned vinyl or carpeting. Check to be sealed. Top ...and ventilation are properly seated and level. Make sure the burners are not obstructed by the range. (See the Installation Safety Instructions section.) MODEL AND SERIAL NUMBER LOCATION Depending on the front frame of flooring. Your oven and cooktop are not designed to the same level or higher...
... Any openings in the vicinity of the range that no range parts have come loose during shipping. 33 Lift up the cooktop (on models with plywood to heat your range can settle into soft floor coverings such as cushioned vinyl or carpeting. Check to be sealed. Top ...and ventilation are properly seated and level. Make sure the burners are not obstructed by the range. (See the Installation Safety Instructions section.) MODEL AND SERIAL NUMBER LOCATION Depending on the front frame of flooring. Your oven and cooktop are not designed to the same level or higher...

Owners Manual
Page 34
... location outside of the range. Installation Instructions 1 PROVIDE ADEQUATE GAS SUPPLY Your range is designed to operate at a pressure of 4″ or 5″ (depending on model) of water column on the range. When checking for LP gas (propane or butane), 10″ of the range manifold must be moved after the...
... location outside of the range. Installation Instructions 1 PROVIDE ADEQUATE GAS SUPPLY Your range is designed to operate at a pressure of 4″ or 5″ (depending on model) of water column on the range. When checking for LP gas (propane or butane), 10″ of the range manifold must be moved after the...
Owners Manual
Page 39
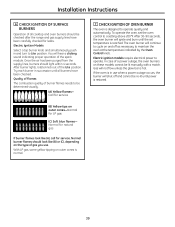
...and oven burners should be checked after the range and gas supply lines have been checked. Call for LP gas (C) Soft blue flames- Electric Ignition Models Select a top burner knob and simultaneously push in use . You will hear a clicking sound indicating proper operation of gas you use when a power... burner lights, rotate knob out of a power outage, the oven burners on the type of the spark module. Normal for service. Electric ignition models require electrical power to operate quietly and automatically. In case of the Lite position. If the oven is in and turn to a setting above ...
...and oven burners should be checked after the range and gas supply lines have been checked. Call for LP gas (C) Soft blue flames- Electric Ignition Models Select a top burner knob and simultaneously push in use . You will hear a clicking sound indicating proper operation of gas you use when a power... burner lights, rotate knob out of a power outage, the oven burners on the type of the spark module. Normal for service. Electric ignition models require electrical power to operate quietly and automatically. In case of the Lite position. If the oven is in and turn to a setting above ...
Owners Manual
Page 40
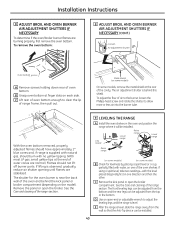
..., slide the range away from the top or the bottom. If lifting is behind the kick panel or broiler compartment (depending on some models) On some models) B Check for the oven burner is supplied with natural gas, should not lift off burner ports. Leg leveler Lower range Raise range ...Lower range Raise range (on some models) (on some models, remove the metal shield at finger slots on one direction and then the other. E After the range is level. B Grasp oven bottom...
..., slide the range away from the top or the bottom. If lifting is behind the kick panel or broiler compartment (depending on some models) On some models) B Check for the oven burner is supplied with natural gas, should not lift off burner ports. Leg leveler Lower range Raise range ...Lower range Raise range (on some models) (on some models, remove the metal shield at finger slots on one direction and then the other. E After the range is level. B Grasp oven bottom...
Owners Manual
Page 43
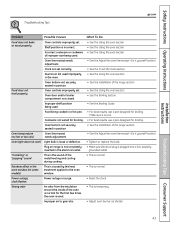
.... • See the Adjust the oven thermostat-Do it yourself! grounded outlet. Safety Instructions Operating Instructions Installation Instructions Troubleshooting Tips ge.com Problem Possible Causes What To Do Food does not bake or roast properly Oven controls improperly set . in the oven window... and/or broiler compartment not closed. • See the Using the oven section. • See the Broiling section. Plug on some models) This is caused by the heat treatment applied to gas ratio. • Adjust oven burner air shutter. Incorrect cookware or cookware •...
.... • See the Adjust the oven thermostat-Do it yourself! grounded outlet. Safety Instructions Operating Instructions Installation Instructions Troubleshooting Tips ge.com Problem Possible Causes What To Do Food does not bake or roast properly Oven controls improperly set . in the oven window... and/or broiler compartment not closed. • See the Using the oven section. • See the Broiling section. Plug on some models) This is caused by the heat treatment applied to gas ratio. • Adjust oven burner air shutter. Incorrect cookware or cookware •...
Owners Manual
Page 44
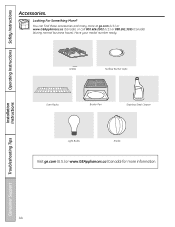
Have your model number ready. Grates Surface Burner Caps Oven Racks Broiler Pan Stainless Steel Cleaner Light Bulbs Knobs Visit ge.com (U.S.) or www.GEAppliances.ca (Canada) for more at ge.com (U.S.) or www.GEAppliances.ca (Canada), or call 800.626.2002 (U.S.) or 888.261.3055 (Canada) (during normal business hours). Operating Instructions Safety Instructions Accessories. Installation Instructions Consumer Support Troubleshooting Tips 44 You can find these accessories and many more information. Looking For Something More?
Have your model number ready. Grates Surface Burner Caps Oven Racks Broiler Pan Stainless Steel Cleaner Light Bulbs Knobs Visit ge.com (U.S.) or www.GEAppliances.ca (Canada) for more at ge.com (U.S.) or www.GEAppliances.ca (Canada), or call 800.626.2002 (U.S.) or 888.261.3055 (Canada) (during normal business hours). Operating Instructions Safety Instructions Accessories. Installation Instructions Consumer Support Troubleshooting Tips 44 You can find these accessories and many more information. Looking For Something More?
Owners Manual
Page 46
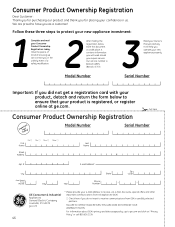
...3 Read your e-mail address to ge.com and click on "Privacy Policy" or call 800.626.2224. 46 Consumer Product Ownership Registration Dear Customer: Thank you for purchasing our product and thank you for placing your new appliance properly. Model Number Serial Number Important: If you ...GEA's privacy and data usage policy, go to receive, via e-mail, discounts, special offers and other important communications from GEA's carefully selected partners. Model Number Serial Number First Name Mr. s Ms. s Mrs. s Miss s Street Address Last Name Apt. # E-mail Address* Zip City ...
...3 Read your e-mail address to ge.com and click on "Privacy Policy" or call 800.626.2224. 46 Consumer Product Ownership Registration Dear Customer: Thank you for purchasing our product and thank you for placing your new appliance properly. Model Number Serial Number Important: If you ...GEA's privacy and data usage policy, go to receive, via e-mail, discounts, special offers and other important communications from GEA's carefully selected partners. Model Number Serial Number First Name Mr. s Ms. s Mrs. s Miss s Street Address Last Name Apt. # E-mail Address* Zip City ...
Owners Manual
Page 47
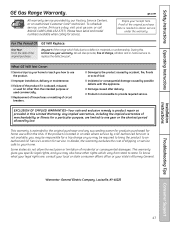
... All warranty service provided by accident, fire, floods or acts of shipping or service calls to an Authorized GE Service Location for a trip charge or you how to state. ge.com Staple your legal rights are limited to obtain service under the warranty. s Improper installation, delivery or ... remedy is not available, you may be required to bring the product to your home to teach you may also have serial and model numbers available when calling for other rights which fails due to replace the defective part. This warranty is abused, misused, or used ...
... All warranty service provided by accident, fire, floods or acts of shipping or service calls to an Authorized GE Service Location for a trip charge or you how to state. ge.com Staple your legal rights are limited to obtain service under the warranty. s Improper installation, delivery or ... remedy is not available, you may be required to bring the product to your home to teach you may also have serial and model numbers available when calling for other rights which fails due to replace the defective part. This warranty is abused, misused, or used ...


