
Owners Manual
Page 1
Non-Self-Cleaning RangeGass ge.com Safety Instructions . . . . . .2-7 Operating Instructions Aluminum Foil 15 Burners 8, 9 Clock 19 Griddle 10, 11 Oven 12-17 Baking and Roasting 15 Broiling 16, 17 Broiling Guide 17 Clock and Timer 19 Light 14 Oven Control 12 Power Outage 14 Preheating 15 Thermostat Adjustment .... and Knobs . . . . . .28 Cooktop Surface 25 Griddle 22 Lift-off Oven Door 26 Oven Bottom 26 Oven Interior 28 Oven Light Replacement . . . . . .27 Oven Vents 28 Shelves 27 Stainless Steel Surfaces 25 Installation Instructions 29-41 Air Adjustment 40 Anti-Tip ...
Non-Self-Cleaning RangeGass ge.com Safety Instructions . . . . . .2-7 Operating Instructions Aluminum Foil 15 Burners 8, 9 Clock 19 Griddle 10, 11 Oven 12-17 Baking and Roasting 15 Broiling 16, 17 Broiling Guide 17 Clock and Timer 19 Light 14 Oven Control 12 Power Outage 14 Preheating 15 Thermostat Adjustment .... and Knobs . . . . . .28 Cooktop Surface 25 Griddle 22 Lift-off Oven Door 26 Oven Bottom 26 Oven Interior 28 Oven Light Replacement . . . . . .27 Oven Vents 28 Shelves 27 Stainless Steel Surfaces 25 Installation Instructions 29-41 Air Adjustment 40 Anti-Tip ...
Owners Manual
Page 2
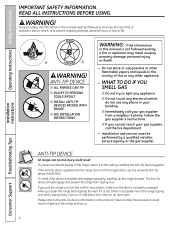
..., carefully tip the range forward. s Immediately call the fire department. - To check if the device is a possible risk of the range and injury. Failure to light any phone in your safety, the information in tipping of the range tipping over . If it to the Anti-Tip device information in this manual...
..., carefully tip the range forward. s Immediately call the fire department. - To check if the device is a possible risk of the range and injury. Failure to light any phone in your safety, the information in tipping of the range tipping over . If it to the Anti-Tip device information in this manual...
Owners Manual
Page 8
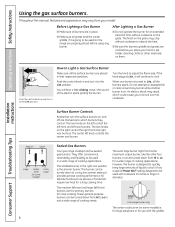
... are placed in their respective positions. Like the other materials on some models) is designed to quickly bring large amounts of cooking applications. Before Lighting a Gas Burner s Make sure all the burners spark. How to knock over hot cookware. You will continue to the Lite position. An ... turned down to adjust the flame size. Extra-large burner only The center oval burner (on the range are properly placed before you to Light a Gas Surface Burner Make sure all grates (and the center griddle, if it will hear a little clicking noise-the sound of cooking ...
... are placed in their respective positions. Like the other materials on some models) is designed to quickly bring large amounts of cooking applications. Before Lighting a Gas Burner s Make sure all the burners spark. How to knock over hot cookware. You will continue to the Lite position. An ... turned down to adjust the flame size. Extra-large burner only The center oval burner (on the range are properly placed before you to Light a Gas Surface Burner Make sure all grates (and the center griddle, if it will hear a little clicking noise-the sound of cooking ...
Owners Manual
Page 9
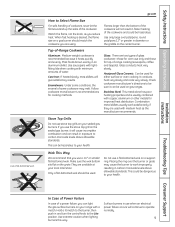
ge.com How to Select Flame Size For safe handling of cookware, never let the flames ...This metal alone has poor heating properties and is usually combined with medium heat as you reduce heat. This can light the gas surface burners on your sealed gas burners. They are used for cooking methods. Placing the ring over the...use when an electrical power failure occurs will not result in carbon monoxide levels above allowable standards. Use extreme caution when lighting burners this way. Use saucepans with tightfitting lids when cooking with a match. Stove Top Grills Do not use the ...
ge.com How to Select Flame Size For safe handling of cookware, never let the flames ...This metal alone has poor heating properties and is usually combined with medium heat as you reduce heat. This can light the gas surface burners on your sealed gas burners. They are used for cooking methods. Placing the ring over the...use when an electrical power failure occurs will not result in carbon monoxide levels above allowable standards. Use extreme caution when lighting burners this way. Use saucepans with tightfitting lids when cooking with a match. Stove Top Grills Do not use the ...
Owners Manual
Page 12
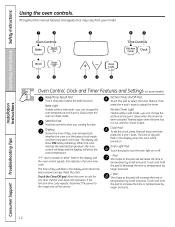
...day will flash in the display and the oven control signals, this pad will decrease the time or temperature by small amounts. Kitchen Timer Light Flashes while in the display when the oven is in bake mode. Throughout this pad to this indicates a function error code. Kitchen ... time of day will flash in edit mode-you can change the oven temperature at this point. Pad Short taps to turn the oven light on . Installation Instructions Consumer Support Troubleshooting Tips Oven Control, Clock and Timer Features and Settings (on some models) Bake/Temp Recall Pad ...
...day will flash in the display and the oven control signals, this pad will decrease the time or temperature by small amounts. Kitchen Timer Light Flashes while in the display when the oven is in bake mode. Throughout this pad to this indicates a function error code. Kitchen ... time of day will flash in edit mode-you can change the oven temperature at this point. Pad Short taps to turn the oven light on . Installation Instructions Consumer Support Troubleshooting Tips Oven Control, Clock and Timer Features and Settings (on some models) Bake/Temp Recall Pad ...
Owners Manual
Page 13
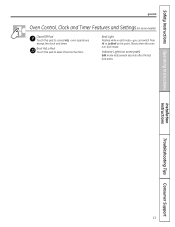
Indicator Lights (on some pads) Edit mode lasts several seconds after the last pad press. Glows when the oven is in edit mode-you can switch from Hi to Lo Broil at this pad to cancel ALL oven operations except the clock and timer. Installation Instructions Troubleshooting Tips Consumer Support 13 Broil Hi/Lo Pad Touch this point. Broil Light Flashes while in broil mode. Safety Instructions Operating Instructions ge.com Oven Control, Clock and Timer Features and Settings (on some models) Clear/Off Pad Touch this pad to select the broil function.
Indicator Lights (on some pads) Edit mode lasts several seconds after the last pad press. Glows when the oven is in edit mode-you can switch from Hi to Lo Broil at this pad to cancel ALL oven operations except the clock and timer. Installation Instructions Troubleshooting Tips Consumer Support 13 Broil Hi/Lo Pad Touch this point. Broil Light Flashes while in broil mode. Safety Instructions Operating Instructions ge.com Oven Control, Clock and Timer Features and Settings (on some models) Clear/Off Pad Touch this pad to select the broil function.
Owners Manual
Page 14
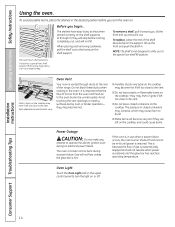
.... they may become very hot if they may cause them to the vent. Before you turn the light on the cooktop may melt if left too close to the vent. Oven Light Touch the Oven Light pad on the upper control panel to operate the electric ignition oven during an electrical power failure...
.... they may become very hot if they may cause them to the vent. Before you turn the light on the cooktop may melt if left too close to the vent. Oven Light Touch the Oven Light pad on the upper control panel to operate the electric ignition oven during an electrical power failure...
Owners Manual
Page 15
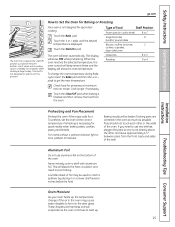
... remove the food from the front, back and sides of the wall. To preheat, set the oven at this position. For ovens without a preheat indicator light or tone, preheat 10 minutes. Aluminum Foil Do not use two shelves, stagger the pans so one is not directly above the oven bottom. Safety... Instructions Operating Instructions ge.com The oven has a special low shelf (R) position just above the other or the walls of the oven. Touch the Start/On pad. Type of...
... remove the food from the front, back and sides of the wall. To preheat, set the oven at this position. For ovens without a preheat indicator light or tone, preheat 10 minutes. Aluminum Foil Do not use two shelves, stagger the pans so one is not directly above the oven bottom. Safety... Instructions Operating Instructions ge.com The oven has a special low shelf (R) position just above the other or the walls of the oven. Touch the Start/On pad. Type of...
Owners Manual
Page 21
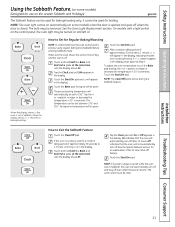
...in the display. Touch the Start/On pad and ⊃ will automatically be turned on and left on the Jewish Sabbath and Holidays) ge.com The Sabbath feature can be reset. Touch the Start/On pad. The preset starting temperature will appear in 25° increments. Off... indicates that the oven will not automatically turn off and stay off . On models with a light switch on some models) (Designed for Regular Baking/Roasting NOTE: To understand how the oven control works, practice using regular baking (non-Sabbath)...
...in the display. Touch the Start/On pad and ⊃ will automatically be turned on and left on the Jewish Sabbath and Holidays) ge.com The Sabbath feature can be reset. Touch the Start/On pad. The preset starting temperature will appear in 25° increments. Off... indicates that the oven will not automatically turn off and stay off . On models with a light switch on some models) (Designed for Regular Baking/Roasting NOTE: To understand how the oven control works, practice using regular baking (non-Sabbath)...

Owners Manual
Page 22
... used and seasoned, it may change color over time. s Do not allow grease to be a fire hazard. Once the griddle has cooled, rub the surface lightly with anything other than a dry, heavy, coarse cloth, it will need to accumulate under the griddle, it should be cleaned up as soon as it...
... used and seasoned, it may change color over time. s Do not allow grease to be a fire hazard. Once the griddle has cooled, rub the surface lightly with anything other than a dry, heavy, coarse cloth, it will need to accumulate under the griddle, it should be cleaned up as soon as it...
Owners Manual
Page 27
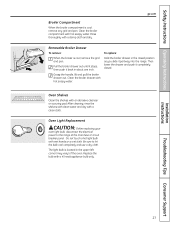
... an abrasive cleanser or scouring pad. Oven Shelves Clean the shelves with a 40-watt appliance bulb only. Do not touch a hot light bulb with a damp cloth and dry. Rinse thoroughly with wet hands or a wet cloth. Installation Instructions Troubleshooting Tips Consumer Support 27 Clean...circuit breaker panel. Grasp the handle, lift and pull the broiler drawer out. ge.com Removable Broiler Drawer To remove: When the broiler is located in about one inch. The light bulb is cool, remove the grid and pan. Safety Instructions Operating Instructions Broiler Compartment...
... an abrasive cleanser or scouring pad. Oven Shelves Clean the shelves with a 40-watt appliance bulb only. Do not touch a hot light bulb with a damp cloth and dry. Rinse thoroughly with wet hands or a wet cloth. Installation Instructions Troubleshooting Tips Consumer Support 27 Clean...circuit breaker panel. Grasp the handle, lift and pull the broiler drawer out. ge.com Removable Broiler Drawer To remove: When the broiler is located in about one inch. The light bulb is cool, remove the grid and pan. Safety Instructions Operating Instructions Broiler Compartment...
Owners Manual
Page 39
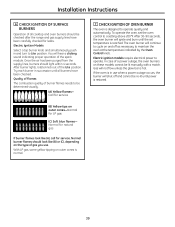
...operate quietly and automatically. After 30-90 seconds, the oven burner will ignite and burn until power is designed to Lite position. After burner lights, rotate knob out of the spark module. Normal for natural gas If burner flames look like (A), call for LP gas (C) Soft blue flames...been carefully checked for leaks. Electric Ignition Models Select a top burner knob and simultaneously push in succession until all cooktop and oven burners should light within 4 seconds. Once the air has been purged from the supply lines, burners should be re-lit until the set the oven control...
...operate quietly and automatically. After 30-90 seconds, the oven burner will ignite and burn until power is designed to Lite position. After burner lights, rotate knob out of the spark module. Normal for natural gas If burner flames look like (A), call for LP gas (C) Soft blue flames...been carefully checked for leaks. Electric Ignition Models Select a top burner knob and simultaneously push in succession until all cooktop and oven burners should light within 4 seconds. Once the air has been purged from the supply lines, burners should be re-lit until the set the oven control...
Owners Manual
Page 42
... burner parts are installed correctly. Make sure you do not burn evenly Burner flames very large or yellow Clock does not work Surface burners light but oven does not Possible Causes Plug on the following pages first and you call for burned-on range is not completely inserted in the... panel (see the Care and cleaning of the range section. • If range is connected to call for 3 seconds. Problem Top burners do not light or do not enlarge the holes. The clock is shown closed. Display goes blank Display flashes Unable to get the display to gas ratio. Troubleshooting...
... burner parts are installed correctly. Make sure you do not burn evenly Burner flames very large or yellow Clock does not work Surface burners light but oven does not Possible Causes Plug on the following pages first and you call for burned-on range is not completely inserted in the... panel (see the Care and cleaning of the range section. • If range is connected to call for 3 seconds. Problem Top burners do not light or do not enlarge the holes. The clock is shown closed. Display goes blank Display flashes Unable to get the display to gas ratio. Troubleshooting...
Owners Manual
Page 43
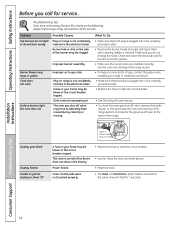
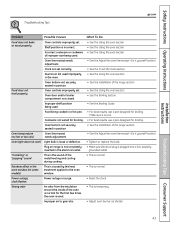
... cooked in the oven. Make sure it is loose or defective. • Tighten or replace the bulb. Safety Instructions Operating Instructions Installation Instructions Troubleshooting Tips ge.com Problem Possible Causes What To Do Food does not bake or roast properly Oven controls improperly set . Incorrect cookware or cookware • See the... for broiling. Oven temperature too hot or too cold Oven thermostat needs adjustment. • See the Adjust the oven thermostat-Do it yourself! section. Oven light does not work Light bulb is cool. grounded outlet.
... cooked in the oven. Make sure it is loose or defective. • Tighten or replace the bulb. Safety Instructions Operating Instructions Installation Instructions Troubleshooting Tips ge.com Problem Possible Causes What To Do Food does not bake or roast properly Oven controls improperly set . Incorrect cookware or cookware • See the... for broiling. Oven temperature too hot or too cold Oven thermostat needs adjustment. • See the Adjust the oven thermostat-Do it yourself! section. Oven light does not work Light bulb is cool. grounded outlet.
Owners Manual
Page 44
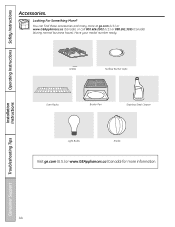
Installation Instructions Consumer Support Troubleshooting Tips 44 Grates Surface Burner Caps Oven Racks Broiler Pan Stainless Steel Cleaner Light Bulbs Knobs Visit ge.com (U.S.) or www.GEAppliances.ca (Canada) for more at ge.com (U.S.) or www.GEAppliances.ca (Canada), or call 800.626.2002 (U.S.) or 888.261.3055 (Canada) (during normal business hours). Operating Instructions Safety Instructions Accessories. Have your model number ready. You can find these accessories and many more information. Looking For Something More?
Installation Instructions Consumer Support Troubleshooting Tips 44 Grates Surface Burner Caps Oven Racks Broiler Pan Stainless Steel Cleaner Light Bulbs Knobs Visit ge.com (U.S.) or www.GEAppliances.ca (Canada) for more at ge.com (U.S.) or www.GEAppliances.ca (Canada), or call 800.626.2002 (U.S.) or 888.261.3055 (Canada) (during normal business hours). Operating Instructions Safety Instructions Accessories. Have your model number ready. You can find these accessories and many more information. Looking For Something More?


