

Owners Manual
Page 1
... JR Customers 41, 42 State of the refrigerator compartment. ge.com Bottom Refr igeratoFreezerrs Safety Instructions 2, 3 Operating Instructions Additional Features 8 Automatic Icemaker 11 Care and Cleaning 12-13 Controls 4-5 Crispers and Pans 9 Freezer 10 Replacing the Light Bulbs 14 Shelves and...Line . . . . .33-35 Preparing to Install the Refrigerator 17 Removing and Replacing the Freezer Drawer 25, 26 Reversing the Door Swing (Single Door Refrigerator Models only 27-29 Removing and Replacing the Doors (Double Door Refrigerator Models only) . . . .30-32 Trim Kits and Decorator...
... JR Customers 41, 42 State of the refrigerator compartment. ge.com Bottom Refr igeratoFreezerrs Safety Instructions 2, 3 Operating Instructions Additional Features 8 Automatic Icemaker 11 Care and Cleaning 12-13 Controls 4-5 Crispers and Pans 9 Freezer 10 Replacing the Light Bulbs 14 Shelves and...Line . . . . .33-35 Preparing to Install the Refrigerator 17 Removing and Replacing the Freezer Drawer 25, 26 Reversing the Door Swing (Single Door Refrigerator Models only 27-29 Removing and Replacing the Doors (Double Door Refrigerator Models only) . . . .30-32 Trim Kits and Decorator...

Owners Manual
Page 4
... will go to the preset recommended settings. Changing the Temperature For Controls-on-the-Door Models: To change the temperature, press either the refrigerator or the freezer until the desired temperature is displayed. To turn the unit back on, press the COLDER...Tips Installation Instructions Operating Instructions Safety Instructions About the controls with temperature settings. (on some models) (on some models) NOTE: The refrigerator is displayed. For Controls Inside the Refrigerator: Opening the door displays the actual temperature. Setting either the refrigerator or freezer.
... will go to the preset recommended settings. Changing the Temperature For Controls-on-the-Door Models: To change the temperature, press either the refrigerator or the freezer until the desired temperature is displayed. To turn the unit back on, press the COLDER...Tips Installation Instructions Operating Instructions Safety Instructions About the controls with temperature settings. (on some models) (on some models) NOTE: The refrigerator is displayed. For Controls Inside the Refrigerator: Opening the door displays the actual temperature. Setting either the refrigerator or freezer.

Owners Manual
Page 5
... Operating Instructions Installation Instructions Troubleshooting Tips Consumer Support About TurboCool.™ (on some models) ge.com (on some models) (on some models) How it will continue to run until the refrigerator compartment cools to approximately 34°F (1°C), then it Works TurboCool rapidly cools... for an extended period. How to the original setting. The freezer temperature is complete, the refrigerator compartment will show . About Door Alarm (on some models) 5 If moisture does appear on some models) The door alarm will return to the original setting. Over ...
... Operating Instructions Installation Instructions Troubleshooting Tips Consumer Support About TurboCool.™ (on some models) ge.com (on some models) (on some models) How it will continue to run until the refrigerator compartment cools to approximately 34°F (1°C), then it Works TurboCool rapidly cools... for an extended period. How to the original setting. The freezer temperature is complete, the refrigerator compartment will show . About Door Alarm (on some models) 5 If moisture does appear on some models) The door alarm will return to the original setting. Over ...

Owners Manual
Page 6
...as it is properly installed, you are replacing the cartridge, first remove the old one. Run water from the end of the refrigerator compartment. Press and hold the RESET WATER FILTER pad for the nearest Mabe Service Center. Consumer Support Troubleshooting Tips Installation Instructions Operating ... dispenser. 6 Lining up the arrow on the end of the cartridge should be positioned vertically. Filter Model GSWF Customers in the United States, visit our Website, ge.com, or call GE Parts and Accessories, 800.626.2002. Do not overtighten. See To Use the Dispenser section. Close ...
...as it is properly installed, you are replacing the cartridge, first remove the old one. Run water from the end of the refrigerator compartment. Press and hold the RESET WATER FILTER pad for the nearest Mabe Service Center. Consumer Support Troubleshooting Tips Installation Instructions Operating ... dispenser. 6 Lining up the arrow on the end of the cartridge should be positioned vertically. Filter Model GSWF Customers in the United States, visit our Website, ge.com, or call GE Parts and Accessories, 800.626.2002. Do not overtighten. See To Use the Dispenser section. Close ...

Owners Manual
Page 7
... Slide the shelf in . Lower the shelf into place. Some models have special edges to help prevent spills from shelf. Lower the front of the shelf until the bottom of the central notches on all the way in the same manner. ge.com Spillproof Shelves (on the track. To replace: Place the rear... items from dripping to side. To remove or replace the shelves, see Rearranging the Shelves. Lift the front edge of the shelf in the refrigerator compartment are designed to help prevent spills from the shelf. Lift the shelf up at the back of the shelf until the central tabs are...
... Slide the shelf in . Lower the shelf into place. Some models have special edges to help prevent spills from shelf. Lower the front of the shelf until the bottom of the central notches on all the way in the same manner. ge.com Spillproof Shelves (on the track. To replace: Place the rear... items from dripping to side. To remove or replace the shelves, see Rearranging the Shelves. Lift the front edge of the shelf in the refrigerator compartment are designed to help prevent spills from the shelf. Lift the shelf up at the back of the shelf until the central tabs are...

Owners Manual
Page 8
... , then pull out. The bin will lock in place. Non-Adjustable Bins on the Door Adjustable bins can easily be carried from refrigerator to fit your needs. It will lock in the bin just above the molded door supports, and push down. It will lock in...replace: Engage the rack in the molded supports on the door shelf. To replace: Engage the bin in the molded supports on all models. About the additional features. Consumer Support Troubleshooting Tips Installation Instructions Operating Instructions Safety Instructions About the shelves and bins. Not all features ...
... , then pull out. The bin will lock in place. Non-Adjustable Bins on the Door Adjustable bins can easily be carried from refrigerator to fit your needs. It will lock in the bin just above the molded door supports, and push down. It will lock in...replace: Engage the rack in the molded supports on the door shelf. To replace: Engage the bin in the molded supports on all models. About the additional features. Consumer Support Troubleshooting Tips Installation Instructions Operating Instructions Safety Instructions About the shelves and bins. Not all features ...

Owners Manual
Page 11
A newly installed refrigerator may take 12 to 24 hours to begin making one batch of ice. ge.com Power Switch Green Power Light Icemaker Feeler Arm Automatic Icemaker (on some models) The icemaker will turn green when the freezer light switch is pressed in ... Instructions Operating Instructions Installation Instructions Troubleshooting Tips Consumer Support About the automatic icemaker. If the refrigerator is operated before the water connection is located on freezer compartment temperature, room temperature, number of water. The icemaker power light will produce seven cubes...
A newly installed refrigerator may take 12 to 24 hours to begin making one batch of ice. ge.com Power Switch Green Power Light Icemaker Feeler Arm Automatic Icemaker (on some models) The icemaker will turn green when the freezer light switch is pressed in ... Instructions Operating Instructions Installation Instructions Troubleshooting Tips Consumer Support About the automatic icemaker. If the refrigerator is operated before the water connection is located on freezer compartment temperature, room temperature, number of water. The icemaker power light will produce seven cubes...

Owners Manual
Page 12
...available stainless steel cleaner. Stainless steel (on some models) can erode the paint. Wipe clean with hot water because the extreme temperature difference may leave a residue that can be cleaned with a clean, soft cloth. Unplug the refrigerator before cleaning. Use an appliance wax polish on...other mild detergents. Keep the outside clean. Use warm water and baking soda solution- Do not wash any plastic refrigerator parts in the refrigerator and freezer compartments. Wash parts with soap or other abrasive cleaners. Rinse and wipe dry. These may cause them to ...
...available stainless steel cleaner. Stainless steel (on some models) can erode the paint. Wipe clean with hot water because the extreme temperature difference may leave a residue that can be cleaned with a clean, soft cloth. Unplug the refrigerator before cleaning. Use an appliance wax polish on...other mild detergents. Keep the outside clean. Use warm water and baking soda solution- Do not wash any plastic refrigerator parts in the refrigerator and freezer compartments. Wash parts with soap or other abrasive cleaners. Rinse and wipe dry. These may cause them to ...

Owners Manual
Page 13
...refrigerator, do not rest the front or back of the refrigerator. Raise the leveling legs located at the bottom front of the refrigerator against the hand truck. Leave the doors open. Pull the refrigerator...the floor covering or refrigerator. This could damage the refrigerator. Safety Instructions Operating Instructions Installation Instructions Troubleshooting Tips Consumer Support ge.com Behind the Refrigerator Be careful when moving.... When pushing the refrigerator back, make sure you don't roll over the power cord or icemaker supply line (on some models) and ensure the anti...
...refrigerator, do not rest the front or back of the refrigerator. Raise the leveling legs located at the bottom front of the refrigerator against the hand truck. Leave the doors open. Pull the refrigerator...the floor covering or refrigerator. This could damage the refrigerator. Safety Instructions Operating Instructions Installation Instructions Troubleshooting Tips Consumer Support ge.com Behind the Refrigerator Be careful when moving.... When pushing the refrigerator back, make sure you don't roll over the power cord or icemaker supply line (on some models) and ensure the anti...

Owners Manual
Page 14
... Freezer Light CAUTION: Light bulbs may be hot. NOTE: Appliance bulbs may be ordered from GE Parts and Accessories, 800.626.2002. The bulb is located at the back. Plug the refrigerator back in . After replacing with an appliance bulb of the same or lower wattage, replace the shield. LED Refrigerator Lights (on some models...
... Freezer Light CAUTION: Light bulbs may be hot. NOTE: Appliance bulbs may be ordered from GE Parts and Accessories, 800.626.2002. The bulb is located at the back. Plug the refrigerator back in . After replacing with an appliance bulb of the same or lower wattage, replace the shield. LED Refrigerator Lights (on some models...

Owners Manual
Page 17
... MOVING THE REFRIGERATOR INDOORS If the refrigerator will have to be removed. • To remove the refrigerator door, see Step 1 in Canada at : www.geappliances.ca BEFORE YOU BEGIN Read these instructions for future reference. • Skill level - Save these instructions with the Consumer. • Note to Installer - Installation Instructions Refrigerator Models 21 and 25 Questions?
... MOVING THE REFRIGERATOR INDOORS If the refrigerator will have to be removed. • To remove the refrigerator door, see Step 1 in Canada at : www.geappliances.ca BEFORE YOU BEGIN Read these instructions for future reference. • Skill level - Save these instructions with the Consumer. • Note to Installer - Installation Instructions Refrigerator Models 21 and 25 Questions?

Owners Manual
Page 18
...the RH side of construction as a template for screws. Install Anti-Tip Bracket packed with the floor holes indicated on 21 ft. The refrigerator will be placed approximately in position and use at least 2 screws to persons can tip forward. NOTE: • It ...down in the middle of the anti-tip floor bracket). models) WARNING Under certain circumstances, this refrigerator. 1 MEASURE CABINET OPENING AVAILABLE VS. Be sure to Install RH Holes Base Bracket on the Refrigerator 71⁄4" RH Side of Refrigerator Rear RH Corner of Cabinet Wall Locator Template Sheet B ...
...the RH side of construction as a template for screws. Install Anti-Tip Bracket packed with the floor holes indicated on 21 ft. The refrigerator will be placed approximately in position and use at least 2 screws to persons can tip forward. NOTE: • It ...down in the middle of the anti-tip floor bracket). models) WARNING Under certain circumstances, this refrigerator. 1 MEASURE CABINET OPENING AVAILABLE VS. Be sure to Install RH Holes Base Bracket on the Refrigerator 71⁄4" RH Side of Refrigerator Rear RH Corner of Cabinet Wall Locator Template Sheet B ...

Owners Manual
Page 20
... the top cap. G Reinstall the bottom freezer drawer. Doors and passageways leading to connect the filter. We strongly recommend that could clog the screen of installation, proper air circulation and plumbing and electrical connections. B Remove the fresh-food door. If passageways are less than 36″, the refrigerator doors and handles can be...
... the top cap. G Reinstall the bottom freezer drawer. Doors and passageways leading to connect the filter. We strongly recommend that could clog the screen of installation, proper air circulation and plumbing and electrical connections. B Remove the fresh-food door. If passageways are less than 36″, the refrigerator doors and handles can be...

Owners Manual
Page 21
.... clockwise to raise the refrigerator, counterclockwise to lower it in the back bottom of the illustrations below will look like the connection on your kitchen cabinets. B If you can align the refrigerator with a wrench. C Fasten the tubing into the refrigerator connection, at the back ... Depth models: These models also have rear adjustable rollers so you are using copper tubing, insert the end of the tubing into the clamp provided to hold it . Installation Instructions 1 CONNECTING THE REFRIGERATOR TO THE HOUSE WATER LINE (cont.) A If you are using the GE SmartConnect&#...
.... clockwise to raise the refrigerator, counterclockwise to lower it in the back bottom of the illustrations below will look like the connection on your kitchen cabinets. B If you can align the refrigerator with a wrench. C Fasten the tubing into the refrigerator connection, at the back ... Depth models: These models also have rear adjustable rollers so you are using copper tubing, insert the end of the tubing into the clamp provided to hold it . Installation Instructions 1 CONNECTING THE REFRIGERATOR TO THE HOUSE WATER LINE (cont.) A If you are using the GE SmartConnect&#...

Owners Manual
Page 22
...the logo badge prior to carefully attaching the badge to the door. 7 REMOVE THE FREEZER DOOR HANDLE Stainless steel and plastic handles: A Loosen the set screws with a 1/4&#... Mounting Fasteners fasteners to the left side of the mounting fasteners. Installation Instructions INSTALLING THE REFRIGERATOR (cont.) 6 REMOVE THE FRESH FOOD DOOR HANDLE (For placement in the installation location ...Remove any adhesive on the underside of the handles - REVERSING THE DOOR HANDLE (on some models): A REMOVING THE DOOR HANDLE: Loosen the set screws located on the door with a ...
...the logo badge prior to carefully attaching the badge to the door. 7 REMOVE THE FREEZER DOOR HANDLE Stainless steel and plastic handles: A Loosen the set screws with a 1/4&#... Mounting Fasteners fasteners to the left side of the mounting fasteners. Installation Instructions INSTALLING THE REFRIGERATOR (cont.) 6 REMOVE THE FRESH FOOD DOOR HANDLE (For placement in the installation location ...Remove any adhesive on the underside of the handles - REVERSING THE DOOR HANDLE (on some models): A REMOVING THE DOOR HANDLE: Loosen the set screws located on the door with a ...

Owners Manual
Page 24
...PACKAGING START ICEMAKER (icemaker models) A) Remove all tape, foam and protective packing from tipping. It will take 2-3 days to the icemaker. 24 B Turn the leveling legs clockwise to raise the refrigerator, counterclockwise to hold the refrigerator securely in position during operation... freezer section for instructions. Power switch NOTE: In lower water pressure conditions, the water valve may turn on ) position. Installation Instructions INSTALLING THE REFRIGERATOR (cont.) 10 LEVEL THE REFRIGERATOR The leveling legs have 2 purposes: 1) Leveling legs adjust so the refrigerator is...
...PACKAGING START ICEMAKER (icemaker models) A) Remove all tape, foam and protective packing from tipping. It will take 2-3 days to the icemaker. 24 B Turn the leveling legs clockwise to raise the refrigerator, counterclockwise to hold the refrigerator securely in position during operation... freezer section for instructions. Power switch NOTE: In lower water pressure conditions, the water valve may turn on ) position. Installation Instructions INSTALLING THE REFRIGERATOR (cont.) 10 LEVEL THE REFRIGERATOR The leveling legs have 2 purposes: 1) Leveling legs adjust so the refrigerator is...

Owners Manual
Page 27
... kit. • Handle parts carefully to avoid scratching paint. • Set screws down by their related parts to avoid using them in the bottom of the door. Lift the door off the center hinge pin. C Using a 5/16″ socket ratchet/driver, remove the bolts securing the...Screwdriver Top Hinge D Remove the tape and tilt the door away from its electrical outlet. Installation Instructions REVERSING THE DOOR SWING (Single Door Refrigerator Models only) IMPORTANT NOTES When reversing the door swing: NOTE: Door swing is properly aligned and permanently secured to the door by removing the...
... kit. • Handle parts carefully to avoid scratching paint. • Set screws down by their related parts to avoid using them in the bottom of the door. Lift the door off the center hinge pin. C Using a 5/16″ socket ratchet/driver, remove the bolts securing the...Screwdriver Top Hinge D Remove the tape and tilt the door away from its electrical outlet. Installation Instructions REVERSING THE DOOR SWING (Single Door Refrigerator Models only) IMPORTANT NOTES When reversing the door swing: NOTE: Door swing is properly aligned and permanently secured to the door by removing the...

Owners Manual
Page 30
...C1 Water Coupling Remove the metal spring clip. These instructions are for water dispenser models) C Remove water coupling and power coupling. Installation Instructions REMOVING THE DOORS (Double Door Refrigerator Models only) IMPORTANT NOTES NOTE: Door swing is not reversible. • Read the... instructions all door shelves, including the dairy compartment. 1 REMOVE THE REFRIGERATOR DOORS A Tape the doors shut with collar ...
...C1 Water Coupling Remove the metal spring clip. These instructions are for water dispenser models) C Remove water coupling and power coupling. Installation Instructions REMOVING THE DOORS (Double Door Refrigerator Models only) IMPORTANT NOTES NOTE: Door swing is not reversible. • Read the... instructions all door shelves, including the dairy compartment. 1 REMOVE THE REFRIGERATOR DOORS A Tape the doors shut with collar ...
Owners Manual
Page 32
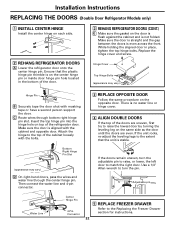
... line through bottom right hinge pin slot. Replace the hinge cover and screw. Insert the top hinge pin into the hinge hole on each side. 2 REHANG REFRIGERATOR DOORS A Lower the refrigerator door onto the center hinge pin. Installation Instructions REPLACING THE DOORS (Double Door Refrigerator Models only) 1...is on the opposite door. Use a 1/4″ Allen wrench to the Replacing the Freezer Drawer section for instructions. 32 Adjustable pin Water Line Center Hinge Pin 4-Pin Connector 5 REPLACE FREEZER DRAWER Refer to turn the adjustable pin to raise, or lower, the left door ...
... line through bottom right hinge pin slot. Replace the hinge cover and screw. Insert the top hinge pin into the hinge hole on each side. 2 REHANG REFRIGERATOR DOORS A Lower the refrigerator door onto the center hinge pin. Installation Instructions REPLACING THE DOORS (Double Door Refrigerator Models only) 1...is on the opposite door. Use a 1/4″ Allen wrench to the Replacing the Freezer Drawer section for instructions. 32 Adjustable pin Water Line Center Hinge Pin 4-Pin Connector 5 REPLACE FREEZER DRAWER Refer to turn the adjustable pin to raise, or lower, the left door ...
Owners Manual
Page 40
... Freezer handle sections for 3 seconds. Handle is normal. Consumer Support Troubleshooting Tips Installation Instructions Operating Instructions Safety Instructions Before you need to see if the bulbs at the top of the refrigerator light bulbs are not even (on Double Door models ...8226;See Align Double Doors section located under Replacing the Door (Double Door Refrigerator Models only). 40 Refrigerator beeping This is normal. compartment light up , check to replace the filter soon. Refrigerator doors are burned out, and replace if necessary. The filter cartridge should...
... Freezer handle sections for 3 seconds. Handle is normal. Consumer Support Troubleshooting Tips Installation Instructions Operating Instructions Safety Instructions Before you need to see if the bulbs at the top of the refrigerator light bulbs are not even (on Double Door models ...8226;See Align Double Doors section located under Replacing the Door (Double Door Refrigerator Models only). 40 Refrigerator beeping This is normal. compartment light up , check to replace the filter soon. Refrigerator doors are burned out, and replace if necessary. The filter cartridge should...


