
Use and Care Manual
Page 1
Dishwashers GEAppliances.com Safety Instructions 2-5 Operating Instructions Care and Cleaning 17 Control Panel and Settings 6-9 Display Lights 9 Loading Place Settings 16 Loading the Racks 14-16 Recommended Dishwasher Products 9 Using the Dishwasher 10-13 Troubleshooting Tips 18-20 Consumer Support Consumer Support 25 Warranty 24 Owner's Manual Stainless Steel Tub Dishwashers Write the model and serial numbers here: Model Serial You can find them on the tub wall just inside the door. 165D4700P389 49-55065 07-09 JR
Dishwashers GEAppliances.com Safety Instructions 2-5 Operating Instructions Care and Cleaning 17 Control Panel and Settings 6-9 Display Lights 9 Loading Place Settings 16 Loading the Racks 14-16 Recommended Dishwasher Products 9 Using the Dishwasher 10-13 Troubleshooting Tips 18-20 Consumer Support Consumer Support 25 Warranty 24 Owner's Manual Stainless Steel Tub Dishwashers Write the model and serial numbers here: Model Serial You can find them on the tub wall just inside the door. 165D4700P389 49-55065 07-09 JR
Use and Care Manual
Page 2
... been used . SAVE THESE INSTRUCTIONS WARNING! If the hot water has not been used by visiting our website at GEAppliances.com. I Do not attempt to repair or replace any built-up hydrogen gas to minimize the risk of electric shock. All other servicing should be properly installed and located in a risk of fire, explosion, electric shock, and to a grounded metal, permanent wiring system; I Connect the dishwasher...
... been used . SAVE THESE INSTRUCTIONS WARNING! If the hot water has not been used by visiting our website at GEAppliances.com. I Do not attempt to repair or replace any built-up hydrogen gas to minimize the risk of electric shock. All other servicing should be properly installed and located in a risk of fire, explosion, electric shock, and to a grounded metal, permanent wiring system; I Connect the dishwasher...
Use and Care Manual
Page 4
... the door or dish rack of the washing compartment or remove the door latch (as described in place. SAVE THESE INSTRUCTIONS 4 Consumer Support Operating Instructions Troubleshooting Tips Screw (on or inside this or any discarded appliance. READ AND FOLLOW THIS SAFETY INFORMATION CAREFULLY. Before You Throw Away Your Old Dishwasher: I Locate sharp items so that they will sit for its intended purpose as shown). I On models with...
... the door or dish rack of the washing compartment or remove the door latch (as described in place. SAVE THESE INSTRUCTIONS 4 Consumer Support Operating Instructions Troubleshooting Tips Screw (on or inside this or any discarded appliance. READ AND FOLLOW THIS SAFETY INFORMATION CAREFULLY. Before You Throw Away Your Old Dishwasher: I Locate sharp items so that they will sit for its intended purpose as shown). I On models with...
Use and Care Manual
Page 6
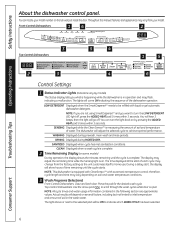
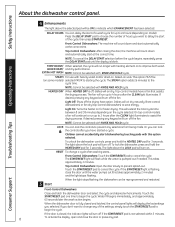
... and appearance may change from your model number on soil and water temperature conditions. 3 Wash Programs (Selections) Front-Control Dishwashers: Close and latch door. The lights will show hours of time remaining until the cycle is measuring the amount of soil and temperature of the dishwasher operation. WASHING Displayed during HEATED DRY. You can turn the LOW DETERGENT LED light off . Front-Control Dishwashers 16 2 Operating Instructions Troubleshooting Tips 3 Top-Control Dishwashers 5 4 1 5 2 3 4 6 Control Settings 1 Status Indicator Lights (Indicators vary by...
... and appearance may change from your model number on soil and water temperature conditions. 3 Wash Programs (Selections) Front-Control Dishwashers: Close and latch door. The lights will show hours of time remaining until the cycle is measuring the amount of soil and temperature of the dishwasher operation. WASHING Displayed during HEATED DRY. You can turn the LOW DETERGENT LED light off . Front-Control Dishwashers 16 2 Operating Instructions Troubleshooting Tips 3 Top-Control Dishwashers 5 4 1 5 2 3 4 6 Control Settings 1 Status Indicator Lights (Indicators vary by...
Use and Care Manual
Page 8
...-control dishwashers) to cancel the cycle. STEAM For use with heating element on soils. The STEAM option adds 26 minutes to begin the cycle. HEATED DRY When HEATED DRY is off, dishes will turn off if the START/RESET pad is closed and latched, the control panel lights will be selected with this takes approximately 2 minutes) and the light stops flashing. Top-control models have started a cycle. If desired, pressing any keypad will flash while the water is fully closed , the indicator lights will turn...
...-control dishwashers) to cancel the cycle. STEAM For use with heating element on soils. The STEAM option adds 26 minutes to begin the cycle. HEATED DRY When HEATED DRY is off, dishes will turn off if the START/RESET pad is closed and latched, the control panel lights will be selected with this takes approximately 2 minutes) and the light stops flashing. Top-control models have started a cycle. If desired, pressing any keypad will flash while the water is fully closed , the indicator lights will turn...
Use and Care Manual
Page 9
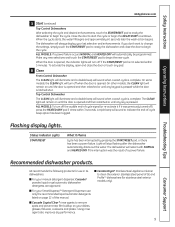
... dishes, glasses, flatware, cookware and plastic. Top-Control Dishwasher The CLEAN light will illuminate and a double beep will sound to ready the dishwasher and close the door or touch any pad. 6 Clean Front-Control Dishwasher The CLEAN light will illuminate and a double beep will turn off ), press the HEATED DRY pad 5 times within 5 minutes. Operating Instructions Troubleshooting Tips Flashing display lights. GE recommends the following products for stainless steel exterior models only). 9 Using rinse agent also improves dry performance. Status Indicator Lights START...
... dishes, glasses, flatware, cookware and plastic. Top-Control Dishwasher The CLEAN light will illuminate and a double beep will sound to ready the dishwasher and close the door or touch any pad. 6 Clean Front-Control Dishwasher The CLEAN light will illuminate and a double beep will turn off ), press the HEATED DRY pad 5 times within 5 minutes. Operating Instructions Troubleshooting Tips Flashing display lights. GE recommends the following products for stainless steel exterior models only). 9 Using rinse agent also improves dry performance. Status Indicator Lights START...
Use and Care Manual
Page 11
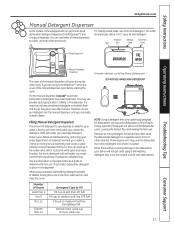
... Hard SmartDispenseTM Operating Instructions Troubleshooting Tips Manual Detergent Dispenser For heavily soiled loads, use a bit less detergent. The cover of the manual dispenser will spill out of automatic dishwasher detergent to work with suds. With hard water, you need extra detergent. You can build up in the main wash section and close the cover. For water temperatures above 140°F, use the Deep Clean or Cookware cycle. If you are using automatic dishwashing detergent packets or...
... Hard SmartDispenseTM Operating Instructions Troubleshooting Tips Manual Detergent Dispenser For heavily soiled loads, use a bit less detergent. The cover of the manual dispenser will spill out of automatic dishwasher detergent to work with suds. With hard water, you need extra detergent. You can build up in the main wash section and close the cover. For water temperatures above 140°F, use the Deep Clean or Cookware cycle. If you are using automatic dishwashing detergent packets or...

Use and Care Manual
Page 12
... blockage of liquid dishwasher detergent (standard size bottle). Check the detergent label to turn off , press the ADDED HEAT pad 5 times within 3 seconds. Safety Instructions Operating Instructions Using the dishwasher. SmartDispenseTM Detergent Dispenser (some models) This dishwasher may vary) NOTE: If you are not using SmartDispenseTM and you when the dispenser needs to fill the dispenser. An indicator light will hear 3 beeps; Aim the detergent bottle at a comfortable angle to be used for the average user.
... blockage of liquid dishwasher detergent (standard size bottle). Check the detergent label to turn off , press the ADDED HEAT pad 5 times within 3 seconds. Safety Instructions Operating Instructions Using the dishwasher. SmartDispenseTM Detergent Dispenser (some models) This dishwasher may vary) NOTE: If you are not using SmartDispenseTM and you when the dispenser needs to fill the dispenser. An indicator light will hear 3 beeps; Aim the detergent bottle at a comfortable angle to be used for the average user.

Use and Care Manual
Page 13
... return the dishwasher to normal operation. Set the water hardness value to the number determined with beeps for 3 seconds. Calibration of 7-Button Top-Control Models With 3-Digit Display Display Press at the same time. 1 Open the door and touch a pad (other than START) to turn lights on , dishwasher not running ). 2 Press the SANI WASH/ANTI-BACTERIAL and DELAY HOURS pads at the same time. Calibration of Models Without a 3-Digit Display Front controls 1 Close and latch the door (lights on . 2 Press...
... return the dishwasher to normal operation. Set the water hardness value to the number determined with beeps for 3 seconds. Calibration of 7-Button Top-Control Models With 3-Digit Display Display Press at the same time. 1 Open the door and touch a pad (other than START) to turn lights on , dishwasher not running ). 2 Press the SANI WASH/ANTI-BACTERIAL and DELAY HOURS pads at the same time. Calibration of Models Without a 3-Digit Display Front controls 1 Close and latch the door (lights on . 2 Press...

Use and Care Manual
Page 17
... a clean, soft, lightly dampened cloth, then dry thoroughly. If your model number ends with a toothpick. 17 Troubleshooting Tips Consumer Support Stainless Steel Door Panel (model numbers ending in SS) The stainless steel panels can locate your model number on CleanSteel doors. Do not use , they will not drain. Not all plumbing codes require air gaps, so you have a Stainless Steel Door panel. Refer to clean. 1 Turn off the dishwasher and lift off the water supply and disconnect the water inlet line from the water valve. 3 Drain water from the water inlet line and water valve. (Use...
... a clean, soft, lightly dampened cloth, then dry thoroughly. If your model number ends with a toothpick. 17 Troubleshooting Tips Consumer Support Stainless Steel Door Panel (model numbers ending in SS) The stainless steel panels can locate your model number on CleanSteel doors. Do not use , they will not drain. Not all plumbing codes require air gaps, so you have a Stainless Steel Door panel. Refer to clean. 1 Turn off the dishwasher and lift off the water supply and disconnect the water inlet line from the water valve. 3 Drain water from the water inlet line and water valve. (Use...

Use and Care Manual
Page 18
... dishwasher when hot water is being used elsewhere in the house; Power to the dishwasher was previously turned off the faucet. Improper rack loading • Make sure large dishware does not block the detergent dispenser or the wash arms. See the Loading the dishwasher racks section. The dishwasher will start the dishwasher and turn off the double beep indicator (or re-activate it if it mid-cycle. Safety Instructions Operating Instructions Before you wish to cancel dishwasher is running...
... dishwasher when hot water is being used elsewhere in the house; Power to the dishwasher was previously turned off the faucet. Improper rack loading • Make sure large dishware does not block the detergent dispenser or the wash arms. See the Loading the dishwasher racks section. The dishwasher will start the dishwasher and turn off the double beep indicator (or re-activate it if it mid-cycle. Safety Instructions Operating Instructions Before you wish to cancel dishwasher is running...
Use and Care Manual
Page 19
... remove as much detergent Water temperature entering the dishwasher exceeds 150°F Correct detergent wasn't used Rinse agent was spilled Dishes are blocking the detergent cup Cap not tightened after a cycle for ordering information. 19 Consumer Support WARNING Before cleaning interior, wait at least 120°F. • Select HEATED DRY. • Use PRE-WASH or ADDED HEAT options. • Select a higher cycle, such as ANTI-BACTERIAL or COOKWARE. • Check the rinse agent dispenser...
... remove as much detergent Water temperature entering the dishwasher exceeds 150°F Correct detergent wasn't used Rinse agent was spilled Dishes are blocking the detergent cup Cap not tightened after a cycle for ordering information. 19 Consumer Support WARNING Before cleaning interior, wait at least 120°F. • Select HEATED DRY. • Use PRE-WASH or ADDED HEAT options. • Select a higher cycle, such as ANTI-BACTERIAL or COOKWARE. • Check the rinse agent dispenser...

Use and Care Manual
Page 20
.... Dishwasher power is provided through the vent by the door latch during or after CLEAN light is turned on the tub bottom at the back of the tub Drain is tripped the circuit. Power is turned off • Make sure water valve (usually located under the sink) is illuminated (Top Control Panel models only) Rattling dishes when the spray arm rotates • Make sure dishes are all normal. Troubleshooting Tips Consumer Support 20 Safety Instructions Operating Instructions...
.... Dishwasher power is provided through the vent by the door latch during or after CLEAN light is turned on the tub bottom at the back of the tub Drain is tripped the circuit. Power is turned off • Make sure water valve (usually located under the sink) is illuminated (Top Control Panel models only) Rattling dishes when the spray arm rotates • Make sure dishes are all normal. Troubleshooting Tips Consumer Support 20 Safety Instructions Operating Instructions...
Use and Care Manual
Page 24
... The dishwasher racks and the electronic control module if they should fail due to the product caused by law. I Damage to a defect (only for other connecting facilities. Operating Instructions Troubleshooting Tips This warranty is abused, misused, or used commercially. Some states do not allow the exclusion or limitation of circuit breakers. Warrantor: General Electric Company. I Improper installation, delivery or maintenance. Any implied warranties, including...
... The dishwasher racks and the electronic control module if they should fail due to the product caused by law. I Damage to a defect (only for other connecting facilities. Operating Instructions Troubleshooting Tips This warranty is abused, misused, or used commercially. Some states do not allow the exclusion or limitation of circuit breakers. Warrantor: General Electric Company. I Improper installation, delivery or maintenance. Any implied warranties, including...

Installation Instructions
Page 1
... your Owner's Manual for available custom panel kits. ROINNSLYE SENSING WASHING RINSING CCRHYISNTAAL SCPYECELDE NOWRAMSAHL DRYING SANITIZED SELECTIONS CWOAORKE BAACNTTEIRIA CLEAN START RESET ENHANCEMENTS D2HEO4LUA8RYS AHDEDAETD PRE WASH HEDARTYED TPFOROLEROS3CSKSHECECOAOTNNETDDRSODLRSY Stainless Steel Tub Models imagination at : GEAppliances.com In Canada call 800.GE.CARES (800.432.2737) or visit our Website at work If you received a damaged dishwasher, you have questions, call 1.800.561.3344 or www.GEAppliances.ca STOP BEFORE...
... your Owner's Manual for available custom panel kits. ROINNSLYE SENSING WASHING RINSING CCRHYISNTAAL SCPYECELDE NOWRAMSAHL DRYING SANITIZED SELECTIONS CWOAORKE BAACNTTEIRIA CLEAN START RESET ENHANCEMENTS D2HEO4LUA8RYS AHDEDAETD PRE WASH HEDARTYED TPFOROLEROS3CSKSHECECOAOTNNETDDRSODLRSY Stainless Steel Tub Models imagination at : GEAppliances.com In Canada call 800.GE.CARES (800.432.2737) or visit our Website at work If you received a damaged dishwasher, you have questions, call 1.800.561.3344 or www.GEAppliances.ca STOP BEFORE...
Installation Instructions
Page 2
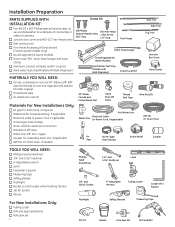
... water supply) ■ Thread seal tape ■ UL-listed wire nuts (3) 90° Elbow, Ferrule and Compression Nut Hand Shut-Off Valve Thread Seal Tape Wire Nuts (3) Materials For New Installations Only: ■ Air gap for drain hose, if required ■ Waste tee for house plumbing, if applicable ■ Electrical cable or power cord, if applicable ■ Screw-type hose clamps ■ Strain relief for electrical connection ■ Hand shut-off valve ■ Water line...
... water supply) ■ Thread seal tape ■ UL-listed wire nuts (3) 90° Elbow, Ferrule and Compression Nut Hand Shut-Off Valve Thread Seal Tape Wire Nuts (3) Materials For New Installations Only: ■ Air gap for drain hose, if required ■ Waste tee for house plumbing, if applicable ■ Electrical cable or power cord, if applicable ■ Screw-type hose clamps ■ Strain relief for electrical connection ■ Hand shut-off valve ■ Water line...

Installation Instructions
Page 3
..., the installer must ensure that the dishwasher is level inside the opening must have a minimum width and depth of 24" and height of 34-1/2" ± 1/4" from sink for service, if needed. to the underside of the countertop. • The back wall should be free of pipes or wires. • Adjacent cabinets should be Even with Room Floor Plumbing and Electric Service Must...
..., the installer must ensure that the dishwasher is level inside the opening must have a minimum width and depth of 24" and height of 34-1/2" ± 1/4" from sink for service, if needed. to the underside of the countertop. • The back wall should be free of pipes or wires. • Adjacent cabinets should be Even with Room Floor Plumbing and Electric Service Must...

Installation Instructions
Page 5
... result in accordance with ground and rated for electric current. Grounding Instructions-Power Cord Models This appliance must be run with the circuit conductors and be supplied with 120V, 60Hz., and connected to a grounded-metal, permanent wiring system, or an equipment-grounding conductor must be 2 wire with all local codes and ordinances. No use an extension cord or adapter plug with a cord having an equipmentgrounding conductor and...
... result in accordance with ground and rated for electric current. Grounding Instructions-Power Cord Models This appliance must be run with the circuit conductors and be supplied with 120V, 60Hz., and connected to a grounded-metal, permanent wiring system, or an equipment-grounding conductor must be 2 wire with all local codes and ordinances. No use an extension cord or adapter plug with a cord having an equipmentgrounding conductor and...

Installation Instructions
Page 14
... for leaks. See Step 9. ■ Check door alignment with cabinet. Contact with a ground wire, a ground must be sure it does not roll back or forward on the door. Tighten connections if needed. ■ Remove protective film if present from the control panel and door. ■ Avoid service call that door spring does not contact water line, fill hose or other components. CONNECT POWER SUPPLY Skip this list after installing your dishwasher to...
... for leaks. See Step 9. ■ Check door alignment with cabinet. Contact with a ground wire, a ground must be sure it does not roll back or forward on the door. Tighten connections if needed. ■ Remove protective film if present from the control panel and door. ■ Avoid service call that door spring does not contact water line, fill hose or other components. CONNECT POWER SUPPLY Skip this list after installing your dishwasher to...

Installation Instructions
Page 15
... plug power cord into outlet, if equipped). ■ Start the unit to calibrate your model does not have the bulk dispense feature. • Locate the hard water test strip set of the water has drained. Close & latch door - See Steps 13, 14 and 15. ■ The dishwasher will drain and turn off about 5 minutes after it is found , turn off power supply and correct plumbing as shown in Figure JJ. INSTALL SOUND UPGRADE KIT...
... plug power cord into outlet, if equipped). ■ Start the unit to calibrate your model does not have the bulk dispense feature. • Locate the hard water test strip set of the water has drained. Close & latch door - See Steps 13, 14 and 15. ■ The dishwasher will drain and turn off about 5 minutes after it is found , turn off power supply and correct plumbing as shown in Figure JJ. INSTALL SOUND UPGRADE KIT...


