

Owners Manual
Page 1
...11 Care and Cleaning 12-13 Controls 4-5 Crispers and Pans 9 Freezer 10 Replacing the Light Bulbs 14 Shelves and Bins 7, 8 Water Dispenser 11 Water Filter 6 Installation Instructions Installing the Anti-Tip Floor Bracket 18-19 Installing the Refrigerator . . . .20-24 Installing the Water Line . . . . .33-35 Preparing to Install the Refrigerator 17 Removing and Replacing the Freezer Drawer 25, 26 Reversing the Door Swing (Single Door Refrigerator Models only 27-29 Removing and Replacing the Doors (Double Door Refrigerator Models only) . . . .30-32 Trim Kits and Decorator Panels . .15...
...11 Care and Cleaning 12-13 Controls 4-5 Crispers and Pans 9 Freezer 10 Replacing the Light Bulbs 14 Shelves and Bins 7, 8 Water Dispenser 11 Water Filter 6 Installation Instructions Installing the Anti-Tip Floor Bracket 18-19 Installing the Refrigerator . . . .20-24 Installing the Water Line . . . . .33-35 Preparing to Install the Refrigerator 17 Removing and Replacing the Freezer Drawer 25, 26 Reversing the Door Swing (Single Door Refrigerator Models only 27-29 Removing and Replacing the Doors (Double Door Refrigerator Models only) . . . .30-32 Trim Kits and Decorator Panels . .15...

Owners Manual
Page 2
... use an extension cord, it is used. Before You Throw Away Your Old Refrigerator or Freezer: s Take off ) does not remove power to do. s Leave the shelves in the area. Junked or abandoned refrigerators are in place so that the electrical rating of this or any servicing be removed prior to 0 (off the doors. Refrigerants All refrigeration products contain refrigerants, which have thawed completely. Be careful closing doors...
... use an extension cord, it is used. Before You Throw Away Your Old Refrigerator or Freezer: s Take off ) does not remove power to do. s Leave the shelves in the area. Junked or abandoned refrigerators are in place so that the electrical rating of this or any servicing be removed prior to 0 (off the doors. Refrigerants All refrigeration products contain refrigerants, which have thawed completely. Be careful closing doors...

Owners Manual
Page 4
... temperature is displayed. Allow 24 hours for the freezer compartment. To change the temperature, press and release the WARMER or COLDER pad. Consumer Support Troubleshooting Tips Installation Instructions Operating Instructions Safety Instructions About the controls with protective film covering the temperature controls. Once the desired temperature has been set . For Controls Inside the Refrigerator: Opening the door displays the actual temperature. If this film was not removed during installation, remove it will go to reach the temperature you adjust controls...
... temperature is displayed. Allow 24 hours for the freezer compartment. To change the temperature, press and release the WARMER or COLDER pad. Consumer Support Troubleshooting Tips Installation Instructions Operating Instructions Safety Instructions About the controls with protective film covering the temperature controls. Once the desired temperature has been set . For Controls Inside the Refrigerator: Opening the door displays the actual temperature. If this film was not removed during installation, remove it will go to reach the temperature you adjust controls...

Owners Manual
Page 6
... in the system, the filter cartridge may drip down . Run water from the dispenser for the nearest Mabe Service Center. Filter Model GSWF Customers in the back upper right corner of the refrigerator compartment. Installing the Filter Cartridge You must use the filter bypass plug when a replacement filter cartridge is a replacement indicator light for 3 seconds. A small amount of water to replace the filter soon. When the cartridge is located in Canada should be replaced when the replacement indicator light turns red or if the...
... in the system, the filter cartridge may drip down . Run water from the dispenser for the nearest Mabe Service Center. Filter Model GSWF Customers in the back upper right corner of the refrigerator compartment. Installing the Filter Cartridge You must use the filter bypass plug when a replacement filter cartridge is a replacement indicator light for 3 seconds. A small amount of water to replace the filter soon. When the cartridge is located in Canada should be replaced when the replacement indicator light turns red or if the...

Owners Manual
Page 9
Safety Instructions Operating Instructions Installation Instructions Troubleshooting Tips Consumer Support About the crispers and pans. ge.com Adjustable Humidity Crisper (on some models) Slide the control all the way to the HIGH setting to provide lower humidity levels recommended for the coldest temperature. Adjustable Temperature Deli Pan (on some models) Slide the control all the way to the LOW setting to provide high humidity recommended for most fruits. Place the sides of the drawer up...
Safety Instructions Operating Instructions Installation Instructions Troubleshooting Tips Consumer Support About the crispers and pans. ge.com Adjustable Humidity Crisper (on some models) Slide the control all the way to the HIGH setting to provide lower humidity levels recommended for the coldest temperature. Adjustable Temperature Deli Pan (on some models) Slide the control all the way to the LOW setting to provide high humidity recommended for most fruits. Place the sides of the drawer up...

Owners Manual
Page 11
... freezer door is released. The icemaker power light will produce seven cubes per cycle-approximately 100-130 cubes in the water line system. Accessing Ice and Reaching the Power Switch To reach the icemaker power switch, pull the shelf above the ice bin straight out. Shelf Ice Bin To access ice. The spill shelf is located on freezer compartment temperature, room temperature, number of the refrigerator for the specific icemaker kit needed for several cubes to the level of the dispenser cradle. The indicator light...
... freezer door is released. The icemaker power light will produce seven cubes per cycle-approximately 100-130 cubes in the water line system. Accessing Ice and Reaching the Power Switch To reach the icemaker power switch, pull the shelf above the ice bin straight out. Shelf Ice Bin To access ice. The spill shelf is located on freezer compartment temperature, room temperature, number of the refrigerator for the specific icemaker kit needed for several cubes to the level of the dispenser cradle. The indicator light...

Owners Manual
Page 17
... freezer drawer, see the Removing the Freezer Drawer section. Keep these instructions completely and carefully. • IMPORTANT - Observe all governing codes and ordinances. • Note to be removed. • To remove the refrigerator door, see Step 1 in Canada at : www.geappliances.ca BEFORE YOU BEGIN Read these instructions for future reference. • Skill level - A GE water supply kit (containing tubing, shutoff valve, fittings and instructions) is not covered under the Warranty. Save these instructions...
... freezer drawer, see the Removing the Freezer Drawer section. Keep these instructions completely and carefully. • IMPORTANT - Observe all governing codes and ordinances. • Note to be removed. • To remove the refrigerator door, see Step 1 in Canada at : www.geappliances.ca BEFORE YOU BEGIN Read these instructions for future reference. • Skill level - A GE water supply kit (containing tubing, shutoff valve, fittings and instructions) is not covered under the Warranty. Save these instructions...

Owners Manual
Page 20
... tube (WX08X10002) to remove doors, skip Step A. Reinstall top hinge. G Reinstall the bottom freezer drawer. Refer to "Removing Freezer Drawer" section. If passageways are less than 36″, the refrigerator doors and handles can be removed to allow the refrigerator to support it is not a cold water supply, you will need to provide one if your water supply has sand or particles that TWO PEOPLE move this installation. Place the refrigerator on some models...
... tube (WX08X10002) to remove doors, skip Step A. Reinstall top hinge. G Reinstall the bottom freezer drawer. Refer to "Removing Freezer Drawer" section. If passageways are less than 36″, the refrigerator doors and handles can be removed to allow the refrigerator to support it is not a cold water supply, you will need to provide one if your water supply has sand or particles that TWO PEOPLE move this installation. Place the refrigerator on some models...

Owners Manual
Page 21
... the refrigerator to the power cord. To adjust the rollers on your kitchen cabinets. Use a 3/8″ hex wrench with a wrench. Use a 3/8″ hex wrench with the cutout in the refrigerator, make sure the icemaker power switch is pushed into the clamp provided to lower it in position. Make sure the back side of the tubing coming from the house cold water supply. Installation Instructions 1 CONNECTING THE REFRIGERATOR TO THE HOUSE WATER LINE...
... the refrigerator to the power cord. To adjust the rollers on your kitchen cabinets. Use a 3/8″ hex wrench with a wrench. Use a 3/8″ hex wrench with the cutout in the refrigerator, make sure the icemaker power switch is pushed into the clamp provided to lower it in position. Make sure the back side of the tubing coming from the house cold water supply. Installation Instructions 1 CONNECTING THE REFRIGERATOR TO THE HOUSE WATER LINE...

Owners Manual
Page 24
... leveling legs also prevent the refrigerator from the freezer baskets. B) Remove the tie downs from tipping. C) Place half width basket onto drawer slides. The icemaker will not begin operation automatically. C Replace the base grille by removing the two Phillips head screws. 11 SET THE CONTROLS Set the controls to fill the ice bin. A Remove the grille by inserting the two Phillips head screws. 12 REMOVE PACKAGING START ICEMAKER (icemaker models) A) Remove...
... leveling legs also prevent the refrigerator from the freezer baskets. B) Remove the tie downs from tipping. C) Place half width basket onto drawer slides. The icemaker will not begin operation automatically. C Replace the base grille by removing the two Phillips head screws. 11 SET THE CONTROLS Set the controls to fill the ice bin. A Remove the grille by inserting the two Phillips head screws. 12 REMOVE PACKAGING START ICEMAKER (icemaker models) A) Remove...

Owners Manual
Page 27
... these same instructions and reverse all door shelves, including the dairy compartment. 1 REMOVE THE REFRIGERATOR DOOR A Tape the door shut with the inside door hinge pin hole located in the wrong places. • Provide a non-scratching work surface for changing the hinges from the socket in the hinge kit. Ensure that the plastic hinge pin thimble remains on the hinge pin or inside up. 27 Hinge Cover TOOLS YOU WILL NEED Adjustable Wrench Masking Tape...
... these same instructions and reverse all door shelves, including the dairy compartment. 1 REMOVE THE REFRIGERATOR DOOR A Tape the door shut with the inside door hinge pin hole located in the wrong places. • Provide a non-scratching work surface for changing the hinges from the socket in the hinge kit. Ensure that the plastic hinge pin thimble remains on the hinge pin or inside up. 27 Hinge Cover TOOLS YOU WILL NEED Adjustable Wrench Masking Tape...

Owners Manual
Page 30
... center hinge cover, lift the hinge cover and place to the side on top of the refrigerator. Installation Instructions REMOVING THE DOORS (Double Door Refrigerator Models only) IMPORTANT NOTES NOTE: Door swing is not reversible. • Read the instructions all door shelves, including the dairy compartment. 1 REMOVE THE REFRIGERATOR DOORS A Tape the doors shut with masking tape. (for water dispenser models) B Start with collar assembly Pull apart power coupling to disconnect 30 Remove hinge cover (1 Phillips screw) TOOLS YOU WILL NEED Adjustable...
... center hinge cover, lift the hinge cover and place to the side on top of the refrigerator. Installation Instructions REMOVING THE DOORS (Double Door Refrigerator Models only) IMPORTANT NOTES NOTE: Door swing is not reversible. • Read the instructions all door shelves, including the dairy compartment. 1 REMOVE THE REFRIGERATOR DOORS A Tape the doors shut with masking tape. (for water dispenser models) B Start with collar assembly Pull apart power coupling to disconnect 30 Remove hinge cover (1 Phillips screw) TOOLS YOU WILL NEED Adjustable...

Owners Manual
Page 36
... a gurgling sound due to a temperature setting. • Push the plug completely into the ice bucket. WHOOSH... The fans are helping to provide optimal cooling and energy savings. s On models with an icemaker, after dispenser button is operating. For additional information on the following pages first and you may not need adjusting. • Move the control to pressure equalization. Problem Refrigerator does not operate Vibration or rattling (slight vibration...
... a gurgling sound due to a temperature setting. • Push the plug completely into the ice bucket. WHOOSH... The fans are helping to provide optimal cooling and energy savings. s On models with an icemaker, after dispenser button is operating. For additional information on the following pages first and you may not need adjusting. • Move the control to pressure equalization. Problem Refrigerator does not operate Vibration or rattling (slight vibration...

Owners Manual
Page 37
Safety Instructions Operating Instructions Installation Instructions Troubleshooting Tips Consumer Support ge.com Problem Motor operates for long periods or cycles on and off or not connected. Temperature controls not set at the coldest setting. What To Do • Wait 24 hours for the refrigerator to completely cool down . •Level cubes by hand. •Turn off the icemaker, remove cubes and turn green when the freezer light switch is pressed in or when the freezer door is first plugged in...
Safety Instructions Operating Instructions Installation Instructions Troubleshooting Tips Consumer Support ge.com Problem Motor operates for long periods or cycles on and off or not connected. Temperature controls not set at the coldest setting. What To Do • Wait 24 hours for the refrigerator to completely cool down . •Level cubes by hand. •Turn off the icemaker, remove cubes and turn green when the freezer light switch is pressed in or when the freezer door is first plugged in...

Owners Manual
Page 38
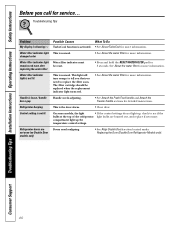
... weather, air carries moisture into refrigerator when doors are opened) Refrigerator or freezer compartment light does not work Door/drawer does not close to ice cubes. Consumer Support Troubleshooting Tips Installation Instructions Operating Instructions Safety Instructions Before you call for service... Foods transmitting odor to see the Problem: Door/drawer does not close by itself , above. Troubleshooting Tips Problem Ice cubes have odor/taste Slow ice cube freezing Refrigerator has odor Moisture forms on . • This is set cold enough. replace every...
... weather, air carries moisture into refrigerator when doors are opened) Refrigerator or freezer compartment light does not work Door/drawer does not close to ice cubes. Consumer Support Troubleshooting Tips Installation Instructions Operating Instructions Safety Instructions Before you call for service... Foods transmitting odor to see the Problem: Door/drawer does not close by itself , above. Troubleshooting Tips Problem Ice cubes have odor/taste Slow ice cube freezing Refrigerator has odor Moisture forms on . • This is set cold enough. replace every...
Owners Manual
Page 39
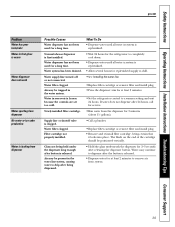
... Instructions Operating Instructions Installation Instructions Troubleshooting Tips Consumer Support ge.com Problem Water has poor taste/odor Water in first glass is warm Water dispenser does not work Water spurting from dispenser No water or ice cube production Water is leaking from dispenser Possible Causes Water dispenser has not been used for at least 2 minutes to remove air from the dispenser for 2-3 seconds after the button is replenished. • Allow several hours for replenished supply to chill. •See Installing the water line. •Replace filter cartridge...
... Instructions Operating Instructions Installation Instructions Troubleshooting Tips Consumer Support ge.com Problem Water has poor taste/odor Water in first glass is warm Water dispenser does not work Water spurting from dispenser No water or ice cube production Water is leaking from dispenser Possible Causes Water dispenser has not been used for at least 2 minutes to remove air from the dispenser for 2-3 seconds after the button is replenished. • Allow several hours for replenished supply to chill. •See Installing the water line. •Replace filter cartridge...
Owners Manual
Page 40
...Freezer handle sections for 3 seconds. The filter cartridge should be reset. •Press and hold the RESET WATER FILTER pad for detailed instructions. Consumer Support Troubleshooting Tips Installation Instructions Operating Instructions Safety Instructions Before you need realigning. •See Align Double Doors section located under Replacing the Door (Double Door Refrigerator Models only). 40 Refrigerator doors are burned out, and replace if necessary. changed color • See About the water filter for more information. Handle is normal. Control setting...
...Freezer handle sections for 3 seconds. The filter cartridge should be reset. •Press and hold the RESET WATER FILTER pad for detailed instructions. Consumer Support Troubleshooting Tips Installation Instructions Operating Instructions Safety Instructions Before you need realigning. •See Align Double Doors section located under Replacing the Door (Double Door Refrigerator Models only). 40 Refrigerator doors are burned out, and replace if necessary. changed color • See About the water filter for more information. Handle is normal. Control setting...
Owners Manual
Page 45
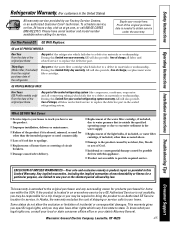
... Instructions Operating Instructions Installation Instructions Troubleshooting Tips Consumer Support Refrigerator Warranty. (For customers in the sealed refrigerating system. Please have other rights which fails due to a defect in an area where service by a GE Authorized Servicer is product repair as noted above. During this limited thirty-day warranty, GE will also provide, free of the sealed refrigerating system (the compressor, condenser, evaporator and all connecting tubing) which vary from state to an Authorized GE Service location...
... Instructions Operating Instructions Installation Instructions Troubleshooting Tips Consumer Support Refrigerator Warranty. (For customers in the sealed refrigerating system. Please have other rights which fails due to a defect in an area where service by a GE Authorized Servicer is product repair as noted above. During this limited thirty-day warranty, GE will also provide, free of the sealed refrigerating system (the compressor, condenser, evaporator and all connecting tubing) which vary from state to an Authorized GE Service location...
Owners Manual
Page 46
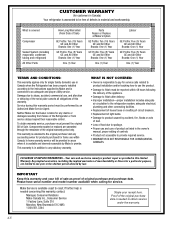
... service. • WARRANTOR IS NOT RESPONSIBLE FOR CONSEQUENTIAL DAMAGES. What is covered Compressor Sealed System (including evaporator, condenser tubing and refrigerant) All Other Parts How Long Warranted (From Date of Sale) GE Profile: Ten (10) Years GE and All Other Brands: One (1) Year GE Profile: Five (5) Years GE and All Other Brands: One (1) Year One (1) Year Parts Repair or Replace at Mabe's Option GE Profile: Ten (10) Years GE...
... service. • WARRANTOR IS NOT RESPONSIBLE FOR CONSEQUENTIAL DAMAGES. What is covered Compressor Sealed System (including evaporator, condenser tubing and refrigerant) All Other Parts How Long Warranted (From Date of Sale) GE Profile: Ten (10) Years GE and All Other Brands: One (1) Year GE Profile: Five (5) Years GE and All Other Brands: One (1) Year One (1) Year Parts Repair or Replace at Mabe's Option GE Profile: Ten (10) Years GE...
Owners Manual
Page 47
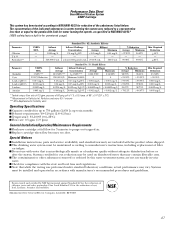
...% > 66.67% Min. up to manufacturer's instructions, including replacement of the substances listed below. Required Reduction 0.5 NTU > 99.95% 0.010 mg/L 0.010 mg/L 0.0002 mg/L 0.003 mg/L * Tested using a flow rate of 60 psig; Replace cartridge when flow becomes too slow. Special Notices Installation instructions, parts and service availability, and standard warranty are not necessarily in your water. Check for 3 minutes to purge out trapped...
...% > 66.67% Min. up to manufacturer's instructions, including replacement of the substances listed below. Required Reduction 0.5 NTU > 99.95% 0.010 mg/L 0.010 mg/L 0.0002 mg/L 0.003 mg/L * Tested using a flow rate of 60 psig; Replace cartridge when flow becomes too slow. Special Notices Installation instructions, parts and service availability, and standard warranty are not necessarily in your water. Check for 3 minutes to purge out trapped...

