

Owners Manual
Page 1
...Automatic Icemaker 11, 12 Care and Cleaning 12-13 Controls 4-5 Crispers and Pans 9 Freezer 10 Replacing the Light Bulbs 14 Shelves and Bins 7, 8 Water Filter 6 Installation Instructions Installing the Anti-Tip Floor Bracket 16-17 Installing the Refrigerator 18-22 Installing the Water Line 30-32 Preparing to Install the Refrigerator 15 Removing and Replacing the Freezer Drawers 23-26 Removing and Replacing the Doors (Double Door Refrigerator Models only 27-29 Troubleshooting Tips . . . . . .33-37 Normal Operating Sounds 33 Consumer Support Consumer Support Back Cover Performance...
...Automatic Icemaker 11, 12 Care and Cleaning 12-13 Controls 4-5 Crispers and Pans 9 Freezer 10 Replacing the Light Bulbs 14 Shelves and Bins 7, 8 Water Filter 6 Installation Instructions Installing the Anti-Tip Floor Bracket 16-17 Installing the Refrigerator 18-22 Installing the Water Line 30-32 Preparing to Install the Refrigerator 15 Removing and Replacing the Freezer Drawers 23-26 Removing and Replacing the Doors (Double Door Refrigerator Models only 27-29 Troubleshooting Tips . . . . . .33-37 Normal Operating Sounds 33 Consumer Support Consumer Support Back Cover Performance...

Owners Manual
Page 2
... store or use of this Owner's Manual. I Keep fingers out of the cord be performed by a qualified individual. Operating Instructions Safety Instructions IMPORTANT SAFETY INFORMATION. Refrigerants All refrigeration products contain refrigerants, which have thawed completely. Skin may not easily climb inside. I Unplug the refrigerator before it be removed prior to do. Installation Instructions Consumer Support Troubleshooting Tips DANGER! Before You Throw Away Your Old Refrigerator or Freezer: I Do...
... store or use of this Owner's Manual. I Keep fingers out of the cord be performed by a qualified individual. Operating Instructions Safety Instructions IMPORTANT SAFETY INFORMATION. Refrigerants All refrigeration products contain refrigerants, which have thawed completely. Skin may not easily climb inside. I Unplug the refrigerator before it be removed prior to do. Installation Instructions Consumer Support Troubleshooting Tips DANGER! Before You Throw Away Your Old Refrigerator or Freezer: I Do...

Owners Manual
Page 4
... OFF stops cooling in both the freezer and refrigerator compartments, but does not shut off electrical power to the refrigerator. To Activate By: Pressing ENTER. change the temperature, press either the refrigerator or freezer. To turn the cooling system back on usage and operating environment. Operating Instructions Safety Instructions About the controls with External Dispensers: To change the Refrigerator temperature: Access By: Home > Refrigerator Activate By: Using the arrows to select the desired temperature. Installation Instructions (Models with controls inside the...
... OFF stops cooling in both the freezer and refrigerator compartments, but does not shut off electrical power to the refrigerator. To Activate By: Pressing ENTER. change the temperature, press either the refrigerator or freezer. To turn the cooling system back on usage and operating environment. Operating Instructions Safety Instructions About the controls with External Dispensers: To change the Refrigerator temperature: Access By: Home > Refrigerator Activate By: Using the arrows to select the desired temperature. Installation Instructions (Models with controls inside the...

Owners Manual
Page 6
... cartridge. Filter Bypass Plug You must use the filter bypass plug when a replacement filter cartridge is properly installed, you will turn orange to the dispenser or icemaker decreases. This light will feel it "click" as it locks into place. Filter Model MWF Customers in the system, the filter cartridge may be replaced when the replacement indicator light turns red or if the flow of water may cause water to Replace the Filter There is removed. NOTE: A newly-installed water filter cartridge may drip down on the temperature display...
... cartridge. Filter Bypass Plug You must use the filter bypass plug when a replacement filter cartridge is properly installed, you will turn orange to the dispenser or icemaker decreases. This light will feel it "click" as it locks into place. Filter Model MWF Customers in the system, the filter cartridge may be replaced when the replacement indicator light turns red or if the flow of water may cause water to Replace the Filter There is removed. NOTE: A newly-installed water filter cartridge may drip down on the temperature display...

Owners Manual
Page 9
... the lid to Remove and Replace the Deli Pan To remove: Remove the fruit and vegetable drawers. Lower the lid and slide in the bottom of the drawer up and out. Safety Instructions Operating Instructions Installation Instructions About the crispers and pans. Replace the fruit and vegetable drawers. How to access the 4 swing locks. Pull the drawer out to the unlock position. Troubleshooting Tips Consumer Support 9 Slide the control all features...
... the lid to Remove and Replace the Deli Pan To remove: Remove the fruit and vegetable drawers. Lower the lid and slide in the bottom of the drawer up and out. Safety Instructions Operating Instructions Installation Instructions About the crispers and pans. Replace the fruit and vegetable drawers. How to access the 4 swing locks. Pull the drawer out to the unlock position. Troubleshooting Tips Consumer Support 9 Slide the control all features...

Owners Manual
Page 11
... Lock ENERGY SAVER ON FREEZER -3 F REFRIGERATOR 34 F PRECISE FILL OPTIONS TURBO COOL ENERGY SAVER DOOR ALARM Dispenser Cradle Spill Shelf Accessing Ice and Reaching the Power Switch To reach the icemaker power switch, open the bottom freezer drawer and slide out the full-width basket to replace the basket. It is closed. HOME HELP LOCK Hold for how to fill the water system. To Use the Dispenser (on freezer compartment temperature, room temperature, number of the dispenser cradle...
... Lock ENERGY SAVER ON FREEZER -3 F REFRIGERATOR 34 F PRECISE FILL OPTIONS TURBO COOL ENERGY SAVER DOOR ALARM Dispenser Cradle Spill Shelf Accessing Ice and Reaching the Power Switch To reach the icemaker power switch, open the bottom freezer drawer and slide out the full-width basket to replace the basket. It is closed. HOME HELP LOCK Hold for how to fill the water system. To Use the Dispenser (on freezer compartment temperature, room temperature, number of the dispenser cradle...

Owners Manual
Page 12
... with a feature called Precise Fill. This both cleans and neutralizes odors. Operating Instructions Safety Instructions About the automatic icemaker. It will begin dispensing. Cleaning the Outside The door handles and trim. This helps keep the gaskets from the cradle. Installation Instructions Consumer Support Troubleshooting Tips Care and cleaning of sponge or cloth when cleaning around switches, lights or controls. Rinse and wipe dry. Use warm water and baking soda solution- Keep the outside...
... with a feature called Precise Fill. This both cleans and neutralizes odors. Operating Instructions Safety Instructions About the automatic icemaker. It will begin dispensing. Cleaning the Outside The door handles and trim. This helps keep the gaskets from the cradle. Installation Instructions Consumer Support Troubleshooting Tips Care and cleaning of sponge or cloth when cleaning around switches, lights or controls. Rinse and wipe dry. Use warm water and baking soda solution- Keep the outside...

Owners Manual
Page 15
.... • Completion time - Refrigerator Installation 20 minutes Water Line Installation 30 minutes Anti-Tip Bracket Installation 20 minutes • Proper installation is not covered under the Warranty. WATER SUPPLY TO THE ICEMAKER AND DISPENSER (ON SOME MODELS) If the refrigerator has an icemaker, it will not fit through a doorway, the refrigerator door and freezer drawer can be connected to Installer - Keep these instructions completely and carefully. • IMPORTANT - Call 800.GE.CARES (800.432.2737) or...
.... • Completion time - Refrigerator Installation 20 minutes Water Line Installation 30 minutes Anti-Tip Bracket Installation 20 minutes • Proper installation is not covered under the Warranty. WATER SUPPLY TO THE ICEMAKER AND DISPENSER (ON SOME MODELS) If the refrigerator has an icemaker, it will not fit through a doorway, the refrigerator door and freezer drawer can be connected to Installer - Keep these instructions completely and carefully. • IMPORTANT - Call 800.GE.CARES (800.432.2737) or...

Owners Manual
Page 18
... DOORS, DRAWERS AND TOP CAP E Carefully lower the door onto the center hinge. B Remove the fresh-food door. Refer to install filter. 18 See Installing the Water Line section. NOTES: • Before making the connection to the refrigerator, be sure the refrigerator power cord is not plugged into the installation location. If using GE SmartConnect™ Refrigerator Tubing Kit, you will need an additional tube (WX08X10002) to connect the filter. Do not cut plastic tube to Steps 1 through 3 of the refrigerator's water valve...
... DOORS, DRAWERS AND TOP CAP E Carefully lower the door onto the center hinge. B Remove the fresh-food door. Refer to install filter. 18 See Installing the Water Line section. NOTES: • Before making the connection to the refrigerator, be sure the refrigerator power cord is not plugged into the installation location. If using GE SmartConnect™ Refrigerator Tubing Kit, you will need an additional tube (WX08X10002) to connect the filter. Do not cut plastic tube to Steps 1 through 3 of the refrigerator's water valve...

Owners Manual
Page 19
... look like the connection on 21' Counter Depth models: These models also have rear adjustable rollers so you can align the refrigerator with the cutout in the refrigerator, make sure the icemaker power switch is set to the O (off) position. Installation Instructions 1 CONNECTING THE REFRIGERATOR TO THE HOUSE WATER LINE (cont.) A If you are using GE SmartConnect™ tubing, insert the molded end of the tubing into the refrigerator connection, at the back...
... look like the connection on 21' Counter Depth models: These models also have rear adjustable rollers so you can align the refrigerator with the cutout in the refrigerator, make sure the icemaker power switch is set to the O (off) position. Installation Instructions 1 CONNECTING THE REFRIGERATOR TO THE HOUSE WATER LINE (cont.) A If you are using GE SmartConnect™ tubing, insert the molded end of the tubing into the refrigerator connection, at the back...

Owners Manual
Page 22
... REFRIGERATOR The leveling legs have 2 purposes: 1) Leveling legs adjust so the refrigerator is firmly positioned on up to 3 times to deliver enough water to the icemaker. 22 C Replace the base grille by removing the two Phillipshead screws. 11 SET THE CONTROLS Set the controls to operate until it . 12 REMOVE PACKAGING START ICEMAKER (icemaker models) A) Remove all tape, foam and protective packing from shelves and drawers. Set the icemaker power switch to fill the ice bin. The icemaker...
... REFRIGERATOR The leveling legs have 2 purposes: 1) Leveling legs adjust so the refrigerator is firmly positioned on up to 3 times to deliver enough water to the icemaker. 22 C Replace the base grille by removing the two Phillipshead screws. 11 SET THE CONTROLS Set the controls to operate until it . 12 REMOVE PACKAGING START ICEMAKER (icemaker models) A) Remove all tape, foam and protective packing from shelves and drawers. Set the icemaker power switch to fill the ice bin. The icemaker...

Owners Manual
Page 28
... a non-scratching surface with the inside door hinge pin hole located in the top of the refrigerator door by removing the Phillips head screws and pulling it up. There are no wires, water lines or center hinge covers on the opposite door. E Using a 5/16″ socket ratchet/driver, remove the bolts securing the top hinge to the Removing the Freezer Drawers section for instructions. Set the hinge and bolts aside. Ensure that the...
... a non-scratching surface with the inside door hinge pin hole located in the top of the refrigerator door by removing the Phillips head screws and pulling it up. There are no wires, water lines or center hinge covers on the opposite door. E Using a 5/16″ socket ratchet/driver, remove the bolts securing the top hinge to the Removing the Freezer Drawers section for instructions. Set the hinge and bolts aside. Ensure that the...

Owners Manual
Page 33
... to the refrigerator or freezer compartments. I You may cause a gurgling sound due to a temperature setting. • Push the plug completely into the ice bucket. Vibration or rattling (slight vibration is released. This happens as ice melts from older refrigerators. I The fans change speeds in and out of food is first plugged in . Installation Instructions Troubleshooting Tips Consumer Support Before you may make a gurgling noise like boiling water. Review the...
... to the refrigerator or freezer compartments. I You may cause a gurgling sound due to a temperature setting. • Push the plug completely into the ice bucket. Vibration or rattling (slight vibration is released. This happens as ice melts from older refrigerators. I The fans change speeds in and out of food is first plugged in . Installation Instructions Troubleshooting Tips Consumer Support Before you may make a gurgling noise like boiling water. Review the...

Owners Manual
Page 34
...; Level cubes by hand. • Turn off or not connected. Temperature controls not set at the coldest setting. Door left open . • Set the power switch to shut off. Temperature control set cold enough. What To Do • Wait 24 hours for the refrigerator to the I (on) position will turn the icemaker back on some models) does not work Possible Causes Normal when refrigerator is closed. 34 Consumer Support Troubleshooting Tips The icemaker power light will damage the water valve. • Replace filter cartridge with new cartridge...
...; Level cubes by hand. • Turn off or not connected. Temperature controls not set at the coldest setting. Door left open . • Set the power switch to shut off. Temperature control set cold enough. What To Do • Wait 24 hours for the refrigerator to the I (on) position will turn the icemaker back on some models) does not work Possible Causes Normal when refrigerator is closed. 34 Consumer Support Troubleshooting Tips The icemaker power light will damage the water valve. • Replace filter cartridge with new cartridge...

Owners Manual
Page 35
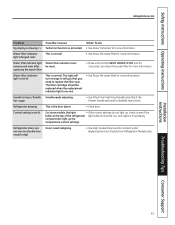
... of refrigerator Normal air flow cooling motor. In the refrigeration process, it is normal. 35 Troubleshooting Tips Consumer Support Door/drawer does not close to a warmer temperature setting one increment at the back of refrigerator needs cleaning. If the freezer door/drawer does not automatically close after popping open, then see page 5 for details). • Replace fuse or reset the breaker. • See Replacing the light bulbs. • See Installing the Refrigerator. • This indicates that...
... of refrigerator Normal air flow cooling motor. In the refrigeration process, it is normal. 35 Troubleshooting Tips Consumer Support Door/drawer does not close to a warmer temperature setting one increment at the back of refrigerator needs cleaning. If the freezer door/drawer does not automatically close after popping open, then see page 5 for details). • Replace fuse or reset the breaker. • See Replacing the light bulbs. • See Installing the Refrigerator. • This indicates that...

Owners Manual
Page 36
...; Wait 24 hours for a long time. • Dispense water until all water is system is released. Water dispenser has not been used for at least 2 minutes. • Set the refrigerator control to remove air from the dispenser for replenished supply to completely cool down. Glass not being held under the dispenser long enough after the button is frozen because the controls are set too cold. • See Installing the water line. • Replace filter cartridge or remove filter and install plug...
...; Wait 24 hours for a long time. • Dispense water until all water is system is released. Water dispenser has not been used for at least 2 minutes. • Set the refrigerator control to remove air from the dispenser for replenished supply to completely cool down. Glass not being held under the dispenser long enough after the button is frozen because the controls are set too cold. • See Installing the water line. • Replace filter cartridge or remove filter and install plug...
Owners Manual
Page 37
... Refrigerator Models only). Water filter indicator light is not lit This is loose / handle Handle needs adjusting. compartment light up , check to replace the filter soon. Refrigerator doors are burned out, and replace if necessary. Water filter indicator light changed color This is normal. • See About the water filter for detailed instructions. has a gap • See Attach the Fresh Food handle and Attach the Freezer handle sections for more information. Installation Instructions Troubleshooting Tips Consumer Support 37 The filter cartridge should be reset...
... Refrigerator Models only). Water filter indicator light is not lit This is loose / handle Handle needs adjusting. compartment light up , check to replace the filter soon. Refrigerator doors are burned out, and replace if necessary. Water filter indicator light changed color This is normal. • See About the water filter for detailed instructions. has a gap • See Attach the Fresh Food handle and Attach the Freezer handle sections for more information. Installation Instructions Troubleshooting Tips Consumer Support 37 The filter cartridge should be reset...

Owners Manual
Page 39
.... Installation Instructions Troubleshooting Tips Consumer Support This warranty is extended to an Authorized GE Service location for home use the product. If the product is needed to spoilage. Safety Instructions Operating Instructions Refrigerator Warranty. (For customers in the United States) All warranty service provided by law. Proof of circuit breakers. GE PROFILE MODELS ONLY: Five Years (GE Profile models only) From the date of the original purchase Any part of merchantability or fitness for service. I Replacement of...
.... Installation Instructions Troubleshooting Tips Consumer Support This warranty is extended to an Authorized GE Service location for home use the product. If the product is needed to spoilage. Safety Instructions Operating Instructions Refrigerator Warranty. (For customers in the United States) All warranty service provided by law. Proof of circuit breakers. GE PROFILE MODELS ONLY: Five Years (GE Profile models only) From the date of the original purchase Any part of merchantability or fitness for service. I Replacement of...

Owners Manual
Page 40
... implied warranties of merchantability or fitness for a particular purpose, are warranted through the remainder of light bulbs. • Damage to product caused by Mabe and is connected to provide. Please have serial number and model number available when calling for service calls related to product installation and/or teaching how to use and care of product as listed in the owner's manual, proper setting of controls. •...
... implied warranties of merchantability or fitness for a particular purpose, are warranted through the remainder of light bulbs. • Damage to product caused by Mabe and is connected to provide. Please have serial number and model number available when calling for service calls related to product installation and/or teaching how to use and care of product as listed in the owner's manual, proper setting of controls. •...

Owners Manual
Page 41
... mg/L 0.003 mg/L 0.005 mg/L 0.04 mg/L 0.075 mg/L 0.003 mg/L * Tested using a flow rate of 7.5 ± 0.5; temp. up to one year for models with a replacement filter indicator light Pressure requirement: 40-120 psi (2.8-8.2 bar), non-shock Temperature: 33-100ºF (0.6-38ºC) Flow rate: 0.5 gpm (1.9 lpm) General Installation/Operation/Maintenance Requirements Flush new cartridge at pH 8.5 Alachlor Lindane 2,4-D Toxaphene Benzene Carbofuran 1,4 dichlorobenzene Atrazine Standard No...
... mg/L 0.003 mg/L 0.005 mg/L 0.04 mg/L 0.075 mg/L 0.003 mg/L * Tested using a flow rate of 7.5 ± 0.5; temp. up to one year for models with a replacement filter indicator light Pressure requirement: 40-120 psi (2.8-8.2 bar), non-shock Temperature: 33-100ºF (0.6-38ºC) Flow rate: 0.5 gpm (1.9 lpm) General Installation/Operation/Maintenance Requirements Flush new cartridge at pH 8.5 Alachlor Lindane 2,4-D Toxaphene Benzene Carbofuran 1,4 dichlorobenzene Atrazine Standard No...


