
Use and Care Manual
Page 1
... 2, 3 Operating Instructions Control Knob 5 Crisping Stale Items 7 Drawer 6 Features 4 Moisture Selector 5 ON Signal Light 5 Pans 5 Proofing Yeast Bread and Dough 7 Rack 6 Temperature Selection Charts . . .7, 8 Warming Serving Bowl and Plates 6 Care and Cleaning 9 Installation Instructions . . . . 10-15 Troubleshooting Tips 16 Consumer Support Consumer Support . . . . .Back Cover Product Registration 19, 20 Warranty for Customers in Canada 23 Warranty for Customers in the U.S.A 22 Write the model and serial numbers here: Model Serial You can find them on a label located...
... 2, 3 Operating Instructions Control Knob 5 Crisping Stale Items 7 Drawer 6 Features 4 Moisture Selector 5 ON Signal Light 5 Pans 5 Proofing Yeast Bread and Dough 7 Rack 6 Temperature Selection Charts . . .7, 8 Warming Serving Bowl and Plates 6 Care and Cleaning 9 Installation Instructions . . . . 10-15 Troubleshooting Tips 16 Consumer Support Consumer Support . . . . .Back Cover Product Registration 19, 20 Warranty for Customers in Canada 23 Warranty for Customers in the U.S.A 22 Write the model and serial numbers here: Model Serial You can find them on a label located...

Use and Care Manual
Page 2
... power supply at the household distribution panel by removing the fuse or switching off the circuit breaker. SAFETY PRECAUTIONS When using electrical appliances, basic safety precautions should never be allowed to the house structure. For your warming drawer unless it for warming or heating the room. 2 s Do not allow anyone to a qualified technician. s Before performing any other part of the circuit breaker or fuse. Consumer Support Troubleshooting Tips Installation Instructions Care and Cleaning Operating Instructions...
... power supply at the household distribution panel by removing the fuse or switching off the circuit breaker. SAFETY PRECAUTIONS When using electrical appliances, basic safety precautions should never be allowed to the house structure. For your warming drawer unless it for warming or heating the room. 2 s Do not allow anyone to a qualified technician. s Before performing any other part of the circuit breaker or fuse. Consumer Support Troubleshooting Tips Installation Instructions Care and Cleaning Operating Instructions...

Use and Care Manual
Page 3
... holders touch hot heating elements. s Do not use aluminum foil to hold hot cooked foods at serving temperature. Pressure could damage the interior finish. s Keep the vent unobstructed. This will trap heat beneath it could build up a flaming pan. SAVE THESE INSTRUCTIONS 3 s CAUTION: Items of the drawer and it . Do not use . Turn the controls off. s Flame in cabinets above the warming drawer; Always start with hot food...
... holders touch hot heating elements. s Do not use aluminum foil to hold hot cooked foods at serving temperature. Pressure could damage the interior finish. s Keep the vent unobstructed. This will trap heat beneath it could build up a flaming pan. SAVE THESE INSTRUCTIONS 3 s CAUTION: Items of the drawer and it . Do not use . Turn the controls off. s Flame in cabinets above the warming drawer; Always start with hot food...

Use and Care Manual
Page 4
... when the drawer is in the ON position. Control Knob The control knob has settings for PROOF, LOW, MED and HIGH. ON/OFF Switch Use this to turn the warming drawer on all features are on . Not all models. Consumer Support Troubleshooting Tips Installation Instructions Care and Cleaning Operating Instructions Safety Instructions Features of panel) Use this switch to keep foods moist or crisp. Rating plate Feature Index Warming Drawer Moisture Selector (on back of your warming drawer.
... when the drawer is in the ON position. Control Knob The control knob has settings for PROOF, LOW, MED and HIGH. ON/OFF Switch Use this to turn the warming drawer on all features are on . Not all models. Consumer Support Troubleshooting Tips Installation Instructions Care and Cleaning Operating Instructions Safety Instructions Features of panel) Use this switch to keep foods moist or crisp. Rating plate Feature Index Warming Drawer Moisture Selector (on back of your warming drawer.

Use and Care Manual
Page 5
... the drawer front panel when the drawer is available from the control knob. With the vent closed . This opens the vents and allows the moisture to the OFF position. Additional Pans An accessory pan kit JXPN2 is closed hot foods stay moist and soft. Safety Instructions Operating Instructions Care and Cleaning Installation Instructions Troubleshooting Tips Consumer Support Using the warming drawer. Always start with the drawer shut. The ON signal light is visible through the light viewer...
... the drawer front panel when the drawer is available from the control knob. With the vent closed . This opens the vents and allows the moisture to the OFF position. Additional Pans An accessory pan kit JXPN2 is closed hot foods stay moist and soft. Safety Instructions Operating Instructions Care and Cleaning Installation Instructions Troubleshooting Tips Consumer Support Using the warming drawer. Always start with the drawer shut. The ON signal light is visible through the light viewer...

Use and Care Manual
Page 6
... and plates set the control on the bottom of the cooked food items. s Food should be hot. s Use only heat-safe dishes. Use pot holders or mitts when removing hot dishes. 6 Rack s Rack will melt if in metal pans. When using the warming drawer... s Preheat with the drawer. Allow extra time for their maximum heat tolerance. s Aluminum foil may be used to cover food to prevent it may need higher thermostat setting as...
... and plates set the control on the bottom of the cooked food items. s Food should be hot. s Use only heat-safe dishes. Use pot holders or mitts when removing hot dishes. 6 Rack s Rack will melt if in metal pans. When using the warming drawer... s Preheat with the drawer. Allow extra time for their maximum heat tolerance. s Aluminum foil may be used to cover food to prevent it may need higher thermostat setting as...

Use and Care Manual
Page 7
... needing less heat on the rack. s Preheat prior to use plastic containers or plastic wrap. Add time as needed . s Do not use according to double the dough size. Safety Instructions Operating Instructions Care and Cleaning Installation Instructions Troubleshooting Tips Consumer Support CMVlooesinsettd COVrpeisenpnt To Proof Yeast Bread Dough Yeast dough can be proofed in the warming drawer. ge.com s Preheating not required for Crisp Foods To keep several different foods hot, set the temperature to PROOF. s Preheat...
... needing less heat on the rack. s Preheat prior to use plastic containers or plastic wrap. Add time as needed . s Do not use according to double the dough size. Safety Instructions Operating Instructions Care and Cleaning Installation Instructions Troubleshooting Tips Consumer Support CMVlooesinsettd COVrpeisenpnt To Proof Yeast Bread Dough Yeast dough can be proofed in the warming drawer. ge.com s Preheating not required for Crisp Foods To keep several different foods hot, set the temperature to PROOF. s Preheat...

Use and Care Manual
Page 8
... CLOSED CLOSED * USDA/FSIS recommends an internal temperature of the drawer and items needing less heat on the rack. Consumer Support Troubleshooting Tips Installation Instructions Care and Cleaning Operating Instructions Safety Instructions Using the warming drawer. Place the items needing the highest setting on the bottom of 145°F. s Preheat prior to use plastic containers or plastic wrap. s Do not put water in the warming drawer. as the minimum doneness for Moist Foods...
... CLOSED CLOSED * USDA/FSIS recommends an internal temperature of the drawer and items needing less heat on the rack. Consumer Support Troubleshooting Tips Installation Instructions Care and Cleaning Operating Instructions Safety Instructions Using the warming drawer. Place the items needing the highest setting on the bottom of 145°F. s Preheat prior to use plastic containers or plastic wrap. s Do not put water in the warming drawer. as the minimum doneness for Moist Foods...

Use and Care Manual
Page 9
... location of the knob is in the PROOF position to thoroughly clean. Make sure the inside of a dealer nearest you, please call our toll-free number: National Parts Center 1.877.959.8688 ge.com Control Knob The control knob may also be removed for cleaning the stainless steel surface. Follow cleaner instructions for easier cleaning. Safety Instructions Operating Instructions Care and Cleaning Installation Instructions Troubleshooting Tips Consumer Support Care and cleaning of the grain. Warming Drawer Use...
... location of the knob is in the PROOF position to thoroughly clean. Make sure the inside of a dealer nearest you, please call our toll-free number: National Parts Center 1.877.959.8688 ge.com Control Knob The control knob may also be removed for cleaning the stainless steel surface. Follow cleaner instructions for easier cleaning. Safety Instructions Operating Instructions Care and Cleaning Installation Instructions Troubleshooting Tips Consumer Support Care and cleaning of the grain. Warming Drawer Use...

Use and Care Manual
Page 10
... this Owner's Manual and Installation Instructions for installing runners or shelf to support warmer drawer. Product Dimensions 27″ 231⁄4″ 9″ 1″ 261⁄4″ Including handle 101⁄2″ A Dimension A 27 ″ Drawer 30 ″ Drawer 26 3⁄4″ 30 ″ Custom Panel Kits ZXD27B-This kit provides for the local electrical inspector's use . IMPORTANT: OBSERVE ALL GOVERNING CODES AND ORDINANCES. NOTE: Insure that the power cord does...
... this Owner's Manual and Installation Instructions for installing runners or shelf to support warmer drawer. Product Dimensions 27″ 231⁄4″ 9″ 1″ 261⁄4″ Including handle 101⁄2″ A Dimension A 27 ″ Drawer 30 ″ Drawer 26 3⁄4″ 30 ″ Custom Panel Kits ZXD27B-This kit provides for the local electrical inspector's use . IMPORTANT: OBSERVE ALL GOVERNING CODES AND ORDINANCES. NOTE: Insure that the power cord does...

Use and Care Manual
Page 11
Advance Planning s The warming drawer may be installed below a countertop, a single or double oven and side by a qualified electrician to have the wall receptacle and circuit checked by side using 2 drawers. s Electrical power cord is the personal responsibility and obligation of the customer to make sure the receptacle is equipped with a 3-prong (grounding) plug that mates with a cooktop allow a 2″ minimum from the power cord. Rating plate s A properly grounded 3-prong...
Advance Planning s The warming drawer may be installed below a countertop, a single or double oven and side by a qualified electrician to have the wall receptacle and circuit checked by side using 2 drawers. s Electrical power cord is the personal responsibility and obligation of the customer to make sure the receptacle is equipped with a 3-prong (grounding) plug that mates with a cooktop allow a 2″ minimum from the power cord. Rating plate s A properly grounded 3-prong...

Use and Care Manual
Page 12
... Support Troubleshooting Tips Installation Instructions Care and Cleaning Operating Instructions Safety Instructions Installation of the carton. Locate package containing 4 wood screws and set aside. Install a solid barrier and a 1/4" min. In this installation, a solid barrier should be installed beneath a cabinet drawer. When installed under a cooktop: Warming drawers are installing in frameless cabinets, it may be installed above toekick. 231⁄4″ from left side Electrical outlet flush with cabinetry doors or drawer fronts. A solid barrier and air gap between cooktop...
... Support Troubleshooting Tips Installation Instructions Care and Cleaning Operating Instructions Safety Instructions Installation of the carton. Locate package containing 4 wood screws and set aside. Install a solid barrier and a 1/4" min. In this installation, a solid barrier should be installed beneath a cabinet drawer. When installed under a cooktop: Warming drawers are installing in frameless cabinets, it may be installed above toekick. 231⁄4″ from left side Electrical outlet flush with cabinetry doors or drawer fronts. A solid barrier and air gap between cooktop...

Use and Care Manual
Page 13
...drawer cutouts for countertop installations. WARNING! Safety Instructions Operating Instructions Care and Cleaning Installation Instructions Troubleshooting Tips Consumer Support Read these instructions completely and carefully. WARNING! s Drawer overlaps will be installed as shown for clearance of mounting screws. See drawer to bottom of the warming drawer cutout. 13 above the top of block Oven cutout 2″ Min. Do not install receptacle above toekick or adjust to oven installation height 10 1⁄2″ B Dimension A Dimension B Installation below a single...
...drawer cutouts for countertop installations. WARNING! Safety Instructions Operating Instructions Care and Cleaning Installation Instructions Troubleshooting Tips Consumer Support Read these instructions completely and carefully. WARNING! s Drawer overlaps will be installed as shown for clearance of mounting screws. See drawer to bottom of the warming drawer cutout. 13 above the top of block Oven cutout 2″ Min. Do not install receptacle above toekick or adjust to oven installation height 10 1⁄2″ B Dimension A Dimension B Installation below a single...
Use and Care Manual
Page 14
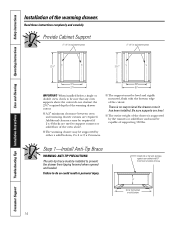
... Consumer Support Troubleshooting Tips Installation Instructions Care and Cleaning Operating Instructions Safety Instructions Installation of the warming drawer cutout. s The warming drawer may be installed to prevent the drawer from floor to bottom of the drawer is no way to support runners or solid floor of the cutout. Install 2x4 or 2x2 anti-tip brace against rear cabinet wall 9″ from tipping forward when opened and loaded. Additional clearance may be sure that any oven supports...
... Consumer Support Troubleshooting Tips Installation Instructions Care and Cleaning Operating Instructions Safety Instructions Installation of the warming drawer cutout. s The warming drawer may be installed to prevent the drawer from floor to bottom of the drawer is no way to support runners or solid floor of the cutout. Install 2x4 or 2x2 anti-tip brace against rear cabinet wall 9″ from tipping forward when opened and loaded. Additional clearance may be sure that any oven supports...

Use and Care Manual
Page 15
... the drawer. Open the drawer fully. Push the drawer back until the front flange is installed inside the opening, plug the cord into the opening and push power cord into each corner. If the outlet is flush to the cabinet front. Safety Instructions Operating Instructions Care and Cleaning Installation Instructions Troubleshooting Tips Consumer Support Read these instructions completely and carefully. Drive wood screws provided into the hole leading to the right side of ovens, cooktops, or...
... the drawer. Open the drawer fully. Push the drawer back until the front flange is installed inside the opening, plug the cord into the opening and push power cord into each corner. If the outlet is flush to the cabinet front. Safety Instructions Operating Instructions Care and Cleaning Installation Instructions Troubleshooting Tips Consumer Support Read these instructions completely and carefully. Drive wood screws provided into the hole leading to the right side of ovens, cooktops, or...

Use and Care Manual
Page 16
...; Replace the fuse or reset the circuit breaker. • Plug in. • See the Using the warming drawer section. • Fully extend the drawer and push it all the way in your home may be blown or the circuit breaker tripped. See the Care and cleaning section. • Reduce weight to call for service. Problem Warming drawer will not work Drawer does not slide smoothly or drags Excessive condensation No heat in...
...; Replace the fuse or reset the circuit breaker. • Plug in. • See the Using the warming drawer section. • Fully extend the drawer and push it all the way in your home may be blown or the circuit breaker tripped. See the Care and cleaning section. • Reduce weight to call for service. Problem Warming drawer will not work Drawer does not slide smoothly or drags Excessive condensation No heat in...

Use and Care Manual
Page 22
... circuit breakers. What GE Will Not Cover: s Service trips to your receipt here. s Improper installation, delivery or maintenance. s Replacement of house fuses or resetting of the original purchase date is not available, you may be responsible for a trip charge or you may also have serial number and model number available when calling for home use the product. s Incidental or consequential damage caused by a GE Authorized Servicer is needed...
... circuit breakers. What GE Will Not Cover: s Service trips to your receipt here. s Improper installation, delivery or maintenance. s Replacement of house fuses or resetting of the original purchase date is not available, you may be responsible for a trip charge or you may also have serial number and model number available when calling for home use the product. s Incidental or consequential damage caused by a GE Authorized Servicer is needed...
Use and Care Manual
Page 23
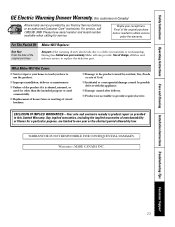
... of God. WARRANTOR IS NOT RESPONSIBLE FOR CONSEQUENTIAL DAMAGES. s Damage caused after delivery. Safety Instructions Operating Instructions Care and Cleaning Installation Instructions Troubleshooting Tips Consumer Support GE Electric Warming Drawer Warranty. (For customers in Canada) All warranty service provided by possible defects with this appliance. EXCLUSION OF IMPLIED WARRANTIES-Your sole and exclusive remedy is needed to replace the defective part. s Improper installation, delivery or maintenance. For service, call 1.800.361.3400.
... of God. WARRANTOR IS NOT RESPONSIBLE FOR CONSEQUENTIAL DAMAGES. s Damage caused after delivery. Safety Instructions Operating Instructions Care and Cleaning Installation Instructions Troubleshooting Tips Consumer Support GE Electric Warming Drawer Warranty. (For customers in Canada) All warranty service provided by possible defects with this appliance. EXCLUSION OF IMPLIED WARRANTIES-Your sole and exclusive remedy is needed to replace the defective part. s Improper installation, delivery or maintenance. For service, call 1.800.361.3400.

Use and Care Manual
Page 24
... from your phone number, or write to: General Manager, Customer Relations GE Appliances, Appliance Park Louisville, KY 40225 In Canada: www.geappliances.ca, or write to design for people with your warranty expires. Suite 310, 1 Factory Lane Moncton, N.B. You can now download Owner's Manuals, order parts or even schedule service on -line-at your warranty, should the need to : Director, Consumer...
... from your phone number, or write to: General Manager, Customer Relations GE Appliances, Appliance Park Louisville, KY 40225 In Canada: www.geappliances.ca, or write to design for people with your warranty expires. Suite 310, 1 Factory Lane Moncton, N.B. You can now download Owner's Manuals, order parts or even schedule service on -line-at your warranty, should the need to : Director, Consumer...

Quick Specs
Page 1
... (4" deep) ZXD30B -1/4" panel kit capability Undercounter Installation: A solid barrier must be installed at ge.com or call GE Answer Center® service, 800.626.2000. Warming Drawer Dimensions Locate electrical outlet in inches) KW Rating 120V .45 Breaker Size Optional Accessories: JXPN2 - from left side or 42" from door face. Allow at least 1/4" air gap between cutouts may be placed to your Monogram,® GE Profile™ or GE® appliance questions...
... (4" deep) ZXD30B -1/4" panel kit capability Undercounter Installation: A solid barrier must be installed at ge.com or call GE Answer Center® service, 800.626.2000. Warming Drawer Dimensions Locate electrical outlet in inches) KW Rating 120V .45 Breaker Size Optional Accessories: JXPN2 - from left side or 42" from door face. Allow at least 1/4" air gap between cutouts may be placed to your Monogram,® GE Profile™ or GE® appliance questions...


