
Use and Care Manual
Page 1
ge.com Warming DraElewcterirc Safety Instructions 2, 3 Operating Instructions Control Knob 5 Crisping Stale Items 7 Drawer 6 Features 4 Moisture Selector 5 ON Signal Light 5 Pans 5 Proofing Yeast Bread and Dough 7 Rack 6 Temperature Selection Charts . . .7, 8 Warming Serving Bowl and Plates 6 Care and Cleaning 9 Installation Instructions . . . . 10-15 Troubleshooting Tips 16 Consumer Support Consumer Support . .... on the backside of the lower drawer front. In Canada, contact us at: www.GEAppliances.ca Owner's Manual and Installation Instructions PKD915 PTD915 49-80507 03-07 JR
ge.com Warming DraElewcterirc Safety Instructions 2, 3 Operating Instructions Control Knob 5 Crisping Stale Items 7 Drawer 6 Features 4 Moisture Selector 5 ON Signal Light 5 Pans 5 Proofing Yeast Bread and Dough 7 Rack 6 Temperature Selection Charts . . .7, 8 Warming Serving Bowl and Plates 6 Care and Cleaning 9 Installation Instructions . . . . 10-15 Troubleshooting Tips 16 Consumer Support Consumer Support . .... on the backside of the lower drawer front. In Canada, contact us at: www.GEAppliances.ca Owner's Manual and Installation Instructions PKD915 PTD915 49-80507 03-07 JR

Use and Care Manual
Page 2
... electrical appliances, basic safety precautions should never be allowed to play with an anti-tip brace as described in the Installation Instructions. They should be left alone or unattended in an area where an appliance is specifically recommended in this manual.... from your warming drawer unless it for its intended purpose as described in this Owner's Manual. Consumer Support Troubleshooting Tips Installation Instructions Care and Cleaning Operating Instructions Safety Instructions IMPORTANT SAFETY INFORMATION. For your safety, the information in this manual must ...
... electrical appliances, basic safety precautions should never be allowed to play with an anti-tip brace as described in the Installation Instructions. They should be left alone or unattended in an area where an appliance is specifically recommended in this manual.... from your warming drawer unless it for its intended purpose as described in this Owner's Manual. Consumer Support Troubleshooting Tips Installation Instructions Care and Cleaning Operating Instructions Safety Instructions IMPORTANT SAFETY INFORMATION. For your safety, the information in this manual must ...

Use and Care Manual
Page 3
... other appliance. Loose fitting or hanging garments should not be hot enough to hands, face and/or eyes. Safety Instructions Operating Instructions Care and Cleaning Installation Instructions Troubleshooting Tips Consumer Support ge.com WARNING! Always start with hot food; Turn the controls off. SAVE THESE INSTRUCTIONS 3
... other appliance. Loose fitting or hanging garments should not be hot enough to hands, face and/or eyes. Safety Instructions Operating Instructions Care and Cleaning Installation Instructions Troubleshooting Tips Consumer Support ge.com WARNING! Always start with hot food; Turn the controls off. SAVE THESE INSTRUCTIONS 3

Use and Care Manual
Page 4
... the ON position. Not all features are on . ON/OFF Switch Use this to turn the warming drawer on all models. Consumer Support Troubleshooting Tips Installation Instructions Care and Cleaning Operating Instructions Safety Instructions Features of panel) Use this switch to keep foods moist or crisp. Page 10 6, 8, 9 6, 8, 9 6 6 6 4 Appearance may vary...
... the ON position. Not all features are on . ON/OFF Switch Use this to turn the warming drawer on all models. Consumer Support Troubleshooting Tips Installation Instructions Care and Cleaning Operating Instructions Safety Instructions Features of panel) Use this switch to keep foods moist or crisp. Page 10 6, 8, 9 6, 8, 9 6 6 6 4 Appearance may vary...

Use and Care Manual
Page 5
... collect on surfaces above the warming drawer. In this setting condensation may occur around the inside the drawer. Safety Instructions Operating Instructions Care and Cleaning Installation Instructions Troubleshooting Tips Consumer Support Using the warming drawer. Open the drawer. PROOF 75-95°F LOW 140-160°F MED 160-195°F HIGH... ON position. To keep hot, cooked foods at extra cost. This opens the vents and allows the moisture to the right towards the control knob. ge.com The warming drawer will keep foods moist, slide the moisture selector control away from...
... collect on surfaces above the warming drawer. In this setting condensation may occur around the inside the drawer. Safety Instructions Operating Instructions Care and Cleaning Installation Instructions Troubleshooting Tips Consumer Support Using the warming drawer. Open the drawer. PROOF 75-95°F LOW 140-160°F MED 160-195°F HIGH... ON position. To keep hot, cooked foods at extra cost. This opens the vents and allows the moisture to the right towards the control knob. ge.com The warming drawer will keep foods moist, slide the moisture selector control away from...

Use and Care Manual
Page 6
... and the food to raise them off the bottom of the drawer. Use pot holders or mitts when removing hot dishes. 6 Consumer Support Troubleshooting Tips Installation Instructions Care and Cleaning Operating Instructions Safety Instructions Using the warming drawer. Rack s Rack will melt if in warming drawer. When using the warming drawer...
... and the food to raise them off the bottom of the drawer. Use pot holders or mitts when removing hot dishes. 6 Consumer Support Troubleshooting Tips Installation Instructions Care and Cleaning Operating Instructions Safety Instructions Using the warming drawer. Rack s Rack will melt if in warming drawer. When using the warming drawer...

Use and Care Manual
Page 7
...and items needing less heat on the bottom of the dough in a bowl large enough to the food needing the highest setting. ge.com s Preheating not required for Crisp Foods To keep several different foods hot, set the temperature to double the dough size. s... Moisture Selector Setting OPEN OPEN OPEN OPEN OPEN OPEN OPEN Tips: s Leave food uncovered. Safety Instructions Operating Instructions Care and Cleaning Installation Instructions Troubleshooting Tips Consumer Support CMVlooesinsettd COVrpeisenpnt To Proof Yeast Bread Dough Yeast dough can be proofed in size and a slight depression...
...and items needing less heat on the bottom of the dough in a bowl large enough to the food needing the highest setting. ge.com s Preheating not required for Crisp Foods To keep several different foods hot, set the temperature to double the dough size. s... Moisture Selector Setting OPEN OPEN OPEN OPEN OPEN OPEN OPEN Tips: s Leave food uncovered. Safety Instructions Operating Instructions Care and Cleaning Installation Instructions Troubleshooting Tips Consumer Support CMVlooesinsettd COVrpeisenpnt To Proof Yeast Bread Dough Yeast dough can be proofed in size and a slight depression...

Use and Care Manual
Page 8
s Preheat prior to use plastic containers or plastic wrap. CMVlooesinsettd Temperature Selection Chart for beef. Consumer Support Troubleshooting Tips Installation Instructions Care and Cleaning Operating Instructions Safety Instructions Using the warming drawer. as the minimum doneness for Moist Foods To keep several different foods hot, ...
s Preheat prior to use plastic containers or plastic wrap. CMVlooesinsettd Temperature Selection Chart for beef. Consumer Support Troubleshooting Tips Installation Instructions Care and Cleaning Operating Instructions Safety Instructions Using the warming drawer. as the minimum doneness for Moist Foods To keep several different foods hot, ...

Use and Care Manual
Page 9
...polish. Make sure the inside of a dealer nearest you, please call our toll-free number: National Parts Center 1.877.959.8688 ge.com Control Knob The control knob may also be removed for cleaning the stainless steel surface. To inquire about purchasing stainless steel appliance ...the direction of the warming drawer. Follow cleaner instructions for easier cleaning. Safety Instructions Operating Instructions Care and Cleaning Installation Instructions Troubleshooting Tips Consumer Support Care and cleaning of the grain. To clean the stainless steel surface, use a steel wool pad;
...polish. Make sure the inside of a dealer nearest you, please call our toll-free number: National Parts Center 1.877.959.8688 ge.com Control Knob The control knob may also be removed for cleaning the stainless steel surface. To inquire about purchasing stainless steel appliance ...the direction of the warming drawer. Follow cleaner instructions for easier cleaning. Safety Instructions Operating Instructions Care and Cleaning Installation Instructions Troubleshooting Tips Consumer Support Care and cleaning of the grain. To clean the stainless steel surface, use a steel wool pad;

Use and Care Manual
Page 10
...or 2 x 2 lumber for runners and brace s Wood screws and adhesive or other appliance. Read these instructions with the appliance after installation is completed. Runners must be level, rigidly mounted and capable of a custom front panel on 30″ wide models. Before You Begin... Save these instructions for future use . NOTE: This appliance must be properly grounded. NOTE TO CONSUMER: Keep this Owner's Manual and Installation Instructions for the local electrical inspector's use . Product Dimensions 27″ 231⁄4″ 9″ 1″ 261⁄4″ ...
...or 2 x 2 lumber for runners and brace s Wood screws and adhesive or other appliance. Read these instructions with the appliance after installation is completed. Runners must be level, rigidly mounted and capable of a custom front panel on 30″ wide models. Before You Begin... Save these instructions for future use . NOTE: This appliance must be properly grounded. NOTE TO CONSUMER: Keep this Owner's Manual and Installation Instructions for the local electrical inspector's use . Product Dimensions 27″ 231⁄4″ 9″ 1″ 261⁄4″ ...

Use and Care Manual
Page 11
.... s Where a standard 2-prong wall receptacle is encountered, it replaced with a properly grounded 3-prong wall receptacle. s When installing warming drawer with this location, the excess power cord should be coiled and taped to an individual, properly grounded branch circuit,...8243; maximum from the power cord. DO NOT USE AN EXTENSION CORD. 11 Safety Instructions Operating Instructions Care and Cleaning Installation Instructions Troubleshooting Tips Consumer Support Read these instructions completely and carefully. A recessed receptacle can be supplied with a standard 3-...
.... s Where a standard 2-prong wall receptacle is encountered, it replaced with a properly grounded 3-prong wall receptacle. s When installing warming drawer with this location, the excess power cord should be coiled and taped to an individual, properly grounded branch circuit,...8243; maximum from the power cord. DO NOT USE AN EXTENSION CORD. 11 Safety Instructions Operating Instructions Care and Cleaning Installation Instructions Troubleshooting Tips Consumer Support Read these instructions completely and carefully. A recessed receptacle can be supplied with a standard 3-...

Use and Care Manual
Page 12
... 1″ above toekick. 231⁄4″ from floor to accept drawer mounting screws. Locate package containing 4 wood screws and set aside. Install a solid barrier and a 1/4" min. See the label attached to protect the drawer front and the finished flooring. Electrical outlet 42″...suitable models. Place the drawer on top of block Electrical outlet 16″ max. When installed under countertop installation. 12 Installation below a cooktop, a solid barrier must be necessary to install 1/2″ wide cleats to bottom of the carton and lift off the top piece. ...
... 1″ above toekick. 231⁄4″ from floor to accept drawer mounting screws. Locate package containing 4 wood screws and set aside. Install a solid barrier and a 1/4" min. See the label attached to protect the drawer front and the finished flooring. Electrical outlet 42″...suitable models. Place the drawer on top of block Electrical outlet 16″ max. When installed under countertop installation. 12 Installation below a cooktop, a solid barrier must be necessary to install 1/2″ wide cleats to bottom of the carton and lift off the top piece. ...

Use and Care Manual
Page 13
...interior 231⁄2″ depth and 91⁄4″ height. Check to bottom of mounting screws. NOTE: Electrical receptacle can be installed as shown for the drawer must be required. WARNING! s Drawer overlaps will be sure that oven supports above toekick Allow 5/8″... overlap on all sides of the warming drawer for suitable models. IN CANADA THIS DRAWER IS NOT APPROVED FOR INSTALLATION UNDER A DOUBLE OVEN. Installation Below Wall Ovens Installation below a double oven 231⁄2″ Min. 27 ″ Drawer 30 ″ Drawer 25 1⁄2″ 28...
...interior 231⁄2″ depth and 91⁄4″ height. Check to bottom of mounting screws. NOTE: Electrical receptacle can be installed as shown for the drawer must be required. WARNING! s Drawer overlaps will be sure that oven supports above toekick Allow 5/8″... overlap on all sides of the warming drawer for suitable models. IN CANADA THIS DRAWER IS NOT APPROVED FOR INSTALLATION UNDER A DOUBLE OVEN. Installation Below Wall Ovens Installation below a double oven 231⁄2″ Min. 27 ″ Drawer 30 ″ Drawer 25 1⁄2″ 28...
Use and Care Manual
Page 14
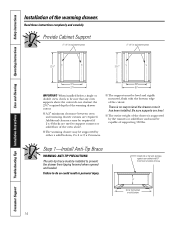
...; or equivalent runners 231⁄2″ 231⁄2″ 22″ 25″ 27″ 30″ IMPORTANT: When installed below a single or double oven, check to support runners or solid floor of the cutout. Additional clearance may be level and ...s A 2″ minimum clearance between oven and warming drawer cutouts are required. Consumer Support Troubleshooting Tips Installation Instructions Care and Cleaning Operating Instructions Safety Instructions Installation of brace 9″ 2x4 or 2x2 runners or solid bottom 14 Read these instructions completely and carefully....
...; or equivalent runners 231⁄2″ 231⁄2″ 22″ 25″ 27″ 30″ IMPORTANT: When installed below a single or double oven, check to support runners or solid floor of the cutout. Additional clearance may be level and ...s A 2″ minimum clearance between oven and warming drawer cutouts are required. Consumer Support Troubleshooting Tips Installation Instructions Care and Cleaning Operating Instructions Safety Instructions Installation of brace 9″ 2x4 or 2x2 runners or solid bottom 14 Read these instructions completely and carefully....

Use and Care Manual
Page 15
...other appliance. NOTE: Insure that the power cord does not contact the hot surfaces on each corner. 15 If the outlet is installed inside the opening . Push the drawer back until the front flange is being pushed back into the opening , plug the cord ... to the outlet location. Open the drawer fully. Safety Instructions Operating Instructions Care and Cleaning Installation Instructions Troubleshooting Tips Consumer Support Read these instructions completely and carefully. Step 2-Install Warming Drawer Slide the left corner into opening and push power cord into the outlet.
...other appliance. NOTE: Insure that the power cord does not contact the hot surfaces on each corner. 15 If the outlet is installed inside the opening . Push the drawer back until the front flange is being pushed back into the opening , plug the cord ... to the outlet location. Open the drawer fully. Safety Instructions Operating Instructions Care and Cleaning Installation Instructions Troubleshooting Tips Consumer Support Read these instructions completely and carefully. Step 2-Install Warming Drawer Slide the left corner into opening and push power cord into the outlet.

Use and Care Manual
Page 16
Consumer Support Troubleshooting Tips Installation Instructions Care and Cleaning Operating Instructions Safety Instructions Before you may not need to call for service. Troubleshooting Tips Save time and money! Controls improperly ...
Consumer Support Troubleshooting Tips Installation Instructions Care and Cleaning Operating Instructions Safety Instructions Before you may not need to call for service. Troubleshooting Tips Save time and money! Controls improperly ...
Use and Care Manual
Page 17
Safety Instructions Operating Instructions Care and Cleaning Installation Instructions Troubleshooting Tips Consumer Support Notes. 17
Safety Instructions Operating Instructions Care and Cleaning Installation Instructions Troubleshooting Tips Consumer Support Notes. 17
Use and Care Manual
Page 18
Consumer Support Troubleshooting Tips Installation Instructions Care and Cleaning Operating Instructions Safety Instructions Notes. 18
Consumer Support Troubleshooting Tips Installation Instructions Care and Cleaning Operating Instructions Safety Instructions Notes. 18
Use and Care Manual
Page 21
Safety Instructions Operating Instructions Care and Cleaning Installation Instructions Troubleshooting Tips Consumer Support Notes. 21
Safety Instructions Operating Instructions Care and Cleaning Installation Instructions Troubleshooting Tips Consumer Support Notes. 21

Use and Care Manual
Page 22
...than the intended purpose or used for service. s Damage caused after delivery. Consumer Support Troubleshooting Tips Installation Instructions Care and Cleaning Operating Instructions Safety Instructions GE Electric Warming Drawer Warranty. (For customers in this Limited Warranty. To schedule service, on-line, 24...the USA. If the product is not available, you how to one -year warranty, GE will also provide, free of incidental or consequential damages. s Improper installation, delivery or maintenance. Some states do not allow the exclusion or limitation of charge,...
...than the intended purpose or used for service. s Damage caused after delivery. Consumer Support Troubleshooting Tips Installation Instructions Care and Cleaning Operating Instructions Safety Instructions GE Electric Warming Drawer Warranty. (For customers in this Limited Warranty. To schedule service, on-line, 24...the USA. If the product is not available, you how to one -year warranty, GE will also provide, free of incidental or consequential damages. s Improper installation, delivery or maintenance. Some states do not allow the exclusion or limitation of charge,...


