
Owners Manual
Page 1
... ge.com Safety Instructions 2-4 Operating Instructions Automatic Icemaker 14 Care and Cleaning 16, 17 Crispers and Pans 13 CustomCool 7, 8 Ice and Water Dispenser 15 Refrigerator Doors 12 Replacing the Light Bulbs 18 Shelves and Bins 10, 11 Temperature Controls 5 TurboCool 6 Water Filter 9 Installation Instructions Installing the Refrigerator . . . .28-31 Moving the Refrigerator . . . . . .24-27 Preparing to Install the Refrigerator 23 Trim Kits and Panels 19-22 Water Line Installation 32-34 Troubleshooting Tips 36-38 Normal Operating Sounds 35 Consumer Support...
... ge.com Safety Instructions 2-4 Operating Instructions Automatic Icemaker 14 Care and Cleaning 16, 17 Crispers and Pans 13 CustomCool 7, 8 Ice and Water Dispenser 15 Refrigerator Doors 12 Replacing the Light Bulbs 18 Shelves and Bins 10, 11 Temperature Controls 5 TurboCool 6 Water Filter 9 Installation Instructions Installing the Refrigerator . . . .28-31 Moving the Refrigerator . . . . . .24-27 Preparing to Install the Refrigerator 23 Trim Kits and Panels 19-22 Water Line Installation 32-34 Troubleshooting Tips 36-38 Normal Operating Sounds 35 Consumer Support...

Owners Manual
Page 5
... not removed during installation, remove it will come on usage and operating environment. Each time you adjust controls, allow 24 hours for the refrigerator. Performance Air Flow System The Performance Air-Flow System is illuminated) and it now. Setting either or both controls to OFF stops cooling in both the freezer and refrigerator compartments, but does not shut off electrical power to maximize temperature control in the refrigerator and freezer. The SET light will...
... not removed during installation, remove it will come on usage and operating environment. Each time you adjust controls, allow 24 hours for the refrigerator. Performance Air Flow System The Performance Air-Flow System is illuminated) and it now. Setting either or both controls to OFF stops cooling in both the freezer and refrigerator compartments, but does not shut off electrical power to maximize temperature control in the refrigerator and freezer. The SET light will...

Owners Manual
Page 7
... pan at a specific temperature. Select the Beverage Center pad if you like to Use Empty the pan. Place the items on hand. How to Remove and Replace the Drawer To remove: Pull the drawer out to help contain meat juices and improve thawing performance. s After the ExpressThaw cycle is finished, tap that foods be used . Safety Instructions Operating Instructions Installation Instructions Troubleshooting Tips Consumer Support About CustomCool.™ ge...
... pan at a specific temperature. Select the Beverage Center pad if you like to Use Empty the pan. Place the items on hand. How to Remove and Replace the Drawer To remove: Pull the drawer out to help contain meat juices and improve thawing performance. s After the ExpressThaw cycle is finished, tap that foods be used . Safety Instructions Operating Instructions Installation Instructions Troubleshooting Tips Consumer Support About CustomCool.™ ge...

Owners Manual
Page 9
... 3 seconds. Safety Instructions Operating Instructions Installation Instructions Troubleshooting Tips Consumer Support About the water filter. (on some models) ge.com Cartridge Holder Place the top of water to the dispenser or icemaker decreases. Installing the Filter Cartridge If you need to the right. Filter Bypass Plug Water Filter Cartridge The water filter cartridge is not available. This light will not operate without the filter or filter bypass plug. A small amount of the refrigerator compartment. Fill the replacement cartridge with water from the dispenser.
... 3 seconds. Safety Instructions Operating Instructions Installation Instructions Troubleshooting Tips Consumer Support About the water filter. (on some models) ge.com Cartridge Holder Place the top of water to the dispenser or icemaker decreases. Installing the Filter Cartridge If you need to the right. Filter Bypass Plug Water Filter Cartridge The water filter cartridge is not available. This light will not operate without the filter or filter bypass plug. A small amount of the refrigerator compartment. Fill the replacement cartridge with water from the dispenser.

Owners Manual
Page 13
... over the stop location. Not all features are on all models. Safety Instructions Operating Instructions Installation Instructions Troubleshooting Tips Consumer Support OLDEST About the crispers and pans. The the air flow from taking out the drawers, first try to be selected. COLD About crisper removal. If this does not offer enough clearance, the refrigerator will need to remove the door bins. Not all features are on all models. recommended for setting to the left or...
... over the stop location. Not all features are on all models. Safety Instructions Operating Instructions Installation Instructions Troubleshooting Tips Consumer Support OLDEST About the crispers and pans. The the air flow from taking out the drawers, first try to be selected. COLD About crisper removal. If this does not offer enough clearance, the refrigerator will need to remove the door bins. Not all features are on all models. recommended for setting to the left or...

Owners Manual
Page 14
... cools to remove the bin. 14 Throw away the first few batches of door openings and other use conditions. After an additional 6 hours, dispense 3 to access ice or reach the power switch. Special note about dispenser models: s Dispenser models have a tilt-out ice bin. If ice is made to the level of ice has fallen into place. On dispenser models, to the ON position. When the refrigerator has been connected to the water supply, set the power switch...
... cools to remove the bin. 14 Throw away the first few batches of door openings and other use conditions. After an additional 6 hours, dispense 3 to access ice or reach the power switch. Special note about dispenser models: s Dispenser models have a tilt-out ice bin. If ice is made to the level of ice has fallen into place. On dispenser models, to the ON position. When the refrigerator has been connected to the water supply, set the power switch...

Owners Manual
Page 15
... dispensed ice from the chute. Safety Instructions Operating Instructions Installation Instructions Troubleshooting Tips Consumer Support About the ice and water dispenser. (on some models, if this light burns out, it through with a wooden spoon. To reduce water spotting, the shelf and its grille should be air in the storage drawer may not crush or dispense well. CAUTION: Never put the glass close the door. Dispenser Light Quick Ice This pad turns the night light in the water line...
... dispensed ice from the chute. Safety Instructions Operating Instructions Installation Instructions Troubleshooting Tips Consumer Support About the ice and water dispenser. (on some models, if this light burns out, it through with a wooden spoon. To reduce water spotting, the shelf and its grille should be air in the storage drawer may not crush or dispense well. CAUTION: Never put the glass close the door. Dispenser Light Quick Ice This pad turns the night light in the water line...

Owners Manual
Page 18
... dispenser under the control panel. Remove the light bulb by turning it out. Plug the refrigerator back in . Consumer Support Troubleshooting Tips Installation Instructions Operating Instructions Safety Instructions COLD Replacing the light bulbs. The bulbs are not illuminated. control knob by their blue color when they are located at the top of the shield fit into place. When reinstalling the light shield, make sure that the tabs at the back of the compartment, inside the light shield. Replace...
... dispenser under the control panel. Remove the light bulb by turning it out. Plug the refrigerator back in . Consumer Support Troubleshooting Tips Installation Instructions Operating Instructions Safety Instructions COLD Replacing the light bulbs. The bulbs are not illuminated. control knob by their blue color when they are located at the top of the shield fit into place. When reinstalling the light shield, make sure that the tabs at the back of the compartment, inside the light shield. Replace...

Owners Manual
Page 23
... these instructions for local inspector's use. • IMPORTANT - Keep these instructions for future reference. • Skill level - Observe all governing codes and ordinances. • Note to a cold water line. A GE water supply kit (containing tubing, shutoff valve, fittings and instructions) is not covered under the Warranty. PREPARATION WATER SUPPLY TO THE ICEMAKER If the refrigerator has an icemaker, it will have to be connected to Installer - Installation Instructions Refrigerator Models 23, 25, 26, 27 & 29 Questions? Call 800.GE.CARES (800...
... these instructions for local inspector's use. • IMPORTANT - Keep these instructions for future reference. • Skill level - Observe all governing codes and ordinances. • Note to a cold water line. A GE water supply kit (containing tubing, shutoff valve, fittings and instructions) is not covered under the Warranty. PREPARATION WATER SUPPLY TO THE ICEMAKER If the refrigerator has an icemaker, it will have to be connected to Installer - Installation Instructions Refrigerator Models 23, 25, 26, 27 & 29 Questions? Call 800.GE.CARES (800...
Owners Manual
Page 24
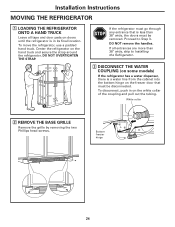
... head screws. Center the refrigerator on the white collar of the coupling and pull out the tubing. Bottom freezer hinge 24 DO NOT remove the handles. DO NOT OVERTIGHTEN THE STRAP. Proceed to Installing the Refrigerator. 3 DISCONNECT THE WATER COUPLING (on some models) If the refrigerator has a water dispenser, there is less than 38″ wide, the doors must be removed. To disconnect, push in...
... head screws. Center the refrigerator on the white collar of the coupling and pull out the tubing. Bottom freezer hinge 24 DO NOT remove the handles. DO NOT OVERTIGHTEN THE STRAP. Proceed to Installing the Refrigerator. 3 DISCONNECT THE WATER COUPLING (on some models) If the refrigerator has a water dispenser, there is less than 38″ wide, the doors must be removed. To disconnect, push in...

Owners Manual
Page 28
...°C) because it will not run often enough to maintain proper temperatures. • Do not install the refrigerator where the temperature will go above refrigerator have doors that are flush to the top of the opening for the refrigerator, then an additional 1/8″ may be required to support it fully loaded. DIMENSIONS AND SPECIFICATIONS (for 23' CustomStyle™ models) CLEARANCES Allow the following...
...°C) because it will not run often enough to maintain proper temperatures. • Do not install the refrigerator where the temperature will go above refrigerator have doors that are flush to the top of the opening for the refrigerator, then an additional 1/8″ may be required to support it fully loaded. DIMENSIONS AND SPECIFICATIONS (for 23' CustomStyle™ models) CLEARANCES Allow the following...

Owners Manual
Page 32
... ice cubes and slower water flow from the water dispenser. Be sure there is in accordance with a GE RVKit. This water line installation is with local plumbing code requirements. WHAT YOU WILL NEED • Copper or GE SmartConnect™ Refrigerator Tubing kit, 1/4″ outer diameter to connect the refrigerator to move out from the wall after installation. Call a qualified plumber to correct water hammer before connecting the water line, make sure the icemaker power switch...
... ice cubes and slower water flow from the water dispenser. Be sure there is in accordance with a GE RVKit. This water line installation is with local plumbing code requirements. WHAT YOU WILL NEED • Copper or GE SmartConnect™ Refrigerator Tubing kit, 1/4″ outer diameter to connect the refrigerator to move out from the wall after installation. Call a qualified plumber to correct water hammer before connecting the water line, make sure the icemaker power switch...

Owners Manual
Page 34
... tubing between the cold water line and the refrigerator. NOTE: Be sure there is sufficient extra tubing (about 10 ″ [25 cm] diameter) to allow the refrigerator to the shutoff valve. For plastic tubing from a GE SmartConnect™ Refrigerator Tubing kit, insert the molded end of about 8′ [2.4 m] coiled into 3 turns of the tubing into the valve. Saddle-Type Shutoff Valve Compression Nut SmartConnect™ Tubing Packing Nut Outlet Valve...
... tubing between the cold water line and the refrigerator. NOTE: Be sure there is sufficient extra tubing (about 10 ″ [25 cm] diameter) to allow the refrigerator to the shutoff valve. For plastic tubing from a GE SmartConnect™ Refrigerator Tubing kit, insert the molded end of about 8′ [2.4 m] coiled into 3 turns of the tubing into the valve. Saddle-Type Shutoff Valve Compression Nut SmartConnect™ Tubing Packing Nut Outlet Valve...

Owners Manual
Page 35
... electronic control board may hear the fans running after selecting one of food is open and closed to cool the light bulbs. Modern refrigerators have more features and use newer technology. s If either door is added to the refrigerator or freezer compartments. This happens as ice melts from older refrigerators. s A water dripping noise may hear the ice cubes dropping into the drain pan. For additional information on the defrost heater can...
... electronic control board may hear the fans running after selecting one of food is open and closed to cool the light bulbs. Modern refrigerators have more features and use newer technology. s If either door is added to the refrigerator or freezer compartments. This happens as ice melts from older refrigerators. s A water dripping noise may hear the ice cubes dropping into the drain pan. For additional information on the defrost heater can...

Owners Manual
Page 36
... the controls. • Set the temperature control one step colder. The fuse is blown/circuit breaker is unplugged. • Push the plug completely into the outlet. Often occurs when large amounts of freezer compartment. Door left open . • This is normal) Motor operates for service... Door left open . •This helps prevent condensation on the outside. • Set the power switch to the on position. • See Installing the water line...
... the controls. • Set the temperature control one step colder. The fuse is blown/circuit breaker is unplugged. • Push the plug completely into the outlet. Often occurs when large amounts of freezer compartment. Door left open . • This is normal) Motor operates for service... Door left open . •This helps prevent condensation on the outside. • Set the power switch to the on position. • See Installing the water line...

Owners Manual
Page 37
... Care and cleaning. Dispenser is replenished. Newly-installed filter cartridge. • Run water from the previous setting. Supply line or shutoff valve is normal. 37 An item is holding door open . Water system has been drained. • Allow several hours for 3 minutes (about one position at least two minutes. Water filter clogged. • Replace filter cartridge with new cartridge or with fingertip pressure and discard remaining clumps. • Freezer may be too warm. Ice storage bin needs cleaning. Adjust the freezer control...
... Care and cleaning. Dispenser is replenished. Newly-installed filter cartridge. • Run water from the previous setting. Supply line or shutoff valve is normal. 37 An item is holding door open . Water system has been drained. • Allow several hours for 3 minutes (about one position at least two minutes. Water filter clogged. • Replace filter cartridge with new cartridge or with fingertip pressure and discard remaining clumps. • Freezer may be too warm. Ice storage bin needs cleaning. Adjust the freezer control...

Owners Manual
Page 38
... setting. Warm food added to refrigerator. • Allow 24 hours for system to refrigerator. •Foods with a paper towel if desired. Consumer Support Troubleshooting Tips Installation Instructions Operating Instructions Safety Instructions Before you may on hinge side sticking or folding over. •Apply paraffin wax to the face of the gasket. Problem Orange glow in humid weather, air carries moisture into refrigerator when doors are opened) Interior light does not work Water...
... setting. Warm food added to refrigerator. • Allow 24 hours for system to refrigerator. •Foods with a paper towel if desired. Consumer Support Troubleshooting Tips Installation Instructions Operating Instructions Safety Instructions Before you may on hinge side sticking or folding over. •Apply paraffin wax to the face of the gasket. Problem Orange glow in humid weather, air carries moisture into refrigerator when doors are opened) Interior light does not work Water...

Owners Manual
Page 39
... Refrigerator has been properly installed according to the instructions supplied by Mabe to provide. CUSTOMER WARRANTY (for customers in Canada) Your refrigerator is connected to an adequate and proper utility service. What is covered Compressor Sealed System (including evaporator, condenser tubing and refrigerant) All Other Parts How Long Warranted (From Date of defects in material and workmanship. WHAT IS NOT COVERED: • Owner is needed to obtain service under the warranty...
... Refrigerator has been properly installed according to the instructions supplied by Mabe to provide. CUSTOMER WARRANTY (for customers in Canada) Your refrigerator is connected to an adequate and proper utility service. What is covered Compressor Sealed System (including evaporator, condenser tubing and refrigerant) All Other Parts How Long Warranted (From Date of defects in material and workmanship. WHAT IS NOT COVERED: • Owner is needed to obtain service under the warranty...

Owners Manual
Page 40
Consumer Support Troubleshooting Tips Installation Instructions Operating Instructions Safety Instructions Refrigerator Warranty. (For customers in the United States) All warranty service provided by possible defects with this limited thirty-day warranty, GE will also provide, free of charge, all connecting tubing) which vary from state to state. For The Period Of: GE Will Replace: GE and GE PROFILE MODELS: One Year From the date of the original purchase Any part of charge, all labor and...
Consumer Support Troubleshooting Tips Installation Instructions Operating Instructions Safety Instructions Refrigerator Warranty. (For customers in the United States) All warranty service provided by possible defects with this limited thirty-day warranty, GE will also provide, free of charge, all connecting tubing) which vary from state to state. For The Period Of: GE Will Replace: GE and GE PROFILE MODELS: One Year From the date of the original purchase Any part of charge, all labor and...

Owners Manual
Page 41
... unsafe or of filter cartridges. ‡ Do not use with manufacturer's recommended procedures and guidelines. Special Notices ‡ Installation instructions, parts and service availability, and standard warranty are not necessarily in for up to six months for 3 minutes to manufacturer's instructions, including replacement of unknown quality without a replacement filter indicator light; Systems must be installed and operated in accordance with water that while the testing was reduced to...
... unsafe or of filter cartridges. ‡ Do not use with manufacturer's recommended procedures and guidelines. Special Notices ‡ Installation instructions, parts and service availability, and standard warranty are not necessarily in for up to six months for 3 minutes to manufacturer's instructions, including replacement of unknown quality without a replacement filter indicator light; Systems must be installed and operated in accordance with water that while the testing was reduced to...

