

Use and Care Manual
Page 1
....com Safety Instructions 2-5 Operating Instructions Controls 6-8 Cycle Options 9-10 Dryer Features 11 Loading and Using the Dryer 12, 13 Installation Instructions Before You Begin 14-16 Connecting a Gas Dryer 17-20 Connecting an Electric Dryer 21-23 Exhausting the Dryer 24-30 Final Setup 31 Reversing the Door Swing 32-33 Troubleshooting Tips 34 Consumer... 38 Owner's Manual and Installation Instructions Write the model and serial numbers here: Model Serial They are on the label on the front of the dryer behind the door. 3828EL2001D 49-90403 11/10/10...
....com Safety Instructions 2-5 Operating Instructions Controls 6-8 Cycle Options 9-10 Dryer Features 11 Loading and Using the Dryer 12, 13 Installation Instructions Before You Begin 14-16 Connecting a Gas Dryer 17-20 Connecting an Electric Dryer 21-23 Exhausting the Dryer 24-30 Final Setup 31 Reversing the Door Swing 32-33 Troubleshooting Tips 34 Consumer... 38 Owner's Manual and Installation Instructions Write the model and serial numbers here: Model Serial They are on the label on the front of the dryer behind the door. 3828EL2001D 49-90403 11/10/10...
Use and Care Manual
Page 2
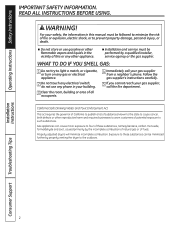
... the room, building or area of natural gas or LP fuels. n Installation and service must be minimized further by properly venting the dryer to such substances. Gas appliances can cause minor exposure to four of these substances can be followed to minimize the risk of potential exposure... soot, caused primarily by a qualified installer, service agency or the gas supplier. Installation Instructions Consumer Support Troubleshooting Tips 2 Properly adjusted dryers will minimize incomplete combustion. Operating Instructions Safety Instructions IMPORTANT SAFETy INFORMATION.
... the room, building or area of natural gas or LP fuels. n Installation and service must be minimized further by properly venting the dryer to such substances. Gas appliances can cause minor exposure to four of these substances can be followed to minimize the risk of potential exposure... soot, caused primarily by a qualified installer, service agency or the gas supplier. Installation Instructions Consumer Support Troubleshooting Tips 2 Properly adjusted dryers will minimize incomplete combustion. Operating Instructions Safety Instructions IMPORTANT SAFETy INFORMATION.
Use and Care Manual
Page 3
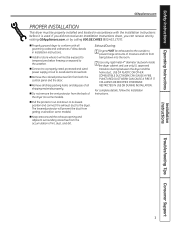
...it will prevent the duct from both the control panel and the door. Safety Instructions Operating Instructions GEAppliances.com PROPER INSTALLATION This dryer must be properly installed and located in Installation Instructions. If you did not receive an Installation Instructions sheet, you can receive one... by visiting GEAppliances.com, or by calling 800.GE.CARES (800.432.2737). n Properly ground dryer to prevent large amounts of the dryer (on some models). n Pull the protector out and down to its lowest position and connect ...
...it will prevent the duct from both the control panel and the door. Safety Instructions Operating Instructions GEAppliances.com PROPER INSTALLATION This dryer must be properly installed and located in Installation Instructions. If you did not receive an Installation Instructions sheet, you can receive one... by visiting GEAppliances.com, or by calling 800.GE.CARES (800.432.2737). n Properly ground dryer to prevent large amounts of the dryer (on some models). n Pull the protector out and down to its lowest position and connect ...
Use and Care Manual
Page 4
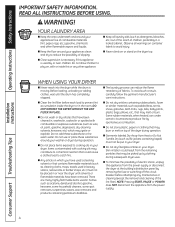
... other appliance. NOTE: Pressing START, PAuSE or POWER does NOT disconnect the appliance from the power supply or disconnect the dryer at the building's distribution panel by clothing during operation. Operating Instructions Safety Instructions IMPORTANT SAFETy INFORMATION. n Never climb on...the lint filter before attempting any other flammable vapors and liquids. YOUR LAUNDRY AREA n Keep the area underneath and around your dryer. WARNING! Some rubber materials, when heated, can reduce the flame retardancy of children, preferably in or near children. Installation...
... other appliance. NOTE: Pressing START, PAuSE or POWER does NOT disconnect the appliance from the power supply or disconnect the dryer at the building's distribution panel by clothing during operation. Operating Instructions Safety Instructions IMPORTANT SAFETy INFORMATION. n Never climb on...the lint filter before attempting any other flammable vapors and liquids. YOUR LAUNDRY AREA n Keep the area underneath and around your dryer. WARNING! Some rubber materials, when heated, can reduce the flame retardancy of children, preferably in or near children. Installation...
Use and Care Manual
Page 5
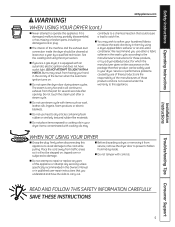
...traffic areas so it will not be safely used in the vicinity of the machine and the exhaust duct connection inside . WHEN USING YOUR DRYER (cont.) n Never attempt to dry articles containing foam rubber or similarly textured rubber-like materials. n Do not use steam cycle with ... for those products and are the responsibility of the manufacturers of this appliance or attempt any part of those products, or try a dryer-added product for which the manufacturer gives written assurance on , tripped over or subjected to soften your laundered fabrics or reduce the static...
...traffic areas so it will not be safely used in the vicinity of the machine and the exhaust duct connection inside . WHEN USING YOUR DRYER (cont.) n Never attempt to dry articles containing foam rubber or similarly textured rubber-like materials. n Do not use steam cycle with ... for those products and are the responsibility of the manufacturers of this appliance or attempt any part of those products, or try a dryer-added product for which the manufacturer gives written assurance on , tripped over or subjected to soften your laundered fabrics or reduce the static...

Use and Care Manual
Page 6
WARNING! Control Panel Throughout this appliance. To reduce the risk of fire, electric shock, or injury to persons, read the ImPORTANT SAfETY INSTRUCTIONS before operating this manual, features and appearance may vary from your model. *Applied Model : PTDS850/PTDS855 2 7 8 1 *Applied Model : PTDN800/PTDN805 2 3 4 56 7 1 3 4 56 Installation Instructions Consumer Support Troubleshooting Tips 6 Operating Instructions Safety Instructions About the dryer control panel.
WARNING! Control Panel Throughout this appliance. To reduce the risk of fire, electric shock, or injury to persons, read the ImPORTANT SAfETY INSTRUCTIONS before operating this manual, features and appearance may vary from your model. *Applied Model : PTDS850/PTDS855 2 7 8 1 *Applied Model : PTDN800/PTDN805 2 3 4 56 7 1 3 4 56 Installation Instructions Consumer Support Troubleshooting Tips 6 Operating Instructions Safety Instructions About the dryer control panel.
Use and Care Manual
Page 7
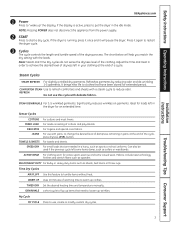
... Use this cycle with a steam cycle to reduce odor. TIMED DRY Set the desired heating time and temperature manually. If the dryer is active, press to put the dryer in the dryer for loads left some casual wear. Adjust the Time and Heat in order to achieve the desired level of warming time... display is running, press it once and it again to loosen up " the display. It brings new life to clothes that need to restart the dryer cycle. 3 Cycles The cycle controls the length and tumble speed of a cycle. For towels and sheets. ACTIVE WEAR For clothing worn for extended period. BulKy...
... Use this cycle with a steam cycle to reduce odor. TIMED DRY Set the desired heating time and temperature manually. If the dryer is active, press to put the dryer in the dryer for loads left some casual wear. Adjust the Time and Heat in order to achieve the desired level of warming time... display is running, press it once and it again to loosen up " the display. It brings new life to clothes that need to restart the dryer cycle. 3 Cycles The cycle controls the length and tumble speed of a cycle. For towels and sheets. ACTIVE WEAR For clothing worn for extended period. BulKy...
Use and Care Manual
Page 8
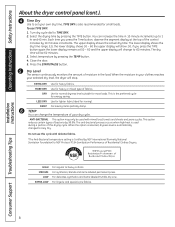
... When the option is selected, dryness level is automatically changed to set your own dry time. Operating Instructions Safety Instructions About the dryer control panel (cont.). 4 Time Dry Use to Very Dry. Turn dry cycle dial to heavy cottons. The dry time will ...fabrics. You can change to :60 minutes. This option reduces certain types of your selected dry level, the dryer will be used during a portion of Residential Clothes Dryers. Installation Instructions Consumer Support Troubleshooting Tips 8 Do not use TIME DRy: 1. For synthetics, blends and items...
... When the option is selected, dryness level is automatically changed to set your own dry time. Operating Instructions Safety Instructions About the dryer control panel (cont.). 4 Time Dry Use to Very Dry. Turn dry cycle dial to heavy cottons. The dry time will ...fabrics. You can change to :60 minutes. This option reduces certain types of your selected dry level, the dryer will be used during a portion of Residential Clothes Dryers. Installation Instructions Consumer Support Troubleshooting Tips 8 Do not use TIME DRy: 1. For synthetics, blends and items...
Use and Care Manual
Page 9
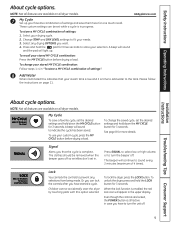
...settings and hold the pad for 3 seconds. lock You can lock the controls after you have started a cycle. Children cannot accidentally start the dryer by touching pads with this indicates that the cycle is still active in "To store a My CyClE combination of settings and save a favorite.... Select your custom cycle, press the My CyClE button before drying a load. The beeper will light up your needs. 3. To unlock the dryer, press and hold down the My CyClE button for more details. NOTE: Not all features are available on all features are available on page 11...
...settings and hold the pad for 3 seconds. lock You can lock the controls after you have started a cycle. Children cannot accidentally start the dryer by touching pads with this indicates that the cycle is still active in "To store a My CyClE combination of settings and save a favorite.... Select your custom cycle, press the My CyClE button before drying a load. The beeper will light up your needs. 3. To unlock the dryer, press and hold down the My CyClE button for more details. NOTE: Not all features are available on all features are available on page 11...
Use and Care Manual
Page 10
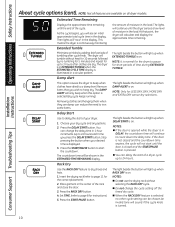
...button will light up to 24 hours) each time you wish to pause for instructions). 5. Consumer Support Troubleshooting Tips 10 The dryer is in EXTENDED TuMBlE when the ESTIMATED CyClE TIME display is on. Stop pressing the button when your dry cycle and any ...drying rack (refer to 24 hours. NOTE: Only for the correct placement). 2. Press the DElAy START button. the amount of a dryer cycle up when DElAy START is selected (dry cycle keeps running). Operating Instructions Safety Instructions Installation Instructions About cycle options (cont). Estimated ...
...button will light up to 24 hours) each time you wish to pause for instructions). 5. Consumer Support Troubleshooting Tips 10 The dryer is in EXTENDED TuMBlE when the ESTIMATED CyClE TIME display is on. Stop pressing the button when your dry cycle and any ...drying rack (refer to 24 hours. NOTE: Only for the correct placement). 2. Press the DElAy START button. the amount of a dryer cycle up when DElAy START is selected (dry cycle keeps running). Operating Instructions Safety Instructions Installation Instructions About cycle options (cont). Estimated ...
Use and Care Manual
Page 11
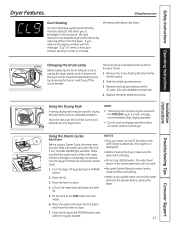
... the MAX water line with a 15-watt, 120-volt candelabra-base bulb. 4 Replace the lamp shield and screw. Place the water tank back into the dryer drum. If you to the MAX line. If not, the ADD WATER light will not work. • Be careful while filling the water tank to... and replace with water. 6. NOTES • Only use this drying rack when there are other clothes in order to clean your exhaust ducting in the dryer. Lift out the water tank and open . 4. It is time to increase efficiency and reduce dry times. Close the lid, press the POWER button and...
... the MAX water line with a 15-watt, 120-volt candelabra-base bulb. 4 Replace the lamp shield and screw. Place the water tank back into the dryer drum. If you to the MAX line. If not, the ADD WATER light will not work. • Be careful while filling the water tank to... and replace with water. 6. NOTES • Only use this drying rack when there are other clothes in order to clean your exhaust ducting in the dryer. Lift out the water tank and open . 4. It is time to increase efficiency and reduce dry times. Close the lid, press the POWER button and...
Use and Care Manual
Page 12
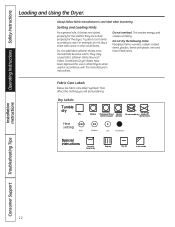
...Tumble dry Dry Heat setting High Normal Permanent Press/ Gentle/ wrinkle resistant delicate Do not dry Do not tumble dry (used in all GE Dryers when used with the manufacturer's instructions. Do not overload. Do not dry the following items: fiberglass items, woolens, rubber-coated items,... items according to dry Drip dry Dry flat In the shade Installation Instructions Consumer Support Troubleshooting Tips 12 Bounce® Fabric Conditioner Dryer Sheets have been approved for the washer, they are fabric care label "symbols" that affect the clothing you will be laundering....
...Tumble dry Dry Heat setting High Normal Permanent Press/ Gentle/ wrinkle resistant delicate Do not dry Do not tumble dry (used in all GE Dryers when used with the manufacturer's instructions. Do not overload. Do not dry the following items: fiberglass items, woolens, rubber-coated items,... items according to dry Drip dry Dry flat In the shade Installation Instructions Consumer Support Troubleshooting Tips 12 Bounce® Fabric Conditioner Dryer Sheets have been approved for the washer, they are fabric care label "symbols" that affect the clothing you will be laundering....
Use and Care Manual
Page 13
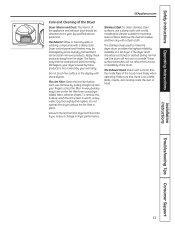
... away from using dryeradded fabric softener sheets. If the dryer drum should be cleaned once a year by some laundry pretreatment soil and stain remover products. Vacuum the lint from the dryer lint filter area if you notice a change in a GE dryer. A waxy buildup may form on the lint filter... from the dryer. Remove by your fingers across the filter. Do not operate the dryer without the lint filter in warm, soapy water....
... away from using dryeradded fabric softener sheets. If the dryer drum should be cleaned once a year by some laundry pretreatment soil and stain remover products. Vacuum the lint from the dryer lint filter area if you notice a change in a GE dryer. A waxy buildup may form on the lint filter... from the dryer. Remove by your fingers across the filter. Do not operate the dryer without the lint filter in warm, soapy water....
Use and Care Manual
Page 14
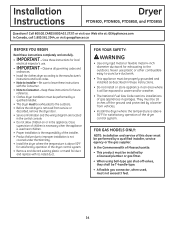
.... • When using ball-type gas shut-off the ground and protected by a qualified installer, service agency or the gas supplier. Call 800.GE.CARES (800.432.2737) or visit our Web site at: GEAppliances.com In Canada, call 1.800.561.3344, or visit geappliances.ca BEFORE YOU... BEGIN Read these instructions. • Do not install or store appliance in the appliance. Keep these instructions for satisfactory operation of the dryer control system. • Remove and discard existing plastic or metal foil duct and replace with the Consumer. • Note to water and/or ...
.... • When using ball-type gas shut-off the ground and protected by a qualified installer, service agency or the gas supplier. Call 800.GE.CARES (800.432.2737) or visit our Web site at: GEAppliances.com In Canada, call 1.800.561.3344, or visit geappliances.ca BEFORE YOU... BEGIN Read these instructions. • Do not install or store appliance in the appliance. Keep these instructions for satisfactory operation of the dryer control system. • Remove and discard existing plastic or metal foil duct and replace with the Consumer. • Note to water and/or ...
Use and Care Manual
Page 15
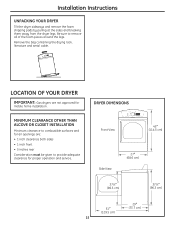
...and remove the foam shipping pads by pulling at the sides and breaking them away from the dryer legs. Remove the bag containing the drying rack, literature and serial cable. LOCATION OF YOUR DRYER IMPORTANT: Gas dryers are : • 1 inch clearance both sides • 1 inch front • .... MINIMUM CLEARANCE OTHER THAN ALCOVE OR CLOSET INSTALLATION Minimum clearance to combustible surfaces and for air openings are not approved for proper operation and service. DRYER DIMENSIONS Front View 45" (114.5 cm) Side View 27" (68.6 cm) 377⁄8" (96.3 cm) 377⁄8" (96.3 cm) 51" (...
...and remove the foam shipping pads by pulling at the sides and breaking them away from the dryer legs. Remove the bag containing the drying rack, literature and serial cable. LOCATION OF YOUR DRYER IMPORTANT: Gas dryers are : • 1 inch clearance both sides • 1 inch front • .... MINIMUM CLEARANCE OTHER THAN ALCOVE OR CLOSET INSTALLATION Minimum clearance to combustible surfaces and for air openings are not approved for proper operation and service. DRYER DIMENSIONS Front View 45" (114.5 cm) Side View 27" (68.6 cm) 377⁄8" (96.3 cm) 377⁄8" (96.3 cm) 51" (...

Use and Care Manual
Page 16
...air into the interior of the exhaust vent. • Provide an opening with the NATIONAL ELECTRICAL CODE, ANSI/NFPA NO. 70 (for electric dryers) or NATIONAL FUEL GAS CODE, ANSI Z223 (for installation in the supply line. MOBILE OR MANUFACTURED HOME INSTALLATION • The installation must ...is 52". • Closet doors must contain a minimum of 120 square inches of open area equally distributed. BATHROOM OR BEDROOM INSTALLATION • The dryer MUST be vented to the outdoors. in the absence of local codes, with a free area of open area equally distributed. • No other...
...air into the interior of the exhaust vent. • Provide an opening with the NATIONAL ELECTRICAL CODE, ANSI/NFPA NO. 70 (for electric dryers) or NATIONAL FUEL GAS CODE, ANSI Z223 (for installation in the supply line. MOBILE OR MANUFACTURED HOME INSTALLATION • The installation must ...is 52". • Closet doors must contain a minimum of 120 square inches of open area equally distributed. BATHROOM OR BEDROOM INSTALLATION • The dryer MUST be vented to the outdoors. in the absence of local codes, with a free area of open area equally distributed. • No other...
Use and Care Manual
Page 17
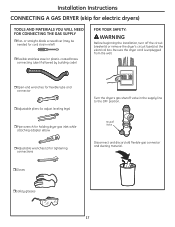
... Open-end wrenches for flexible tube and connector Adjustable pliers (to adjust leveling legs) Pipe wrench for holding dryer gas inlet while attaching adapter elbow Adjustable wrenches (2) for cord strain relief) Flexible stainless steel or plastic-coated brass...(if allowed by building code) FOR YOUR SAFETY: WARNING Before beginning the installation, turn off the circuit breaker(s) or remove the dryer's circuit fuse(s) at the electrical box. Shutoff Valve Disconnect and discard old flexible gas connector and ducting material. Safety glasses...
... Open-end wrenches for flexible tube and connector Adjustable pliers (to adjust leveling legs) Pipe wrench for holding dryer gas inlet while attaching adapter elbow Adjustable wrenches (2) for cord strain relief) Flexible stainless steel or plastic-coated brass...(if allowed by building code) FOR YOUR SAFETY: WARNING Before beginning the installation, turn off the circuit breaker(s) or remove the dryer's circuit fuse(s) at the electrical box. Shutoff Valve Disconnect and discard old flexible gas connector and ducting material. Safety glasses...
Use and Care Manual
Page 18
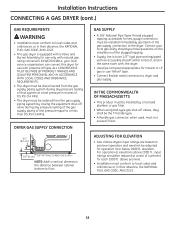
...) gas. GAS SUPPLY • A 1/8" National Pipe Taper thread plugged tapping, accessible for each 1000 ft. Installation Instructions CONNECTING A GAS DRYER (cont.) GAS REQUIREMENTS WARNING • Installation must conform to floor. above 2000 ft., input ratings should you have questions on sea level operation...when used, must be installed by closing the equipment shut-off valves, they shall be adjusted for use only with natural gas. elevation. DRYER GAS SUPPLY CONNECTION 31⁄4" (8.2 cm) 23⁄8" (6 cm) 3/8" NPT MALE THREAD GAS SUPPLY NOTE: Add to vertical dimension ...
...) gas. GAS SUPPLY • A 1/8" National Pipe Taper thread plugged tapping, accessible for each 1000 ft. Installation Instructions CONNECTING A GAS DRYER (cont.) GAS REQUIREMENTS WARNING • Installation must conform to floor. above 2000 ft., input ratings should you have questions on sea level operation...when used, must be installed by closing the equipment shut-off valves, they shall be adjusted for use only with natural gas. elevation. DRYER GAS SUPPLY CONNECTION 31⁄4" (8.2 cm) 23⁄8" (6 cm) 3/8" NPT MALE THREAD GAS SUPPLY NOTE: Add to vertical dimension ...
Use and Care Manual
Page 19
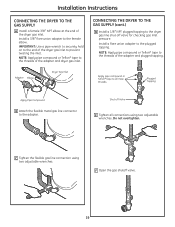
...compound or Teflon® tape to the threads of the adapter and plugged tapping. Adapter Elbow Dryer Gas Inlet CONNECTING THE DRYER TO THE GAS SUPPLY (cont.) D Install a 1/8" NPT plugged tapping to the dryer gas line shut-off Valve E Tighten all male threads. Install a flare union adapter to .... F Open the gas shutoff valve. 19 NOTE: Apply pipe compound or Teflon® tape to the threads of the adapter and dryer gas inlet. Apply pipe compound or Teflon® tape to all connections using two adjustable wrenches. Plugged Tapping Apply Pipe Compound B Attach...
...compound or Teflon® tape to the threads of the adapter and plugged tapping. Adapter Elbow Dryer Gas Inlet CONNECTING THE DRYER TO THE GAS SUPPLY (cont.) D Install a 1/8" NPT plugged tapping to the dryer gas line shut-off Valve E Tighten all male threads. Install a flare union adapter to .... F Open the gas shutoff valve. 19 NOTE: Apply pipe compound or Teflon® tape to the threads of the adapter and dryer gas inlet. Apply pipe compound or Teflon® tape to all connections using two adjustable wrenches. Plugged Tapping Apply Pipe Compound B Attach...
Use and Care Manual
Page 20
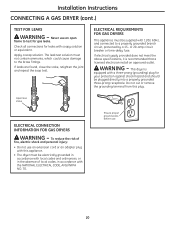
...and connected to a properly grounded branch circuit, protected by a 15- ELECTRICAL REQUIREMENTS FOR GAS DRYERS This appliance must be plugged directly into a properly grounded three-prong receptacle. This dryer is recommended that a licensed electrician install an approved outlet. Ensure proper ground exists before use ...20-amp circuit breaker or time-delay fuse. Do not cut or remove the grounding terminal from this appliance. • The dryer must not contain ammonia, which could cause damage to test for your protection against shock hazard and should be supplied with soapy solution...
...and connected to a properly grounded branch circuit, protected by a 15- ELECTRICAL REQUIREMENTS FOR GAS DRYERS This appliance must be plugged directly into a properly grounded three-prong receptacle. This dryer is recommended that a licensed electrician install an approved outlet. Ensure proper ground exists before use ...20-amp circuit breaker or time-delay fuse. Do not cut or remove the grounding terminal from this appliance. • The dryer must not contain ammonia, which could cause damage to test for your protection against shock hazard and should be supplied with soapy solution...


