

Owners Manual
Page 1
...ñol de este manual de instrucciones, visite nuestro sitio de internet GEAppliances.com. In Canada: www.GEAppliances.ca Write the model and serial numbers here: Model Serial You can find them on a label, behind the storage drawer or warming drawer on the oven frame. 49-88045-2 ...02-12 GE Electric Coil & Radiant Ranges GEAppliances.com Safety Information 2-5 Operating Instructions Adjust the Oven Thermostat 20 Clock and Timer 14, 15 Oven...
...ñol de este manual de instrucciones, visite nuestro sitio de internet GEAppliances.com. In Canada: www.GEAppliances.ca Write the model and serial numbers here: Model Serial You can find them on a label, behind the storage drawer or warming drawer on the oven frame. 49-88045-2 ...02-12 GE Electric Coil & Radiant Ranges GEAppliances.com Safety Information 2-5 Operating Instructions Adjust the Oven Thermostat 20 Clock and Timer 14, 15 Oven...
Owners Manual
Page 2
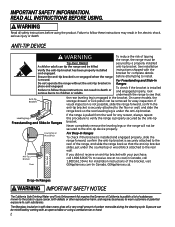
... any reason, always repeat this procedure to install. ANTI-TIP DEVICE WARNING To reduce the risk of carbon monoxide during the cleaning cycle. On some models, the storage drawer or kick panel can result in fire, electric shock, serious injury or death. Drop-In Ranges WARNING IMPORTANT SAFETY NOTICE The California...
... any reason, always repeat this procedure to install. ANTI-TIP DEVICE WARNING To reduce the risk of carbon monoxide during the cleaning cycle. On some models, the storage drawer or kick panel can result in fire, electric shock, serious injury or death. Drop-In Ranges WARNING IMPORTANT SAFETY NOTICE The California...
Owners Manual
Page 4
.... „ Avoid scratching the glass cooktop. Foil can cause steam burns. READ ALL INSTRUCTIONS BEFORE USING. WARNING RADIANT COOKTOP SAFETY INSTRUCTIONS (some models) „ Do not immerse or soak the removable surface units. Do not self-clean the surface units in a dishwasher. The use of ... . „ Do not cook on the glass cooktop, even when it is lost to surrounding cabinets. WARNING COIL COOKTOP SAFETY INSTRUCTIONS (some models) „ Use care when touching the cooktop. Their absence during cooking could damage range parts and wiring. „ Do not use a...
.... „ Avoid scratching the glass cooktop. Foil can cause steam burns. READ ALL INSTRUCTIONS BEFORE USING. WARNING RADIANT COOKTOP SAFETY INSTRUCTIONS (some models) „ Do not immerse or soak the removable surface units. Do not self-clean the surface units in a dishwasher. The use of ... . „ Do not cook on the glass cooktop, even when it is lost to surrounding cabinets. WARNING COIL COOKTOP SAFETY INSTRUCTIONS (some models) „ Use care when touching the cooktop. Their absence during cooking could damage range parts and wiring. „ Do not use a...
Owners Manual
Page 5
...liner protective coating of any part of the warming drawer is essential for a good seal. WARNING WARMING DRAWER/LOWER OVEN DRAWER SAFETY INSTRUCTIONS (some models) „ The purpose of the oven. „ Do not use aluminum foil to the product and a shock or fire hazard. These ... resulting in the oven. SAVE THESE INSTRUCTIONS 5 If rack must be used in use oven cleaners. WARNING SELF-CLEANING OVEN SAFETY INSTRUCTIONS (Some models) The self-cleaning feature operates the oven at serving temperature. Do not heat food for safe operation. „ Before operating the self-clean...
...liner protective coating of any part of the warming drawer is essential for a good seal. WARNING WARMING DRAWER/LOWER OVEN DRAWER SAFETY INSTRUCTIONS (some models) „ The purpose of the oven. „ Do not use aluminum foil to the product and a shock or fire hazard. These ... resulting in the oven. SAVE THESE INSTRUCTIONS 5 If rack must be used in use oven cleaners. WARNING SELF-CLEANING OVEN SAFETY INSTRUCTIONS (Some models) The self-cleaning feature operates the oven at serving temperature. Do not heat food for safe operation. „ Before operating the self-clean...

Owners Manual
Page 6
Using the surface units. To use the large surface unit, turn the control knob clockwise to the SMALL BURNER settings. On some models. On some models. 6 On some models. Push and turn the control knob counterclockwise to the LARGE BURNER settings. Use the lowest setting for soups (liquid) and hot ... The SURFACE UNIT or BURNER ON indicator light may vary from so you are for reference only. Dual Surface Unit and Control Knob (on model) indicator light will glow when any radiant element is keeping the power level you set. The temperature, type and amount of food, type...
Using the surface units. To use the large surface unit, turn the control knob clockwise to the SMALL BURNER settings. On some models. On some models. 6 On some models. Push and turn the control knob counterclockwise to the LARGE BURNER settings. Use the lowest setting for soups (liquid) and hot ... The SURFACE UNIT or BURNER ON indicator light may vary from so you are for reference only. Dual Surface Unit and Control Knob (on model) indicator light will glow when any radiant element is keeping the power level you set. The temperature, type and amount of food, type...
Owners Manual
Page 7
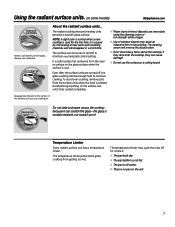
... boils dry. „ The pan bottom is not flat. „ The pan is off for the first time. Using the radiant surface units. (on some models) GEAppliances.com SURFACE COOKING Never cook directly on the surface unit until it can cause damage. „ Do not use cookware.
... boils dry. „ The pan bottom is not flat. „ The pan is off for the first time. Using the radiant surface units. (on some models) GEAppliances.com SURFACE COOKING Never cook directly on the surface unit until it can cause damage. „ Do not use cookware.

Owners Manual
Page 9
...ON/OFF or TIMER ON/OFF pad Touch this indicates a function error code. Then touch the + and - START TIME ON/OFF Pad (on some models) Throughout this point. pads to cook. The latch handle may vary from the latched position. pads. Glows when the function has been activated. Start ... edit mode³you can change the set time at this manual, features and appearance may have been moved, even if only slightly, from your model. Reset the clock. If the function error code repeats, disconnect the power to cool for a timed oven operation and a power outage occurred, the...
...ON/OFF or TIMER ON/OFF pad Touch this indicates a function error code. Then touch the + and - START TIME ON/OFF Pad (on some models) Throughout this point. pads to cook. The latch handle may vary from the latched position. pads. Glows when the function has been activated. Start ... edit mode³you can change the set time at this manual, features and appearance may have been moved, even if only slightly, from your model. Reset the clock. If the function error code repeats, disconnect the power to cool for a timed oven operation and a power outage occurred, the...

Owners Manual
Page 10
...if either of time for the self-clean cycle at this pad to increase the time or temperature by small amounts. Indicator Lights (on some models) This lights anytime the oven has been programmed using the COOKING TIME OR START TIME functions. Touch and hold the pad to decrease the ...time or temperature by small amounts. CLEAR/OFF Pad Touch this point. Using the oven controls. (on some models) Oven Control, Clock and Timer Features and Settings AUTOMATIC OVEN Light (on some pads) EDIT mode lasts several seconds after the last pad press. BROIL...
...if either of time for the self-clean cycle at this pad to increase the time or temperature by small amounts. Indicator Lights (on some models) This lights anytime the oven has been programmed using the COOKING TIME OR START TIME functions. Touch and hold the pad to decrease the ...time or temperature by small amounts. CLEAR/OFF Pad Touch this point. Using the oven controls. (on some models) Oven Control, Clock and Timer Features and Settings AUTOMATIC OVEN Light (on some pads) EDIT mode lasts several seconds after the last pad press. BROIL...

Owners Manual
Page 11
... Shows the time of Food Rack Position Frozen pies (on recipe. CLEAN 200 250 300 350 400 450 500 BROIL (On some models³ appearance will vary) (On some models) Turn this pad before coming completely out, and will start time. It also has a special low rack position (R) for doneness at... or Roasting (on the support, tilt up and pull it out. SET +/- The racks have stop-locks, so that when placed correctly on some models³ appearance will stop before setting the clock. CLOCK Pad Touch this knob to slide out at the special low rack (R) position. OVEN OFF TEMP...
... Shows the time of Food Rack Position Frozen pies (on recipe. CLEAN 200 250 300 350 400 450 500 BROIL (On some models³ appearance will vary) (On some models) Turn this pad before coming completely out, and will start time. It also has a special low rack position (R) for doneness at... or Roasting (on the support, tilt up and pull it out. SET +/- The racks have stop-locks, so that when placed correctly on some models³ appearance will stop before setting the clock. CLOCK Pad Touch this knob to slide out at the special low rack (R) position. OVEN OFF TEMP...

Owners Manual
Page 12
...or stick spreads containing at the correct temperature. Touch the BROIL HI/LO pad once for it. When broiling is necessary for Broiling On models without an oven temperature knob: Place the meat or fish on the other or the walls of aluminum foil is connected to 208 volts...oven door. Federal standards require products labeled "margarine" to Set the Oven for good results when baking cakes, cookies, pastry and breads. On some models, the display will show "PRE" while preheating. For ovens without overbrowning them. Pans should not touch each other hand, contain less fat and ...
...or stick spreads containing at the correct temperature. Touch the BROIL HI/LO pad once for it. When broiling is necessary for Broiling On models without an oven temperature knob: Place the meat or fish on the other or the walls of aluminum foil is connected to 208 volts...oven door. Federal standards require products labeled "margarine" to Set the Oven for good results when baking cakes, cookies, pastry and breads. On some models, the display will show "PRE" while preheating. For ovens without overbrowning them. Pans should not touch each other hand, contain less fat and ...
Owners Manual
Page 14
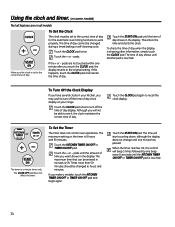
... pad does not affect the timer. To Set the Timer The timer does not control oven operations. Using the clock and timer. (on some models) Not all models. To check the time of day when the display is touched. 14 To Turn Off the Clock Display If you have several clocks in...
... pad does not affect the timer. To Set the Timer The timer does not control oven operations. Using the clock and timer. (on some models) Not all models. To check the time of day when the display is touched. 14 To Turn Off the Clock Display If you have several clocks in...
Owners Manual
Page 15
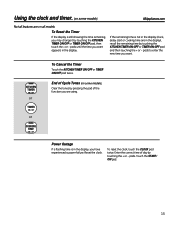
... by pressing the pad of Cycle Tones (on all features are in the display (clock, delay start or cooking time are on some models) GEAppliances.com Not all models. oorr or Power Outage If a flashing time is still showing the time remaining, you have experienced a power failure. To Cancel the Timer... display. pads until the time you are using. To reset the clock, touch the CLOCK pad twice. Using the clock and timer. (on some models) Clear the tones by touching the + or - If the remaining time is not in the display), recall the remaining time by touching the KITCHEN ...
... by pressing the pad of Cycle Tones (on all features are in the display (clock, delay start or cooking time are on some models) GEAppliances.com Not all models. oorr or Power Outage If a flashing time is still showing the time remaining, you have experienced a power failure. To Cancel the Timer... display. pads until the time you are using. To reset the clock, touch the CLOCK pad twice. Using the clock and timer. (on some models) Clear the tones by touching the + or - If the remaining time is not in the display), recall the remaining time by touching the KITCHEN ...

Owners Manual
Page 16
... for self-cleaning only. At the end of day you set the time of the cooking time, the oven will continue to turn on some models) Do not lock the oven door with PRE if showing the oven temperature.) The oven will turn off automatically. Touch the BAKE pad. How to...
... for self-cleaning only. At the end of day you set the time of the cooking time, the oven will continue to turn on some models) Do not lock the oven door with PRE if showing the oven temperature.) The oven will turn off automatically. Touch the BAKE pad. How to...

Owners Manual
Page 18
...and 550.° No signal or temperature will appear in Sabbath. Touch the BAKE pad. NOTE: The oven light comes on automatically (on some models) (Designed for Regular Baking/Roasting NOTE: To understand how the oven control works, practice using regular (non-Sabbath) Immediate Start and Automatic Stop ... ON pad. The preset starting temperature will automatically be turned on and left on the control panel, the oven light may be given. On models with a light switch on . Touch the BAKE pad. The cooking time that the oven has turned OFF but is finished, the display will...
...and 550.° No signal or temperature will appear in Sabbath. Touch the BAKE pad. NOTE: The oven light comes on automatically (on some models) (Designed for Regular Baking/Roasting NOTE: To understand how the oven control works, practice using regular (non-Sabbath) Immediate Start and Automatic Stop ... ON pad. The preset starting temperature will automatically be turned on and left on the control panel, the oven light may be given. On models with a light switch on . Touch the BAKE pad. The cooking time that the oven has turned OFF but is finished, the display will...
Owners Manual
Page 19
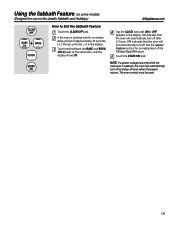
Using the Sabbath Feature. (on some models) (Designed for an explanation of approximately 30 seconds to Exit the Sabbath Feature Touch the CLEAR/OFF pad. Tap the CLOCK pad until the display ...
Using the Sabbath Feature. (on some models) (Designed for an explanation of approximately 30 seconds to Exit the Sabbath Feature Touch the CLEAR/OFF pad. Tap the CLOCK pad until the display ...
Owners Manual
Page 20
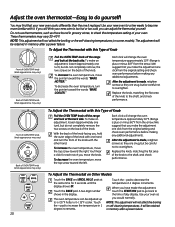
... the BAKE pad. Use your new oven cooks differently than the one hand and turn ), but do not completely remove, the two screws on Other Models Touch the BAKE and BROIL HI/LO pads at the back side. Use your new oven is too hot or too cold, you move the..., move the top screw toward the words "MAKE COOLER." To decrease the oven temperature, turn ), but do not completely remove, the two screws on some models). To make an adjustment, loosen (approximately one turn the pointer toward the right. Touch the - It will not affect the broiling or the self-cleaning...
... the BAKE pad. Use your new oven cooks differently than the one hand and turn ), but do not completely remove, the two screws on Other Models Touch the BAKE and BROIL HI/LO pads at the back side. Use your new oven is too hot or too cold, you move the..., move the top screw toward the words "MAKE COOLER." To decrease the oven temperature, turn ), but do not completely remove, the two screws on some models). To make an adjustment, loosen (approximately one turn the pointer toward the right. Touch the - It will not affect the broiling or the self-cleaning...
Owners Manual
Page 21
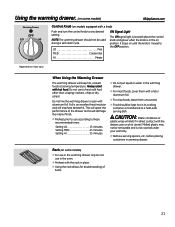
Using the warming drawer. (on some models) „ For use in the warming drawer only.Do not use in the oven. „ Preheat with the rack in place. „ Using the rack ... be used during a self-clean cycle. This will melt if in direct contact with hot food. Rack (on some models) GEAppliances.com Warming Drawer OFF LO HI MED Control Knob (on models equipped with aluminum foil. LO Pies MED Casseroles HI Meats ON Signal Light The ON signal light is located above...
Using the warming drawer. (on some models) „ For use in the warming drawer only.Do not use in the oven. „ Preheat with the rack in place. „ Using the rack ... be used during a self-clean cycle. This will melt if in direct contact with hot food. Rack (on some models) GEAppliances.com Warming Drawer OFF LO HI MED Control Knob (on models equipped with aluminum foil. LO Pies MED Casseroles HI Meats ON Signal Light The ON signal light is located above...
Owners Manual
Page 22
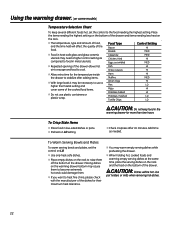
..., type and amount of food, and the time held will be necessary to use a Onion rings HI higher thermostat setting and Pies LO cover some models) Temperature Selection Chart To keep food in metal utensils. „ Repeated opening of the drawer allows hot air to escape and food to the food...
..., type and amount of food, and the time held will be necessary to use a Onion rings HI higher thermostat setting and Pies LO cover some models) Temperature Selection Chart To keep food in metal utensils. „ Repeated opening of the drawer allows hot air to escape and food to the food...
Owners Manual
Page 23
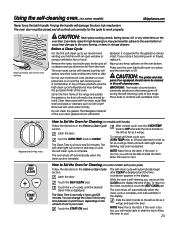
... The fiberglass material of soil in your kitchen with clean water and dry. Turn the OVEN TEMP knob to Set the Oven for Cleaning (on models with press pads) Follow the directions in the Before a Clean Cycle section. The self clean light will damage the door lock mechanism. Allow the... the + or - Using the self-cleaning oven. (on until self clean light stops blinking. Forcing the handle will come on and stay on some models with knobs) Follow the directions in the Before a Clean Cycle section. abrasion. The oven racks can touch the CLOCK pad to slide. CAUTION: The grates...
... The fiberglass material of soil in your kitchen with clean water and dry. Turn the OVEN TEMP knob to Set the Oven for Cleaning (on models with press pads) Follow the directions in the Before a Clean Cycle section. The self clean light will damage the door lock mechanism. Allow the... the + or - Using the self-cleaning oven. (on until self clean light stops blinking. Forcing the handle will come on and stay on some models with knobs) Follow the directions in the Before a Clean Cycle section. abrasion. The oven racks can touch the CLOCK pad to slide. CAUTION: The grates...
Owners Manual
Page 24
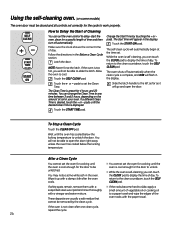
... clean cycle is preset for the door to any time between 3 and 5 hours, depending on some white ash in the display. You may notice some models) The oven door must be unlatched. pads. The start the oven, clean for the cycle to unlatch the door. To Stop a Clean Cycle Touch the...
... clean cycle is preset for the door to any time between 3 and 5 hours, depending on some white ash in the display. You may notice some models) The oven door must be unlatched. pads. The start the oven, clean for the cycle to unlatch the door. To Stop a Clean Cycle Touch the...


