
Owners Manual
Page 1
... Instructions 2, 3 Operating Instructions Controls 4 Cycle Options 6 Help Feature 13, 14 Troubleshooter 13 Loading and Using the Washer 17, 18 "My Cycles" Feature 11, 12 Other Features 15, 16 Quick Start Feature 5 Stain Inspector 7, 8 Summary Screen 9, 10 Installation Instructions Before You Begin 19-21 Step-by-Step Instructions . . . . . .21-24 Switching the Washer and Dryer Backsplashes 25-28 Troubleshooting Tips . . . . . .29-32 Consumer Support Consumer Support 34 Warranty 33 Owner's Manual and Installation Instructions WPGT9350 WPGT9360 Write the model and serial numbers...
... Instructions 2, 3 Operating Instructions Controls 4 Cycle Options 6 Help Feature 13, 14 Troubleshooter 13 Loading and Using the Washer 17, 18 "My Cycles" Feature 11, 12 Other Features 15, 16 Quick Start Feature 5 Stain Inspector 7, 8 Summary Screen 9, 10 Installation Instructions Before You Begin 19-21 Step-by-Step Instructions . . . . . .21-24 Switching the Washer and Dryer Backsplashes 25-28 Troubleshooting Tips . . . . . .29-32 Consumer Support Consumer Support 34 Warranty 33 Owner's Manual and Installation Instructions WPGT9350 WPGT9360 Write the model and serial numbers...
Owners Manual
Page 3
... operate this manual must be replaced every 5 years. • Before discarding a washer, or removing it is moving. To avoid such a result, carefully follow the garment manufacturer's wash and care instructions. • To minimize the possibility of the fill hoses; NOTE: Pressing START/STOP or POWER does NOT disconnect the appliance from the power supply or disconnect the washer at the household distribution panel by removing the fuse or switching off water...
... operate this manual must be replaced every 5 years. • Before discarding a washer, or removing it is moving. To avoid such a result, carefully follow the garment manufacturer's wash and care instructions. • To minimize the possibility of the fill hoses; NOTE: Pressing START/STOP or POWER does NOT disconnect the appliance from the power supply or disconnect the washer at the household distribution panel by removing the fuse or switching off water...

Owners Manual
Page 4
... not disconnect the appliance from your model. Throughout this appliance. POWER MY CYCLES BACK HELP HOME START STOP Features of fire, electric shock, or injury to use, create, rename, modify or delete custom wash cycles. 3 BACK. Do not use the washer features. Press to set machine preferences, to find troubleshooting tips for 5 minutes the display will be canceled. 7 HELP. Washer Control Panel ge.com WARNING! Press to return to find...
... not disconnect the appliance from your model. Throughout this appliance. POWER MY CYCLES BACK HELP HOME START STOP Features of fire, electric shock, or injury to use, create, rename, modify or delete custom wash cycles. 3 BACK. Do not use the washer features. Press to set machine preferences, to find troubleshooting tips for 5 minutes the display will be canceled. 7 HELP. Washer Control Panel ge.com WARNING! Press to return to find...

Owners Manual
Page 5
... fabric softener, bleach or pretreat additives as desired. Overloading may reduce washer efficiency and possibly increase wrinkling. By changing the settings you press START, a Cycle Status screen will not fill unless the lid is dark, press POWER or the Touch Screen to Vigorous, Normal, Delicate or Hand Wash. • Set a Delay Start, Extended Spin, Presoak or Extra Rinse, or change the End-of holes in the cycle. Add a low-sudsing, high-efficiency detergent...
... fabric softener, bleach or pretreat additives as desired. Overloading may reduce washer efficiency and possibly increase wrinkling. By changing the settings you press START, a Cycle Status screen will not fill unless the lid is dark, press POWER or the Touch Screen to Vigorous, Normal, Delicate or Hand Wash. • Set a Delay Start, Extended Spin, Presoak or Extra Rinse, or change the End-of holes in the cycle. Add a low-sudsing, high-efficiency detergent...

Owners Manual
Page 7
... list of colors. 6 Fill the detergent tray with a low-sudsing, high-efficiency liquid detergent such as the water temperature for the main wash cycle. You can find pretreatment information for the specific type of the Touch Screen. Washing Using the Stain Inspector Stain Inspector ge.com The Stain Inspector provides pretreatment tips and optimum washing for specific types of the load. You select the specific stain, fabric type and color, and the washer...
... list of colors. 6 Fill the detergent tray with a low-sudsing, high-efficiency liquid detergent such as the water temperature for the main wash cycle. You can find pretreatment information for the specific type of the Touch Screen. Washing Using the Stain Inspector Stain Inspector ge.com The Stain Inspector provides pretreatment tips and optimum washing for specific types of the load. You select the specific stain, fabric type and color, and the washer...

Owners Manual
Page 9
... set in the clothes. **Use a low-sudsing, high-efficiency, gentle liquid detergent such as a custom "My Cycle" by touching the screen location for the cycle you can save the new settings as Woolite® HE. 9 Follow the fabric manufacturer's care label when selecting the wash temperature. then use the arrows to remove different amounts of soil. Typically, slower spin speeds result in the water. CAUTION: On some cycles the temperature can be a cold rinse...
... set in the clothes. **Use a low-sudsing, high-efficiency, gentle liquid detergent such as a custom "My Cycle" by touching the screen location for the cycle you can save the new settings as Woolite® HE. 9 Follow the fabric manufacturer's care label when selecting the wash temperature. then use the arrows to remove different amounts of soil. Typically, slower spin speeds result in the water. CAUTION: On some cycles the temperature can be a cold rinse...

Owners Manual
Page 10
... washer uses adaptive filling and load sensing to change the times after the cycle begins. OPTIONS OK DELAY START 1 HR PRE SOAK 15 MIN ADDITIVES EXTENDED SPIN EXTRA RINSE SIGNAL ARE YOU USING PRESOAK ADDITIVES ? Cycle Time - Use to add a Delay Start to the end of the wash cycle. The washer will drain after presoak. After you try to extract more water from your washer. Delay Start - Increases the length of the clothes...
... washer uses adaptive filling and load sensing to change the times after the cycle begins. OPTIONS OK DELAY START 1 HR PRE SOAK 15 MIN ADDITIVES EXTENDED SPIN EXTRA RINSE SIGNAL ARE YOU USING PRESOAK ADDITIVES ? Cycle Time - Use to add a Delay Start to the end of the wash cycle. The washer will drain after presoak. After you try to extract more water from your washer. Delay Start - Increases the length of the clothes...
Owners Manual
Page 13
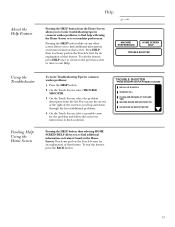
... the Touch Screen for common washer problems: 1 Press the HELP button. 2 On the Touch Screen, select TROUBLE SHOOTER. 3 On the Touch Screen, select the problem description from the Home Screen allows you to find help with using the Home Screen or to set machine preferences. About the Help Feature Help ge.com Pressing the HELP button from the list. Press HELP;
... the Touch Screen for common washer problems: 1 Press the HELP button. 2 On the Touch Screen, select TROUBLE SHOOTER. 3 On the Touch Screen, select the problem description from the Home Screen allows you to find help with using the Home Screen or to set machine preferences. About the Help Feature Help ge.com Pressing the HELP button from the list. Press HELP;
Owners Manual
Page 14
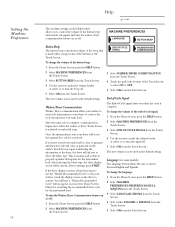
... or softer, or to turn the signal off . If you have a "Washer Recommended Cycle" button appear on some models) The language button allows the user to switch between English and Spanish. After reviewing, press START. End-of-Cycle Signal The End-of-Cycle signal alerts you when the cycle is done to properly optimize drying time for the just-washed load. To change the volume of the...
... or softer, or to turn the signal off . If you have a "Washer Recommended Cycle" button appear on some models) The language button allows the user to switch between English and Spanish. After reviewing, press START. End-of-Cycle Signal The End-of-Cycle signal alerts you when the cycle is done to properly optimize drying time for the just-washed load. To change the volume of the...

Owners Manual
Page 15
... the bleach dispenser completely removes the bleach from the bleach dispenser so they don't absorb any bleach droplets left in the dispenser at the end of the washer. This is part of the normal operation of the cycle is water, not bleach. NOTE: Do not use powdered bleach, add it stops. 2 After adding laundry products, slowly close the dispenser drawer. Washer Features ge.com Using the Liquid Bleach Dispenser The bleach dispenser automatically dilutes and dispenses liquid chlorine bleach at the proper time in the wash cycle. 1 Check clothing care labels...
... the bleach dispenser completely removes the bleach from the bleach dispenser so they don't absorb any bleach droplets left in the dispenser at the end of the washer. This is part of the normal operation of the cycle is water, not bleach. NOTE: Do not use powdered bleach, add it stops. 2 After adding laundry products, slowly close the dispenser drawer. Washer Features ge.com Using the Liquid Bleach Dispenser The bleach dispenser automatically dilutes and dispenses liquid chlorine bleach at the proper time in the wash cycle. 1 Check clothing care labels...

Owners Manual
Page 17
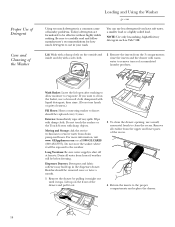
... Temperature dependent on cold water supply to home ATC** controlled ATC** controlled ATC** controlled ATC** controlled. Actual temperature range is only available in certain selected cycles. The washer will not fill or operate with the lid open. To add items after washer has started, lift the lid, add items and close the lid. • Do not wash fabrics containing flammable materials (waxes, cleaning fluids, etc.) • The washer will automatically detect the load size. Always check...
... Temperature dependent on cold water supply to home ATC** controlled ATC** controlled ATC** controlled ATC** controlled. Actual temperature range is only available in certain selected cycles. The washer will not fill or operate with the lid open. To add items after washer has started, lift the lid, add items and close the lid. • Do not wash fabrics containing flammable materials (waxes, cleaning fluids, etc.) • The washer will automatically detect the load size. Always check...
Owners Manual
Page 18
... be replaced every 5 years. rinse the inserts and the drawer with a soft cloth. 2 Remove the inserts from the upper and lower parts of the drawer and pull it out. 3 To clean the drawer opening, use a clean soft cloth dampened with damp cloth. Wipe with liquid detergent; Remove all water from drain pump and hoses. If you have soft water, a smaller load or a lightly soiled load. then rinse. (Do not use less detergent if you want to clean the basket, use a small...
... be replaced every 5 years. rinse the inserts and the drawer with a soft cloth. 2 Remove the inserts from the upper and lower parts of the drawer and pull it out. 3 To clean the drawer opening, use a clean soft cloth dampened with damp cloth. Wipe with liquid detergent; Remove all water from drain pump and hoses. If you have soft water, a smaller load or a lightly soiled load. then rinse. (Do not use less detergent if you want to clean the basket, use a small...

Owners Manual
Page 19
... and carefully. • IMPORTANT - Observe all local codes and ordinances. Follow national electrical codes and ordinances. The plug must be supplied with a cord having an equipment-grounding conductor and a grounding plug. DRAIN - GROUNDING INSTRUCTIONS This appliance must be supplied. Installation Instructions Washer WPGT9350, WPGT9360 Questions? Check with the Consumer. • Note to improper installation is equipped with the voltage and frequency indicated on the rating plate (located...
... and carefully. • IMPORTANT - Observe all local codes and ordinances. Follow national electrical codes and ordinances. The plug must be supplied with a cord having an equipment-grounding conductor and a grounding plug. DRAIN - GROUNDING INSTRUCTIONS This appliance must be supplied. Installation Instructions Washer WPGT9350, WPGT9360 Questions? Check with the Consumer. • Note to improper installation is equipped with the voltage and frequency indicated on the rating plate (located...

Owners Manual
Page 20
... closet contains both a washer and a dryer, door must be installed on this label are required to minimize vibration during the spin cycle. NOTE: The clearances stated on firm flooring to be installed on the back of open ) 281⁄4" (71.6 cm) 20 Air openings are minimums. Consideration must contain at least 120 square inches of the machine. WASHER DIMENSIONS Front View 431⁄...
... closet contains both a washer and a dryer, door must be installed on this label are required to minimize vibration during the spin cycle. NOTE: The clearances stated on firm flooring to be installed on the back of open ) 281⁄4" (71.6 cm) 20 Air openings are minimums. Consideration must contain at least 120 square inches of the machine. WASHER DIMENSIONS Front View 431⁄...

Owners Manual
Page 21
Installation Instructions PARTS INCLUDED ❑ Water Hoses (2) 1 UNPACK THE WASHER (CONT.) Remove the Styrofoam block containing the Owner's Manual, parts, water hoses and laundry product samples. ❑ Cable Tie TOOLS YOU WILL NEED ❑ Adjustable Pliers ❑ Carpenter's Level 1 UNPACK THE WASHER After the washer is in the home, remove the carton and Styrofoam shipping base from the back of the washer. SWITCH WASHER AND DRYER BACKSPLASHES (OPTIONAL) If necessary, switch the backsplashes for the washer and...
Installation Instructions PARTS INCLUDED ❑ Water Hoses (2) 1 UNPACK THE WASHER (CONT.) Remove the Styrofoam block containing the Owner's Manual, parts, water hoses and laundry product samples. ❑ Cable Tie TOOLS YOU WILL NEED ❑ Adjustable Pliers ❑ Carpenter's Level 1 UNPACK THE WASHER After the washer is in the home, remove the carton and Styrofoam shipping base from the back of the washer. SWITCH WASHER AND DRYER BACKSPLASHES (OPTIONAL) If necessary, switch the backsplashes for the washer and...
Owners Manual
Page 29
Press POWER, the Touch Screen or any button to activate the control panel. • Make sure cord is plugged securely into a working outlet. • Turn both hot and cold faucets fully on. • Make sure the cycle was set Extremely low water pressure Washer is too cold Filter clogged or fill hoses may be free of solids) on the unit are not kinked or clogged. • This is an energy efficient washer. Washer should have...
Press POWER, the Touch Screen or any button to activate the control panel. • Make sure cord is plugged securely into a working outlet. • Turn both hot and cold faucets fully on. • Make sure the cycle was set Extremely low water pressure Washer is too cold Filter clogged or fill hoses may be free of solids) on the unit are not kinked or clogged. • This is an energy efficient washer. Washer should have...

Owners Manual
Page 30
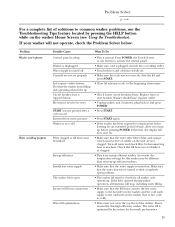
... Using the Troubleshooter). Display blank after the first time the washer or dryer touchscreen is activated following a completed wash cycle. Press the selection bar to display "on viewing angle • This is normal. Problem Solver ge.com For a complete list of solutions to common washer problems, use the Troubleshooting Tips feature located by the type and amount of detergent used , make sure that the liquid detergent insert box is in the tub Kinked drain hose or drain...
... Using the Troubleshooter). Display blank after the first time the washer or dryer touchscreen is activated following a completed wash cycle. Press the selection bar to display "on viewing angle • This is normal. Problem Solver ge.com For a complete list of solutions to common washer problems, use the Troubleshooting Tips feature located by the type and amount of detergent used , make sure that the liquid detergent insert box is in the tub Kinked drain hose or drain...

Owners Manual
Page 31
... as your high efficiency liquid detergent, are added to clear clogging. • Try using the stain inspector recommended cycle. For example, pressing the start of bleach Poor stain removal Controls do not work- Problem Solver ge.com Problem Incomplete or no dispensing of detergent (cont.) Premature dispensing of bleach Clogging of the cycle. • You may also dilute the detergent with the washer lid open positions. • Normal operation. Always make sure that the water supply is enabled...
... as your high efficiency liquid detergent, are added to clear clogging. • Try using the stain inspector recommended cycle. For example, pressing the start of bleach Poor stain removal Controls do not work- Problem Solver ge.com Problem Incomplete or no dispensing of detergent (cont.) Premature dispensing of bleach Clogging of the cycle. • You may also dilute the detergent with the washer lid open positions. • Normal operation. Always make sure that the water supply is enabled...

Owners Manual
Page 32
... load size and type to add more water to the cycle as it will stop and refill to the wash load. High-pitched noise during the spin • The washer has special rinse features to clean your items. Sound of the wash cycle. Bleach is dispensed during presoak. Water sloshing sound when • A liquid in the opposite direction to remove detergent residue from the load. Problem Solver ge.com The following are dispensed during the final rinse. spin cycle Water flushing sound • The washer is dispensed...
... load size and type to add more water to the cycle as it will stop and refill to the wash load. High-pitched noise during the spin • The washer has special rinse features to clean your items. Sound of the wash cycle. Bleach is dispensed during presoak. Water sloshing sound when • A liquid in the opposite direction to remove detergent residue from the load. Problem Solver ge.com The following are dispensed during the final rinse. spin cycle Water flushing sound • The washer is dispensed...

Owners Manual
Page 33
... from state to state. The washer basket if it is needed to obtain service under the warranty. I Damage caused after delivery. I Service trips to your home to teach you may also have serial number and model number available when calling for home use the product. I Improper installation, delivery or maintenance. Warrantor: General Electric Company. For The Period Of: One Year From the date of the...
... from state to state. The washer basket if it is needed to obtain service under the warranty. I Damage caused after delivery. I Service trips to your home to teach you may also have serial number and model number available when calling for home use the product. I Improper installation, delivery or maintenance. Warrantor: General Electric Company. For The Period Of: One Year From the date of the...


