Manual
Page 2
... 2 The author assumes no responsibility for home and other limited viewing uses only unless otherwise authorized by Macrovision Corporation. AP64D /AP64D-H Graphics Accelerator Chapter 1 User's Manual Copyright Copyright by GIGA-BYTE TECHNOLOGY CO., LTD. ("GBT") No part of this manual may void the warranty of this VGA card. patents and other rights owners. Notice Due to update the information contained herein. Trademarks Third-party brands and names...
... 2 The author assumes no responsibility for home and other limited viewing uses only unless otherwise authorized by Macrovision Corporation. AP64D /AP64D-H Graphics Accelerator Chapter 1 User's Manual Copyright Copyright by GIGA-BYTE TECHNOLOGY CO., LTD. ("GBT") No part of this manual may void the warranty of this VGA card. patents and other rights owners. Notice Due to update the information contained herein. Trademarks Third-party brands and names...
Manual
Page 3
...1.INTRODUCTION 1.1. HARDWARE INSTALLATION 7 3.SOFTWARE INSTALLATION 3.1 Win98 /98SE or WinME / Win XP Driver And Utilities Installation .. 9 3.1.1 Operating system requirement 9 3.1.2 DirectX installation 10 3.1.3 Driver installation 12 3.1.4 Utilities on driver CD 15 3.1.5 Taskbar Icon 15 3.1.6 Property pages 19 3.2.WINDOWS NT 4.0 DRIVER INSTALLATION 25 3.3.WINDOWS 2000 DRIVER INSTALLATION 26 3.4 BIOS FLASH UTILITY 26 4.Troubleshooting Tips 27 5.Appendix 28 5.1.How to refash the BIOS 28 5.2.Resolutions and Color Depth Table 30 3 UNPACKING 5 2.2. BOARD LAYOUT 6 2.3. PREFACE...
...1.INTRODUCTION 1.1. HARDWARE INSTALLATION 7 3.SOFTWARE INSTALLATION 3.1 Win98 /98SE or WinME / Win XP Driver And Utilities Installation .. 9 3.1.1 Operating system requirement 9 3.1.2 DirectX installation 10 3.1.3 Driver installation 12 3.1.4 Utilities on driver CD 15 3.1.5 Taskbar Icon 15 3.1.6 Property pages 19 3.2.WINDOWS NT 4.0 DRIVER INSTALLATION 25 3.3.WINDOWS 2000 DRIVER INSTALLATION 26 3.4 BIOS FLASH UTILITY 26 4.Troubleshooting Tips 27 5.Appendix 28 5.1.How to refash the BIOS 28 5.2.Resolutions and Color Depth Table 30 3 UNPACKING 5 2.2. BOARD LAYOUT 6 2.3. PREFACE...

Manual
Page 4
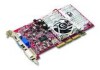
...® support, and flexible memory configurations allow implementations targeted at 275 / 250 (AP64D-H/AP64D) MHz n 165 MHz integrated TMDS transmitter supports panels up to (2048x1536) resolution n Supported DVI-I and TV-Out n Supported V-Tuner for the latest applications and enables use of 3D Games(4 full version,2 lite version) and CyberLink PowerDVD. 4 PREFACE Unsurpassed graphics performance AP64D(-H) provides the fastest and most advanced 2D, 3D and multimedia graphics performance for hardware monitor and...
...® support, and flexible memory configurations allow implementations targeted at 275 / 250 (AP64D-H/AP64D) MHz n 165 MHz integrated TMDS transmitter supports panels up to (2048x1536) resolution n Supported DVI-I and TV-Out n Supported V-Tuner for the latest applications and enables use of 3D Games(4 full version,2 lite version) and CyberLink PowerDVD. 4 PREFACE Unsurpassed graphics performance AP64D(-H) provides the fastest and most advanced 2D, 3D and multimedia graphics performance for hardware monitor and...
Manual
Page 5
... CARD. UNPACKING The AP64D series package contains the following: l The AP64D(-H) graphics accelerator l This USER'S MANUAL l Power DVD XP CDx1 l Full Version game CD x4 (CD x 4), Lite version game x2 (CDx1) l Driver CDwith V-Tuner utilities l One cable support S-video and AV output ; The card contains sensitive electric components, which can be easily damaged by static electricity, so the card sh ould be done on your computer and unplug power supply. 2. If you work...
... CARD. UNPACKING The AP64D series package contains the following: l The AP64D(-H) graphics accelerator l This USER'S MANUAL l Power DVD XP CDx1 l Full Version game CD x4 (CD x 4), Lite version game x2 (CDx1) l Driver CDwith V-Tuner utilities l One cable support S-video and AV output ; The card contains sensitive electric components, which can be easily damaged by static electricity, so the card sh ould be done on your computer and unplug power supply. 2. If you work...
Manual
Page 7
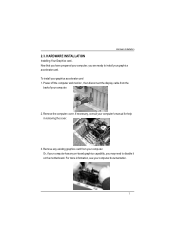
... your computer, you may need to install your graphics accelerator card 1. Remove the computer cover. To install your graphics accelerator card. Power off the computer and monitor , then disconnect the display cable from your computer has any on-board graphics capability, you are ready to disable it on the motherboard. For more information, see your computer. 2. If necessary, consult your computer's manual for help in removing the cover. 3. HARDWARE INSTALLATION Installing Your Graphics card..
... your computer, you may need to install your graphics accelerator card 1. Remove the computer cover. To install your graphics accelerator card. Power off the computer and monitor , then disconnect the display cable from your computer has any on-board graphics capability, you are ready to disable it on the motherboard. For more information, see your computer. 2. If necessary, consult your computer's manual for help in removing the cover. 3. HARDWARE INSTALLATION Installing Your Graphics card..
Manual
Page 8
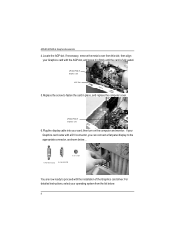
... detailed instructions, select your Graphics card came with a DVI connector, you can connect a flat panel display to the appropriate connector, as shown below : 8 then align your card; AP64D /AP64D-H Graphics Accelerator 4.Locate the AGP slot. If necessary, remove the metal cover from the list below ... then turn on the computer and monitor. AP64D/A P64D-H G raphics card 6.Plug the display cable into your Graphics card with the installation of the Graphics card driver. AP64D/A P64D-H Graphics card AGP Slot 5.Replace the screw...
... detailed instructions, select your Graphics card came with a DVI connector, you can connect a flat panel display to the appropriate connector, as shown below : 8 then align your card; AP64D /AP64D-H Graphics Accelerator 4.Locate the AGP slot. If necessary, remove the metal cover from the list below ... then turn on the computer and monitor. AP64D/A P64D-H G raphics card 6.Plug the display cable into your Graphics card with the installation of the Graphics card driver. AP64D/A P64D-H Graphics card AGP Slot 5.Replace the screw...
Manual
Page 9
... subsection 3.1.3 "Step By Step Installation" to be Drive D: 3.1. WINDOWS®98 /98SE / WINDOWS ME /WINDOWS XP DRIVER AND UTILITIES INSTALLATION The installation of SIS, ALI or VIA chipsets, please install the appropriate Driver programfor that your CD-ROM Drive letter to install the driver for your AP64D/AP64D-H graphics accelerator. 3.1.1.Operating systemrequirement l If your AP64D(-H) driver (Please follow guides to setup your OS is very simple. Software Installation 3.SOFTWARE INSTALLATION In this manual, we assume that mainboard.
... subsection 3.1.3 "Step By Step Installation" to be Drive D: 3.1. WINDOWS®98 /98SE / WINDOWS ME /WINDOWS XP DRIVER AND UTILITIES INSTALLATION The installation of SIS, ALI or VIA chipsets, please install the appropriate Driver programfor that your CD-ROM Drive letter to install the driver for your AP64D/AP64D-H graphics accelerator. 3.1.1.Operating systemrequirement l If your AP64D(-H) driver (Please follow guides to setup your OS is very simple. Software Installation 3.SOFTWARE INSTALLATION In this manual, we assume that mainboard.

Manual
Page 10
Installation DirectX Driver Click "Install DirectX 8.1"Item. 2.Click "Yes" icon. 3.Click "Yes"icon. 10 MMust be install DirectX 8.1 (or later) 1. Note: For software MPEG support in Win98/98SE or WinME, you must DirectX first install. AP64D /AP64D-H Graphics Accelerator 3.1.2.DirectX Installation Install Microsoft DirectX 8.1 to enable 3D hardware acceleration support for Win98/ 98SE or WinME to achieve better 3D performence.
Installation DirectX Driver Click "Install DirectX 8.1"Item. 2.Click "Yes" icon. 3.Click "Yes"icon. 10 MMust be install DirectX 8.1 (or later) 1. Note: For software MPEG support in Win98/98SE or WinME, you must DirectX first install. AP64D /AP64D-H Graphics Accelerator 3.1.2.DirectX Installation Install Microsoft DirectX 8.1 to enable 3D hardware acceleration support for Win98/ 98SE or WinME to achieve better 3D performence.
Manual
Page 12
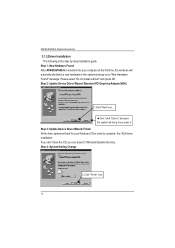
... the first time, the windows will automatically detect a new hardware in order to complete the VGA driver installation. Please select "Do not install a driver" and press OK. MDon't click "Cance l", because the system will hang if you can press C:\Windows\System directory. Step 4: System Setting Change 2..Click "Finish"icon. 12 Step 2: Update Device Driver Wizard: Standard PCI Graphics Adapter(VGA) 1.Click "Next"icon. AP64D /AP64D-H Graphics Accelerator 3.1.3.Driver Installation The following is inserted...
... the first time, the windows will automatically detect a new hardware in order to complete the VGA driver installation. Please select "Do not install a driver" and press OK. MDon't click "Cance l", because the system will hang if you can press C:\Windows\System directory. Step 4: System Setting Change 2..Click "Finish"icon. 12 Step 2: Update Device Driver Wizard: Standard PCI Graphics Adapter(VGA) 1.Click "Next"icon. AP64D /AP64D-H Graphics Accelerator 3.1.3.Driver Installation The following is inserted...

Manual
Page 13
Click "Install Display Driver(Radeon 8500 Series). 2.Click "Next"icon. 3.Click "Yes"icon. 13 Step 5: Driver Setup 1. If it does not show up, please run "D:\setup.exe". After the system has finished loading, insert the AP64D Series driver CD disk into your CD-ROM, and then you can see the AUTORUN window. Software Installation 3..Click "NO"icon.
Click "Install Display Driver(Radeon 8500 Series). 2.Click "Next"icon. 3.Click "Yes"icon. 13 Step 5: Driver Setup 1. If it does not show up, please run "D:\setup.exe". After the system has finished loading, insert the AP64D Series driver CD disk into your CD-ROM, and then you can see the AUTORUN window. Software Installation 3..Click "NO"icon.
Manual
Page 15
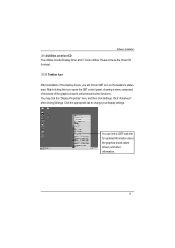
... "Display Properties"item, and then click Settings. You can link to change your display settings. Right-clicking this icon opens the GBT control panel, showing a menu composed of shortcute of the display drivers, you will find an GBT icon on driver CD The utilities include Display Driver and V-Tuner utilities. Software Installation 3.1.4.Utilities on the taskbar's status area. Please browse the driver CD for updated information about the graphics borad, latest drivers...
... "Display Properties"item, and then click Settings. You can link to change your display settings. Right-clicking this icon opens the GBT control panel, showing a menu composed of shortcute of the display drivers, you will find an GBT icon on driver CD The utilities include Display Driver and V-Tuner utilities. Software Installation 3.1.4.Utilities on the taskbar's status area. Please browse the driver CD for updated information about the graphics borad, latest drivers...

Manual
Page 18
AP64D /AP64D-H Graphics Accelerator After installation of the display drivers, you will find an ATI icon on the taskbar's status area. Clicking this icon open the ATi control panel. 1.Using Single Display 2.Quick Setting. 18
AP64D /AP64D-H Graphics Accelerator After installation of the display drivers, you will find an ATI icon on the taskbar's status area. Clicking this icon open the ATi control panel. 1.Using Single Display 2.Quick Setting. 18

Manual
Page 19
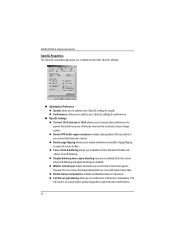
... taskbar icon application enables or disable s the ATI taskbar icon. Setting (Resolutions and Color depth for windows) The Setting properties page allows you to adjust the Direct 3D settings You can click the item to the change the color depth. You can move the slider to change resolution. Software Installation 3.1.6.Display Property pages The screen shows the information of display adapter, color, the range of display area and the refresh rate. n Show ATI icon on...
... taskbar icon application enables or disable s the ATI taskbar icon. Setting (Resolutions and Color depth for windows) The Setting properties page allows you to adjust the Direct 3D settings You can click the item to the change the color depth. You can move the slider to change resolution. Software Installation 3.1.6.Display Property pages The screen shows the information of display adapter, color, the range of display area and the refresh rate. n Show ATI icon on...
Manual
Page 20
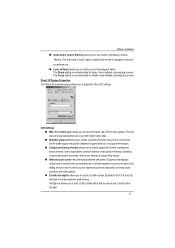
... vertical sync lowers the frames per second rate in an overall higher quality image with higher frame rates. l Wait for performance n OpenGL Settings l Convert 32 bit textures to 16 bit allows you to set the level of the OpenGL settings. l Enable texture compression enables and disables texture compression. AP64D /AP64D-H Graphics Accelerator OpenGL Properties: The OpenGL properties page gives you to enable hardware acceleration ofpage flipping to swap full...
... vertical sync lowers the frames per second rate in an overall higher quality image with higher frame rates. l Wait for performance n OpenGL Settings l Convert 32 bit textures to 16 bit allows you to set the level of the OpenGL settings. l Enable texture compression enables and disables texture compression. AP64D /AP64D-H Graphics Accelerator OpenGL Properties: The OpenGL properties page gives you to enable hardware acceleration ofpage flipping to swap full...
Manual
Page 21
.... Itis recommend that W-buffer support should only be disabled for the Z-b uffe r. 21 Disabling compressed texture format the video driver ceases to set the level of Detail allows you to su pport this feature. n Z-buffer bit depths allows you to set a level of full screen games. Software Installation n Anisotropic texture filtering allows you to set the Z-buffer bit rate. This will resu lt in...
.... Itis recommend that W-buffer support should only be disabled for the Z-b uffe r. 21 Disabling compressed texture format the video driver ceases to set the level of Detail allows you to su pport this feature. n Z-buffer bit depths allows you to set a level of full screen games. Software Installation n Anisotropic texture filtering allows you to set the Z-buffer bit rate. This will resu lt in...
Manual
Page 22
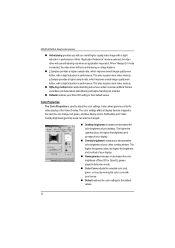
.... n Defaults restores your display. SetDesktop and Video Overlay brightness (gamma) levels can change red, green, and blue display colors. The higher the gamma value, the higher the brightness and contrast of your mouse. This also requires more video memory. n Game gamma increases or decreases the color brightness of your display. AP64D /AP64D-H Graphics Accelerator n Anti-aliasing provides you desktop. When "Always On"mode is selected, the video driver will...
.... n Defaults restores your display. SetDesktop and Video Overlay brightness (gamma) levels can change red, green, and blue display colors. The higher the gamma value, the higher the brightness and contrast of your mouse. This also requires more video memory. n Game gamma increases or decreases the color brightness of your display. AP64D /AP64D-H Graphics Accelerator n Anti-aliasing provides you desktop. When "Always On"mode is selected, the video driver will...

Manual
Page 23
Ensure your graphics card. Using an S-Video cable or the supplied adapter cable, attach one end of your computer, locate your graphics card is equipped with a S-Video connector , you VGA card is installed correctly. Select Display Type Enable /Disable"Extend my windows desktop onto this monitor" Connecting your graphics card to second device or copying your graphics card and the other to a TV (or VCR)"on the second device. Looking at the back of the cable to your...
Ensure your graphics card. Using an S-Video cable or the supplied adapter cable, attach one end of your computer, locate your graphics card is equipped with a S-Video connector , you VGA card is installed correctly. Select Display Type Enable /Disable"Extend my windows desktop onto this monitor" Connecting your graphics card to second device or copying your graphics card and the other to a TV (or VCR)"on the second device. Looking at the back of the cable to your...

Manual
Page 25
... Wizard's on "Install Display Drivers(Radeon 8500 Series)"to begin the Installation Wizard. 7. Type the following: D:\SETUP (If D is not your CD-ROM drive. Click on -screen instructions to the license agreement. 9. WINDOWS NT 4.0 DRIVER INSTALLATION Please make sure the Windows NT 4.0 have installed Windows NT 4.0 Service Pack version 6.0 (or later) before installing the graphics accelerator driver. Click"Yes"to complete the installation. 25 To install the AP64D series driver for Windows NT 1. Select Run. 4. Click "Next". 8. Software Installation 3.2. Click "OK...
... Wizard's on "Install Display Drivers(Radeon 8500 Series)"to begin the Installation Wizard. 7. Type the following: D:\SETUP (If D is not your CD-ROM drive. Click on -screen instructions to the license agreement. 9. WINDOWS NT 4.0 DRIVER INSTALLATION Please make sure the Windows NT 4.0 have installed Windows NT 4.0 Service Pack version 6.0 (or later) before installing the graphics accelerator driver. Click"Yes"to complete the installation. 25 To install the AP64D series driver for Windows NT 1. Select Run. 4. Click "Next". 8. Software Installation 3.2. Click "OK...

Manual
Page 26
... performance, resolutions, and special graphic features of the Graphics card. To install the AP64D series driver for the file. Type the following: D:\SETUP (If D is not your CD-ROM drive, substitute D with your computer, you need to install the AP64D series driver to the license agreement. 9. Click on "Install Display Drivers(Radeon 8500 Series)"to detail on -screen instructions to complete the installation. 3.4.BIOS FLASH UTILITY AP64D(-H) BIOS update procedure: MNote: Please download the newest BIOS from our website (www.gigabyte.com...
... performance, resolutions, and special graphic features of the Graphics card. To install the AP64D series driver for the file. Type the following: D:\SETUP (If D is not your CD-ROM drive, substitute D with your computer, you need to install the AP64D series driver to the license agreement. 9. Click on "Install Display Drivers(Radeon 8500 Series)"to detail on -screen instructions to complete the installation. 3.4.BIOS FLASH UTILITY AP64D(-H) BIOS update procedure: MNote: Please download the newest BIOS from our website (www.gigabyte.com...
Manual
Page 27
... to the card's display connector. n For more advanced troubleshooting information. n For more information, consult your computer manufacturer. 27 For more assistance, use F8 to become the secondary display.) n Make sure you selected the appropriate display device and graphics card when you are plugged in and receiving power. Then select the number for duplicate display adapter and monitor entries if you installed the graphics driver. In Windows®98...
... to the card's display connector. n For more advanced troubleshooting information. n For more information, consult your computer manufacturer. 27 For more assistance, use F8 to become the secondary display.) n Make sure you selected the appropriate display device and graphics card when you are plugged in and receiving power. Then select the number for duplicate display adapter and monitor entries if you installed the graphics driver. In Windows®98...


