
Manual
Page 1
... intellectual property rights. GV-R467ZL-1GI/ GV-R467D3-512I/ GV-R465OC-1GI/ GV-R467GR-1GI ATI RadeonTM HD 4670/4650 Graphics Accelerator User's Manual Rev. 201 12MM-R4600S-201R Copyright © 2009 GIGABYTE TECHNOLOGY CO., LTD Copyright by Macrovision. Reverse engineering or disassembly is protected by U.S. No part of this manual may appear in technology, some of the specifications might be authorized by Macrovision, and is intended for any errors or...
... intellectual property rights. GV-R467ZL-1GI/ GV-R467D3-512I/ GV-R465OC-1GI/ GV-R467GR-1GI ATI RadeonTM HD 4670/4650 Graphics Accelerator User's Manual Rev. 201 12MM-R4600S-201R Copyright © 2009 GIGABYTE TECHNOLOGY CO., LTD Copyright by Macrovision. Reverse engineering or disassembly is protected by U.S. No part of this manual may appear in technology, some of the specifications might be authorized by Macrovision, and is intended for any errors or...
Manual
Page 4
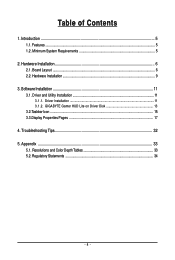
Minimum System Requirements 5 2. Introduction ...5 1.1. Software Installation 11 3.1. Troubleshooting Tips 32 5. Resolutions and Color Depth Tables 33 5.2. Regulatory Statements 34 - 4 - Board Layout ...6 2.2. Hardware Installation ...9 3. Appendix ...33 5.1. Driver Installation ...11 3.1.2. Driver and Utility Installation 11 3.1.1. GIGABYTE Gamer HUD Lite on Driver Disk 13 3.2.Taskbar Icon ...15 3.3.Display Properties Pages 17 4. Table of Contents 1. Features ...5 1.2. Hardware Installation 6 2.1.
Minimum System Requirements 5 2. Introduction ...5 1.1. Software Installation 11 3.1. Troubleshooting Tips 32 5. Resolutions and Color Depth Tables 33 5.2. Regulatory Statements 34 - 4 - Board Layout ...6 2.2. Hardware Installation ...9 3. Appendix ...33 5.1. Driver Installation ...11 3.1.2. Driver and Utility Installation 11 3.1.1. GIGABYTE Gamer HUD Lite on Driver Disk 13 3.2.Taskbar Icon ...15 3.3.Display Properties Pages 17 4. Table of Contents 1. Features ...5 1.2. Hardware Installation 6 2.1.
Manual
Page 5
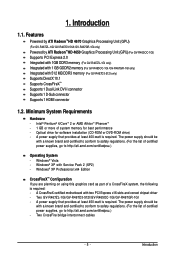
... memory (For GV-R465OC-1GI /GV-R467GR-1GI only) Integrated with two PCI Express x16 slots and correct chipset driver - A CrossFireX certified motherboard with 512 MB DDR3 memory (For GV-R467D3-512I only) Supports DirectX 10.1 Supports CrossFireXTM Supports 1 Dual-Link DVI-I connector Supports 1 D-Sub connector Supports 1 HDMI connector 1.2. Optical drive for best performance - Windows® Vista - Two GV-R467ZL-1GI/GV-R467D3-512I/GV-R465OC-1GI/GV-R467GR-1GI - Introduction Minimum System Requirements Hardware - The power supply should be with Service Pack 2 (SP2) - Windows...
... memory (For GV-R465OC-1GI /GV-R467GR-1GI only) Integrated with two PCI Express x16 slots and correct chipset driver - A CrossFireX certified motherboard with 512 MB DDR3 memory (For GV-R467D3-512I only) Supports DirectX 10.1 Supports CrossFireXTM Supports 1 Dual-Link DVI-I connector Supports 1 D-Sub connector Supports 1 HDMI connector 1.2. Optical drive for best performance - Windows® Vista - Two GV-R467ZL-1GI/GV-R467D3-512I/GV-R465OC-1GI/GV-R467GR-1GI - Introduction Minimum System Requirements Hardware - The power supply should be with Service Pack 2 (SP2) - Windows...
Manual
Page 6
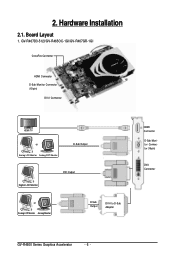
Board Layout 1. Hardware Installation 2.1. 2. GV-R467D3-512I/GV-R465OC-1GI/GV-R467GR-1GI CrossFire Connector HDMI Connector D-Sub Monitor Connector (15-pin) DVI-I Connector HDMI TV HDMI TV or Analog LCD Monitor Analog CRT Monitor D-Sub Output Digital LCD Monitor DVI Output or Analog LCD Monitor Analog Monitor D-Sub Output DVI-I to D-Sub Adapter HDMI Connector D-Sub Monitor Connector (15-pin) DVI-I Connector GV-R4600 Series Graphics Accelerator - 6 -
Board Layout 1. Hardware Installation 2.1. 2. GV-R467D3-512I/GV-R465OC-1GI/GV-R467GR-1GI CrossFire Connector HDMI Connector D-Sub Monitor Connector (15-pin) DVI-I Connector HDMI TV HDMI TV or Analog LCD Monitor Analog CRT Monitor D-Sub Output Digital LCD Monitor DVI Output or Analog LCD Monitor Analog Monitor D-Sub Output DVI-I to D-Sub Adapter HDMI Connector D-Sub Monitor Connector (15-pin) DVI-I Connector GV-R4600 Series Graphics Accelerator - 6 -

Manual
Page 8
If you work correctly, please use official GIGABYTE BIOS only. Inspect the card carton for HDMI output function, set the onboard audio controller or the external sound card to be the default Sound Playback device to obtain audio output from static electricity, you should follow some precautions whenever you do not have one, touch both audio and video signals. For more details, refer to a metal object, such as the...
If you work correctly, please use official GIGABYTE BIOS only. Inspect the card carton for HDMI output function, set the onboard audio controller or the external sound card to be the default Sound Playback device to obtain audio output from static electricity, you should follow some precautions whenever you do not have one, touch both audio and video signals. For more details, refer to a metal object, such as the...
Manual
Page 9
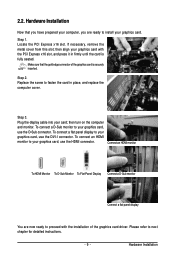
Locate the PCI Express x16 slot. Plug the display cable into your graphics card, use the DVI-I connector. Hardware Installation then turn on the computer and monitor. Connect an HDMI monitor To HDMI Monitor To D-Sub Monitor To Flat Panel Display Connect a D-Sub monitor Connect a flat panel display You are ready to fasten the card in firmly until the card is securely inserted. Please refer to proceed with the PCI Express x16 slot, and press it in place, and replace the computer...
Locate the PCI Express x16 slot. Plug the display cable into your graphics card, use the DVI-I connector. Hardware Installation then turn on the computer and monitor. Connect an HDMI monitor To HDMI Monitor To D-Sub Monitor To Flat Panel Display Connect a D-Sub monitor Connect a flat panel display You are ready to fasten the card in firmly until the card is securely inserted. Please refer to proceed with the PCI Express x16 slot, and press it in place, and replace the computer...
Manual
Page 10
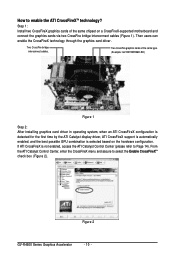
... to Page 14). If ATI CrossFireX is selected based on a CrossFireX-supported motherboard and connect the graphics cards via two CrossFire bridge interconnect cables (Figure 1). From the ATI Catalyst Control Center, enter the CrossFireX menu and assure to enable the ATI CrossFireXTM technology? How to select the Enable CrossFireXTM check box (Figure 2). Two CrossFire graphics cards of the same chipset on the hardware configuration. Then users can enable the CrossFireX technology through the graphics card driver. Figure 2 GV-R4600 Series Graphics Accelerator - 10 -
... to Page 14). If ATI CrossFireX is selected based on a CrossFireX-supported motherboard and connect the graphics cards via two CrossFire bridge interconnect cables (Figure 1). From the ATI Catalyst Control Center, enter the CrossFireX menu and assure to enable the ATI CrossFireXTM technology? How to select the Enable CrossFireXTM check box (Figure 2). Two CrossFire graphics cards of the same chipset on the hardware configuration. Then users can enable the CrossFireX technology through the graphics card driver. Figure 2 GV-R4600 Series Graphics Accelerator - 10 -
Manual
Page 11
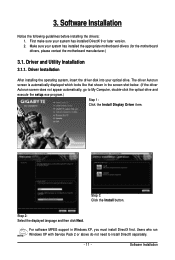
... click Next. Driver and Utility Installation 3.1.1. For software MPEG support in the screen shot below. (If the driver Autorun screen does not appear automatically, go to install DirectX separately. - 11 - Software Installation Users who run Windows XP with Service Pack 2 or above do not need to My Computer, double-click the optical drive and execute the setup.exe program.) Step 1: Click the Install Display Driver item. Make sure your optical drive. 3. Software Installation Notice the...
... click Next. Driver and Utility Installation 3.1.1. For software MPEG support in the screen shot below. (If the driver Autorun screen does not appear automatically, go to install DirectX separately. - 11 - Software Installation Users who run Windows XP with Service Pack 2 or above do not need to My Computer, double-click the optical drive and execute the setup.exe program.) Step 1: Click the Install Display Driver item. Make sure your optical drive. 3. Software Installation Notice the...
Manual
Page 12
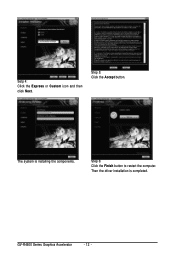
GV-R4600 Series Graphics Accelerator - 12 - The system is completed. Step 5: Click the Accept button. Step 6: Click the Finish button to restart the computer. Then the driver installation is installing the components. Setp 4: Click the Express or Custom icon and then click Next.
GV-R4600 Series Graphics Accelerator - 12 - The system is completed. Step 5: Click the Accept button. Step 6: Click the Finish button to restart the computer. Then the driver installation is installing the components. Setp 4: Click the Express or Custom icon and then click Next.
Manual
Page 14
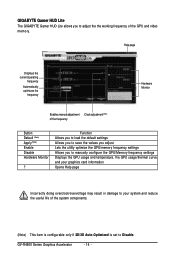
GV-R4600 Series Graphics Accelerator - 14 - Function Allows you to load the default settings Allows you to save the values you adjust Lets the utility optimize the GPU/memory frequency settings Allows you to Disable. GIGABYTE Gamer HUD Lite The GIGABYTE Gamer HUD Lite allows you to manually configure the GPU/Memory frequency settings Displays the GPU usage and temperature, the GPU usage/thermal curve, and your graphics card information Opens Help page Incorrectly doing overclock/overvoltage may result in damage to your...
GV-R4600 Series Graphics Accelerator - 14 - Function Allows you to load the default settings Allows you to save the values you adjust Lets the utility optimize the GPU/memory frequency settings Allows you to Disable. GIGABYTE Gamer HUD Lite The GIGABYTE Gamer HUD Lite allows you to manually configure the GPU/Memory frequency settings Displays the GPU usage and temperature, the GPU usage/thermal curve, and your graphics card information Opens Help page Incorrectly doing overclock/overvoltage may result in damage to your...
Manual
Page 17
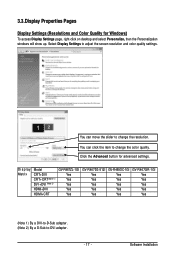
... the item to adjust the screen resolution and color quality settings. Software Installation Click the Advanced button for Windows) To access Display Settings page, right-click on desktop and select Personalize, then the Personalization windows will show up. Display Matrix Model CRT+DVI CRT+CRT(Note 1) DVI +DVI (Note 2) HDMI+DVI HDMI+CRT GV-R467ZL-1GI Yes Yes Yes Yes Yes GV-R467D3-512I Yes Yes Yes Yes Yes GV-R465OC-1GI Yes Yes Yes Yes Yes GV-R467GR-1GI Yes Yes...
... the item to adjust the screen resolution and color quality settings. Software Installation Click the Advanced button for Windows) To access Display Settings page, right-click on desktop and select Personalize, then the Personalization windows will show up. Display Matrix Model CRT+DVI CRT+CRT(Note 1) DVI +DVI (Note 2) HDMI+DVI HDMI+CRT GV-R467ZL-1GI Yes Yes Yes Yes Yes GV-R467D3-512I Yes Yes Yes Yes Yes GV-R465OC-1GI Yes Yes Yes Yes Yes GV-R467GR-1GI Yes Yes...
Manual
Page 19
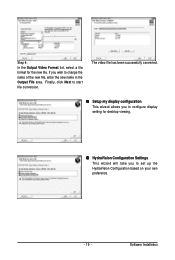
Step 4: In the Output Video Format list, select a file format for desktop viewing. „ HydraVision Configuration Settings This wizard will take you to set up the HydraVision Configuration based on your own preference. - 19 - Software Installation The video file has been successfully converted. „ Setup my display configuration This wizard allows you wish to start file conversion. Finally, click Next to change the name of the new file, enter the new name in the Output File area. If you to configure display setting for the new file.
Step 4: In the Output Video Format list, select a file format for desktop viewing. „ HydraVision Configuration Settings This wizard will take you to set up the HydraVision Configuration based on your own preference. - 19 - Software Installation The video file has been successfully converted. „ Setup my display configuration This wizard allows you wish to start file conversion. Finally, click Next to change the name of the new file, enter the new name in the Output File area. If you to configure display setting for the new file.

Manual
Page 20
GV-R4600 Series Graphics Accelerator - 20 - Quick Settings: The Quick Settings page provides access to three main settings. „ 3D Quality 3D Performance and Quality Settings allows your desktop, including changing desktop resolution and desktop mode, setting up extended desktop (requires more balanced setting. „ Video Playback Use this option to optimize video playback in Basic and Advanced View provides hardware and software information about the installed graphics card. „ Graphics Software Provides software information including driver version, CATALYST version, Direct...
GV-R4600 Series Graphics Accelerator - 20 - Quick Settings: The Quick Settings page provides access to three main settings. „ 3D Quality 3D Performance and Quality Settings allows your desktop, including changing desktop resolution and desktop mode, setting up extended desktop (requires more balanced setting. „ Video Playback Use this option to optimize video playback in Basic and Advanced View provides hardware and software information about the installed graphics card. „ Graphics Software Provides software information including driver version, CATALYST version, Direct...
Manual
Page 22
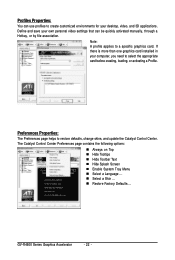
GV-R4600 Series Graphics Accelerator - 22 - If there is more than one graphics card installed in your own personal video settings that can use profiles to select the appropriate card before creating, loading, or activating a Profile. Preferences Properties: The Preferences page helps to a specific graphics card. Define and save your computer, you need to create customized environments for your desktop, video, and 3D applications. The Catalyst Control Center Preferences page contains the following options...
GV-R4600 Series Graphics Accelerator - 22 - If there is more than one graphics card installed in your own personal video settings that can use profiles to select the appropriate card before creating, loading, or activating a Profile. Preferences Properties: The Preferences page helps to a specific graphics card. Define and save your computer, you need to create customized environments for your desktop, video, and 3D applications. The Catalyst Control Center Preferences page contains the following options...
Manual
Page 24
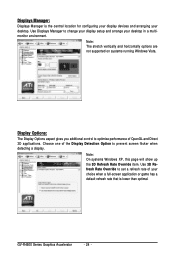
Use Displays Manager to set a refresh rate of OpenGL and Direct 3D applications. Use 3D Refresh Rate Override to change your display setup and arrange your choice when a full-screen application or game has a default refresh rate that is the central location for configuring your display devices and arranging your desktop. Choose one of the Display Detection Option to optimize performance of your desktop in a multimonitor environment. Note: On systems Windows XP...
Use Displays Manager to set a refresh rate of OpenGL and Direct 3D applications. Use 3D Refresh Rate Override to change your display setup and arrange your choice when a full-screen application or game has a default refresh rate that is the central location for configuring your display devices and arranging your desktop. Choose one of the Display Detection Option to optimize performance of your desktop in a multimonitor environment. Note: On systems Windows XP...

Manual
Page 25
Monitor Properties 1: „ Attributes Monitor Attributes provides information about the attached monitor. Independently set the hue, saturation, and temperature for ATI graphics cards that support per-display color settings. You can also enable Extended Display Identification Data (EDID). EDID uses the information provided by the attached monitor to determine the limits for the resolution and refresh rate. „ Adjustments Use Monitor Adjustments to resize and reposition the computer desktop on your monitor's display screen. Software Installation You can also adjust the...
Monitor Properties 1: „ Attributes Monitor Attributes provides information about the attached monitor. Independently set the hue, saturation, and temperature for ATI graphics cards that support per-display color settings. You can also enable Extended Display Identification Data (EDID). EDID uses the information provided by the attached monitor to determine the limits for the resolution and refresh rate. „ Adjustments Use Monitor Adjustments to resize and reposition the computer desktop on your monitor's display screen. Software Installation You can also adjust the...
Manual
Page 28
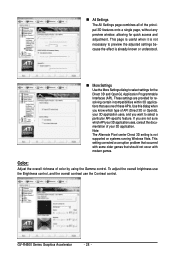
... (Direct 3D or OpenGL your 3D application. GV-R4600 Series Graphics Accelerator - 28 - Use this dialog when you are provided for quick access and adjustment. „ All Settings The All Settings page combines all of color by using the Gamma control. Color: Adjust the overall richness of the principal 3D features onto a single page, without any preview window, allowing for resolving certain incompatibilities within 3D...
... (Direct 3D or OpenGL your 3D application. GV-R4600 Series Graphics Accelerator - 28 - Use this dialog when you are provided for quick access and adjustment. „ All Settings The All Settings page combines all of color by using the Gamma control. Color: Adjust the overall richness of the principal 3D features onto a single page, without any preview window, allowing for resolving certain incompatibilities within 3D...
Manual
Page 30
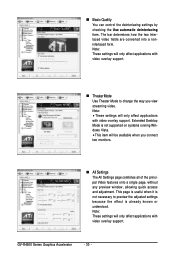
... is not supported on systems running Windows Vista. • This item will only affect applications with video overlay support. „ Theater Mode Use Theater Mode to change the way you connect two monitors. „ All Settings The All Settings page combines all of the principal Video features onto a single page, without any preview window, allowing quick access and adjustment. Note: These settings will be available when you view streaming video. The...
... is not supported on systems running Windows Vista. • This item will only affect applications with video overlay support. „ Theater Mode Use Theater Mode to change the way you connect two monitors. „ All Settings The All Settings page combines all of the principal Video features onto a single page, without any preview window, allowing quick access and adjustment. Note: These settings will be available when you view streaming video. The...
Manual
Page 31
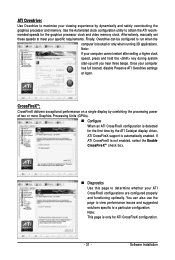
... CrossFireX configurations are configured properly and functioning optimally. Use the Automated clock configuration utility to obtain the ATI recommended speeds for the graphics processor clock and video memory clock. Finally, Overdrive can also use the page to view performance issues and suggested solutions specific to a particular configuration. If ATI CrossFireX is booted or only when running 3D applications. Software Installation ATI Overdrive: Use Overdrive to maximize your viewing experience by combining the processing power...
... CrossFireX configurations are configured properly and functioning optimally. Use the Automated clock configuration utility to obtain the ATI recommended speeds for the graphics processor clock and video memory clock. Finally, Overdrive can also use the page to view performance issues and suggested solutions specific to a particular configuration. If ATI CrossFireX is booted or only when running 3D applications. Software Installation ATI Overdrive: Use Overdrive to maximize your viewing experience by combining the processing power...
Manual
Page 32
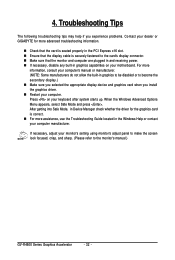
... experience problems. Contact your dealer or GIGABYTE for the graphics card is securely fastened to the monitor's manual.) GV-R4600 Series Graphics Accelerator - 32 - Troubleshooting Tips The following troubleshooting tips may help if you install the graphics driver. „ Restart your monitor's setting using monitor's adjust panel to make the screen look focused, crisp, and sharp. (Please refer to the card's display connector. „ Make sure that the monitor and computer are plugged in and receiving power...
... experience problems. Contact your dealer or GIGABYTE for the graphics card is securely fastened to the monitor's manual.) GV-R4600 Series Graphics Accelerator - 32 - Troubleshooting Tips The following troubleshooting tips may help if you install the graphics driver. „ Restart your monitor's setting using monitor's adjust panel to make the screen look focused, crisp, and sharp. (Please refer to the card's display connector. „ Make sure that the monitor and computer are plugged in and receiving power...


