Manual
Page 1
... part of this card. Due to update the information contained herein. Macrovision corporation product notice: This product incorporates copyright protection technology that may appear in this document nor does the author make a commitment to rapid change in any form without the expressed, written permission of this manual may void the warranty of GBT. GV-R485ZL-512I/ GV-R485MC-1GI/ GV-R485OC-1GI ATI RadeonTM HD 4850 Graphics Accelerator User's Manual Rev...
... part of this card. Due to update the information contained herein. Macrovision corporation product notice: This product incorporates copyright protection technology that may appear in this document nor does the author make a commitment to rapid change in any form without the expressed, written permission of this manual may void the warranty of GBT. GV-R485ZL-512I/ GV-R485MC-1GI/ GV-R485OC-1GI ATI RadeonTM HD 4850 Graphics Accelerator User's Manual Rev...
Manual
Page 3
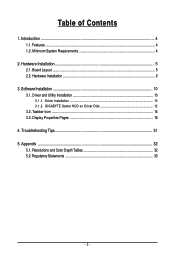
Minimum System Requirements 4 2. Taskbar Icon ...14 3.3. Display Properties Pages 16 4. Software Installation 10 3.1. Driver Installation ...10 3.1.2. Resolutions and Color Depth Tables 32 5.2. Hardware Installation 5 2.1. Driver and Utility Installation 10 3.1.1. Appendix ...32 5.1. Board Layout ...5 2.2. Troubleshooting Tips 31 5. Regulatory Statements 33 - 3 - Features ...4 1.2. Table of Contents 1. Introduction ...4 1.1. Hardware Installation ...8 3. GIGABYTE Gamer HUD on Driver Disk 12 3.2.
Minimum System Requirements 4 2. Taskbar Icon ...14 3.3. Display Properties Pages 16 4. Software Installation 10 3.1. Driver Installation ...10 3.1.2. Resolutions and Color Depth Tables 32 5.2. Hardware Installation 5 2.1. Driver and Utility Installation 10 3.1.1. Appendix ...32 5.1. Board Layout ...5 2.2. Troubleshooting Tips 31 5. Regulatory Statements 33 - 3 - Features ...4 1.2. Table of Contents 1. Introduction ...4 1.1. Hardware Installation ...8 3. GIGABYTE Gamer HUD on Driver Disk 12 3.2.
Manual
Page 4
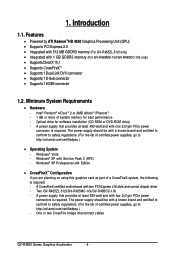
...-pin PCIe power connectors is required: - Features • Powered by ATI RadeonTMHD 4850 Graphics Processing Unit (GPU) • Supports PCI Express 2.0 • Integrated with 512 MB GDDR3 memory (For GV-R485ZL-512I only) • Integrated with two PCI Express x16 slots and correct chipset driver - Minimum System Requirements • Hardware - The power supply should be with a known brand and certified to conform to http://ati.amd.com/certifiedpsu.) - Two GV-R485ZL-512I/GV-R485MC-1GI/GV-R485OC-1GI...
...-pin PCIe power connectors is required: - Features • Powered by ATI RadeonTMHD 4850 Graphics Processing Unit (GPU) • Supports PCI Express 2.0 • Integrated with 512 MB GDDR3 memory (For GV-R485ZL-512I only) • Integrated with two PCI Express x16 slots and correct chipset driver - Minimum System Requirements • Hardware - The power supply should be with a known brand and certified to conform to http://ati.amd.com/certifiedpsu.) - Two GV-R485ZL-512I/GV-R485MC-1GI/GV-R485OC-1GI...
Manual
Page 7
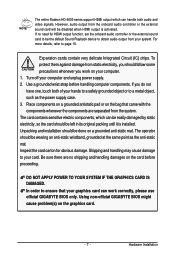
.... Inspect the card carton for HDMI output function, set the onboard audio controller or the external sound card to be disabled when HDMI output is installed. In order to obtain audio output from the onboard audio controller or the external sound card will be the default Sound Playback device to ensure that came with the components whenever the components are no need for obvious damage. Using non-official GIGABYTE BIOS might cause problem(s) on a grounded...
.... Inspect the card carton for HDMI output function, set the onboard audio controller or the external sound card to be disabled when HDMI output is installed. In order to obtain audio output from the onboard audio controller or the external sound card will be the default Sound Playback device to ensure that came with the components whenever the components are no need for obvious damage. Using non-official GIGABYTE BIOS might cause problem(s) on a grounded...
Manual
Page 8
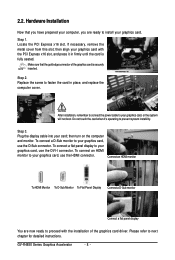
... align your graphics card, use the HDMI connector. After installation, remember to connect the power cable to your graphics card. To connect an HDMI monitor to your card; Step 2. Step 3. Please refer to fasten the card in firmly until the card is securely inserted. GV-R4850 Series Graphics Accelerator - 8 - Plug the display cable into your graphics card, or the system will not boot. Connect an HDMI monitor To HDMI Monitor To D-Sub Monitor To Flat Panel Display Connect a D-Sub monitor Connect a flat panel display You are ready to prevent...
... align your graphics card, use the HDMI connector. After installation, remember to connect the power cable to your graphics card. To connect an HDMI monitor to your card; Step 2. Step 3. Please refer to fasten the card in firmly until the card is securely inserted. GV-R4850 Series Graphics Accelerator - 8 - Plug the display cable into your graphics card, or the system will not boot. Connect an HDMI monitor To HDMI Monitor To D-Sub Monitor To Flat Panel Display Connect a D-Sub monitor Connect a flat panel display You are ready to prevent...
Manual
Page 9
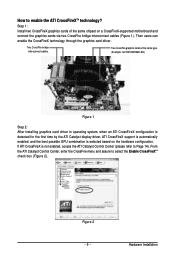
...Then users can enable the CrossFireX technology through the graphics card driver. Two CrossFire bridge interconnect cables. Figure 2 - 9 - From the ATI Catalyst Control Center, enter the CrossFire menu and assure to Page 14). Hardware Installation Two CrossFire graphics cards of the same chipset on the hardware configuration. If ATI CrossFireX is selected based on a CrossFireX-supported motherboard and connect the graphics cards via two CrossFire bridge interconnect cables (Figure 1). Step 1: Install two CrossFireX graphics cards of the same type. (Example: GV-RX195P256D...
...Then users can enable the CrossFireX technology through the graphics card driver. Two CrossFire bridge interconnect cables. Figure 2 - 9 - From the ATI Catalyst Control Center, enter the CrossFire menu and assure to Page 14). Hardware Installation Two CrossFire graphics cards of the same chipset on the hardware configuration. If ATI CrossFireX is selected based on a CrossFireX-supported motherboard and connect the graphics cards via two CrossFire bridge interconnect cables (Figure 1). Step 1: Install two CrossFireX graphics cards of the same type. (Example: GV-RX195P256D...
Manual
Page 10
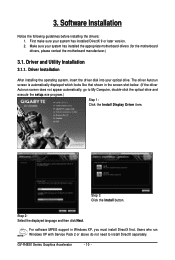
... Series Graphics Accelerator - 10 - First make sure your system has installed the appropriate motherboard drivers (for the motherboard drivers, please contact the motherboard manufacturer.) 3.1. Make sure your system has installed DirectX 9 or later version. 2. The driver Autorun screen is automatically displayed which looks like that shown in Windows XP, you must install DirectX first. Driver and Utility Installation 3.1.1. Step 3: Click the Install button. Driver Installation After installing the operating system, insert the driver disk into your optical drive. Software...
... Series Graphics Accelerator - 10 - First make sure your system has installed the appropriate motherboard drivers (for the motherboard drivers, please contact the motherboard manufacturer.) 3.1. Make sure your system has installed DirectX 9 or later version. 2. The driver Autorun screen is automatically displayed which looks like that shown in Windows XP, you must install DirectX first. Driver and Utility Installation 3.1.1. Step 3: Click the Install button. Driver Installation After installing the operating system, insert the driver disk into your optical drive. Software...
Manual
Page 13
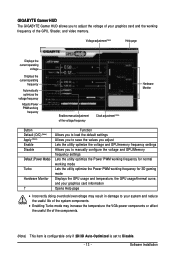
GIGABYTE Gamer HUD The GIGABYTE Gamer HUD allows you to manually configure the voltage and GPU/Memory frequency settings Lets the utility optimize the Power PWM working frequency for normal working mode Lets the utility optimize the Power PWM working frequency for 3D gaming mode Displays the GPU usage and temperature, the GPU usage/thermal curve, and your graphics card information Opens Help page • Incorrectly doing overclock/overvoltage may result in damage to your graphics card and the working frequency Enables manual adjustment of...
GIGABYTE Gamer HUD The GIGABYTE Gamer HUD allows you to manually configure the voltage and GPU/Memory frequency settings Lets the utility optimize the Power PWM working frequency for normal working mode Lets the utility optimize the Power PWM working frequency for 3D gaming mode Displays the GPU usage and temperature, the GPU usage/thermal curve, and your graphics card information Opens Help page • Incorrectly doing overclock/overvoltage may result in damage to your graphics card and the working frequency Enables manual adjustment of...

Manual
Page 15
Using the picture to the left as the example, to set HDMI audio to Start > Control Panel > Hardware and Sound > Manage audio devices. Software Installation Figure 1 Figure 2 Figure 3 Step 2: In the Manage audio devices dialog box, click the Playback tab. Step 1: Go to be the default Sound Playback device, select Digital Output Device (HDMI). Configuring Audio Output Configure the default audio output device based upon your needs. Otherwise, select Digital Output Device (SPDIF), which is the onboard audio controller. - 15 -
Using the picture to the left as the example, to set HDMI audio to Start > Control Panel > Hardware and Sound > Manage audio devices. Software Installation Figure 1 Figure 2 Figure 3 Step 2: In the Manage audio devices dialog box, click the Playback tab. Step 1: Go to be the default Sound Playback device, select Digital Output Device (HDMI). Configuring Audio Output Configure the default audio output device based upon your needs. Otherwise, select Digital Output Device (SPDIF), which is the onboard audio controller. - 15 -
Manual
Page 16
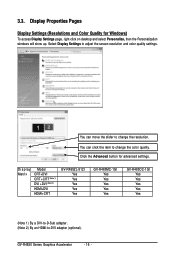
... desktop and select Personalize, then the Personalization windows will show up. You can move the slider to change the resolution. Select Display Settings to -DVI adapter (optional). Display Matrix Model CRT+DVI CRT+CRT (Note 1) DVI +DVI (Note 2) HDMI+DVI HDMI+CRT GV-R485ZL-512I Yes Yes Yes Yes Yes GV-R485MC-1GI Yes Yes Yes Yes Yes GV-R485OC-1GI Yes Yes Yes Yes Yes (Note 1) By a DVI-to-D-Sub adapter. (Note 2) By an HDMI-to adjust the screen resolution and color...
... desktop and select Personalize, then the Personalization windows will show up. You can move the slider to change the resolution. Select Display Settings to -DVI adapter (optional). Display Matrix Model CRT+DVI CRT+CRT (Note 1) DVI +DVI (Note 2) HDMI+DVI HDMI+CRT GV-R485ZL-512I Yes Yes Yes Yes Yes GV-R485MC-1GI Yes Yes Yes Yes Yes GV-R485OC-1GI Yes Yes Yes Yes Yes (Note 1) By a DVI-to-D-Sub adapter. (Note 2) By an HDMI-to adjust the screen resolution and color...
Manual
Page 17
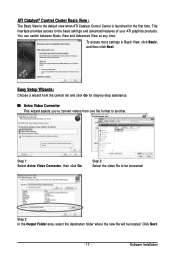
... - Step 3: In the Output Folder area, select the destination folder where the new file will be converted. Easy Setup Wizards: Choose a wizard from the central list and click Go for the first time. This interface provides access to be located. ATI Catalyst® Control Center Basic View : The Basic View is the default view when ATI Catalyst Control Center is launched for step...
... - Step 3: In the Output Folder area, select the destination folder where the new file will be converted. Easy Setup Wizards: Choose a wizard from the central list and click Go for the first time. This interface provides access to be located. ATI Catalyst® Control Center Basic View : The Basic View is the default view when ATI Catalyst Control Center is launched for step...
Manual
Page 19
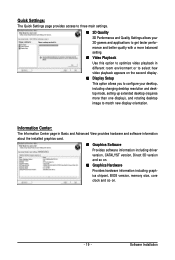
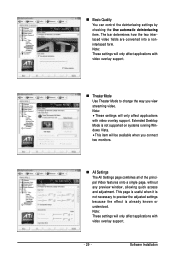
... Use this option to optimize video playback in Basic and Advanced View provides hardware and software information about the installed graphics card. Graphics Software Provides software information including driver version, CATALYST version, Direct 3D version and so on. Graphics Hardware Provides hardware information including graphics chipset, BIOS version, memory size, core clock and so on the second display. Display Setup This option allows you to configure your desktop, including changing desktop resolution and desktop mode, setting up extended desktop (requires...
... Use this option to optimize video playback in Basic and Advanced View provides hardware and software information about the installed graphics card. Graphics Software Provides software information including driver version, CATALYST version, Direct 3D version and so on. Graphics Hardware Provides hardware information including graphics chipset, BIOS version, memory size, core clock and so on the second display. Display Setup This option allows you to configure your desktop, including changing desktop resolution and desktop mode, setting up extended desktop (requires...
Manual
Page 21
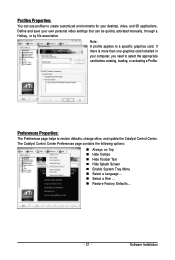
... creating, loading, or activating a Profile. Define and save your own personal video settings that can use profiles to restore defaults, change skins, and update the Catalyst Control Center. If there is more than one graphics card installed in your desktop, video, and 3D applications. Preferences Properties: The Preferences page helps to create customized environments for your computer, you need to a specific graphics card. Profiles Properties: You can be quickly activated manually, through a Hotkey, or by...
... creating, loading, or activating a Profile. Define and save your own personal video settings that can use profiles to restore defaults, change skins, and update the Catalyst Control Center. If there is more than one graphics card installed in your desktop, video, and 3D applications. Preferences Properties: The Preferences page helps to create customized environments for your computer, you need to a specific graphics card. Profiles Properties: You can be quickly activated manually, through a Hotkey, or by...
Manual
Page 23
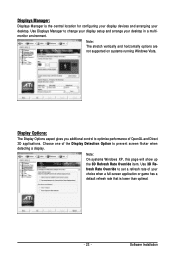
... 3D applications. Software Installation Use 3D Refresh Rate Override to set a refresh rate of your choice when a full-screen application or game has a default refresh rate that is the central location for configuring your display devices and arranging your desktop in a multimonitor environment. Use Displays Manager to prevent screen flicker when detecting a display. Note: The stretch vertically and horizontally options are not supported on systems running Windows Vista. Note: On systems Windows XP, this...
... 3D applications. Software Installation Use 3D Refresh Rate Override to set a refresh rate of your choice when a full-screen application or game has a default refresh rate that is the central location for configuring your display devices and arranging your desktop in a multimonitor environment. Use Displays Manager to prevent screen flicker when detecting a display. Note: The stretch vertically and horizontally options are not supported on systems running Windows Vista. Note: On systems Windows XP, this...
Manual
Page 24
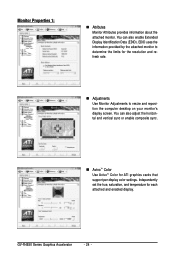
GV-R4850 Series Graphics Accelerator - 24 - You can also enable Extended Display Identification Data (EDID). Monitor Properties 1: Attributes Monitor Attributes provides information about the attached monitor. Independently set the hue, saturation, and temperature for the resolution and refresh rate. Adjustments Use Monitor Adjustments to determine the limits for each attached and enabled display. You can also adjust the horizontal and vertical sync or enable composite sync. AvivoTM Color Use AvivoTM Color for ATI graphics cards that support per...
GV-R4850 Series Graphics Accelerator - 24 - You can also enable Extended Display Identification Data (EDID). Monitor Properties 1: Attributes Monitor Attributes provides information about the attached monitor. Independently set the hue, saturation, and temperature for the resolution and refresh rate. Adjustments Use Monitor Adjustments to determine the limits for each attached and enabled display. You can also adjust the horizontal and vertical sync or enable composite sync. AvivoTM Color Use AvivoTM Color for ATI graphics cards that support per...
Manual
Page 25
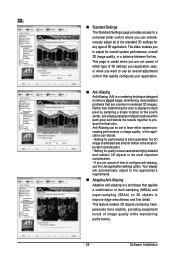
... levels of 3D settings your application uses, or when you want to use the Use application settings option. The slider enables you are common in rendered 3D images. Software Installation This page is a technique that applies a combination of multi-sampling (MSAA) and super-sampling (SSAA) on 3D objects to remove jagged edges, shimmering, and pixelation problems that rapidly configures your application...
... levels of 3D settings your application uses, or when you want to use the Use application settings option. The slider enables you are common in rendered 3D images. Software Installation This page is a technique that applies a combination of multi-sampling (MSAA) and super-sampling (SSAA) on 3D objects to remove jagged edges, shimmering, and pixelation problems that rapidly configures your application...
Manual
Page 27
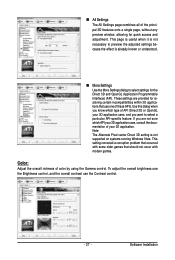
... systems running Windows Vista. If you want to select settings for the Direct 3D and OpenGL Application Programmable Interfaces (API). This setting corrected a corruption problem that occurred with modern games. Use this dialog when you know which API your 3D application uses, and you are provided for quick access and adjustment. These settings are not sure which type of these APIs. Software Installation Color: Adjust...
... systems running Windows Vista. If you want to select settings for the Direct 3D and OpenGL Application Programmable Interfaces (API). This setting corrected a corruption problem that occurred with modern games. Use this dialog when you know which API your 3D application uses, and you are provided for quick access and adjustment. These settings are not sure which type of these APIs. Software Installation Color: Adjust...
Manual
Page 29
... Desktop Mode is not supported on systems running Windows Vista. • This item will only affect applications with video overlay support. Theater Mode Use Theater Mode to preview the adjusted settings because the effect is not necessary to change the way you connect two monitors. All Settings The All Settings page combines all of the principal Video features onto a single page, without any preview window, allowing quick access and adjustment...
... Desktop Mode is not supported on systems running Windows Vista. • This item will only affect applications with video overlay support. Theater Mode Use Theater Mode to preview the adjusted settings because the effect is not necessary to change the way you connect two monitors. All Settings The All Settings page combines all of the principal Video features onto a single page, without any preview window, allowing quick access and adjustment...
Manual
Page 30
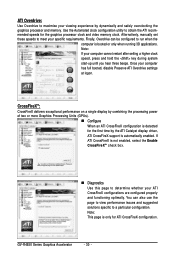
... the graphics processor clock and video memory clock. ATI Overdrive: Use Overdrive to maximize your viewing experience by the ATI Catalyst display driver, ATI CrossFireX support is not enabled, select the Enable CrossFireXTM check box. Diagnostics Use this page to determine whether your ATI CrossFireX configurations are configured properly and functioning optimally. Finally, Overdrive can also use the page to view performance issues and suggested solutions specific to meet your specific requirements. Once...
... the graphics processor clock and video memory clock. ATI Overdrive: Use Overdrive to maximize your viewing experience by the ATI Catalyst display driver, ATI CrossFireX support is not enabled, select the Enable CrossFireXTM check box. Diagnostics Use this page to determine whether your ATI CrossFireX configurations are configured properly and functioning optimally. Finally, Overdrive can also use the page to view performance issues and suggested solutions specific to meet your specific requirements. Once...

Manual
Page 31
... the driver for the graphics card is correct. For more advanced troubleshooting information. Check that the card is seated properly in the PCI Express x16 slot. Ensure that the display cable is securely fastened to find the desired monitor color/resolution settings: The color and screen resolution options available for more assistance, use the Troubleshooting Guide located in the Windows Help or contact your motherboard. When the Windows Advanced...
... the driver for the graphics card is correct. For more advanced troubleshooting information. Check that the card is seated properly in the PCI Express x16 slot. Ensure that the display cable is securely fastened to find the desired monitor color/resolution settings: The color and screen resolution options available for more assistance, use the Troubleshooting Guide located in the Windows Help or contact your motherboard. When the Windows Advanced...


