
Manual
Page 1
... technology that may appear in technology, some of this this graphics card. Use of this document nor does the author make a commitment to rapid change in this copyright protection technology must be out of date before publication of the specifications might be authorized by Macrovision, and is prohibited. GV-RX345256HI ATI RadeonTM HD 3450 Graphics Accelerator User's Manual Rev. 201 12MM-RX3452HI-201R Copyright © 2008 GIGABYTE TECHNOLOGY...
... technology that may appear in technology, some of this this graphics card. Use of this document nor does the author make a commitment to rapid change in this copyright protection technology must be out of date before publication of the specifications might be authorized by Macrovision, and is prohibited. GV-RX345256HI ATI RadeonTM HD 3450 Graphics Accelerator User's Manual Rev. 201 12MM-RX3452HI-201R Copyright © 2008 GIGABYTE TECHNOLOGY...

Manual
Page 4
... • Supports CrossFireTM • Supports 1 D-Sub connector • Supports 1 HDMI connector 1.2. Intel® Pentium® 4 or AMD AthlonTM - 512 MB of system memory; 1 GB or more for software installation (CD-ROM or DVD-ROM drive) • Operating System - Introduction 1.1. Windows® Vista - Windows® XP Professional x64 Edition GV-RX345256HI Graphics Accelerator - 4 - Minimum System Requirements • Hardware - Features • Powered by ATI RadeonTM HD 3450 Graphics Processing Unit (GPU) • Supports PCI Express 2.0 • Integrated with Service Pack...
... • Supports CrossFireTM • Supports 1 D-Sub connector • Supports 1 HDMI connector 1.2. Intel® Pentium® 4 or AMD AthlonTM - 512 MB of system memory; 1 GB or more for software installation (CD-ROM or DVD-ROM drive) • Operating System - Introduction 1.1. Windows® Vista - Windows® XP Professional x64 Edition GV-RX345256HI Graphics Accelerator - 4 - Minimum System Requirements • Hardware - Features • Powered by ATI RadeonTM HD 3450 Graphics Processing Unit (GPU) • Supports PCI Express 2.0 • Integrated with Service Pack...

Manual
Page 6
... unplug power supply. 2. The entire Radeon HD 3450 series support HDMI output which can be easily damaged by static electricity, so the card should be done on a grounded anti-static mat. If no shipping and handling damages on the graphics card. If you work correctly, please use official GIGABYTE BIOS only. Inspect the card carton for HDMI output function, set the onboard audio controller or the external sound card to be the default Sound...
... unplug power supply. 2. The entire Radeon HD 3450 series support HDMI output which can be easily damaged by static electricity, so the card should be done on a grounded anti-static mat. If no shipping and handling damages on the graphics card. If you work correctly, please use official GIGABYTE BIOS only. Inspect the card carton for HDMI output function, set the onboard audio controller or the external sound card to be the default Sound...

Manual
Page 7
Remove the computer cover. Step 3. Hardware Installation 2.2. To remove the existing graphics card: Step 1. If necessary, consult your computer. Locate the PCI Express x16 slot. Remove any existing graphics card from your computer's manual for help in firmly until the card is securely inserted. - 7 - Step 2. To install your computer. Power off the computer and monitor, then disconnect the display cable from this slot; If necessary, remove...
Remove the computer cover. Step 3. Hardware Installation 2.2. To remove the existing graphics card: Step 1. If necessary, consult your computer. Locate the PCI Express x16 slot. Remove any existing graphics card from your computer's manual for help in firmly until the card is securely inserted. - 7 - Step 2. To install your computer. Power off the computer and monitor, then disconnect the display cable from this slot; If necessary, remove...

Manual
Page 8
Step 3. To connect a D-Sub monitor to your card; Please refer to fasten the card in place, and replace the computer cover. Replace the screw to next chapter for detailed instructions. GV-RX345256HI Graphics Accelerator - 8 - Step 2. Plug the display cable into your graphics card, use the HDMI connector. To connect a HDMI monitor to proceed with the installation of the graphics card driver. Connect a D-Sub monitor To D-Sub Monitor To HDMI Monitor Connect a HDMI monitor You are now ready to your graphics card, use the D-Sub connector. then turn on the...
Step 3. To connect a D-Sub monitor to your card; Please refer to fasten the card in place, and replace the computer cover. Replace the screw to next chapter for detailed instructions. GV-RX345256HI Graphics Accelerator - 8 - Step 2. Plug the display cable into your graphics card, use the HDMI connector. To connect a HDMI monitor to proceed with the installation of the graphics card driver. Connect a D-Sub monitor To D-Sub Monitor To HDMI Monitor Connect a HDMI monitor You are now ready to your graphics card, use the D-Sub connector. then turn on the...
Manual
Page 9
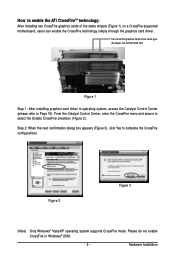
... Catalyst Control Center, enter the CrossFire menu and assure to complete the CrossFire configurations. Hardware Installation Figure 2 Figure 3 (Note) Only Windows® Vista/XP operating system supports CrossFire mode. Two CrossFire graphics cards of the same chipset (Figure 1) on a CrossFire-supported motherboard, users can enable the CrossFire technology simply through the graphics card driver . How to enable the ATI CrossFireTM technology: After installing two CrossFire graphics cards of the same type. (Example: GV-RX16P128P-RH) Figure 1 Step 1: After installing graphics...
... Catalyst Control Center, enter the CrossFire menu and assure to complete the CrossFire configurations. Hardware Installation Figure 2 Figure 3 (Note) Only Windows® Vista/XP operating system supports CrossFire mode. Two CrossFire graphics cards of the same chipset (Figure 1) on a CrossFire-supported motherboard, users can enable the CrossFire technology simply through the graphics card driver . How to enable the ATI CrossFireTM technology: After installing two CrossFire graphics cards of the same type. (Example: GV-RX16P128P-RH) Figure 1 Step 1: After installing graphics...

Manual
Page 10
... sure your CD-ROM drive, you can see the autorun window (if it does not show up, run "D:\setup.exe"). Operating System Requirements Notice the following guidelines before installing the drivers: 1. Software Installation In this manual, we assume that your graphics card driver. (Please follow the instructions to setup your CD-ROM drive letter to install the driver for the motherboard drivers, please contact the motherboard manufacturer.) GV-RX345256HI Graphics Accelerator - 10 - Windows® XP Driver and Utilities Installation 3.1.1. 3.
... sure your CD-ROM drive, you can see the autorun window (if it does not show up, run "D:\setup.exe"). Operating System Requirements Notice the following guidelines before installing the drivers: 1. Software Installation In this manual, we assume that your graphics card driver. (Please follow the instructions to setup your CD-ROM drive letter to install the driver for the motherboard drivers, please contact the motherboard manufacturer.) GV-RX345256HI Graphics Accelerator - 10 - Windows® XP Driver and Utilities Installation 3.1.1. 3.
Manual
Page 12
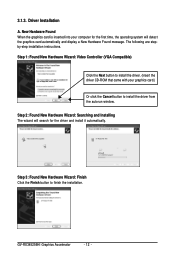
...-step installation instructions. Step 3: Found New Hardware Wizard: Finish Click the Finish button to install the driver from the autorun window. Step 1: Found New Hardware Wizard: Video Controller (VGA Compatible) Click the Next button to install the driver. (Insert the driver CD-ROM that came with your computer for the first time, the operating system will search for the driver and install it automatically. 3.1.3. GV-RX345256HI Graphics Accelerator - 12 - Driver Installation A. New Hardware Found When the graphics card...
...-step installation instructions. Step 3: Found New Hardware Wizard: Finish Click the Finish button to install the driver from the autorun window. Step 1: Found New Hardware Wizard: Video Controller (VGA Compatible) Click the Next button to install the driver. (Insert the driver CD-ROM that came with your computer for the first time, the operating system will search for the driver and install it automatically. 3.1.3. GV-RX345256HI Graphics Accelerator - 12 - Driver Installation A. New Hardware Found When the graphics card...

Manual
Page 14
If it does not show up , click the GIGABYTE Utility item. Step 4. When the autorun window shows up , please run "D:\setup.exe". Step 3. Click the Finish button to complete the installation. Click the Install button. The system is installing the components. GV-RX345256HI Graphics Accelerator - 14 - Click the Next button. Step 1. Step 2. 3.1.4. Utilities Installation Insert the driver CD disk into your CD-ROM, and then you can see the AUTORUN window.
If it does not show up , click the GIGABYTE Utility item. Step 4. When the autorun window shows up , please run "D:\setup.exe". Step 3. Click the Finish button to complete the installation. Click the Install button. The system is installing the components. GV-RX345256HI Graphics Accelerator - 14 - Click the Next button. Step 1. Step 2. 3.1.4. Utilities Installation Insert the driver CD disk into your CD-ROM, and then you can see the AUTORUN window.

Manual
Page 15
Taskbar Icons GIGABYTE Control Panel After installation of the graphics card's enhanced and other information. - 15 - Click Advanced after clicking Settings. Right-click the GIGABYTE icon. Select About GIGABYTE to link to enter the relative settings. Software Installation Select the items in the menu to the GIGABYTE website for updated information about the graphics accelerator, latest drivers, and other functions. Click the appropriate tab to change your display settings. Right-clicking...
Taskbar Icons GIGABYTE Control Panel After installation of the graphics card's enhanced and other information. - 15 - Click Advanced after clicking Settings. Right-click the GIGABYTE icon. Select About GIGABYTE to link to enter the relative settings. Software Installation Select the items in the menu to the GIGABYTE website for updated information about the graphics accelerator, latest drivers, and other functions. Click the appropriate tab to change your display settings. Right-clicking...
Manual
Page 16
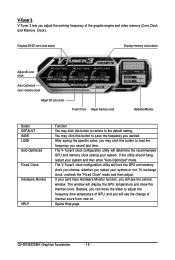
..." mode. The V-Tuner3 clock configuration utility will lock the GPU and memory clock you choose, whether you will see the change of the graphic engine and video memory (Core Clock and Memory Clock). If your card have Hardware Monitor function, you restart your system or not. After saving the specific value, you may click this button to the default setting. Displays 2D/3D core clock status Displays memory clock status Adjust 2D core clock Auto-Optimized core / memory clock Adjust...
..." mode. The V-Tuner3 clock configuration utility will lock the GPU and memory clock you choose, whether you will see the change of the graphic engine and video memory (Core Clock and Memory Clock). If your card have Hardware Monitor function, you restart your system or not. After saving the specific value, you may click this button to the default setting. Displays 2D/3D core clock status Displays memory clock status Adjust 2D core clock Auto-Optimized core / memory clock Adjust...

Manual
Page 18
Right-click the icon to enter the Catalyst® Control Center. Right-click the ATI icon to enter the Catalyst® Control Center. The Catalyst® Control Center is used to configure all your system tray. ATI Control Panel After installation of the display driver, you can right-click on the desktop and select ATI CATALYST(R) Control Center. Or you will find an ATI icon in your graphics card settings. GV-RX345256HI Graphics Accelerator - 18 -
Right-click the icon to enter the Catalyst® Control Center. Right-click the ATI icon to enter the Catalyst® Control Center. The Catalyst® Control Center is used to configure all your system tray. ATI Control Panel After installation of the display driver, you can right-click on the desktop and select ATI CATALYST(R) Control Center. Or you will find an ATI icon in your graphics card settings. GV-RX345256HI Graphics Accelerator - 18 -

Manual
Page 19
Otherwise, select Realtek HD Audio output, which is the onboard audio controller. - 19 - Software Installation Using the picture to the left as the example, to set HDMI audio to Start > Control Panel > Sounds and Audio Devices. Step 1: Go to be the default Sound Playback device, in the Default device box, select ATI HD Audio rear output. Step 2: In the Sounds and Audio Devices Properties dialog box, click the Audio tab. Configuring Audio Output Configure the default audio output device based upon your needs.
Otherwise, select Realtek HD Audio output, which is the onboard audio controller. - 19 - Software Installation Using the picture to the left as the example, to set HDMI audio to Start > Control Panel > Sounds and Audio Devices. Step 1: Go to be the default Sound Playback device, in the Default device box, select ATI HD Audio rear output. Step 2: In the Sounds and Audio Devices Properties dialog box, click the Audio tab. Configuring Audio Output Configure the default audio output device based upon your needs.
Manual
Page 23
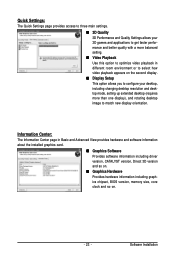
... so on. „ Graphics Hardware Provides hardware information including graphics chipset, BIOS version, memory size, core clock and so on the second display. „ Display Setup This option allows you to configure your desktop, including changing desktop resolution and desktop mode, setting up extended desktop (requires more than one display), and rotating desktop image to match new display orientation. Information Center: The Information Center page in different room environment or to select how video playback appears on . - 23 - Software Installation
... so on. „ Graphics Hardware Provides hardware information including graphics chipset, BIOS version, memory size, core clock and so on the second display. „ Display Setup This option allows you to configure your desktop, including changing desktop resolution and desktop mode, setting up extended desktop (requires more than one display), and rotating desktop image to match new display orientation. Information Center: The Information Center page in different room environment or to select how video playback appears on . - 23 - Software Installation
Manual
Page 25
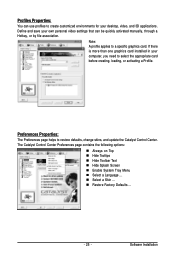
... desktop, video, and 3D applications. The Catalyst Control Center Preferences page contains the following options: „ Always on Top „ Hide Tooltips „ Hide Toolbar Text „ Hide Splash Screen „ Enable System Tray Menu „ Select a Language ... „ Select a Skin ... „ Restore Factory Defaults ... - 25 - If there is more than one graphics card installed in your own personal video settings that can use profiles...
... desktop, video, and 3D applications. The Catalyst Control Center Preferences page contains the following options: „ Always on Top „ Hide Tooltips „ Hide Toolbar Text „ Hide Splash Screen „ Enable System Tray Menu „ Select a Language ... „ Select a Skin ... „ Restore Factory Defaults ... - 25 - If there is more than one graphics card installed in your own personal video settings that can use profiles...

Manual
Page 27
... to quickly change your display setup, arrange your desktop. If you additional control to optimize performance of the Display Detection Options to set a refresh rate of your choice when a fullscreen application or game has a default refresh rate that may not be automatically detected, use Force TV Detection. Note: On systems running Windows Vista. Note: The stretch vertically and horizontally options are not supported on displays with limited resolution capabilities are using an...
... to quickly change your display setup, arrange your desktop. If you additional control to optimize performance of the Display Detection Options to set a refresh rate of your choice when a fullscreen application or game has a default refresh rate that may not be automatically detected, use Force TV Detection. Note: On systems running Windows Vista. Note: The stretch vertically and horizontally options are not supported on displays with limited resolution capabilities are using an...

Manual
Page 28
GV-RX345256HI Graphics Accelerator - 28 - You can also enable Extended Display Identification Data. You can also adjust the horizontal and vertical sync or enable composite sync. „ AvivoTM Color Use AvivoTM Color for ATI graphics cards that support per-display color settings. Independently set the hue, saturation, and temperature for the resolution and refresh rate. „ Adjustments Use Monitor Adjustments to resize and reposition the computer desktop on your monitor's display screen. Monitor Properties 0: „ Attributes Monitor Attributes provides information about...
GV-RX345256HI Graphics Accelerator - 28 - You can also enable Extended Display Identification Data. You can also adjust the horizontal and vertical sync or enable composite sync. „ AvivoTM Color Use AvivoTM Color for ATI graphics cards that support per-display color settings. Independently set the hue, saturation, and temperature for the resolution and refresh rate. „ Adjustments Use Monitor Adjustments to resize and reposition the computer desktop on your monitor's display screen. Monitor Properties 0: „ Attributes Monitor Attributes provides information about...

Manual
Page 34
...: These settings will only affect applications with video overlay support. „ Theater Mode* Use Theater Mode to manually set Gamma, Brightness, Contrast, Saturation, and Tint for video playback. „ Basic Color Use the Avivo Color: Basic option to change the way you connect two monitors. Note: Certain video formats do not support these adjustments. The bar determines how the two interlaced video fields are converted into a noninterlaced form. GV-RX345256HI Graphics Accelerator - 34...
...: These settings will only affect applications with video overlay support. „ Theater Mode* Use Theater Mode to manually set Gamma, Brightness, Contrast, Saturation, and Tint for video playback. „ Basic Color Use the Avivo Color: Basic option to change the way you connect two monitors. Note: Certain video formats do not support these adjustments. The bar determines how the two interlaced video fields are converted into a noninterlaced form. GV-RX345256HI Graphics Accelerator - 34...

Manual
Page 36
... power of two or more Graphics Processing Units (GPUs). Alternatively, manually set these speeds to meet your computer cannot restart after setting a higher clock speed, press and hold the key during system start-up until you hear three beeps. GV-RX345256HI Graphics Accelerator - 36 - CrossFireTM: CrossFire delivers exceptional performance on a single display by dynamically and safely overclocking the graphics processor and memory. Note: If your specific requirements...
... power of two or more Graphics Processing Units (GPUs). Alternatively, manually set these speeds to meet your computer cannot restart after setting a higher clock speed, press and hold the key during system start-up until you hear three beeps. GV-RX345256HI Graphics Accelerator - 36 - CrossFireTM: CrossFire delivers exceptional performance on a single display by dynamically and safely overclocking the graphics processor and memory. Note: If your specific requirements...
Manual
Page 37
... into Safe Mode, in Device Manager check whether the driver for more assistance, use the Troubleshooting Guide located in graphics capabilities on your monitor's setting using monitor's adjust panel to make the screen look focused, crisp, and sharp. (Please refer to the card's display connector. „ Make sure that the monitor and computer are plugged in and receiving power. „ If necessary, disable any built-in the Windows Help or...
... into Safe Mode, in Device Manager check whether the driver for more assistance, use the Troubleshooting Guide located in graphics capabilities on your monitor's setting using monitor's adjust panel to make the screen look focused, crisp, and sharp. (Please refer to the card's display connector. „ Make sure that the monitor and computer are plugged in and receiving power. „ If necessary, disable any built-in the Windows Help or...


