User Manual
Page 2
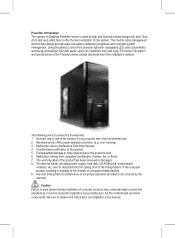
Nonobservance of the Poseidon series, please download them from Gigabyte's website. Incorrect connector installation may cause damage to personnel and devices. For further information and specifications of the proper operation... light with easer installation procedures and computer system management. The warranty label of the product. 5. over-clocking) 3. Malfunction arising from nonobservance of Gigabyte Poseidon series is not covered by the warranty. Unauthorized modification of the product has been removed or damaged. 8. Caution Failure to wear gloves...
Nonobservance of the Poseidon series, please download them from Gigabyte's website. Incorrect connector installation may cause damage to personnel and devices. For further information and specifications of the proper operation... light with easer installation procedures and computer system management. The warranty label of the product. 5. over-clocking) 3. Malfunction arising from nonobservance of Gigabyte Poseidon series is not covered by the warranty. Unauthorized modification of the product has been removed or damaged. 8. Caution Failure to wear gloves...
User Manual
Page 5
... screw x 4 f. Basic chassis power front projector light front and rear fans switch control cable kit 5 English Motherboard securing screw x 9 d. DIY transparent projector panel x 1 (Equipped with Poseidon at shipment) a.USB 2.0 b. Securing runner x 6 c. HD AUDIO c.IEEE1394 (Refer to the right figures for the attachments in hard disk English English English Deutsch Deutsch...
... screw x 4 f. Basic chassis power front projector light front and rear fans switch control cable kit 5 English Motherboard securing screw x 9 d. DIY transparent projector panel x 1 (Equipped with Poseidon at shipment) a.USB 2.0 b. Securing runner x 6 c. HD AUDIO c.IEEE1394 (Refer to the right figures for the attachments in hard disk English English English Deutsch Deutsch...
User Manual
Page 9
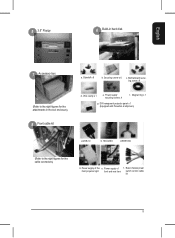
... FLEX ATX Code A1-A9 M1-M9 U1-U9 F1-F6 Motherboard securing screw 9 9 9 6 Standoffs 9 9 9 6 Select proper rear I/O panel of Motherboard The Poseidon is recommended to place the Poseidon chassis upright on the table. English 4 Installation Instruction Please follow the reference sections for installation. 4-1 Installation of Power Supply To facilitate the installation...
... FLEX ATX Code A1-A9 M1-M9 U1-U9 F1-F6 Motherboard securing screw 9 9 9 6 Standoffs 9 9 9 6 Select proper rear I/O panel of Motherboard The Poseidon is recommended to place the Poseidon chassis upright on the table. English 4 Installation Instruction Please follow the reference sections for installation. 4-1 Installation of Power Supply To facilitate the installation...
User Manual
Page 10
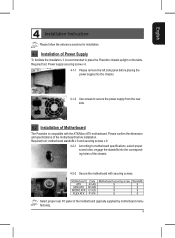
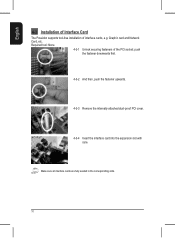
English English English English 4-3 Installation of Interface Card The Poseidon supports tool-free installation of the PCI socket; push the fastener downwards first. 4-3-2 And then, push the fastener upwards. 4-3-3 Remove the internally attached dust-proof PCI cover. 4-3-4 Insert the interface card into the expansion slot with care. Make sure all interface cards are fully seated in the corresponding slots. 10 Deutsch Deutsch English Required tool: None 4-3-1 Unlock securing fasteners of interface cards, e.g. Graphic card and Network Card, etc.
English English English English 4-3 Installation of Interface Card The Poseidon supports tool-free installation of the PCI socket; push the fastener downwards first. 4-3-2 And then, push the fastener upwards. 4-3-3 Remove the internally attached dust-proof PCI cover. 4-3-4 Insert the interface card into the expansion slot with care. Make sure all interface cards are fully seated in the corresponding slots. 10 Deutsch Deutsch English Required tool: None 4-3-1 Unlock securing fasteners of interface cards, e.g. Graphic card and Network Card, etc.
User Manual
Page 14
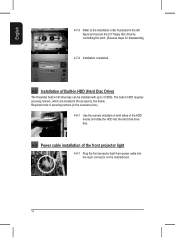
... 4-9-1 Plug the front projector light 4-pin power cable into the hard disk drive bay. 4-9 Power cable installation of Built-in HDD (Hard Disc Drive) The Poseidon built-in HD drive bay can be installed with up to the installation order illustrated in the accessory box below. Required tools: 6 securing runners (in...
... 4-9-1 Plug the front projector light 4-pin power cable into the hard disk drive bay. 4-9 Power cable installation of Built-in HDD (Hard Disc Drive) The Poseidon built-in HD drive bay can be installed with up to the installation order illustrated in the accessory box below. Required tools: 6 securing runners (in...

User Manual
Page 15
...10-3 Post the trimmed slide onto the transparent projector panel. 4-10-4 Remove the factory default plate located in the bottom of Projector Light The Poseidon is provided with another transparent projector panel, which can be DIY designed and replaced with the projector bracket under front panel. aspx) to remove the... English English English English 4-10 DIY Front Bracket of the front panel. (See Figure a and Figure b) 4-10-5 Push forward to search the Poseidon series case products by file name "DIYbracket_Poseidon.doc". Print out the slides by the user) 4-10-1 Please visit...
...10-3 Post the trimmed slide onto the transparent projector panel. 4-10-4 Remove the factory default plate located in the bottom of Projector Light The Poseidon is provided with another transparent projector panel, which can be DIY designed and replaced with the projector bracket under front panel. aspx) to remove the... English English English English 4-10 DIY Front Bracket of the front panel. (See Figure a and Figure b) 4-10-5 Push forward to search the Poseidon series case products by file name "DIYbracket_Poseidon.doc". Print out the slides by the user) 4-10-1 Please visit...
User Manual
Page 16
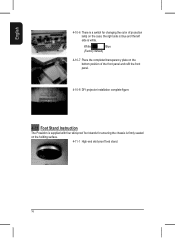
... the bottom position of the front panel and refit the front panel. 4-10-8 DIY projector installation complete figure. 4-11 Foot Stand Instruction The Poseidon is supplied with four skid-proof foot stands for ensuring the chassis is a switch for changing the color of projection lamp on the holding surface...
... the bottom position of the front panel and refit the front panel. 4-10-8 DIY projector installation complete figure. 4-11 Foot Stand Instruction The Poseidon is supplied with four skid-proof foot stands for ensuring the chassis is a switch for changing the color of projection lamp on the holding surface...
User Manual
Page 17
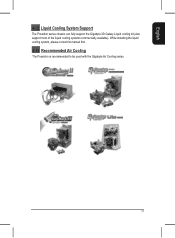
While installing the liquid cooling system, please consult its manual first. 4-13 Recommended Air Cooling The Poseidon is recommended to be used with the Gigabyte Air Cooling series. 17 Deutsch Deutsch English English English English English 4-12 Liquid Cooling System Support The Poseidon series chassis can fully support the Gigabyte 3D Galaxy Liquid cooling kit (also support most of the liquid cooling systems commercially available).
While installing the liquid cooling system, please consult its manual first. 4-13 Recommended Air Cooling The Poseidon is recommended to be used with the Gigabyte Air Cooling series. 17 Deutsch Deutsch English English English English English 4-12 Liquid Cooling System Support The Poseidon series chassis can fully support the Gigabyte 3D Galaxy Liquid cooling kit (also support most of the liquid cooling systems commercially available).