
GIGABYTE User Manual
Page 3
...; Before connecting the monitor to the power outlet, make sure that the voltage rating of time. • Do not attempt to disassemble or repair the monitor yourself. Failure to do so may use the monitor near any heat sources such as electric radiators or direct sunlight. • The holes or openings on the monitor are located. • The power cord plug must be scratched, avoid touching the...
...; Before connecting the monitor to the power outlet, make sure that the voltage rating of time. • Do not attempt to disassemble or repair the monitor yourself. Failure to do so may use the monitor near any heat sources such as electric radiators or direct sunlight. • The holes or openings on the monitor are located. • The power cord plug must be scratched, avoid touching the...

GIGABYTE User Manual
Page 4
...remote controls, on the top of the product or furniture on cloth or other shocks, make sure to install the product in a stable location and take measures to the floor/wall in accordance with the installation instructions. Many injuries, particularly to children, can be avoided by taking simple precautions such as: • ALWAYS use stands or installation...the product caused by the manufacturer of climbing on furniture to reach the product or its controls. • ALWAYS route cords and cables connected to your product so they cannot be tripped over, pulled or grabbed. • NEVER...
...remote controls, on the top of the product or furniture on cloth or other shocks, make sure to install the product in a stable location and take measures to the floor/wall in accordance with the installation instructions. Many injuries, particularly to children, can be avoided by taking simple precautions such as: • ALWAYS use stands or installation...the product caused by the manufacturer of climbing on furniture to reach the product or its controls. • ALWAYS route cords and cables connected to your product so they cannot be tripped over, pulled or grabbed. • NEVER...

GIGABYTE User Manual
Page 5
... 6 Package Contents 8 Product Overview 9 GETTING STARTED 11 Installing the Monitor Base 11 Adjusting the Viewing Angle 13 Installing a Wall-Mount Bracket (Optional 14 Making Connections 15 USING THE DEVICE 16 Turning the Power On/Off 16 User Comfort Recommendations 17 Selecting the Input Source 17 OPERATIONS 18 Quick Menu 18 Configure the Device Settings 27 APPENDICES 37 Specifications 37 Supported Timing List 38 Troubleshooting 40 Basic Care 41 GIGABYTE Service Information 41 SAFETY INFORMATION 43...
... 6 Package Contents 8 Product Overview 9 GETTING STARTED 11 Installing the Monitor Base 11 Adjusting the Viewing Angle 13 Installing a Wall-Mount Bracket (Optional 14 Making Connections 15 USING THE DEVICE 16 Turning the Power On/Off 16 User Comfort Recommendations 17 Selecting the Input Source 17 OPERATIONS 18 Quick Menu 18 Configure the Device Settings 27 APPENDICES 37 Specifications 37 Supported Timing List 38 Troubleshooting 40 Basic Care 41 GIGABYTE Service Information 41 SAFETY INFORMATION 43...
GIGABYTE User Manual
Page 11
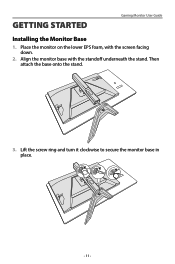
Align the monitor base with the screen facing down. 2. GETTING STARTED Gaming Monitor User Guide Installing the Monitor Base 1. Lift the screw ring and turn it clockwise to secure the monitor base in place. - 11 - Then attach the base onto the stand. 3. Place the monitor on the lower EPS foam, with the standoff underneath the stand.
Align the monitor base with the screen facing down. 2. GETTING STARTED Gaming Monitor User Guide Installing the Monitor Base 1. Lift the screw ring and turn it clockwise to secure the monitor base in place. - 11 - Then attach the base onto the stand. 3. Place the monitor on the lower EPS foam, with the standoff underneath the stand.
GIGABYTE User Manual
Page 14
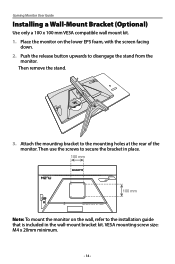
... the stand from the monitor. Gaming Monitor User Guide Installing a Wall-Mount Bracket (Optional) Use only a 100 x 100 mm VESA compatible wall mount kit. 1. Push the release button upwards to the mounting holes at the rear of the monitor. Then remove the stand. 3. Then use the screws to the installation guide that is included in place. 100 mm 100 mm Note: To mount the monitor on the lower EPS foam, with the screen facing down. 2. VESA mounting screw size...
... the stand from the monitor. Gaming Monitor User Guide Installing a Wall-Mount Bracket (Optional) Use only a 100 x 100 mm VESA compatible wall mount kit. 1. Push the release button upwards to the mounting holes at the rear of the monitor. Then remove the stand. 3. Then use the screws to the installation guide that is included in place. 100 mm 100 mm Note: To mount the monitor on the lower EPS foam, with the screen facing down. 2. VESA mounting screw size...
GIGABYTE User Manual
Page 16
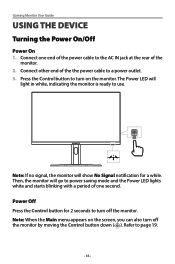
Gaming Monitor User Guide USING THE DEVICE Turning the Power On/Off Power On 1. Then, the monitor will go to power saving mode and the Power LED lights white and starts blinking with a period of the monitor. 2. Connect one second. Note: If no signal, the monitor will light in white, indicating the monitor is ready to the AC IN jack at the rear of one end of the power cable to use. Refer to a power outlet. 3. The Power LED will show...
Gaming Monitor User Guide USING THE DEVICE Turning the Power On/Off Power On 1. Then, the monitor will go to power saving mode and the Power LED lights white and starts blinking with a period of the monitor. 2. Connect one second. Note: If no signal, the monitor will light in white, indicating the monitor is ready to the AC IN jack at the rear of one end of the power cable to use. Refer to a power outlet. 3. The Power LED will show...
GIGABYTE User Manual
Page 17
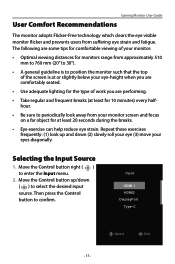
...; A general guideline is to position the monitor such that the top of the screen is at or slightly below your eye-height when you are comfortably seated. • Use adequate lighting for 10 minutes) every halfhour. • Be sure to select the desired input source. Selecting the Input Source 1. Select Exit Move the Control button right ( ) to confirm. Input HDMI 1 HDMI2 DisplayPort Type-C - 17...
...; A general guideline is to position the monitor such that the top of the screen is at or slightly below your eye-height when you are comfortably seated. • Use adequate lighting for 10 minutes) every halfhour. • Be sure to select the desired input source. Selecting the Input Source 1. Select Exit Move the Control button right ( ) to confirm. Input HDMI 1 HDMI2 DisplayPort Type-C - 17...
GIGABYTE User Manual
Page 18
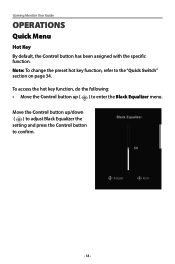
To access the hot key function, do the following: • Move the Control button up /down ( ) to adjust Black Equalizer the setting and press the Control button to confirm. Black Equalizer 50 Adjust Exit - 18 - Gaming Monitor User Guide OPERATIONS Quick Menu Hot Key By default, the Control button has been assigned with the specific function. Note: To change the preset hot key function, refer to enter the Black Equalizer menu. Move the Control button up ( ) to the "Quick Switch" section on page 34.
To access the hot key function, do the following: • Move the Control button up /down ( ) to adjust Black Equalizer the setting and press the Control button to confirm. Black Equalizer 50 Adjust Exit - 18 - Gaming Monitor User Guide OPERATIONS Quick Menu Hot Key By default, the Control button has been assigned with the specific function. Note: To change the preset hot key function, refer to enter the Black Equalizer menu. Move the Control button up ( ) to the "Quick Switch" section on page 34.
GIGABYTE User Manual
Page 20
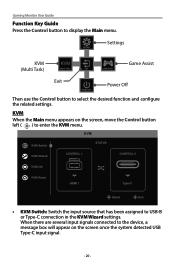
... the related settings. Gaming Monitor User Guide Function Key Guide Press the Control button to USB-B or Type-C connection in the KVM Wizard settings. KVM KVM Switch STATUS KVM Wizard CONTROL 1 CONTROL 2 KVM ON KVM Reset HDMI 1 Type-C Select Exit • KVM Switch: Switch the input source that has been assigned to display the Main menu. KVM When the Main menu appears on the screen once the system detected USB Type-C input signal. - 20 - Settings SETTING KVM (Multi...
... the related settings. Gaming Monitor User Guide Function Key Guide Press the Control button to USB-B or Type-C connection in the KVM Wizard settings. KVM KVM Switch STATUS KVM Wizard CONTROL 1 CONTROL 2 KVM ON KVM Reset HDMI 1 Type-C Select Exit • KVM Switch: Switch the input source that has been assigned to display the Main menu. KVM When the Main menu appears on the screen once the system detected USB Type-C input signal. - 20 - Settings SETTING KVM (Multi...
GIGABYTE User Manual
Page 22
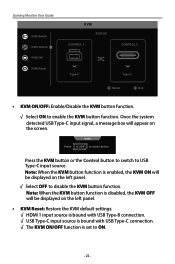
... enabled, the KVM ON will be displayed on the screen. Note: When the KVM button function is set to switch device. Once the system detected USB Type-C input signal, a message box will be displayed on the left panel. • KVM Reset: Restore the KVM default settings. √ HDMI 1 input source is bound with USB Type-B connection. √ USB Type-C input source is bound with USB Type-C connection. √ The KVM ON/OFF function...
... enabled, the KVM ON will be displayed on the screen. Note: When the KVM button function is set to switch device. Once the system detected USB Type-C input signal, a message box will be displayed on the left panel. • KVM Reset: Restore the KVM default settings. √ HDMI 1 input source is bound with USB Type-B connection. √ USB Type-C input source is bound with USB Type-C connection. √ The KVM ON/OFF function...
GIGABYTE User Manual
Page 26
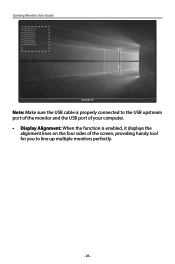
Gaming Monitor User Guide CPU Temperature CPU Frequency CPU Fan Speed CPU Usage Rate GPU Temperature GPU Frequency GPU Fan Speed GPU Usage Rate AORUS Mouse DPI Note: Make sure the USB cable is properly connected to the USB upstream port of the monitor and the USB port of your computer. • Display Alignment: When the function is enabled, it displays the alignment lines on the four sides of the screen, providing handy tool for you to line up multiple monitors perfectly. - 26 -
Gaming Monitor User Guide CPU Temperature CPU Frequency CPU Fan Speed CPU Usage Rate GPU Temperature GPU Frequency GPU Fan Speed GPU Usage Rate AORUS Mouse DPI Note: Make sure the USB cable is properly connected to the USB upstream port of the monitor and the USB port of your computer. • Display Alignment: When the function is enabled, it displays the alignment lines on the four sides of the screen, providing handy tool for you to line up multiple monitors perfectly. - 26 -

GIGABYTE User Manual
Page 27
... Stabilizer sync OFF Overdrive Smart OD Gaming Picture Display PIP/PBP System Language Save Settings Reset all Aim Stabilizer sync Black Equalizer Super Resolution Display Mode Overdrive AMD FreeSync Premium Pro Refresh Rate 60 HZ AMD FreeSync Premium OFF Picture Mode Standard 10 Exit Move/Adjust Enter/Confirm Item Aim Stabilizer sync Black Equalizer Description When this function is HDR. Adjust the brightness of the black areas. - 27 - when the current source is...
... Stabilizer sync OFF Overdrive Smart OD Gaming Picture Display PIP/PBP System Language Save Settings Reset all Aim Stabilizer sync Black Equalizer Super Resolution Display Mode Overdrive AMD FreeSync Premium Pro Refresh Rate 60 HZ AMD FreeSync Premium OFF Picture Mode Standard 10 Exit Move/Adjust Enter/Confirm Item Aim Stabilizer sync Black Equalizer Description When this function is HDR. Adjust the brightness of the black areas. - 27 - when the current source is...
GIGABYTE User Manual
Page 30
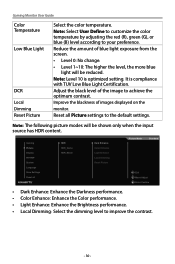
... Low Blue Light Certification. Gaming Monitor User Guide Color Temperature Low Blue Light DCR Local Dimming Reset Picture Select the color temperature. Reduce the amount of blue light exposure from the screen. • Level 0: No change. • Level 1~10: The higher the level, the more blue light will be reduced. It is optimized setting. Note: The following picture modes will be shown only when the input source has HDR content. Adjust the black level of images displayed...
... Low Blue Light Certification. Gaming Monitor User Guide Color Temperature Low Blue Light DCR Local Dimming Reset Picture Select the color temperature. Reduce the amount of blue light exposure from the screen. • Level 0: No change. • Level 1~10: The higher the level, the more blue light will be reduced. It is optimized setting. Note: The following picture modes will be shown only when the input source has HDR content. Adjust the black level of images displayed...

GIGABYTE User Manual
Page 31
...: This option is enabled, it automatically. When this function is only available for HDMI input. Gaming Monitor User Guide SDR Brightness 50 Contrast 50 Gaming Picture Display PIP/PBP System Language Save Settings Reset all of DisplayPort to detect it slightly enlarges the input image to all Input DP Refresh Rate RGB Range Overscan Apply Picture Mode Sharpness 5 HDMI 1 HDMI 2 DisplayPort Type-C Gamma 2.2 Color Temperature Normal Picture Mode Standard Exit Move/Adjust Enter/Confirm Item Input Description Select the input source.
...: This option is enabled, it automatically. When this function is only available for HDMI input. Gaming Monitor User Guide SDR Brightness 50 Contrast 50 Gaming Picture Display PIP/PBP System Language Save Settings Reset all of DisplayPort to detect it slightly enlarges the input image to all Input DP Refresh Rate RGB Range Overscan Apply Picture Mode Sharpness 5 HDMI 1 HDMI 2 DisplayPort Type-C Gamma 2.2 Color Temperature Normal Picture Mode Standard Exit Move/Adjust Enter/Confirm Item Input Description Select the input source.

GIGABYTE User Manual
Page 32
... screen into 2 parts (main window and inset window). • Source: Change the input source for the right window. • PBP Mode: Adjust the aspect ratio of window. • Display Switch: Swap the two windows. • Audio Switch: Select which audio source you want to hear the sound from . Gaming Monitor User Guide PIP/PBP Configure the multi-picture related settings. SDR Brightness 50 Contrast 50 Gaming Picture Display PIP/PBP System Language Save Settings Reset all OFF PIP PBP Sharpness 5 Gamma 2.2 Color Temperature Normal Picture Mode...
... screen into 2 parts (main window and inset window). • Source: Change the input source for the right window. • PBP Mode: Adjust the aspect ratio of window. • Display Switch: Swap the two windows. • Audio Switch: Select which audio source you want to hear the sound from . Gaming Monitor User Guide PIP/PBP Configure the multi-picture related settings. SDR Brightness 50 Contrast 50 Gaming Picture Display PIP/PBP System Language Save Settings Reset all OFF PIP PBP Sharpness 5 Gamma 2.2 Color Temperature Normal Picture Mode...

GIGABYTE User Manual
Page 33
... the on-screen display (OSD) menu related settings. • Display Time: Set the length of time the OSD menu remains on the screen, select Yes to unlock OSD No Yes • OSD Size: Enable or disable adjusting the OSD menu window. • OSD Pivot: Set the OSD menu orientation. - 33 - System Configure the system related settings. Gaming Monitor User Guide SDR Brightness 50 Contrast 50 Gaming Picture Display PIP/PBP System Language Save Settings Reset all Audio OSD Settings Quick Switch Other Settings Sharpness 5 Volume Mute Gamma 2.2 Color Temperature Normal Picture Mode...
... the on-screen display (OSD) menu related settings. • Display Time: Set the length of time the OSD menu remains on the screen, select Yes to unlock OSD No Yes • OSD Size: Enable or disable adjusting the OSD menu window. • OSD Pivot: Set the OSD menu orientation. - 33 - System Configure the system related settings. Gaming Monitor User Guide SDR Brightness 50 Contrast 50 Gaming Picture Display PIP/PBP System Language Save Settings Reset all Audio OSD Settings Quick Switch Other Settings Sharpness 5 Volume Mute Gamma 2.2 Color Temperature Normal Picture Mode...

GIGABYTE User Manual
Page 34
... screen when the monitor switches to another input source. • Input Auto Switch: When this function is enabled, it automatically switches to an available input source. • Auto Power OFF: When this function is enabled, the recommended resolution message will remain off the Power LED. Standby ON: The Power LED lights white in standby mode. Gaming Monitor User Guide Quick Switch Assign the function of the hot keys as below: Up ( ): Black Equalizer Down ( ): Picture Mode Right ( ): Input Left ( ): Volume Other Settings...
... screen when the monitor switches to another input source. • Input Auto Switch: When this function is enabled, it automatically switches to an available input source. • Auto Power OFF: When this function is enabled, the recommended resolution message will remain off the Power LED. Standby ON: The Power LED lights white in standby mode. Gaming Monitor User Guide Quick Switch Assign the function of the hot keys as below: Up ( ): Black Equalizer Down ( ): Picture Mode Right ( ): Input Left ( ): Volume Other Settings...
GIGABYTE User Manual
Page 37
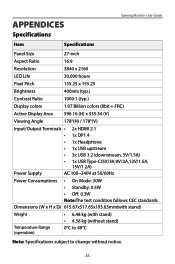
APPENDICES Gaming Monitor User Guide Specifications Item Specifications Panel Size 27-inch Aspect Ratio 16:9 Resolution 3840 x 2160 LED Life 30,000 hours Pixel Pitch 155.25 x 155.25 Brightness 400nits (typ.) Contrast Ratio 1000:1 (typ.) Display colors 1.07 Billion colors (8bit + FRC) Active Display Area 596.16 (H) x 335.34 (V) Viewing Angle 178°(H) / 178°(V) Input/Output Terminals • • • 2x HDMI 2.1 1x DP1.4 1x Headphone • 1x USB upstream...
APPENDICES Gaming Monitor User Guide Specifications Item Specifications Panel Size 27-inch Aspect Ratio 16:9 Resolution 3840 x 2160 LED Life 30,000 hours Pixel Pitch 155.25 x 155.25 Brightness 400nits (typ.) Contrast Ratio 1000:1 (typ.) Display colors 1.07 Billion colors (8bit + FRC) Active Display Area 596.16 (H) x 335.34 (V) Viewing Angle 178°(H) / 178°(V) Input/Output Terminals • • • 2x HDMI 2.1 1x DP1.4 1x Headphone • 1x USB upstream...

GIGABYTE User Manual
Page 40
... screen are properly connected and both devices are not broken. • Make sure the monitor is turned on . • Make sure you have selected the correct input source. No sound or volume is low • Make sure the headphone cable is properly connected. • Configure the image related settings. Gaming Monitor User Guide Troubleshooting Problem Possible Solution(s) No power • Make sure the power cable is properly connected to the power source and the monitor. • Check the cable and plug...
... screen are properly connected and both devices are not broken. • Make sure the monitor is turned on . • Make sure you have selected the correct input source. No sound or volume is low • Make sure the headphone cable is properly connected. • Configure the image related settings. Gaming Monitor User Guide Troubleshooting Problem Possible Solution(s) No power • Make sure the power cable is properly connected to the power source and the monitor. • Check the cable and plug...
GIGABYTE User Manual
Page 42
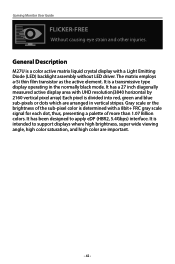
... the brightness of more than 1.07 Billion colors. Gaming Monitor User Guide FLICKER-FREE Without causing eye strain and other injuries. The matrix employs a-Si thin film transistor as the active element. It is divided into red, green and blue sub-pixels or dots which are important. - 42 - It is a color active matrix liquid crystal display with a Light Emitting Diode (LED) backlight assembly without LED driver. It has a 27 inch...
... the brightness of more than 1.07 Billion colors. Gaming Monitor User Guide FLICKER-FREE Without causing eye strain and other injuries. The matrix employs a-Si thin film transistor as the active element. It is divided into red, green and blue sub-pixels or dots which are important. - 42 - It is a color active matrix liquid crystal display with a Light Emitting Diode (LED) backlight assembly without LED driver. It has a 27 inch...

