OSD Sidekick User Manual
Page 4
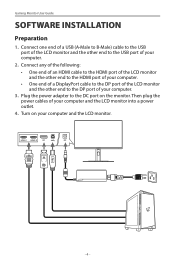
.... 3. Turn on the monitor. HDMI-1 HDMI-2 DP DC - 4 - Connect any of the following: • One end of an HDMI cable to the HDMI port of the LCD monitor and the other end to the HDMI port of your computer. • One end of a DisplayPort cable to the DP port of your computer and the LCD monitor. Then plug the power cables of your computer and the LCD monitor into a power outlet. 4. Gaming Monitor User Guide SOFTWARE INSTALLATION Preparation 1. Plug...
.... 3. Turn on the monitor. HDMI-1 HDMI-2 DP DC - 4 - Connect any of the following: • One end of an HDMI cable to the HDMI port of the LCD monitor and the other end to the HDMI port of your computer. • One end of a DisplayPort cable to the DP port of your computer and the LCD monitor. Then plug the power cables of your computer and the LCD monitor into a power outlet. 4. Gaming Monitor User Guide SOFTWARE INSTALLATION Preparation 1. Plug...
OSD Sidekick User Manual
Page 7
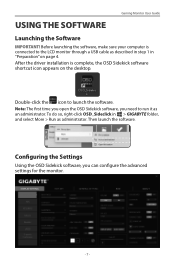
.... Configuring the Settings Using the OSD Sidekick software, you need to run it as administrator. Before launching the software, make sure your computer is complete, the OSD Sidekick software shortcut icon appears on page 4. Gaming Monitor User Guide USING THE SOFTWARE Launching the Software IMPORTANT! After the driver installation is connected to launch the software. Double-click the icon to the LCD monitor through a USB cable as described in step 1 in > GIGABYTE folder, and...
.... Configuring the Settings Using the OSD Sidekick software, you need to run it as administrator. Before launching the software, make sure your computer is complete, the OSD Sidekick software shortcut icon appears on page 4. Gaming Monitor User Guide USING THE SOFTWARE Launching the Software IMPORTANT! After the driver installation is connected to launch the software. Double-click the icon to the LCD monitor through a USB cable as described in step 1 in > GIGABYTE folder, and...
OSD Sidekick User Manual
Page 8
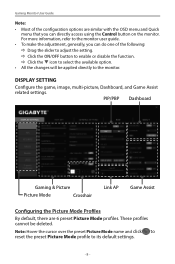
... to adjust the setting. PIP/PBP Dashboard Gaming & Picture Picture Mode Crosshair Link AP Game Assist Configuring the Picture Mode Profiles By default, there are similar with the OSD menu and Quick menu that you can directly access using the Control button on the monitor. These profiles cannot be applied directly to select the available option. • All the changes will be deleted. DISPLAY SETTING Configure the game, image, multi-picture...
... to adjust the setting. PIP/PBP Dashboard Gaming & Picture Picture Mode Crosshair Link AP Game Assist Configuring the Picture Mode Profiles By default, there are similar with the OSD menu and Quick menu that you can directly access using the Control button on the monitor. These profiles cannot be applied directly to select the available option. • All the changes will be deleted. DISPLAY SETTING Configure the game, image, multi-picture...

OSD Sidekick User Manual
Page 16
Customizing the Game Assist Settings Configure the following Game Assist settings: DD Set the REFRESH RATE setting to ON to set the countdown time. - 16 - Click the q icon to enable displaying the refresh rate. DD Set the GAMING TIMER setting to ON to be shown on the screen. Gaming Monitor User Guide DD Click SETTINGS and check the desired option(s) to enable displaying the gaming timer. - Select either COUNT UP or COUNT DOWN the timer. - Note: Uncheck the option to hide it from the screen.
Customizing the Game Assist Settings Configure the following Game Assist settings: DD Set the REFRESH RATE setting to ON to set the countdown time. - 16 - Click the q icon to enable displaying the refresh rate. DD Set the GAMING TIMER setting to ON to be shown on the screen. Gaming Monitor User Guide DD Click SETTINGS and check the desired option(s) to enable displaying the gaming timer. - Select either COUNT UP or COUNT DOWN the timer. - Note: Uncheck the option to hide it from the screen.
GIGABYTE User Manual
Page 3
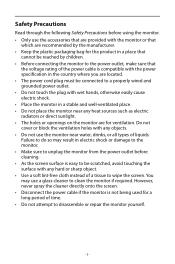
... scratched, avoid touching the surface with any heat sources such as electric radiators or direct sunlight. • The holes or openings on the monitor are located. • The power cord plug must be reached by the manufacturer. • Keep the plastic packaging bag for the product in a place that the voltage rating of the power cable is compatible with the power specification in a stable...
... scratched, avoid touching the surface with any heat sources such as electric radiators or direct sunlight. • The holes or openings on the monitor are located. • The power cord plug must be reached by the manufacturer. • Keep the plastic packaging bag for the product in a place that the voltage rating of the power cable is compatible with the power specification in a stable...

GIGABYTE User Manual
Page 4
...set. • ALWAYS use furniture that can safely support the product. • ALWAYS ensure the product is going to be retained and relocated, the same considerations as toys and remote controls, on the top of climbing on furniture to reach the product or its controls. • ALWAYS route cords and cables connected... product or furniture on cloth or other shocks, make sure to install the product in accordance with the installation instructions. Stability Hazard Precautions The product may be located between the product and supporting furniture. • NEVER place items that might ...
...set. • ALWAYS use furniture that can safely support the product. • ALWAYS ensure the product is going to be retained and relocated, the same considerations as toys and remote controls, on the top of climbing on furniture to reach the product or its controls. • ALWAYS route cords and cables connected... product or furniture on cloth or other shocks, make sure to install the product in accordance with the installation instructions. Stability Hazard Precautions The product may be located between the product and supporting furniture. • NEVER place items that might ...
GIGABYTE User Manual
Page 5
......8 Product Overview...9 Getting Started...11 Installing the Monitor Base 11 Adjusting the Viewing Angle 13 Installing a Wall-Mount Bracket (Optional 14 Making Connections...15 Using the Device...16 Turning the Power On/Off 16 User Comfort Recommendations 17 Selecting the Input Source 17 Operations...18 Quick Menu...18 Configure the Device Settings 26 Appendices...37 Specifications...37 Supported Timing List 38 Troubleshooting...40 Basic Care...41 Notes on USB Charging 41 GIGABYTE Service Information 41 Safety...
......8 Product Overview...9 Getting Started...11 Installing the Monitor Base 11 Adjusting the Viewing Angle 13 Installing a Wall-Mount Bracket (Optional 14 Making Connections...15 Using the Device...16 Turning the Power On/Off 16 User Comfort Recommendations 17 Selecting the Input Source 17 Operations...18 Quick Menu...18 Configure the Device Settings 26 Appendices...37 Specifications...37 Supported Timing List 38 Troubleshooting...40 Basic Care...41 Notes on USB Charging 41 GIGABYTE Service Information 41 Safety...
GIGABYTE User Manual
Page 11
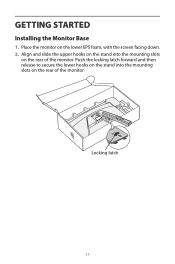
Align and slide the upper hooks on the stand into the mounting slots on the rear of the monitor. Locking latch - 11 - GETTING STARTED Installing the Monitor Base 1. Push the locking latch forward and then release to secure the lower hooks on the stand into the mounting slots on the rear of the monitor. Place the monitor on the lower EPS foam, with the screen facing down. 2.
Align and slide the upper hooks on the stand into the mounting slots on the rear of the monitor. Locking latch - 11 - GETTING STARTED Installing the Monitor Base 1. Push the locking latch forward and then release to secure the lower hooks on the stand into the mounting slots on the rear of the monitor. Place the monitor on the lower EPS foam, with the screen facing down. 2.
GIGABYTE User Manual
Page 14
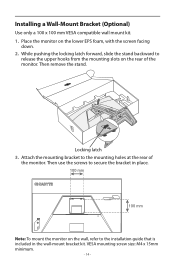
... the wall-mount bracket kit. VESA mounting screw size: M4 x 15mm minimum. - 14 - While pushing the locking latch forward, slide the stand backward to release the upper hooks from the mounting slots on the wall, refer to the mounting holes at the rear of the monitor. Place the monitor on the lower EPS foam, with the screen facing down. 2. Attach the mounting bracket to the installation guide that...
... the wall-mount bracket kit. VESA mounting screw size: M4 x 15mm minimum. - 14 - While pushing the locking latch forward, slide the stand backward to release the upper hooks from the mounting slots on the wall, refer to the mounting holes at the rear of the monitor. Place the monitor on the lower EPS foam, with the screen facing down. 2. Attach the mounting bracket to the installation guide that...
GIGABYTE User Manual
Page 17
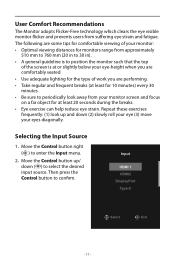
...: (1) look up / down (2) slowly roll your eye (3) move your eye-height when you are comfortably seated. • Use adequate lighting for the type of work you are some tips for comfortable viewing of your monitor: • Optimal viewing distances for 10 minutes) every 30 minutes. • Be sure to select the desired input source. Then press the Control button to enter the Input menu. 2.
...: (1) look up / down (2) slowly roll your eye (3) move your eye-height when you are comfortably seated. • Use adequate lighting for the type of work you are some tips for comfortable viewing of your monitor: • Optimal viewing distances for 10 minutes) every 30 minutes. • Be sure to select the desired input source. Then press the Control button to enter the Input menu. 2.
GIGABYTE User Manual
Page 25
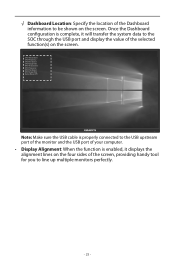
CPU Temperature CPU Frequency CPU Fan Speed CPU Usage Rate GPU Temperature GPU Frequency GPU Fan Speed GPU Usage Rate Game Mouse DPI Note: Make sure the USB cable is properly connected to the USB upstream port of the monitor and the USB port of your computer. • Display Alignment: When the function is complete, it displays the alignment lines on the screen. √√ Dashboard Location...
CPU Temperature CPU Frequency CPU Fan Speed CPU Usage Rate GPU Temperature GPU Frequency GPU Fan Speed GPU Usage Rate Game Mouse DPI Note: Make sure the USB cable is properly connected to the USB upstream port of the monitor and the USB port of your computer. • Display Alignment: When the function is complete, it displays the alignment lines on the screen. √√ Dashboard Location...
GIGABYTE User Manual
Page 26
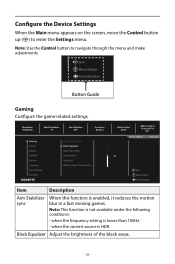
... Gaming Picture Display PIP/PBP System Language Save Settings Reset All Aim Stabilizer sync Black Equalizer Super Resolution Display Mode Overdrive AMD FreeSync Premium Pro Refresh Rate 60 HZ AMD FreeSync Premium Pro ON Picture Mode Standard 10 Exit Move/Adjust Enter/Confirm Item Description Aim Stabilizer sync When this function is HDR. Black Equalizer Adjust the brightness of the black areas. - 26 - Note: Use the Control button to ente1r0the Settings menu. Exit Move/Adjust Enter/Confirm Button Guide...
... Gaming Picture Display PIP/PBP System Language Save Settings Reset All Aim Stabilizer sync Black Equalizer Super Resolution Display Mode Overdrive AMD FreeSync Premium Pro Refresh Rate 60 HZ AMD FreeSync Premium Pro ON Picture Mode Standard 10 Exit Move/Adjust Enter/Confirm Item Description Aim Stabilizer sync When this function is HDR. Black Equalizer Adjust the brightness of the black areas. - 26 - Note: Use the Control button to ente1r0the Settings menu. Exit Move/Adjust Enter/Confirm Button Guide...

GIGABYTE User Manual
Page 27
... ratio. • 27"W(16:9): Display the input image as if on the type of the screen. • Full: Scale the input image to check your graphics driver's version and update it eliminates the screen lag and tearing while playing games. Note: If you turn on the FreeSync function while playing a game, the screen may flicker depending on a 27"W monitor of the LCD monitor. Note: 1:1, 22"W(16...
... ratio. • 27"W(16:9): Display the input image as if on the type of the screen. • Full: Scale the input image to check your graphics driver's version and update it eliminates the screen lag and tearing while playing games. Note: If you turn on the FreeSync function while playing a game, the screen may flicker depending on a 27"W monitor of the LCD monitor. Note: 1:1, 22"W(16...
GIGABYTE User Manual
Page 28
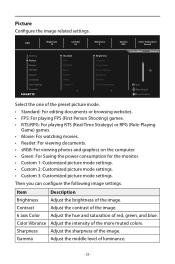
...: For viewing photos and graphics on the computer. • Green: For Saving the power consumption for the monitor. • Custom 1: Customized picture mode settings. • Custom 2: Customized picture mode settings. • Custom 3: Customized picture mode settings. SDR Brightness 75 Contrast 50 Gaming Picture Display PIP/PBP System Language Save Settings Reset All Standard FPS RTS/RPG Movie Reader sRGB Custom 1 Sharpness 6 Gamma OFF Color Temperature Normal Brightness Contrast 6 axis Color Color Vibrance Sharpness Gamma Color Temperature Picture Mode Standard 75...
...: For viewing photos and graphics on the computer. • Green: For Saving the power consumption for the monitor. • Custom 1: Customized picture mode settings. • Custom 2: Customized picture mode settings. • Custom 3: Customized picture mode settings. SDR Brightness 75 Contrast 50 Gaming Picture Display PIP/PBP System Language Save Settings Reset All Standard FPS RTS/RPG Movie Reader sRGB Custom 1 Sharpness 6 Gamma OFF Color Temperature Normal Brightness Contrast 6 axis Color Color Vibrance Sharpness Gamma Color Temperature Picture Mode Standard 75...

GIGABYTE User Manual
Page 30
... monitor to apply higher refresh rate. When this function is only available for HDMI input. SDR Brightness 75 Contrast 50 Gaming Picture Display PIP/PBP System Language Save Settings Reset All Input Over Clock RGB Range Overscan Apply Picture Model Sharpness 6 HDMI 1 HDMI 2 DisplayPort Type-C Gamma OFF Color Temperature Normal Picture Mode Standard Exit Move/Adjust Enter/Confirm Item Input Over Clock RGB Range Overscan Apply Picture Model Description Select the input source. Enable the monitor to detect it slightly enlarges the input image...
... monitor to apply higher refresh rate. When this function is only available for HDMI input. SDR Brightness 75 Contrast 50 Gaming Picture Display PIP/PBP System Language Save Settings Reset All Input Over Clock RGB Range Overscan Apply Picture Model Sharpness 6 HDMI 1 HDMI 2 DisplayPort Type-C Gamma OFF Color Temperature Normal Picture Mode Standard Exit Move/Adjust Enter/Confirm Item Input Over Clock RGB Range Overscan Apply Picture Model Description Select the input source. Enable the monitor to detect it slightly enlarges the input image...
GIGABYTE User Manual
Page 31
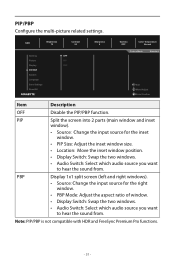
...-picture related settings. SDR Brightness 75 Contrast 50 Gaming Picture Display PIP/PBP System Language Save Settings Reset All OFF PIP PBP Sharpness 6 Gamma OFF Color Temperature Normal Picture Mode Standard Exit Move/Adjust Enter/Confirm Item Description OFF Disable the PIP/PBP function. PBP Display 1x1 split screen (left and right windows). • Source: Change the input source for the inset window. • PIP Size: Adjust the inset window size. • Location: Move the inset window position. • Display Switch...
...-picture related settings. SDR Brightness 75 Contrast 50 Gaming Picture Display PIP/PBP System Language Save Settings Reset All OFF PIP PBP Sharpness 6 Gamma OFF Color Temperature Normal Picture Mode Standard Exit Move/Adjust Enter/Confirm Item Description OFF Disable the PIP/PBP function. PBP Display 1x1 split screen (left and right windows). • Source: Change the input source for the inset window. • PIP Size: Adjust the inset window size. • Location: Move the inset window position. • Display Switch...
GIGABYTE User Manual
Page 32
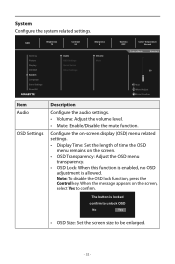
... Brightness 75 Contrast 50 Gaming Picture Display PIP/PBP System Language Save Settings Reset All Audio OSD Settings Quick Switch Other Settings Sharpness 6 Volume Mute Gamma OFF Color Temperature Normal Picture Mode Standard 30 Exit Move/Adjust Enter/Confirm Item Audio OSD Settings Description Configure the audio settings. • Volume: Adjust the volume level. • Mute: Enable/Disable the mute function. Note: To disable the OSD lock function, press the Control key. When the message appears on the screen. • OSD Transparency: Adjust the OSD menu transparency...
... Brightness 75 Contrast 50 Gaming Picture Display PIP/PBP System Language Save Settings Reset All Audio OSD Settings Quick Switch Other Settings Sharpness 6 Volume Mute Gamma OFF Color Temperature Normal Picture Mode Standard 30 Exit Move/Adjust Enter/Confirm Item Audio OSD Settings Description Configure the audio settings. • Volume: Adjust the volume level. • Mute: Enable/Disable the mute function. Note: To disable the OSD lock function, press the Control key. When the message appears on the screen. • OSD Transparency: Adjust the OSD menu transparency...

GIGABYTE User Manual
Page 33
... monitor when they are waken up and switch offthe display when they enter either Standby or off . • Type-C Compatibility: Turn this function is enabled, it automatically switches to an available input source. • Auto Power OFF: When this option on to Always ON. - Available options: Aim Stabilizer sync, Black Equalizer, Volume, Input, Contrast, Brightness, Picture Mode, and KVM Switch. The default setting of the hot keys. Item Description Quick Switch...
... monitor when they are waken up and switch offthe display when they enter either Standby or off . • Type-C Compatibility: Turn this function is enabled, it automatically switches to an available input source. • Auto Power OFF: When this option on to Always ON. - Available options: Aim Stabilizer sync, Black Equalizer, Volume, Input, Contrast, Brightness, Picture Mode, and KVM Switch. The default setting of the hot keys. Item Description Quick Switch...
GIGABYTE User Manual
Page 37
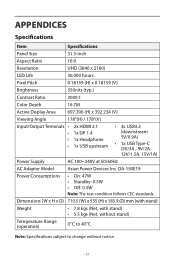
... condition follows CEC standards. APPENDICES Specifications Item Specifications Panel Size 31.5-inch Aspect Ratio 16:9 Resolution UHD (3840 x 2160) LED Life 30,000 hours Pixel Pitch 0.18159 (H) x 0.18159 (V) Brightness 350nits (typ.) Contrast Ratio 3000:1 Color Depth 16.7M Active Display Area 697.306 (H) x 392.234 (V) Viewing Angle 178°(H) / 178°(V) Input/Output Terminals 2x HDMI 2.1 1x DP 1.4 1x Headphone 1x USB upstream • 3x USB3...
... condition follows CEC standards. APPENDICES Specifications Item Specifications Panel Size 31.5-inch Aspect Ratio 16:9 Resolution UHD (3840 x 2160) LED Life 30,000 hours Pixel Pitch 0.18159 (H) x 0.18159 (V) Brightness 350nits (typ.) Contrast Ratio 3000:1 Color Depth 16.7M Active Display Area 697.306 (H) x 392.234 (V) Viewing Angle 178°(H) / 178°(V) Input/Output Terminals 2x HDMI 2.1 1x DP 1.4 1x Headphone 1x USB upstream • 3x USB3...
GIGABYTE User Manual
Page 40
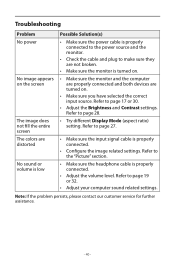
... Display Mode (aspect ratio) setting. Refer to page 19 or 32. • Adjust your computer sound related settings. Refer to the "Picture" section. • Make sure the headphone cable is properly connected to the power source and the monitor. • Check the cable and plug to page 17 or 30. • Adjust the Brightness and Contrast settings. Troubleshooting Problem No power No image appears on the screen The image does not fill the entire screen The colors are turned...
... Display Mode (aspect ratio) setting. Refer to page 19 or 32. • Adjust your computer sound related settings. Refer to the "Picture" section. • Make sure the headphone cable is properly connected to the power source and the monitor. • Check the cable and plug to page 17 or 30. • Adjust the Brightness and Contrast settings. Troubleshooting Problem No power No image appears on the screen The image does not fill the entire screen The colors are turned...

